RemoteViews的内部机制和意义思维导图
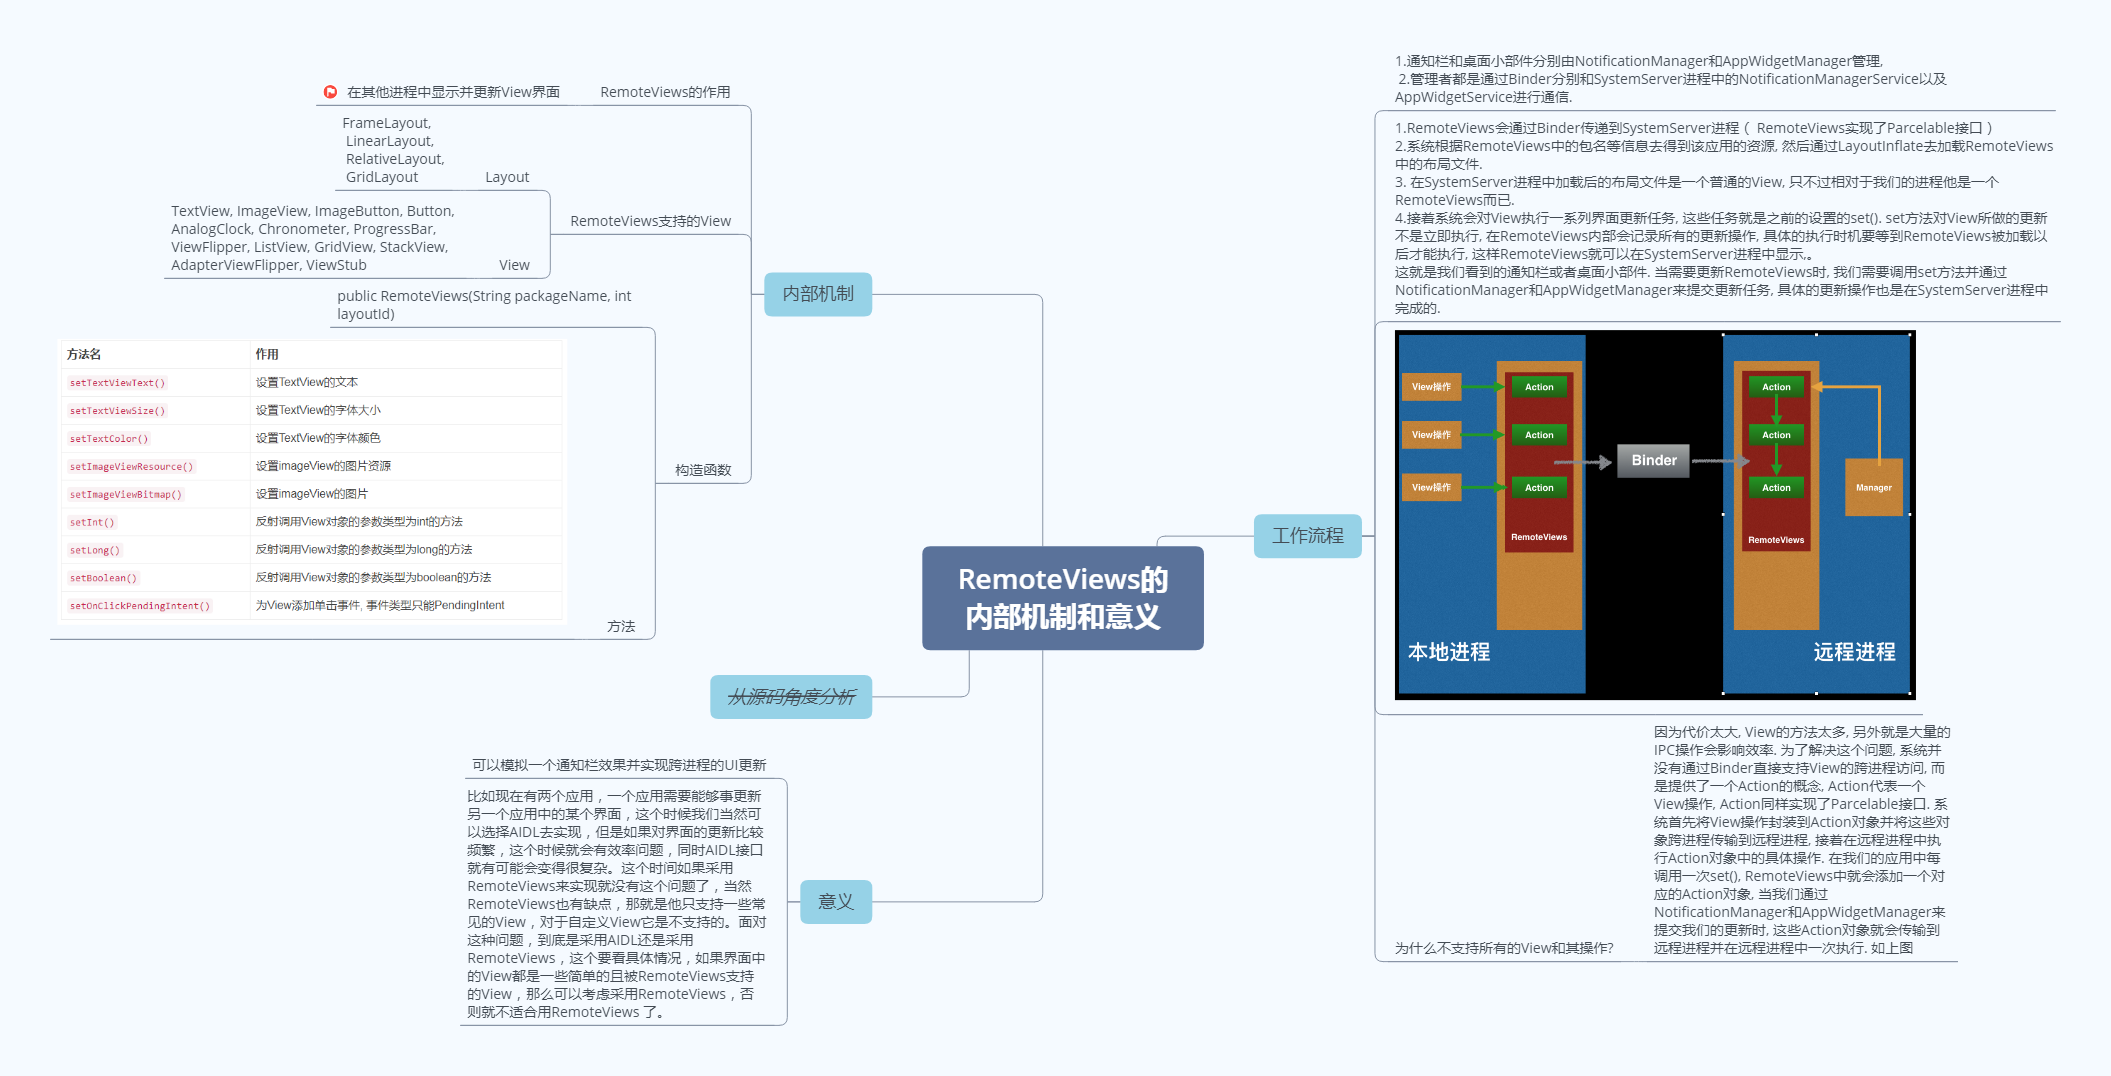
RemoteViews的内部机制
RemoteViews的作用是在其他进程中显示并更新View界面.
最常用的构造函数就是public RemoteViews(String packageName, int layoutId), 注意RemoteViews目前并不能支持所有的View类型, 目前支持如下(不包括其子类):
Layout
FrameLayout, LinearLayout, RelativeLayout, GridLayout
View
TextView, ImageView, ImageButton, Button, AnalogClock, Chronometer, ProgressBar, ViewFlipper, ListView, GridView, StackView, AdapterViewFlipper, ViewStub
RemoteViews没有提供findviewById()方法, 只有一系列的set()方法.
| 方法名 | 作用 |
|---|---|
setTextViewText() |
设置TextView的文本 |
setTextViewSize() |
设置TextView的字体大小 |
setTextColor() |
设置TextView的字体颜色 |
setImageViewResource() |
设置imageView的图片资源 |
setImageViewBitmap() |
设置imageView的图片 |
setInt() |
反射调用View对象的参数类型为int的方法 |
setLong() |
反射调用View对象的参数类型为long的方法 |
setBoolean() |
反射调用View对象的参数类型为boolean的方法 |
setOnClickPendingIntent() |
为View添加单击事件, 事件类型只能PendingIntent |
RemoteViews的工作流程
通知栏和桌面小部件分别由NotificationManager和AppWidgetManager管理, 而这两个管理者都是通过Binder分别和SystemServer进程中的NotificationManagerService以及AppWidgetService进行通信. 由此可见,通知栏和桌面小部件中的布局文件实际上是在NotificationManagerService以及AppWidgetService中被加载的, 而他们运行在系统的SystemServer中, 这就和我们的进程构成了进程间通信.
最开始RemoteViews会通过Binder传递到SystemServer进程, RemoteViews实现了Parcelable接口. 系统根据RemoteViews中的包名等信息去得到该应用的资源, 然后通过LayoutInflate去加载RemoteViews中的布局文件. 在SystemServer进程中加载后的布局文件是一个普通的View, 只不过相对于我们的进程他是一个RemoteViews而已. 接着系统会对View执行一系列界面更新任务, 这些任务就是之前的设置的set(). set方法对View所做的更新不是立即执行, 在RemoteViews内部会记录所有的更新操作, 具体的执行时机要等到RemoteViews被加载以后才能执行, 这样RemoteViews就可以在SystemServer进程中显示, 这就是我们看到的通知栏或者桌面小部件. 当需要更新RemoteViews时, 我们需要调用set方法并通过NotificationManager和AppWidgetManager来提交更新任务, 具体的更新操作也是在SystemServer进程中完成的.
为什么不支持所有的View和其操作? 因为代价太大, View的方法太多, 另外就是大量的IPC操作会影响效率. 为了解决这个问题, 系统并没有通过Binder直接支持View的跨进程访问, 而是提供了一个Action的概念, Action代表一个View操作, Action同样实现了Parcelable接口. 系统首先将View操作封装到Action对象并将这些对象跨进程传输到远程进程, 接着在远程进程中执行Action对象中的具体操作. 在我们的应用中每调用一次set(), RemoteViews中就会添加一个对应的Action对象, 当我们通过NotificationManager和AppWidgetManager来提交我们的更新时, 这些Action对象就会传输到远程进程并在远程进程中一次执行. 如图
[图片上传失败…(image-f43de0-1599738952325)]
远程进程通过RemoteViews的apply方法来进行View的更新操作, RemoteViews的apply方法内部则会去遍历所有的Action对象并调用他们的apply方法, 具体的View更新操作是由Action对象的apply方法来完成的. 上述做法的好处是显而易见的, 首先不需要定义大量的Binder接口, 其次通过远程进程中批量执行RemoteViews的修改操作从而避免了大量的IPC操作, 这就提高了程序的性能.
接下来从源码角度分析.
首先最长用到的setTextViewText(),源码如下
public void setTextViewText(int viewId, CharSequence text) {

   setCharSequence(viewId, "setText", text);

}
接收的参数比较简单,继续跟进setCharSequence()方法.
public void setCharSequence(int viewId, String methodName, CharSequence value) {

   addAction(new ReflectionAction(viewId, methodName, ReflectionAction.CHAR_SEQUENCE, value));

}
从这里实现看到, 内部并没有对View进程直接的操作, 而是添加一个ReflectionAction()一个看名字类似反射类型的对象. 接下看addAction()
private void addAction(Action a) {

    //省略部分代码...

    if (mActions == null) {

        mActions = new ArrayList<Action>();

    }

    mActions.add(a);

    // update the memory usage stats

    a.updateMemoryUsageEstimate(mMemoryUsageCounter);

}
这里看到, 在RemoteViews内部有一个mActions成员, 它是一个ArrayList, 外界每调用一次set(), RemoteViews就会为其创建一个Action对象并加入到这个集合中, 这里仅仅将Action对象保存了起来, 并未对View进行实际的操作, 这一点在上面的理论分析中已经提到过.
接下来再看ReflectionAction的实现之前, 先看一下RemoteViews的apply()方法以及Action类的实现.
public View apply(Context context, ViewGroup parent, OnClickHandler handler) {

        RemoteViews rvToApply = getRemoteViewsToApply(context);

        View result;

        final Context contextForResources = getContextForResources(context);

        Context inflationContext = new ContextWrapper(context) {

            @Override

            public Resources getResources() {

                return contextForResources.getResources();

            }

            @Override

            public Resources.Theme getTheme() {

                return contextForResources.getTheme();

            }

            @Override

            public String getPackageName() {

                return contextForResources.getPackageName();

            }

        };

        LayoutInflater inflater = (LayoutInflater)

                context.getSystemService(Context.LAYOUT_INFLATER_SERVICE);

        // Clone inflater so we load resources from correct context and

        // we don't add a filter to the static version returned by getSystemService.

        inflater = inflater.cloneInContext(inflationContext);

        inflater.setFilter(this);

        result = inflater.inflate(rvToApply.getLayoutId(), parent, false);

        rvToApply.performApply(result, parent, handler);

        return result;

    }
这段代码首先通过LayoutInflate去加载RemoteViews中的布局文件, RemoteViews中的布局文件可以通过getLayoutId()这个方法获得, 加载完布局文件后会通过performApply()去执行一些更新操作,如下:
private void performApply(View v, ViewGroup parent, OnClickHandler handler) {

       if (mActions != null) {

           handler = handler == null ? DEFAULT_ON_CLICK_HANDLER : handler;

           final int count = mActions.size();

           for (int i = 0; i < count; i++) {

               Action a = mActions.get(i);

               a.apply(v, parent, handler);

           }

       }

   }
这个实现就是遍历mActions并执行每个Action对象的apply()方法, 这里猜想Action对象的apply方法就是真正操作View的地方.
RemoteViews在通知栏和桌面小部件中的工作过程和上面描述的过程是一致的. 当调用了RemoteViews的set方法时, 并不会立刻更新他们的界面, 而必须要通过NotificationManager的notify方法以及AppWidgetManager的updateAppWidget才能更新他们的界面. 实际上在AppWidgetManager的updateAppWidget内部实现中, 他们就是通过RemoteViews的apply以及reapply方法来加载或者更新布局的. apply和reApply的区别在于:前者会加载布局并更新界面, 而后者只会更新界面. 通知栏和桌面小部件在初始化界面的时候回调用apply()方法, 而在后续的更新界面时则会调用reapply()方法.
了解了apply()以及reapply()的作用后, 接着看Action的子类具体实现, 先看ReflectionAction的具体实现.
private final class ReflectionAction extends Action {

   //省略部分代码    ...

   String methodName;

   int type;

   Object value;

   ReflectionAction(int viewId, String methodName, int type, Object value) {

       this.viewId = viewId;

       this.methodName = methodName;

       this.type = type;

       this.value = value;

   }

   @Override

   public void apply(View root, ViewGroup rootParent, OnClickHandler handler) {

       final View view = root.findViewById(viewId);

       if (view == null) return;

       Class<?> param = getParameterType();

       if (param == null) {

           throw new ActionException("bad type: " + this.type);

       }

       try {

           getMethod(view, this.methodName, param).invoke(view, wrapArg(this.value));

       } catch (ActionException e) {

           throw e;

       } catch (Exception ex) {

           throw new ActionException(ex);

       }

   }

    // ...

}
ReflectionAction表示的是一个反射动作, 通过它对View的操作会以反射的方式来调用, 其中getMethod就是根据方法名来得到反射所需要的Method对象. 除了ReflectionAction, 还有其他的Action. 例如: TextViewSizeAction, ViewPaddingAction, SetOnClickPendingIntent等. 看一下TextViewSizeAction
private class TextViewSizeAction extends Action {

   public TextViewSizeAction(int viewId, int units, float size) {

       this.viewId = viewId;

       this.units = units;

       this.size = size;

   }

   @Override

   public void apply(View root, ViewGroup rootParent, OnClickHandler handler) {

       final TextView target = (TextView) root.findViewById(viewId);

       if (target == null) return;

       target.setTextSize(units, size);

   }

   public String getActionName() {

       return "TextViewSizeAction";

   }

   int units;

   float size;

   public final static int TAG = 13;

}
这个类没有使用反射, 因为setTextSize的方法有两个参数,因此无法复用ReflectionAction, 因为这个反射调用只能有一个参数.
关于单击事件, RemoteViews只支持发起PendingIntent,不支持onClickListener()这种模式.
setOnClickPendingIntent,setPendingIntentTemplate,setOnClickFillIntent这三个的区别.
setOnClickPendingIntent: 只支持普通View设置点击事件, 不能给集合(ListView,StackView)中的View设置点击事件,如item. 因为开销比较大, 系统禁止了这种方式. 如果要给集合中的item添加点击事件,则必须使用后两种组合使用才可以.
RemoteViews的意义可以模拟一个通知栏效果并实现跨进程的UI更新
参看文章
《Android 开发艺术探索》书集
《Android 开发艺术探索》 05-理解RemoteViews