目标
了解Vue内在的响应式原理
用原生js实现Vue响应式效果
写在前面
写在前面:最近对vue 也算是情有独钟(毕竟还要靠吃饭),发现vue 真的魅力无穷,底层运用原生js实现了那么多令人舒适的交互效果。看了几天官网(https://cn.vuejs.org/),对响应式原理也算是有点头绪。本文用原生js 实现vue的响应式效果。
MVVM响应式原理
之前的理解:m(model)数据层,vue的数据层,都放在data里面;v(view)视图层,及我们所见的HTML页面;vm(view-model)控制器,将数据层与视图层建立联系(vue实例)。联系后,数据改变驱动视图,视图改变影响数据
现在的理解:vue 采用数据劫持配合发布者-订阅者(观察者)模式的方式,通过Object.defineProperty() 来劫持各个属性的 setter 和 getter,在数据变动时,发布消息给依赖收集器,去通知观察者,执行对用的回调函数,实现更新视图。
实现过程
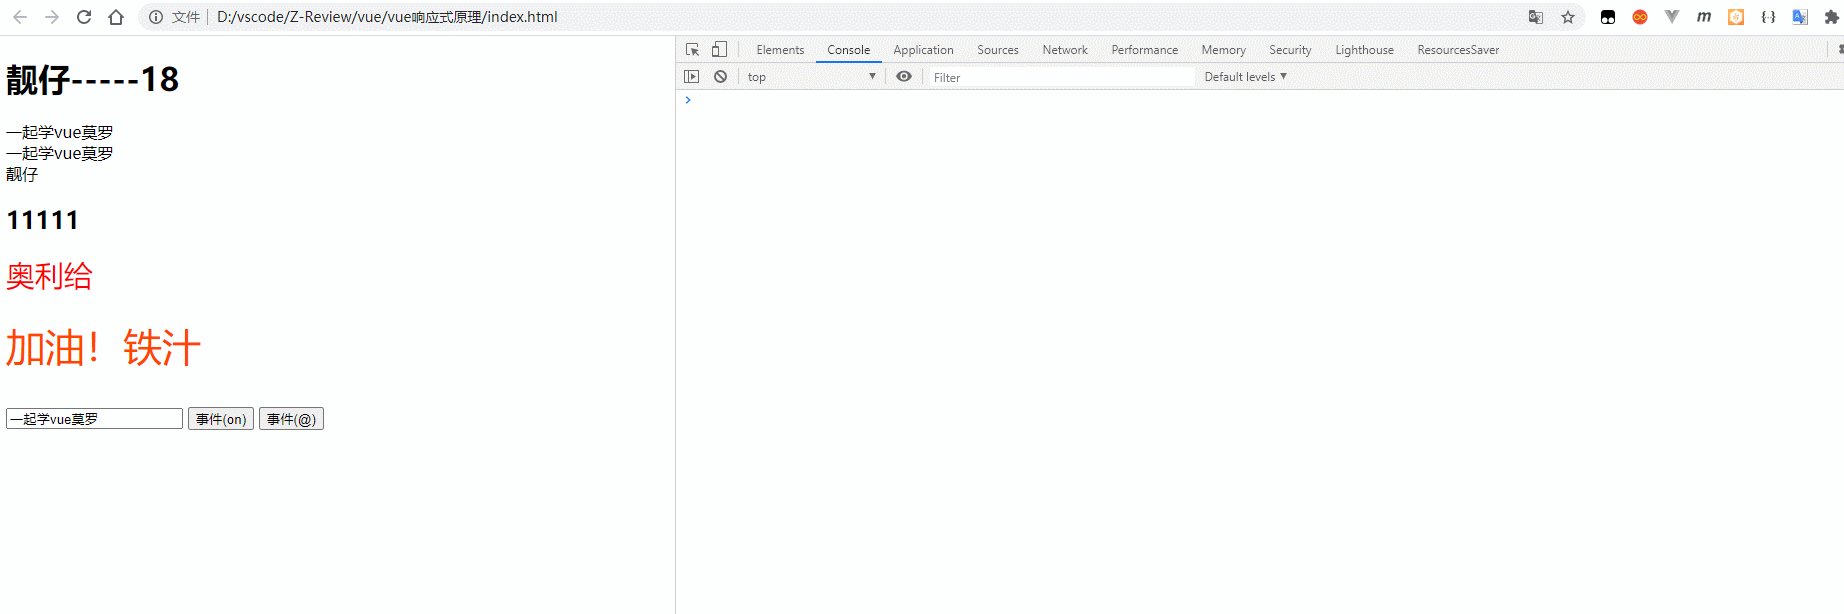
1. 实现的效果预览
代码示例:
 <div id="app">
        <h1>{

    {

    myInfo.name}}-----{

    {

    myInfo.age}}</h1>
        <div>{

    {

    msg}}</div>
        <div v-text="msg"></div>
        <div v-text="myInfo.name"></div>
        <div v-html="msg1"></div>
        <div v-bind:class="my_style">奥利给</div>
        <div :class="second_style">加油!铁汁</div>
        <input type="text" v-model="msg">
        <button v-on:click="handle1">事件(on)</button>
        <button @click="handle1">事件(@)</button>
    </div>
    <script src="./Observer.js"></script>
    <script src="./mvvm.js"></script>
    <script>
        var vm = new Mvvm({


            el: '#app',
            data: {


                myInfo: {


                    name: '靓仔',
                    age: 18
                },
                msg: '一起学vue莫罗',
                msg1: '<h2>11111</h2>',
                my_style: 'my_style',
                second_style: 'second_style'
            },
            methods: {


                handle1() {


                    console.log(this)
                    console.log(this.msg)
                }
            }
        })
    </script>
效果:
2. 实现的原理
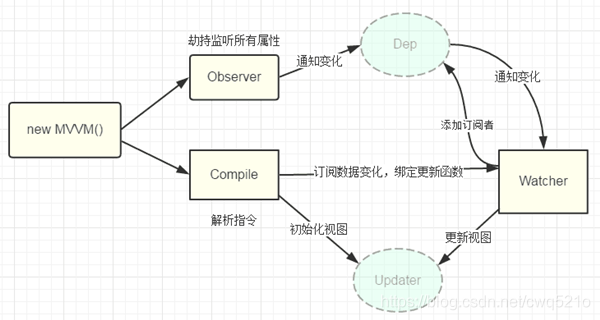
Mvvm作为绑定的入口,整合了 Observer、Compile、Watcher三者,通过Observer 来监听model 数据变化,通过 Compile 来解析编译模板。最终利用Watcher 搭起 Observer 、Compile 之间的桥梁。实现数据变化=>视图更新;视图交互变化=>数据model 变更的双向绑定效果。
3. Compile解析编译模板
此处注释清晰,简述略
const compileUtil = {

      //# 执行指令的对象(进行指令匹配)
    getVal(expr, vm) {

      //@ 获取标签指令内的值
        // reduce() 方法对数组中的每个元素执行一个由您提供的reducer函数(升序执行),将其结果汇总为单个返回值。
        return expr.split('.').reduce((data, currentVal) => {


            return data[currentVal]
        }, vm.$data)
    },
    setVal(expr, vm, newVal) {

      // 获取v-model输入框的值
        return expr.split('.').reduce((data, currentVal) => {


            data[currentVal] = newVal
        }, vm.$data)
    },
    getContentVal(expr, vm) {

       // 获取修改后的{

    {}}内的值
        return expr.replace(/\{\{(.+?)\}\}/g, (...args) => {


            return this.getVal(args[1], vm);
        })
    },
    text(node, expr, vm) {

     // val 对应 msg
        // const value = vm.$data[expr] //@ 此方法无法获取对象内的值(<div v-text="fruits.name"></div>),以及插值表达式的值{

    {}}
        let value;
        if (expr.indexOf('{

    {') !== -1) {


            value = expr.replace(/\{\{(.+?)\}\}/g, (...args) => {


                new Watcher(vm, args[1], () => {

      //todo 绑定watcher(数据放生变化,触发回调,进行更新)
                    // 此处数据如果连属性名一块修改,就无法获取newVal。所以需重新获取
                    this.textUpdater(node, this.getContentVal(expr, vm));
                })
                return this.getVal(args[1], vm)
            })
        } else {


            value = this.getVal(expr, vm);
            new Watcher(vm, expr, (newVal) => {

      //todo 绑定watcher
                this.textUpdater(node, newVal);
            })
        }
        this.textUpdater(node, value);
    },
    html(node, expr, vm) {


        const value = this.getVal(expr, vm);
        new Watcher(vm, expr, (newVal) => {

      //todo 绑定watcher
            this.htmlUpdater(node, newVal);
        })
        this.htmlUpdater(node, value);
    },
    model(node, expr, vm) {


        const value = this.getVal(expr, vm);
        new Watcher(vm, expr, (newVal) => {

       //todo 绑定watcher (数据=>视图)
            this.modelUpdater(node, newVal);
        });
        //# 为input输入框添加input事件,监听值的变化(视图=>数据=>视图)
        node.addEventListener('input', (e) => {


            // 设置值
            this.setVal(expr, vm, e.target.value)
        });
        this.modelUpdater(node, value);
    },
    bind(node, expr, vm, eventName) {


        const value = this.getVal(expr, vm)
        this.bindUpdater(node, value, eventName)
    },
    on(node, expr, vm, eventName) {


        let fn = vm.$options.methods && vm.$options.methods[expr];
        node.addEventListener(eventName, fn.bind(vm)) //@注意,此处要改变this指向(vue中的this永远指向实例对象)
    },
    // 渲染v-text的值
    textUpdater(node, value) {


        node.textContent = value
    },
    // 渲染v-html的值
    htmlUpdater(node, value) {


        node.innerHTML = value
    },
    // 渲染v-model的值
    modelUpdater(node, value) {


        node.value = value
    },
    // 渲染v-bind的属性
    bindUpdater(node, value, eventName) {


        // class为保留字,所以此处要判断后渲染className
        if (eventName === 'class') {


            node.className = value
        }
    }
}
class Compile {

      //# 解析器类
    constructor(el, vm) {


        //@ 获取容器el
        this.el = this.isElementNode(el) ? el : document.querySelector(el);
        this.vm = vm;
        //cwen 1.获取文档碎片对象,放入内存中,减少页面的回流和重绘
        const fragment = this.nodeFragment(this.el);

        //cwen 2.编译模板
        this.compile(fragment)

        //cwen 3.追加子元素到根元素
        this.el.appendChild(fragment);
    }
    compile(fragment) {


        // 获取子节点
        const childNodes = fragment.childNodes;
        // 将对象转换为数组进行遍历
        [...childNodes].forEach(child => {


            if (this.isElementNode(child)) {


                // 获取元素节点并编译
                // console.log('元素节点', child)
                this.compileElement(child);
            } else {


                // 获取文本节点并编译
                // console.log('文本节点', child)
                this.compileText(child);
            }
            // 利用递归对节点进行深层次的遍历,拿到节点内的文本
            if (child.childNodes && child.childNodes.length) {


                this.compile(child);
            }
        })
    }

    compileElement(node) {


        // <div v-text="msg"></div>
        // 获取标签属性
        const attributes = node.attributes;
        [...attributes].forEach(attr => {


            const {

     name, value } = attr;
            if (this.isDirective(name)) {

     //@ 判断是否是指令:v-text v-html v-model v-on:click
                const [, directive] = name.split('-'); //@ text html model on:click bind:style
                const [directiveName, eventName] = directive.split(':'); //@ text html model click style
                //@ 调用函数执行相应的指令(数据驱动视图)
                compileUtil[directiveName](node, value, this.vm, eventName);

                //@ 删除有指令的标签上的指令
                node.removeAttribute('v-' + directive);
            } else if (this.isElementName(name)) {

     // @匹配@开头的事件绑定
                let [, eventName] = name.split('@');
                compileUtil['on'](node, value, this.vm, eventName);
            } else if (this.isStyleName(name)) {

     //@ 匹配 :开头的属性绑定
                let [, eventName] = name.split(':');
                compileUtil['bind'](node, value, this.vm, eventName);
            }
        })
    }
    compileText(node) {


        // 拿到插值表达式{

    {}}
        const content = node.textContent;
        if (/\{\{(.+?)\}\}/.test(content)) {


            compileUtil['text'](node, content, this.vm);
        }
    }
    isDirective(attrName) {


        return attrName.startsWith('v-')
    }
    nodeFragment(el) {


        //@ 创建文档碎片
        const f = document.createDocumentFragment();
        let firstChild;
        while (firstChild = el.firstChild) {


            f.appendChild(firstChild)
        }
        return f
    }
    isElementNode(node) {

     //@ 判断节点是否为元素节点
        return node.nodeType === 1
    }
    isElementName(elementname) {


        return elementname.startsWith('@')
    }
    isStyleName(stylename) {


        return stylename.startsWith(':')
    }
}
//# 实现编译器
class Mvvm {


    constructor(options) {


        this.$el = options.el;
        this.$data = options.data;
        this.$options = options;
        if (this.$el) {


            //# 1.实现数据观察者
            new Observer(this.$data);
            //# 2.实现指令的解析器
            new Compile(this.$el, this);
            // 添加代理(使得可以直接使用vm.对象)
            this.proxyData(this.$data);
        }
    }
    proxyData(data) {


        for (const key in data) {


            Object.defineProperty(this, key, {


                get() {


                    return data[key];
                },
                set(newVal) {


                    data[key] = newVal;
                }
            })
        }
    }
}
4. Observer 劫持监听数据
注释清晰
class Watcher {


    constructor(vm, expr, cb) {


        this.vm = vm;
        this.expr = expr;
        this.cb = cb;
        this.oldVal = this.getOldVal()
    }
    getOldVal() {


        //# 给观察者挂载
        Dep.target = this;
        const oldVal = compileUtil.getVal(this.expr, this.vm);
        //# 得到值后销毁
        Dep.target = null;
        return oldVal;
    }
    update() {


        const newVal = compileUtil.getVal(this.expr, this.vm);
        if (newVal !== this.oldVal) {


            this.cb(newVal)
        }
    }
}

class Dep {

     //数据依赖器
    constructor() {


        this.subs = []
    }
    addSub(watcher) {

     //# 收集所有观察者
        this.subs.push(watcher)
    }
    notify() {

     //# 通知观察者去更新
        this.subs.forEach(w => w.update())
    }
}

//# 挟持属性
class Observer {


    constructor(data) {


        this.observer(data);
    }
    observer(data) {


        if (data && typeof data === 'object') {


            Object.keys(data).forEach(key => {


                this.defineReactive(data, key, data[key])
            })
        }
    }

    defineReactive(obj, key, value) {


        const dep = new Dep();
        // 递归遍历(拿到所有的属性及值)
        this.observer(value)
        Object.defineProperty(obj, key, {


            enumerable: true, //是否可遍历属性
            configurable: true, //是否可修改此属性
            get() {


                //# 订阅数据变化时,往Dep中添加观察者
                Dep.target && dep.addSub(Dep.target);
                return value;
            },
            set: (newVal) => {


                // 回调,防止只能操作一次
                this.observer(newVal);
                if (newVal !== value) {


                    value = newVal;
                }
                //# 告诉Dep通知变化
                dep.notify();
            }
        })
    }
}
注意点
- 订阅数据时,何时绑定watcher(解析指令渲染数据时,就要绑定watcher)
- Dep何时与Observer 关联,把watcher 添加进去 (在劫持监听所有属性时,创建Dep 添加对应的watcher)
- 当修改数据时:(走到
Object.defineProperty() 的set中去,监听到数据变化,然后更改;更改后调用notify() 去通知观察者;拿到对应的观察者,去更新对应的函数update();新值与旧值对比,若不同执行回调函数 this.cb(newVal)更新视图)