SHELL脚本练习题实战
文章目录
-
- SHELL脚本练习题实战
-
- 9.0如何执行脚本文件
- 9.1 查找当前网段内存活IP用户,重定向到指定文件中
- 9.2 自动创建用户student101-150,且密码为password101-150
- 9.3 编写脚本,检测当前服务器正在运行的网络服务,并输出服务名
- 9.4 根据passwd文件内容,输出指定文本,依次类推
- 9.5 根据要求创建一个shell脚本
- 9.6 打印无密码用户
- 9.7 写一个脚本,显示当前系统上shell为-s指定类型的shell,并统计其用户总数。
- 9.8 监控磁盘的使用率,>90%时给root发邮件
- 9.9 ldd应用之通过脚本实现把库文件自动的复制到固定目录的相对应的目录中
- 9.10 查看主机网卡流量,每2秒显示1次当前的速率
9.0如何执行脚本文件
- “. 路径” 或者 “source 路径” ,表示在当前shell执行文件
- “bash 路径”,表示在新创建的子shell中执行文件
- 当我们用ssh登录系统,在当前shell中执行脚本,如果在脚本文件执行到exit命令,意味着会退出登陆ssh
9.1 查找当前网段内存活IP用户,重定向到指定文件中
要求:查找当前网段(192.168.6.0/24)内存活IP用户,重定向到/tmp/ip.txt文件中(ping)
- 网段192.168.6.0/24有24位掩码,因此主机位有8位,可以使用的IP地址范围为(192.168.6.1/24-192.168.6.254/24)
- 判断网段内IP地址是否存货,只需执行Ping测试该ip地址是否可达
- 对于执行ping命令结果会将标准输出和标准错误输出打印到当前终端,我们将其重定向到/dev/null
- 考察循环语句
[root@ ~/test/shell 03:07:38]#vim ./iptest.sh
#! /bin/bash
ip=192.168.6
for (( i=1;i<=254;i++ );do  	  //遍历ip地址,也可以for i in `seq 1 254`;do
(								         //小括号内的命令,在新开的子shell中执行
	ping -c 1 -W 1 $ip.$i > /dev/null 2>&1  //ping指定ip,将标准(错误)输出重定向
    if [ $? -eq 0 ];then						//判断上一个命令ping通ip地址了没
    	echo $ip.$i >> /tmp/ip.txt  		    //符合要求的ip地址追加到指定文件下
        echo "$ip.$i is alive !"
    else
    	echo "$ip.$i dosen't exist !"				//不符合要求的ip地址打印提示
    fi
) &  							//&表示将括号内的任务放到后台执行,继续在当前终端工作
done
- 测试结果
[root@ ~/test/shell 03:07:38]#chmod +x ./iptest.sh  			//增加执行权限
[root@ ~/test/shell 04:49:21]#./iptest.sh 				  //当前shell下执行脚本
192.168.6.1 is alive !									//打印活的ip
192.168.6.2 is alive !
192.168.6.128 is alive !
[root@ ~/test/shell 04:49:24]#192.168.6.41 doesn't exist !
192.168.6.56 doesn't exist !							//打印剩下没有存活的ip
192.168.6.35 doesn't exist !
...
[root@ ~/test/shell 04:50:37]#cat /tmp/ip.txt 	//脚本执行后/tmp/ip.txt写入情况
192.168.6.1
192.168.6.2
192.168.6.128
9.2 自动创建用户student101-150,且密码为password101-150
- 批量创建用户/批量添加密码
- 位用户设置密码:我们选择非交互式的命令即:
echo “password” |passwd --stdin username
- 考察循环语句,非交互式用户密码设置
[root@ ~/test/shell 03:38:00]#vim ./adduser.sh
#! /bin/bash
name=student									//用户名
for i in {

    101..150};do							//遍历
       useradd $name$i > /dev/null 2>&1			  //添加用户,重定向到垃圾桶
        if [ $? -eq 0 ];then
               echo "$name$i added!"
               echo "$password$i" |passwd --stdin $name$i > /dev/null 2>&1
            	//↑为用户添加密码
       else
                echo "Error:$name$i exists!" //用户已经存在的就不能添加用户
        fi
done
- 测试结果
[root@ ~/test/shell 03:38:00]#chmod  700 ./adduser.sh
[root@ ~/test/shell 05:30:50]#./adduser.sh 					//
student101 successfully added!!
...
student150 successfully added!!
[root@ ~/test/shell 05:30:56]#./adduser.sh
Error:student101 exists!
...
Error:student150 exists!
9.3 编写脚本,检测当前服务器正在运行的网络服务,并输出服务名
Tips: netstat
- 我们要通过命令 netstat -tulnp选择最后一个字段,并从最后一个字段里面选择/字符后面的服务名
- 首先通过awk -F/ 选乡将每一行分成两个字段
- 因为第一行文本是标识每一个文本字段的意义,需要筛掉
- 晒出服务名称之后,出现重复的情况,需要先排序后进行去重操作
- 考察命令管道 使用
[root@ ~/test/shell 04:39:55]#vim ./serve.sh
#! /bin/bash
netstat -tulnp | awk -F/ '/^tcp|^udp/{print $2}'|sort |uniq  //筛选符合的字段
- 测试结果
[root@ ~/test/shell 04:39:55]#chmod 700 ./serve.sh
[root@ ~/test/shell 04:40:05]#. ./serve.sh
master
sshd
9.4 根据passwd文件内容,输出指定文本,依次类推
根据passwd文件内容,输出“The line 1(行数) is root(用户名)”依次类推
- /etc/passwd每一行的文本结构都有相同的格式,所以可以通过按照:字符,用awk命令将每一行分成多个字段,并择取第一个字段,即用户名
- 通过设置变量i,每次读取一行就进行自增运算,以记录当前处理的行的行号
- 考察循环语句
[root@ ~/test/shell 04:52:41]#vim ./lineanduser.sh
#! /bin/bash
i=0
while read line;do						//遍历逐行读取到line变量
        let  i++ 					    //let
        echo  -e "The line $i is \c "    //-e开启转义,\c不换行
        echo $line|awk -F: '{print $1}'  //按照:分割,打印首个参数
done < /etc/passwd					   //读取文件
- 测试结果
[root@ ~/test/shell 04:52:41]#chmod 700 ./lineanduser.sh
[root@ ~/test/shell 04:52:57]#. ./lineanduser.sh
The line 1 is root
The line 2 is bin
...
The line 28 is testbash
The line 29 is nologin
The line 30 is xixi
9.5 根据要求创建一个shell脚本
1.当你输入“kernel”参数时,此shell脚本就输出“user“
2.当你输入”user“参数时,此shell脚本就输出”kernel”
3.当此脚本不输入任何参数或者输入的参数是按照要求输入的话,那么就会输出如下标准错误:
-
考察 case语句
“usage:./test6.sh kernel|user”
[root@ ~/test/shell 05:01:30]#vim test6.sh
#! /bin/bash
if [ $# -eq 0 ];then   //没有没有参数的特殊情况
        echo "usage:./test6.sh kernel|user"
else
        case $1 in    //考察case语句
        kernel)
                echo  "user"
        ;;
        user)
                echo  "kernel"
        ;;
        *)  		//其他情况
                echo  "usage:./test6.sh kernel|user"
        ;;
        esac
fi
- 测试结果
[root@ ~/test/shell 05:33:23]#chmod 700 ./test6.sh
[root@ ~/test/shell 05:33:31]#. ./test6.sh 						//无参数情况
usage:./test6.sh kernel|user
[root@ ~/test/shell 05:33:37]#. ./test6.sh uu					//错误参数情况
usage:./test6.sh kernel|user
[root@ ~/test/shell 05:33:43]#. ./test6.sh kernel				//参数为kernel
user
[root@ ~/test/shell 05:33:47]#. ./test6.sh user					//参数为user
kernel
9.6 打印无密码用户
- /etc/shadow文件中,以:字符分隔,每一行的第二个字段存放被加密的密码,如果某个用户没有设置密码,这个字段就是”!!“字符。
- 第二字段是"!!",意味着账户从未设置过密码,是“*”,意味着账户已经锁定,用户无法登录
- 考察 ||
[root@ / 06:39:48]#vim nopasswd.sh
#! /bin/bash
awk -F: '$2=="!!" || $2=="*" {print $1}' /etc/shadow //筛选符合的字段
- 测试结果
[root@ / 06:42:38]#chmod 700 ./nopasswd.sh
[root@ / 06:42:49]#. nopasswd.sh
systemd-network
...
arod
nologin
9.7 写一个脚本,显示当前系统上shell为-s指定类型的shell,并统计其用户总数。
-s选项后面跟的参数必须是/etc/shells文件中存在的shell类型,否则不执行此脚本。另外,此脚本还可以接受–help选项,以显示帮助信息。脚本执行形如:
显示结果形如:
./test8.sh -s bash
bash,3users,they are:
root redhat gentoo
- 本题目需要进行测试判断的情况比较多。
- 考察位置参数判断
[root@ ~/test/shell 09:17:24]#vim  ./test8.sh
#! /bin/bash
if [ $# -eq 0 ];then             				//没有附带任何参数的例外情况
        echo "Wanning:0 parameter!"
        exit 1
else											//有带参数
   while [ $# -gt 0 ];do						//考虑选项会出现多个,需要进行遍历
        case $1 in
        --help|-h)								//帮助 选项
                echo "echo --help|-h"
                echo "echo -s [shelltype]..."
                shift
        ;;
        -s) 									//-s 选项
                shift
                if [ $# -eq 0 ];then			 //若-s选项后不带参数,退出脚本
                       echo "Wanning:0 shellname!!"
                       exit 1
                else							//若选项-s后带参数
                       while [ $# -gt 0 ];do	//-s选项后面带有至少一个路径
                              flag=`grep "$1" /etc/shells` //判断路径是否存在
                              if [ -n "$flag" ];then
                                  name=$1
                                  num=`grep "$1$" /etc/passwd |wc -l` //统计用户数

                                  list=`grep "$1$" /etc/passwd |awk -F: '{print $1}'`
                              	  //↑统计用户
                                  echo "$name, $num users,they are: "
                                  echo $list
                                  shift

                              else			//路径错误,退出执行
                                  echo "wrong shellname !"
                                  exit 1
                              fi
                        done
                fi
        ;;
        *)	//其他情况,错误参数
                echo "wrong enter!"
                exit 1
        ;;
        esac
done
fi
- 测试结果
[root@ ~/test/shell 09:17:24]#bash  ./test8.sh  		//测试脚本执行时,不带参数
Wanning:0 parameter!
[root@ ~/test/shell 09:17:32]#bash  ./test8.sh -h		//测试 参数是 帮助选项
Tips:
echo --help
echo -s [shellname]...
[root@ ~/test/shell 09:17:37]#bash  ./test8.sh --help	//测试 参数是 帮助选项
Tips:
echo --help
echo -s [shellname]...
[root@ ~/test/shell 09:17:41]#bash  ./test8.sh -hel		//测试 参数是其他乱码情况
wrong enter!
[root@ ~/test/shell 09:17:47]#bash  ./test8.sh -s	//测试 参数选项-s且不带路径
Wanning:0 shellname!!
[root@ ~/test/shell 09:17:50]#bash  ./test8.sh -s bbbb   //测试参数选项-s且带错误路径
wrong shellname !
[root@ ~/test/shell 09:17:53]#bash  ./test8.sh -s bash //测试参数选项-s 带一个路径
bash, 20 users,they are:
root user alex arod mary alice bash testbash xixi student6 student7 student8 student9 student10 student11 student12 student13 student14 student15 hehehe
[root@ ~/test/shell 09:17:57]#bash  ./test8.sh -s bash nologin  //测试参数选共项-s 带两个路径
bash, 20 users,they are:
root user alex arod mary alice bash testbash xixi student6 student7 student8 student9 student10 student11 student12 student13 student14 student15 hehehe
nologin, 18 users,they are:
bin daemon adm lp mail operator games ftp nobody systemd-network dbus polkitd sshd postfix tss nginx bobby nologin
9.8 监控磁盘的使用率,>90%时给root发邮件
- mail命令 -s选项表示主题
- ${file%.*}:删掉file指代的串最短匹配(从左到右)的.及其右边部分
- ${file%%.*}:删掉file指代的串最长匹配的.及其右边部分
[root@ ~/test/shell 09:35:29]#vim  dfsh.sh
#! /bin/bash
df -P|sed '1d' > ./temp     				//删掉df命令执行结果的第一行,将剩余的行重定向到指定文件
while read line;do							//遍历读取每一行
        percent=`echo $line|awk '{print $5}'`//筛选百分数字段
        getnum=${

    percent%\%*}   			//取百分数字段的数字部分
        diskname=`echo $line |awk '{print $6}'`
        if [ $getnum -gt 90 ];then			//判断,打印
                echo "$diskname is nearly full!!!" |mail -s "Disk Wanning!!" root@localhost       						//mail,说明某个文件系统以及存储占比超90%
         fi    done < ./temp                 //重定向
- 测试结果
[root@ ~/test/shell 09:35:29]#bash  dfsh.sh
[root@ ~/test/shell 09:35:31]#mail        						 //查看mail
Heirloom Mail version 12.5 7/5/10.  Type ? for help.
"/var/spool/mail/root": 1 message 1 new
>N  1 root                  Tue Aug  4 21:35  18/587   "Disk Wanning!!"
& 1
Message  1:
From root@linpengze.com  Tue Aug  4 21:35:32 2020
Return-Path: <root@linpengze.com>
X-Original-To: root@localhost
Delivered-To: root@localhost.com
Date: Tue, 04 Aug 2020 21:35:31 +0800
To: root@localhost.com
Subject: Disk Wanning!!
User-Agent: Heirloom mailx 12.5 7/5/10
Content-Type: text/plain; charset=us-ascii
From: root@linpengze.com (root)
Status: R
/mnt/cdrom is nearly full!!!
&
9.9 ldd应用之通过脚本实现把库文件自动的复制到固定目录的相对应的目录中
ldd是用来查看二进制程序的共享库文件的,现在通过脚本实现把库文件自动的复制到固定目录(/newroot)的相对应的目录中,如源库文件:/lib/a.so.1,应复制到/newroot/lib/a.so.1
- 通过输入命令就可以实现对命令对应的二进制文件/库文件的整套复制(交互性更好)
- 复制文件的过程当中需要在新目录添加对应的子目录,才能进行文件复制
- 正则表达式 []指的是指定范围外的任意字符,比如可以在后面加[:space:]指的是后跟除了空格外的任意字符
#!/bin/bash
dest=/newroot
cplib()
{


        lpath=${

    i%/*}
        [ ! -d $dest$lpath ] && mkdir -p $dest$lpath
        cp $i $dest$lpath >/dev/null 2>&1
        echo "copy $i finished"

}
cpbin()
{


        cpath=`which $cmd|grep bin`
        bpath=${

    cpath%/*}
        [ ! -d $dest$bpath ] && mkdir -p $dest$bpath
        [ ! -e $dest$cmd ]  && cp $cpath $dest$bpath > /dev/null 2>&1
        for i in `ldd $cpath |egrep -o "/.*lib(64){0,1}[^[:space:]]{0,}"`;do
                cplib $i
        done
}
read -p "please enter command(\"q\" for quit):" cmd
while [ $cmd != 'q' ];do
        ! which $cmd >/dev/null 2>&1  && echo "wrong command" && read -p "input again:" cmd && continue
        cpbin
        echo "finished!"
- 测试结果
[root@ ~/test/shell 10:36:37]#./lddsh.sh      //执行文件
please enter command("q" for quit):aaaaaaaaaa //错误参数
wrong command
input again:echo								//输入 echo命令
copy /lib64/libc.so.6 finished
copy /lib64/ld-linux-x86-64.so.2 finished
finished!									//成功传输
continue? :q								//退出
[root@ ~/test/shell 10:37:16]#ls /newroot
lib64  usr
[root@ ~/test/shell 10:37:21]#ls /newroot/lib64 //查看复制状况
ld-linux-x86-64.so.2  libc.so.6
[root@ ~/test/shell 10:37:26]#ls /newroot/usr/bin
echo
[root@ ~/test/shell 10:37:31]#
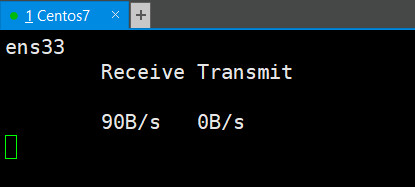
9.10 查看主机网卡流量,每2秒显示1次当前的速率
Tips:sleep 2 程序睡眠2秒
[root@ ~/test/shell 01:42:29]#vim ./wangka.sh
#! /bin/bash
time=2										//设定休眠两秒
if [ $# -eq 0 ];then						//执行脚本不带参数,打印错误提示,并退出
        echo "0 network adapter??"
        exit 1
else
        while :;do							//通过循环,实时获取数据字段并进行计算,打印
                RecvBefore=$(grep $1 /proc/net/dev |tr : " "|awk '{print $2}')
                TranBefore=$(grep $1 /proc/net/dev |tr : " "|awk '{print $10}')
                sleep $time
                RecvAfter=$(grep $1 /proc/net/dev |tr : " "|awk '{print $2}')
                TranAfter=$(grep $1 /proc/net/dev |tr : " "|awk '{print $10}')
                clear
                echo $1
                echo -e "\tReceive\tTransmit\n"
                let  AvgRecv=(RecvAfter-RecvBefore)/time  //计算传输速率
                let  AvgTran=(TranAfter-TranBefore)/time  //计算传输速率
                echo -e "\t${AvgRecv}B/s\t${AvgTran}B/s"  //打印计算结果
        done
fi
- 实验截图
[root@ /newroot 01:07:12]#ip ad sh   			//查看网卡名称 :ens33
...
2: ens33: <BROADCAST,MULTICAST,UP,LOWER_UP> mtu 1500 qdisc pfifo_fast state UP group default qlen 1000
...
    inet 192.168.6.128/24 brd 192.168.6.255 scope global ens33
...
[root@ ~/test/shell 01:42:29]#chmod 700 ./wangka.sh
[root@ ~/test/shell 01:42:29]#. wangka.sh ens33