3. Augment Keypoints
Keypoints in imgaug are points on images, given as absolute x- and y- pixel coordinates with subpixel accuracy (i.e. as floats with value range [0, S), where S denotes the size of an axis).
In the literature they are also called “landmarks” and may be used for e.g. human pose estimation.
In imgaug, keypoints are only affected by augmenters changing the geometry of images.
This is the case for e.g. horizontal flips or affine transformations.
They are not affected by other methods, such as gaussian noise.
3.1 Basic example
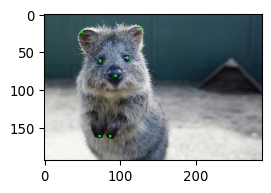
3.1.1 Load data
image = ia.quokka(size=0.3)
image.shape
Output:
(193, 288, 3)
keypoints = ia.quokka_keypoints(size=0.3)
keypoints
Output:
KeypointsOnImage([Keypoint(x=48.90000153, y=23.41213036), Keypoint(x=126.59999847, y=16.80871010), Keypoint(x=74.39999390, y=61.53187943), Keypoint(x=109.79999542, y=58.23017120), Keypoint(x=93.90000153, y=81.04199219), Keypoint(x=73.19999695, y=160.58320618), Keypoint(x=87.00000000, y=160.88336182)], shape=(193, 288, 3))
ia.imshow(keypoints.draw_on_image(image))
Output:

keypoints.keypoints
Output:
[Keypoint(x=48.90000153, y=23.41213036),
 Keypoint(x=126.59999847, y=16.80871010),
 Keypoint(x=74.39999390, y=61.53187943),
 Keypoint(x=109.79999542, y=58.23017120),
 Keypoint(x=93.90000153, y=81.04199219),
 Keypoint(x=73.19999695, y=160.58320618),
 Keypoint(x=87.00000000, y=160.88336182)]
3.1.2 Augmentation
Apply an affine transformation, which will alter both the image and the keypoints.
Choose a bit of translation and rotation as our transformation.
Add a bit of color jittering to the mix (That color jitter is only going to affect the image, not the keypoints).
ia.seed(4)

seq = iaa.Sequential([

    iaa.Affine(translate_px={

    'x': (10, 30)}, rotate=(-10, 10)),
    iaa.AddToHueAndSaturation(value=(-50, 50))
])

image_aug, keypoints_aug = seq(image=image, keypoints=keypoints)
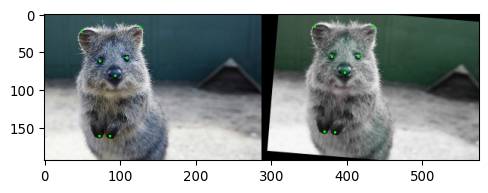
Visualize the image and keypoints before/after augmentation:
ia.imshow(np.hstack([keypoints.draw_on_image(image), keypoints_aug.draw_on_image(image_aug)]))
Output:
3.2 Project Keypoints onto other Images
The method KeypointsOnImage.on(image or shape) can be used to recompute keypoint coordinates after changing the image size.
It projects the keypoints onto the same relative positions on a new image.
In the following code block, the initial example image is increased to twice the original size:
(1) the keypoints are drawn and visualized on the original image
(2) drawn and visualized on the resized image without using on()
(3) drawn and visualized in combination with on()
image_larger = ia.imresize_single_image(image=image, sizes=2.0)

print("Small image %s with keypoints optimized for the size:" % (image.shape,))
ia.imshow(keypoints.draw_on_image(image))

print("Large image %s with keypoints optimized for the small image size:" % (image_larger.shape,))
ia.imshow(keypoints.draw_on_image(image_larger))

print("Large image %s with keypoints projected onto that size:" % (image_larger.shape,))
ia.imshow(keypoints.on(image_larger).draw_on_image(image_larger))
Output:
Small image (193, 288, 3) with keypoints optimized for the size:
Large image (386, 576, 3) with keypoints optimized for the small image size:
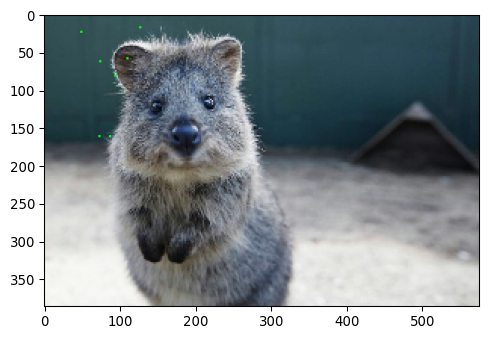
Large image (386, 576, 3) with keypoints projected onto that size:

3.3 Shifting keypoints
The previously mentioned on() can help in cases of resized images, but not when images were padded, as in these cases the relative positions of keypoints on the image change.
Such padding can be compensated for by using KeypointsOnImage.shift(x=<number>, y=<number>), where x describes the shift to the left/right and y to the top/bottom.
image_pad = iaa.pad(image, left=100)
keypoints_pad = keypoints.shift(x=100)
ia.imshow(keypoints_pad.draw_on_image(image_pad))
Output:

3.4 Drawing on Images
The method KeypointsOnImage.draw_on_image() has been used in the previous example to visualize keypoints.
It draws them on images in the form of squares.
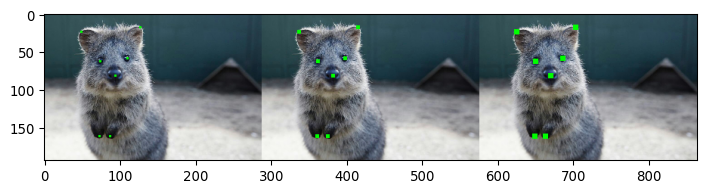
3.4.1 Control size
ia.imshow(np.hstack([

    keypoints.draw_on_image(image, size=3),
    keypoints.draw_on_image(image, size=5),
    keypoints.draw_on_image(image, size=7)
]))
Output:
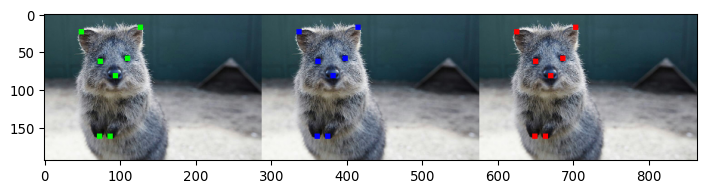
3.4.2 Control color
all keypoints
ia.imshow(np.hstack([

    keypoints.draw_on_image(image, size=7, color=(0, 255, 0)),
    keypoints.draw_on_image(image, size=7, color=(0, 0, 255)),
    keypoints.draw_on_image(image, size=7, color=(255, 0, 0))
]))
Output:
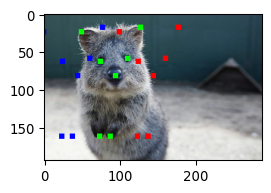
single keypoint
image_draw = np.copy(image)

colors = [(0, 255, 0), (0, 255, 0),
          (0, 0, 255), (0, 0, 255),
          (255, 0, 0),
          (255, 255, 255), (255, 255, 255)]

for kp, c in zip(keypoints, colors):
    image_draw = kp.draw_on_image(image_draw, size=7, color=c)

ia.imshow(image_draw)
Output:

3.4.3 Draw multiple times
image_draw = np.copy(image)
keypoints_shift_1 = keypoints.shift(x=-50)
keypoints_shift_2 = keypoints.shift(x=50)

keypoints.draw_on_image(image_draw, size=7, color=(0, 255, 0), copy=False)
keypoints_shift_1.draw_on_image(image_draw, size=7, color=(0, 0, 255), copy=False)
keypoints_shift_2.draw_on_image(image_draw, size=7, color=(255, 0, 0), copy=False)

ia.imshow(image_draw)
Output:
3.5 To/From Numpy Arrays
3.5.1 To
arr = keypoints.to_xy_array()
print("Keypoints as objects:", keypoints.keypoints)
print()
print("Keypoints as array:", arr)
print()
print("Shape:", arr.shape)
Output:
Keypoints as objects: [Keypoint(x=48.90000153, y=23.41213036), Keypoint(x=126.59999847, y=16.80871010), Keypoint(x=74.39999390, y=61.53187943), Keypoint(x=109.79999542, y=58.23017120), Keypoint(x=93.90000153, y=81.04199219), Keypoint(x=73.19999695, y=160.58320618), Keypoint(x=87.00000000, y=160.88336182)]

Keypoints as array: [[ 48.9       23.41213 ]
 [126.6       16.80871 ]
 [ 74.399994  61.53188 ]
 [109.799995  58.23017 ]
 [ 93.9       81.04199 ]
 [ 73.2      160.5832  ]
 [ 87.       160.88336 ]]

Shape: (7, 2)
3.5.2 From
xy = np.float32([
    [10, 20],
    [50, 17],
    [27.54, 49.13]
])

image_height = 10
image_width = 20

# shape: The shape of the image on which the keypoints are placed.
keypoints_xy = KeypointsOnImage.from_xy_array(xy, shape=(image_height, image_width, 3))
print(keypoints_xy)
Output:
KeypointsOnImage([Keypoint(x=10.00000000, y=20.00000000), Keypoint(x=50.00000000, y=17.00000000), Keypoint(x=27.54000092, y=49.13000107)], shape=(10, 20, 3))