前言
好久没有写过博客了,最近做了个微信小程序(后面统称小程序)加入购物车动画效果,然后给大家分享下。还是老规矩,先看效果图镇楼。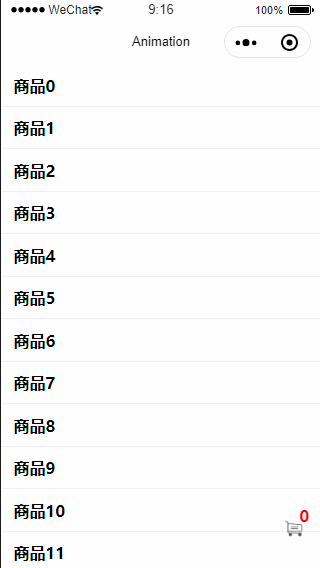
因为是demo,所以UI美观度请无视,如果是你需要的效果或者功能,那就请接下来往下看。
准备
准备一张购物车图片,如下

实现
实现这个效果主要就是用小程序提供的动画相关的API,如果你对小程序动画相关的API还不了解,可以移步官方教程:微信小程序动画官方教程。
原理
- 右下角放一个购物车的icon,然后设置position为fixed,让购物车按钮浮动在content上。不理解为什么要这么做的请参考我之前的系列文章微信小程序布局技巧。
- 页面上放置一个position为fixed的飞行点,也就是上图中的绿色点,默认隐藏。
- 在页面渲染完成之后获取购物车在页面中的坐标。
- 通过tap事件获取到tap点的坐标,将步骤2中的飞行点移动到点击处。
- 通过小程序动画相关的API(Animation.left和Animation.top)来执行动画到购物车处。
布局
<view class="container">
  <view wx:for='12345678901234567' class="item" bindtap="addshopcar" hover-class="hover">商品{

    {

    index}}</view>
</view>
<view class="dot" animation='{

    {ani}}' hidden="{

    {!showdot}}">+1</view>
<view class="count">{

    {

    count}}</view>
<view class="shopcar" id="shopcar">
  <image src="../../images/shopcar.png" class="shopcarimg"></image>
</view>
在和pages同级目录新增一个images目录,将购物车图片放入images根目录,然后引用,想必上面的布局文件应该没有什么问题和难度。
样式
.container {


  height: 100%;
  display: flex;
  flex-direction: column;
  align-items: center;
  justify-content: space-between;
  box-sizing: border-box;
}

.item {


  width: 720rpx;
  height: 100rpx;
  display: flex;
  flex-direction: row;
  align-items: center;
  font-weight: bold;
  padding-left: 30rpx;
  border-bottom: 1rpx solid #efeff4;
}

.hover {


  background: #d9d9db;
}

.dot {


  top: 0;
  left: 0;
  position: fixed;
  width: 40rpx;
  height: 40rpx;
  border-radius: 50%;
  background: #1dae01;
  display: flex;
  flex-direction: row;
  justify-content: center;
  align-items: center;
  font-size: 24rpx;
  color: white;
}

.shopcar {


  position: fixed;
  right: 40rpx;
  bottom: 60rpx;
}

.shopcarimg {


  width: 48rpx;
  height: 48rpx;
}

.count {


  color: red;
  position: fixed;
  font-weight: bold;
  right: 30rpx;
  bottom: 100rpx;
}
布局中用到的样式文件就是以上这些,基本都是一些常规属性,如果对以上还是不能理解,可以查看我之前的布局技巧的系列文章。
逻辑实现
由于代码量也不多,直接就贴出来了,然后关键步骤会做好注释
//方便引用自身
var that
Page({


  data: {


  	//购物车x坐标
    animationx: 0,
    //购物车y坐标
    animationy: 0,
    //是否显示飞行物,默认不显示
    showdot: false,
    //动画对象
    ani: {

    },
    //商品记数
    count: 0
  },
  onLoad(options) {


    that = this
  },
  onReady() {


  	//页面渲染完后获取购物车在页面中的坐标
    const query = wx.createSelectorQuery()
    query.select('#shopcar').boundingClientRect()
    query.selectViewport().scrollOffset()
    query.exec(function(res) {


      let point = res[0]
      //坐标修正,让飞行物可以正好落在购物车正中心,20是飞行物宽度一半然后转化成px
      var xtemp = (point.left + point.right) / 2 - 20 / 750 * wx.getSystemInfoSync().windowWidth
      var ytemp = (point.top + point.bottom) / 2 - 20 / 750 * wx.getSystemInfoSync().windowWidth
      console.log('xtemp : ' + xtemp + ' ytemp : ' + ytemp)
      that.setData({


      	//获取修正后坐标
        animationx: xtemp,
        animationy: ytemp
      })
    })
  },
  addshopcar(e){


    if(that.data.showdot == true){


      return
    }
    //获取点击点坐标
    var touches = e.touches[0]
    //坐标修正,同上,这么做是为了让飞行点落到点击的中心
    let toptemp = touches.clientY - 20 / 750 * wx.getSystemInfoSync().windowWidth
    let lefttemp = touches.clientX - 20 / 750 * wx.getSystemInfoSync().windowWidth
    console.log('toptemp : ' + toptemp + ' lefttemp : ' + lefttemp)
    var animation1 = wx.createAnimation({


      duration: 1,
      timingFunction: 'ease'
    })
    //通过极短的时间让飞行点移动到手指点击位置,同时让飞行点显示出来
    animation1.left(lefttemp).top(toptemp).step()
    that.setData({


      ani: animation1.export(),
      showdot: true
    })

	//然后让飞行点飞行到购物车坐标处,形成添加效果
    setTimeout(function(){


      const animation = wx.createAnimation({


        duration: 1500,
        timingFunction: 'ease'
      })
      //通过Animation的left和top这两个API,将飞行点移动到购物车坐标处
      animation.left(that.data.animationx).top(that.data.animationy).step()
      that.setData({


        ani: animation.export()
      })
      setTimeout(function () {


        var counttemp = that.data.count + 1
        that.setData({


          showdot: false,
          ani: null,
          count: counttemp
        })
      }.bind(this), 1520)//这里也是要稍微延后,后隐藏飞行点,然后清除动画,增加购物计数器
    },5)//注意这里要稍微延后,保证前面移动到手指点击处的动画完成
  }
})
以上就是所有的逻辑实现了, 然后对比注释然后,发现是不是一切都如此简单了。
尾巴
当然你也可以再每个item固定地方放置按钮,然后点击按钮来实现不同的效果,各位自由发挥了。
老规矩,喜欢我的文章,欢迎素质三连:点赞,评论,关注,谢谢大家!