MBG+通用Mapper使用教程
MBG+通用Mapper使用步骤
直接用tk-mapper的可省略3.4步

MBG
1、引入依赖(MBG依赖,mabatis,数据库驱动,数据源,lombok)
        <!--mybatis和springboot的整合包-->
        <dependency>
            <groupId>org.mybatis.spring.boot</groupId>
            <artifactId>mybatis-spring-boot-starter</artifactId>
            <version>2.0.0</version>
        </dependency>

        <!--mysql数据库驱动-->
        <dependency>
            <groupId>mysql</groupId>
            <artifactId>mysql-connector-java</artifactId>
            <version>5.1.48</version>
        </dependency>

        <!--数据源-->
        <dependency>
            <groupId>com.alibaba</groupId>
            <artifactId>druid</artifactId>
            <version>1.0.29</version>
        </dependency>

        <!-- lombok -->
        <dependency>
            <groupId>org.projectlombok</groupId>
            <artifactId>lombok</artifactId>
            <version>1.18.4</version>
        </dependency>
    <plugins>
      <plugin>
      <!--导入MBG插件-->
        <groupId>org.mybatis.generator</groupId>
        <artifactId>mybatis-generator-maven-plugin</artifactId>
        <version>1.3.2</version>
        <dependencies>
        <!--MBG需要数据库驱动-->
          <dependency>
            <groupId>mysql</groupId>
            <artifactId>mysql-connector-java</artifactId>
            <version>5.1.48</version>
          </dependency>
        </dependencies>
        <configuration>
          <!--指定generatorConfig.xml 配置文件的路径 -->
          <configurationFile>${

    basedir}/src/main/resources/generatorConfig.xml</configurationFile>
          <overwrite>true</overwrite>
        </configuration>
      </plugin>
    </plugins>
2、配置连接相关参数
server:
  port: 8989
  servlet:
    context-path: /yx
spring:
  datasource:
    driver-class-name: com.mysql.jdbc.Driver
    url:  jdbc:mysql://127.168.17.0:3306/yingxue
    type: com.alibaba.druid.pool.DruidDataSource
    username: root
    password: root
mybatis:
    mapper-locations: classpath:com/bz/mapper/*.xml
    type-aliases-package: com.bz.entity
3、将generatorConfig.xml配置文件放入main/resource目录下
<?xml version="1.0" encoding="UTF-8"?>
<!DOCTYPE generatorConfiguration
  PUBLIC "-//mybatis.org//DTD MyBatis Generator Configuration 1.0//EN"
  "http://mybatis.org/dtd/mybatis-generator-config_1_0.dtd">
<generatorConfiguration>
    <context id="test" targetRuntime="MyBatis3">
        <plugin type="org.mybatis.generator.plugins.EqualsHashCodePlugin"/>
        <plugin type="org.mybatis.generator.plugins.SerializablePlugin"/>
        <plugin type="org.mybatis.generator.plugins.ToStringPlugin"/>
        <commentGenerator>
            <!-- 这个元素用来去除指定生成的注释中是否包含生成的日期 false:表示包含 -->
            <!-- 如果生成日期,会造成即使修改一个字段,整个实体类所有属性都会发生变化,不利于版本控制,所以设置为true -->
            <property name="suppressDate" value="true" />
            <!-- 是否去除自动生成的注释 true:是 : false:否 -->
            <property name="suppressAllComments" value="true" />
        </commentGenerator>
        <!--数据库链接URL,用户名、密码 -->
        <jdbcConnection driverClass="com.mysql.jdbc.Driver"
            connectionURL="jdbc:mysql://localhost:3306/test" userId="root" password="root">
            </jdbcConnection>
        <javaTypeResolver>
            <!-- 浮点精度更高 -->
            <property name="forceBigDecimals" value="false" />
        </javaTypeResolver>
        <!-- 生成模型(entity)的包名和位置 -->
        <javaModelGenerator targetPackage="com.bz.entity"
            targetProject="src/main/java">
            <property name="enableSubPackages" value="true" />  <!-- enableSubPackages:是否要合并当前两个包    合并之后的包结构是src/main/java/com.bz.entity -->
            <property name="trimStrings" value="true" />        <!-- 是否去除生成实体类中的空格 -->
        </javaModelGenerator>

        <!-- 生成映射文件的包名和位置 -->
        <sqlMapGenerator targetPackage="com.bz.mapper"
            targetProject="src/main/resources">
            <property name="enableSubPackages" value="true" />
        </sqlMapGenerator>

        <!-- 生成DAO的包名和位置 -->
        <javaClientGenerator type="XMLMAPPER"
            targetPackage="com.bz.dao" targetProject="src/main/java">    <!--类型就是XMLMAPPER,不用改-->
            <property name="enableSubPackages" value="true" />
        </javaClientGenerator>

        <!-- 数据库中生成哪些表 有多少表就写几个table标签
             tableName:数据库中表名    domainObjectName:生成的实体类名 -->
        <table tableName="files" domainObjectName="Files"></table>

    </context>

</generatorConfiguration>
需要修改的有:
- 数据库链接URL,用户名、密码
- 生成模型(entity)的包名
- 生成映射文件的包名
- 生成DAO的包名
- 数据库中生成哪些表
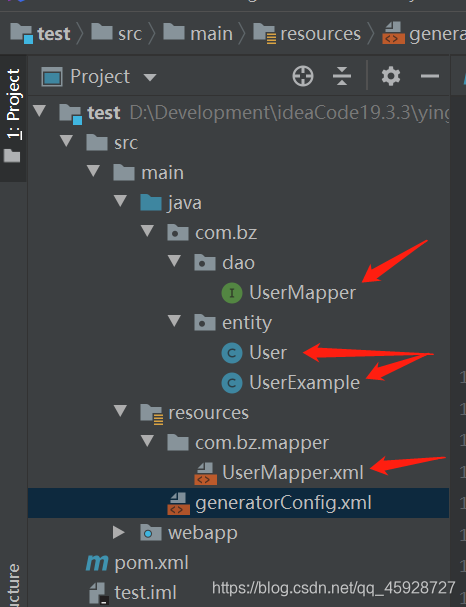
4、生成dao(xxxMapper)、mapper映射文件、实体类
点击Maven——找到当前项目——找到mybatis-generator 双击mybatis-generator:generate ,就可在设定的位置生成dao、mapper映射文件、实体类了
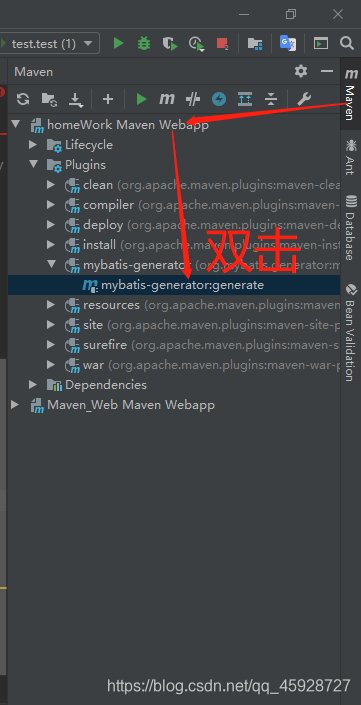
绘制成功

通用Mapper
5、引入依赖(tk.mybatis)
<!-- https://mvnrepository.com/artifact/tk.mybatis/mapper-spring-boot-starter -->
<dependency>
    <groupId>tk.mybatis</groupId>
    <artifactId>mapper-spring-boot-starter</artifactId>
    <version>2.1.5</version>
</dependency>
6、将xxxMapper(也就是dao)的方法全部删除,并继承Mapper<>
package com.bz.dao;
import com.bz.entity.User;
import tk.mybatis.mapper.common.Mapper;
public interface UserMapper extends Mapper<User> {

    //泛型是实体类的名
}
7、将xxxMapper.xml中的sql全部删除
8、 实体类加入相关注解
@Table(name = "yx_user")
@Data
@AllArgsConstructor
@NoArgsConstructor
public class User implements Serializable {


    @Id
    private String id;
    private String phone;
    private String username;
    @Column(name="head_img")
    private String headImg;
    private String brief;
    private String wechat;
    @Column(name="create_date")
    private Date createDate;
    private String status;
}
9、 入口类引入相关注解
@SpringBootApplication
@tk.mybatis.spring.annotation.MapperScan("com.bz.dao")
@org.mybatis.spring.annotation.MapperScan("com.bz.dao")
public class Demo222Application {


    public static void main(String[] args) {


        SpringApplication.run(Demo222Application.class, args);
    }
}
查询
@SpringBootTest(classes = Demo222Application.class)
@RunWith(SpringRunner.class)
public class Demo222ApplicationTests {


    //注入userMapper
    @Autowired
    private UserMapper userMapper;

    @Test
    public void 查询所有() {


        List<User> users = userMapper.selectAll();
    }
    @Test
    public void 根据主键id查询() {


        User user = userMapper.selectByPrimaryKey("1");
    }
    @Test
    public void 查询一条数据() {


        //设置查询条件对象
        User user = new User();
        user.setId("1");
        //查询数据
        userMapper.selectOne(user);//查询数据

        //根据条件查询返回一条数据
        UserExample userExample = new UserExample();//设置查询条件
        userExample.createCriteria().andIdEqualTo("1");
        userMapper.selectOneByExample(userExample);//查询数据
    }
    @Test
    public void 分页查询() {


        UserExample userExample = new UserExample();//相当于是一个条件,没有条件对所有数据进行分页
        RowBounds rowBounds = new RowBounds(0,3);//分页查询: 参数:忽略几条,获取几条数据
        userMapper.selectByExampleAndRowBounds(userExample,rowBounds);//查询
    }
    @Test
    public void 查询数量() {


        //根据传递对象内容进行查询,空对象表示所有数据,返回数量
        User user = new User();
        user.setStatus("异常");
        userMapper.selectCount(user);
    }
    @Test
    public void 根据条件查询数量() {


        //在example设置条件
        UserExample userExample = new UserExample();
        userExample.createCriteria().andUsernameEqualTo("张三");
        userMapper.selectCountByExample(userExample);
    }
    @Test
    public void 其他条件查询数量() {


        //条件查询时创建条件对象 example,根据要查询的字e段设置查询条件,查询返回集合数据,下面以id为例,每一个字段都有相对应的方法
        UserExample example = new UserExample();
        example.createCriteria().andIdEqualTo("1");//id为1
        example.createCriteria().andIdNotEqualTo("1"); //id不为1
        example.createCriteria().andIdBetween("1","5");  //id在1到5之间
        example.createCriteria().andIdNotBetween("1","5"); //id不在1到5之间
        example.createCriteria().andIdIsNull();  //id为null
        example.createCriteria().andIdIsNotNull();  //id不为null
        example.createCriteria().andIdLike("%2%");  // 模糊条件
        example.createCriteria().andIdNotLike("%2%");  // 模糊条件
        example.createCriteria().andIdGreaterThan("1");  // >  id(大于) 多少
        example.createCriteria().andIdGreaterThanOrEqualTo("1"); //  >=  id(大于等于) 多少
        example.createCriteria().andIdLessThan("1"); //  <  id(小于) 多少
        example.createCriteria().andIdLessThanOrEqualTo("1"); //  <=  id(小于等于) 多少
        example.createCriteria().andIdIn(Arrays.asList("1","2","3")); //id满足集合数据的数据
        example.createCriteria().andIdNotIn(Arrays.asList("1","2","3"));//id不满足集合数据的数据
        example.setOrderByClause("upload_time desc" ); //排序查询
        //查询数据
        userMapper.selectCountByExample(example);
    }
}
插入
    @Test
    public void 插入() {


        //两种插入方法没区别,没有设置的数据为null
        User user = new User();
        user.setId("12");
        userMapper.insert(user);
        userMapper.insertSelective(user);
    }
删除
    @Test
    public void 删除() {


        //根据id删除
        userMapper.deleteByPrimaryKey("1");

        //根据条件删除
        UserExample example = new UserExample();//添加删除条件
        example.createCriteria().andIdEqualTo("2");
        userMapper.deleteByExample(example);

        //根据对象数据删除
        User user = new User();
        user.setId("11");
        userMapper.delete(user);
    }
修改
    @Test
    public void 根据主键修改数据() {


        //1、根据主键修改数据,对象中没有赋值的字段数据会变为空
        User user = new User();
        user.setId("5");
        user.setUsername("小明");
        userMapper.updateByPrimaryKey(user);
        //2、根据主键可选择修改数据,对象中没有赋值的字段数据不会变为空
        User user2 = new User();
        user2.setId("5");
        user2.setUsername("小明");
        userMapper.updateByPrimaryKeySelective(user2);
    }
    @Test
    public void 根据条件修改数据() {


        //1、根据条件修改数据,对象中没有赋值的字段数据会变为空
        //设置要修改后的数据
        User user = new User();
        user.setUsername("小红");
        //添加修改条件
        UserExample example = new UserExample();
        example.createCriteria().andIdEqualTo("5");
        //执行修改
        userMapper.updateByExample(user,example);

        //2、根据条件可选择修改数据,对象中没有赋值的字段数据不会变为空
        //设置要修改后的数据
        User user2 = new User();
        user2.setUsername("小明");
        //添加修改条件
        UserExample example2 = new UserExample();
        example2.createCriteria().andIdEqualTo("5");
        //执行修改
        userMapper.updateByExampleSelective(user2,example2);
    }