黄色标注部分重点注意
1. Flask模板简介
•模板是一个web开发必备的,因为在渲染一个网页的时候,并不是只渲染一个纯文本字符串,而是需要渲染一个有富文本标签的页面,这时候就需要使用模板来简化渲染步骤
•在Flask中,配套的模板是Jinja2,Jinja2模板非常强大,并且执行效率高
函数返回HTML代码测试:
from flask import Flask

app = Flask(__name__)


@app.route('/db')
def first_flask():
    return '<input id="kw" name="wd" class="s_ipt" value="" maxlength="255" autocomplete="off">'


if __name__ == '__main__':
    app.run(debug=True)
网页显示:

虽然这样做是可以解析HTML的,但是这样做不利于前后端分离,给开发工作带来很多不便
在一般开发时应该将HTML代码与Python代码分离,将前端代码放入templates目录中,然后在python代码中通过render_template()方法来渲染模板即可
在项目目录下创建templates目录,templates目录下创建list.html文件,如下:
<!DOCTYPE html>
<html lang="en">
<head>
    <meta charset="UTF-8">
    <title>Flask</title>
</head>
<body>
    <input id="kw" name="wd" class="s_ipt" value="" maxlength="255" autocomplete="off">
</body>
</html>
python代码测试:
from flask import Flask, render_template

app = Flask(__name__)


@app.route('/db')
def first_flask():
    return render_template('list.html')


if __name__ == '__main__':
    app.run(debug=True)
网页显示与之前的一样
•render_template()方法根据传入的模板名在默认模板templates目录下寻找匹配模板,然后将模板里数据导入
当你需要传入模板不在templates目录下,而在templates目录的子目录时,你需要传入完整的子目录路径才能完成调用
•在templates目录下再创建一个子目录file,里边创建一个模板文件module.html如下:
<!DOCTYPE html>
<html lang="en">
<head>
    <meta charset="UTF-8">
    <title>用户中心</title>
</head>
<body>
    <h1>但行好事,莫问前程</h1>
</body>
</html>
此时加载此模块需要添加完整的子目录的路径,如下:
from flask import Flask, render_template

app = Flask(__name__)


@app.route('/db')
def first_flask():
    return render_template('list.html')


@app.route('/file')
def file():
    return render_template('file/module.html')


if __name__ == '__main__':
    app.run(debug=True)
网页显示:

如果想自定义模板保存目录,可以在初始化FLask时,传入template_folder参数来指定自定义模板保存目录,具体路径,如下:
app = Flask(__name__, template_folder='./template') #自定义目录名
这样你就可以将所有模板文件放入template文件夹中,但是不建议自定义模板目录以免路径错误模板导入出错
注意:
在模板代码中尽量不要使用常规的HTML注释,如 <!-- 这就是注释 -->,因为Flask会解析这种方式注释的代码,如果需要使用注释,可以用{# 这是注释 #}这种格式的注释
2. Flask模板传参
我们可以在Flask项目中给模板传入参数,如下:
from flask import Flask, render_template

app = Flask(__name__)


@app.route('/db')
def first_flask():
    return render_template('list.html', username='ycx', age=18, height=180)# 传入参数


@app.route('/file')
def file():
    return render_template('file/module.html')


if __name__ == '__main__':
    app.run(debug=True)
在list.html模板中调用:
<!DOCTYPE html>
<html lang="en">
<head>
    <meta charset="UTF-8">
    <title>Flask</title>
</head>
<body>
<input id="kw" name="wd" class="s_ipt" value="" maxlength="255" autocomplete="off">
    <h2>{

   { username }}</h2>
    <h2>{

   { age }}</h2>
    <h2>{

   { height }}</h2>
</body>
</html>
网页运行显示:
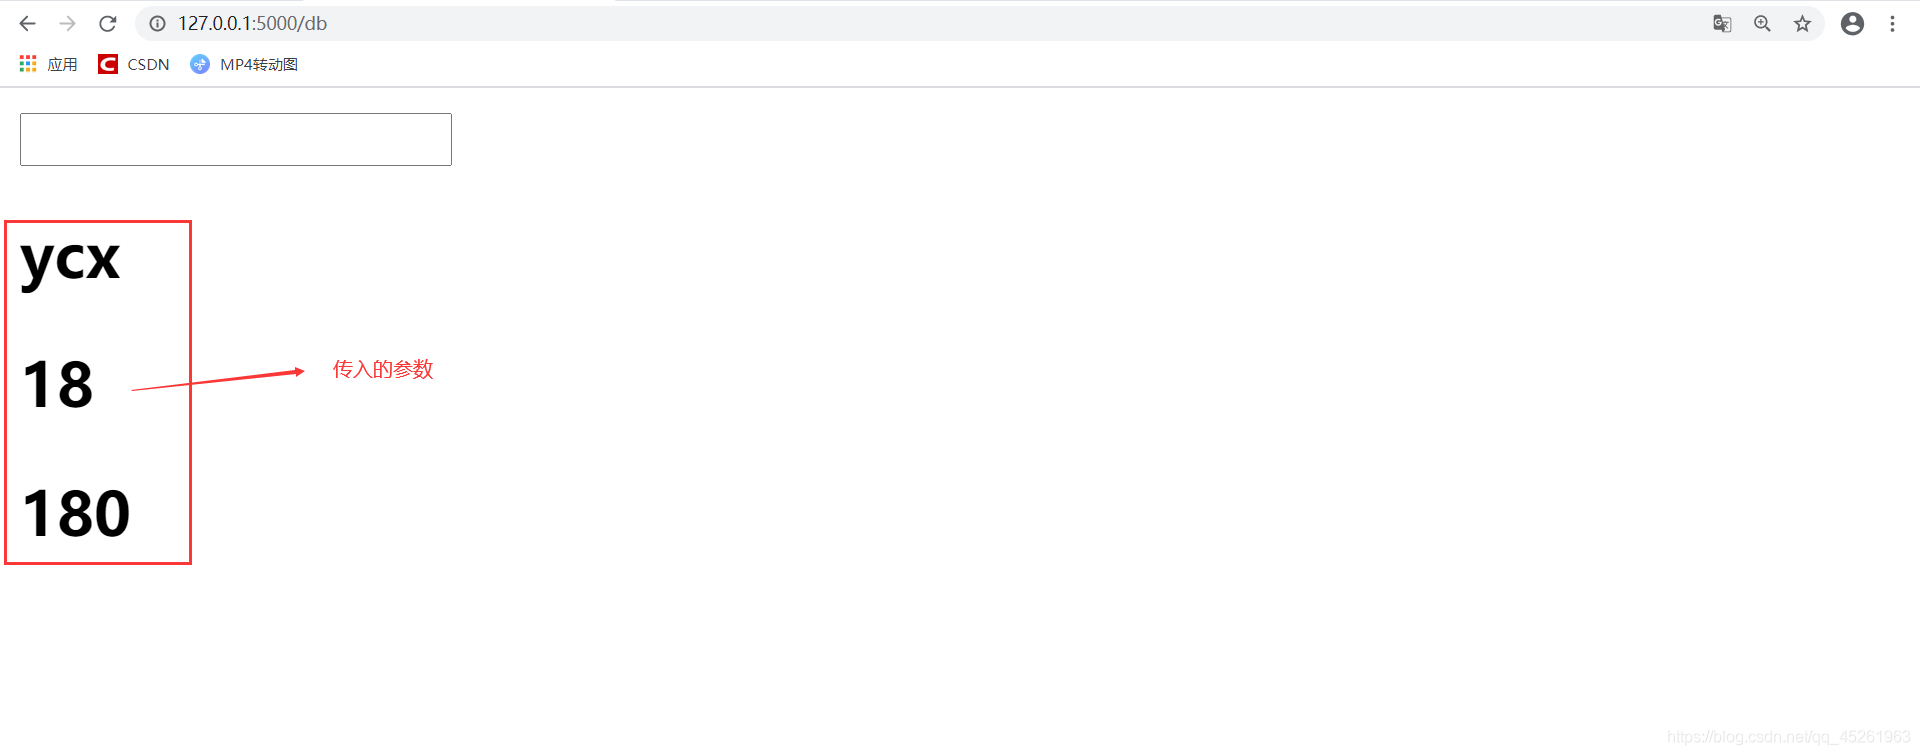
•此时传入的参数已经被渲染到网页显示出来了
•当模板中要传递的参数过多的时候,将所有参数放在一个函数中会显得传参部分的代码十分臃肿
•我们使用字典进行包装,并且还可以加两个 * 号,来转换成关键字参数
如下测试:
from flask import Flask, render_template

app = Flask(__name__)

context = {


    'username': 'ycx',
    'age': 18,
    'height': 180
}


@app.route('/db')
def first_flask():
    return render_template('list.html', context=context)


@app.route('/file')
def file():
    return render_template('file/module.html')


if __name__ == '__main__':
    app.run(debug=True)
修改list.html代码如下:
<!DOCTYPE html>
<html lang="en">
<head>
    <meta charset="UTF-8">
    <title>Flask</title>
</head>
<body>
	<input id="kw" name="wd" class="s_ipt" value="" maxlength="255" autocomplete="off">
    <h2>{

   { context.username }}</h2>
    <h2>{

   { context.age }}</h2>
    <h2>{

   { context.height }}</h2>
</body>
</html>
运行结果与之前完全一致
•如果想要模板代码不改变,可以使用**context修饰此字典,即直接用username而不是context.username
from flask import Flask, render_template

app = Flask(__name__)

context = {


    'username': 'ycx',
    'age': 18,
    'height': 180
}


@app.route('/db')
def first_flask():
    return render_template('list.html', **context)


@app.route('/file')
def file():
    return render_template('file/module.html')


if __name__ == '__main__':
    app.run(debug=True)
context中字典嵌套字典测试:
from flask import Flask, render_template

app = Flask(__name__)

context = {


    'username': 'ycx',
    'age': 18,
    'height': 180,
    'hobby': {


        'music': 'music',
        'football': 'football',
        'tv': 'tv'
    }
}


@app.route('/db')
def first_flask():
    return render_template('list.html', **context)


@app.route('/file')
def file():
    return render_template('file/module.html')


if __name__ == '__main__':
    app.run(debug=True)
模块代码:
<!DOCTYPE html>
<html lang="en">
<head>
    <meta charset="UTF-8">
    <title>Flask</title>
</head>
<body>
<input id="kw" name="wd" class="s_ipt" value="" maxlength="255" autocomplete="off">
    <h2>{

   { username }}</h2>
    <h2>{

   { age }}</h2>
    <h2>{

   { height }}</h2>
    <h2>{

   {hobby.football}}</h2>
    <h2>{

   {hobby['tv']}}</h2>
</body>
</html>
网页显示:

字典嵌套字典的取值方式:
•属性调用:
如:hobby.football
•字典取值方式:
如:hobby[‘tv’]
嵌套列表测试:
from flask import Flask, render_template

app = Flask(__name__)

context = {


    'username': 'ycx',
    'age': 18,
    'height': 180,
    'hobby': {


        'music': 'music',
        'football': 'football',
        'tv': 'tv'
    },
    'language':['python','java','php']
}


@app.route('/db')
def first_flask():
    return render_template('list.html', **context)


@app.route('/file')
def file():
    return render_template('file/module.html')


if __name__ == '__main__':
    app.run(debug=True)
模板文件:
<!DOCTYPE html>
<html lang="en">
<head>
    <meta charset="UTF-8">
    <title>Flask</title>
</head>
<body>
<input id="kw" name="wd" class="s_ipt" value="" maxlength="255" autocomplete="off">
    <h2>{

   { username }}</h2>
    <h2>{

   { age }}</h2>
    <h2>{

   { height }}</h2>
    <h2>{

   {hobby.football}}</h2>
    <h2>{

   {hobby['tv']}}</h2>
    <h2>{

   {language.0}}</h2>
    <h2>{

   {language[1]}}</h2>
</body>
</html>
网页显示:

嵌套列表的取值方式:
•下表属性调用:
如:language.0
•列表取值方式:
如:language[1]
字典和列表的取值都有两种方法,建议使用属性取值方法