文章目录
一、前言
本文是笔者阅读Spring源码的记录文章,由于本人技术水平有限,在文章中难免出现错误,如有发现,感谢各位指正。在阅读过程中也创建了一些衍生文章,衍生文章的意义是因为自己在看源码的过程中,部分知识点并不了解或者对某些知识点产生了兴趣,所以为了更好的阅读源码,所以开设了衍生篇的文章来更好的对这些知识点进行进一步的学习。
MVC 部分很久之前就写了一半了,因为各种琐事耽搁了一直没写完。。。现在处理差不多了,不鸽了。。。
Spring 的 Mvc 基于 Servlet 功能实现的,通过实现Servlet 接口的 DispatcherServlet 来封装其核心功能实现,通过将请求分派给处理程序,同时带有可配置的处理程序映射、视图解析、本地语言、主题解析以及上载文件的支持。默认的处理程序是非常简单的Controller 接口
@FunctionalInterface
public interface Controller {


    @Nullable
    ModelAndView handleRequest(HttpServletRequest var1, HttpServletResponse var2) throws Exception;
}
对Spring mvc 或者其他成熟的MVC 框架而言,解决的问题无外乎以下几点
- 将web 页面的请求传给服务器
- 根据不同得到请求处理不同的逻辑单元
- 返回处理结果数据并跳转至相应页面
1. 各个上下文的区别
在开始前,我们首先需要了解 ServletContext、ServletConfig、BeanFactory、ApplicationContext、WebApplicationContext 的区别。
-
ServletContext:应该说是Serlvet层面的上下文。包含了WebApplicationContext。Servlet规范中的概念,本质上并不是Spring的概念。他是servlet用来和容器间进行交互的接口的组合。也就是说,这个接口定 义了一系列的方法, servlet通过这些方法可以很方便地与自己所在的容器进行一些交互,比如通过getMajorVersion与getMinorVersion来获取容器的版本信息等.从它的定 义中也可以看出,在一个应用中(一个JVM)只有一个ServletContext,换句话说,容器中所有的servlet都共享同一个ServletContext. -
ServletConfig:它与ServletContext的区别在于,servletConfig是针对servlet而言的,每个servlet都有它独有的serveltConfig信息,相互之间不共享. -
BeanFactory:Spring 中最基础的容器, 提供了最简单的 IOC 功能。 -
ApplicationContext:这个类是Spring实现容器功能的核心接口,它也是Spring实现IoC功能中最重要的接口,从它的名字中可以看出,它维护了整个程序运行期间所需要的上下文信息, 注意这里的应用程序并不一定是web程序,也可能是其它类型的应用. 在Spring中允许存在多个applicationContext,这些context相互之间还形成了父与子,继承与被继承的关系,这也是通常我们所说的,在spring中存在两个context,一个是root context,一个是servlet applicationContext的意思. 这点后面会进一步阐述. -
WebApplicationContext: 其实这个接口不过是applicationContext接口的一个子接口罢了,只不过说它的应用形式是web罢了. 它在ApplicationContext的基础上,添加了对ServletContext的引用,即getServletContext方法.
他们四者的关系如下:
ServletContext针对Servlet来说,是Servlet的全局上下文。目前看到应该是作用于最大的,可以在前后端传递数据ServletConfig针对的每个Servlet ,是每个Servlet的配置内容,即init-param标签内容BeanFactory提供了最基础的SpringIOC功能.ApplicationContext在BeanFactory的基础.上增加了更多的功能。这里实际上是ApplicationContext中有BeanFactory变量而并非ApplicationContext继承了BeanFactory。 关于IOC的–些功能,ApplicationContext实际.上还是委托给了BeanFactory完成,即调用BeanFactory的方法。
2、Servlet 的生命周期
Servlet 是一个java 编写的程序,此程序基于http 协议,在服务端运行达到是按照servlet 规范编写的一个类。主要处理客户端的请求并将结果发送到客户端。Servlet 的生命周期是由Servlet 容器来控制的,可以分为三个阶段。
1.1. 初始化阶段
- servlet容器加载 servlet类, 把 servlet 类的 .class 文件中的数据读取到内存中
- servlet 容器创建了一个ServletConfig对象。ServletConfig 对象包含了 servlet 的初始化配置信息
- servlet 容器创建了一个servlet 对象
- servlet 容器调用 servlet 对象的 init 方法进行初始化。
1.2. 运行阶段
当一个 servlet 容器收到一个请求后,servlet容器会针对这个请求创建一个 servletRequest 和 servletResponse 对象,然后调用service 方法。并将这两个参数传递给 service 方法。service 方法通过 servletRequest 对象获取请求的信息,并处理该请求再通过 servletResponse 对象生成这个请求的相应结果。然后销毁servletRequest 和 servletResponse 对象。
1.3. 销毁阶段
当web应用被终止时,servlet 容器会先调用servlet对象的destory 方法,然后再销毁servlet 对象,同时也会销毁与 servlet 对象想关联的servletConfig 对象。我们可以在destory 方法的实现中,释放servlet 所占用的资源,如关闭数据库连接等。
3. 简单Demo
本来想直接上 SpringBoot 。但是还是求稳一下,我们这里用最基础的xml配置方式来搭建一个简单的Demo。(都忘了怎么搭的了,搭了一个小时,Spring mvc 真难搞 )
3.1 web.xml
<!DOCTYPE web-app PUBLIC
        "-//Sun Microsystems, Inc.//DTD Web Application 2.3//EN"
        "http://java.sun.com/dtd/web-app_2_3.dtd" >

<web-app>
    <display-name>Archetype Created Web Application</display-name>
    <!--    配置 -->
    <context-param>
        <param-name>contextConfigLocation</param-name>
        <!--        指定配置文件-->
        <param-value>classpath:applicationContext.xml</param-value>
    </context-param>
    <!--  配置监听器-->
    <listener>
        <listener-class>org.springframework.web.context.ContextLoaderListener</listener-class>
    </listener>
    <!--    配置默认的使用Default的 servlet 来处理 .html 的静态静态资源-->
    <!--    这个一定要放在DispatcherServlet 的前面,先于DispatcherServlet 拦截 -->
    <servlet-mapping>
        <servlet-name>default</servlet-name>
        <url-pattern>*.html</url-pattern>
    </servlet-mapping>

    <!--  配置 DispatcherServlet 及其映射地址-->
    <servlet>
        <servlet-name>springmvc</servlet-name>
        <servlet-class>org.springframework.web.servlet.DispatcherServlet</servlet-class>
        <!--   init-param配合的既是 ServerConfig-->
        <init-param>
            <param-name>contextConfigLocation</param-name>
            <param-value>classpath:applicationContext.xml</param-value>
        </init-param>
    </servlet>
    <servlet-mapping>
        <servlet-name>springmvc</servlet-name>
        <url-pattern>/</url-pattern>
    </servlet-mapping>
</web-app>
Spring mvc 之所以要配置 web.xml,关键在于
contextConfigLocation: Spring的核心就是配置文件,可以说Spring中必不可少的就是配置文件,而这个参数就是使 web 和 Spring的配置文件相结合的一个关键配置。DispatcherServlet: 包含了 Springmvc的请求逻辑,Spring 使用此类拦截web请求并进行相应的逻辑处理。
3.2 applicationContext.xml
<?xml version="1.0" encoding="UTF-8"?>
<beans xmlns="http://www.springframework.org/schema/beans"
       xmlns:xsi="http://www.w3.org/2001/XMLSchema-instance"
       xmlns:context="http://www.springframework.org/schema/context"
       xsi:schemaLocation="http://www.springframework.org/schema/beans http://www.springframework.org/schema/beans/spring-beans.xsd http://www.springframework.org/schema/context https://www.springframework.org/schema/context/spring-context.xsd">
    <!--    配置 扫描路径 -->
    <context:component-scan base-package="com.kingfish.springmvcdemo"/>
    <!--    配置视图解析器 -->
    <bean id="viewResolver" class="org.springframework.web.servlet.view.InternalResourceViewResolver">
        <property name="prefix" value="/WEB-INF/static/"></property>
        <property name="suffix" value=".html"></property>
    </bean>
</beans>
3.3 SayController 以及静态页面
@Controller
@RequestMapping("say")
public class SayController {


    @RequestMapping("hello")
    public String hello() {


        return "hello";
    }
}
<!DOCTYPE html>
<html lang="en">
	<head>
	    <meta charset="UTF-8">
	    <title>Title</title>
	</head>
	<body>
	<h1>Hello</h1>
	</body>
</html>
这里的配置问题我们暂时不过多解释,后面在下面分析过程中会一一进行解释。
二、ContextLoaderListener
我们看到在web.xml 中有一个监听器的配置,即 ContextLoaderListener,如下:
    <listener>
        <listener-class>org.springframework.web.context.ContextLoaderListener</listener-class>
    </listener>
我们这里看看 ContextLoaderListener 的结构:
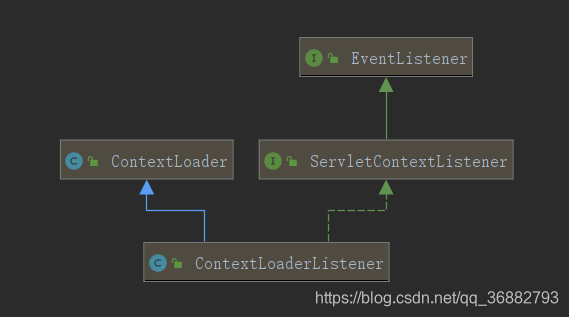
可以看到 ContextLoaderListener 实现了 ServletContextListener 接口。
ServletContextListener 的作用是监听容器启动,并在容器启动时调用ServletContextListener#contextInitialized 方法,在容器销毁时调用 ServletContextListener#contextDestroyed方法。
所以下面我们来看看 ContextLoaderListener#contextInitialized 方法:
	@Override
	public void contextInitialized(ServletContextEvent event) {


		initWebApplicationContext(event.getServletContext());
	}
	...
	// 初始化 webApplicationContext
	public WebApplicationContext initWebApplicationContext(ServletContext servletContext) {


		// 初始化完成的 webApplicationContext 会被保存到  servletContext 的属性中,key 为 ROOT_WEB_APPLICATION_CONTEXT_ATTRIBUTE
		// 所以这里是判断是否已经初始化了webApplicationContext,就抛出异常(web.xml 中声明了多次ContextLoader 的定义),不可重复初始化。
		if (servletContext.getAttribute(WebApplicationContext.ROOT_WEB_APPLICATION_CONTEXT_ATTRIBUTE) != null) {


			throw new IllegalStateException(
					"Cannot initialize context because there is already a root application context present - " +
					"check whether you have multiple ContextLoader* definitions in your web.xml!");
		}

		servletContext.log("Initializing Spring root WebApplicationContext");
		Log logger = LogFactory.getLog(ContextLoader.class);
		if (logger.isInfoEnabled()) {


			logger.info("Root WebApplicationContext: initialization started");
		}
		long startTime = System.currentTimeMillis();

		try {


			// Store context in local instance variable, to guarantee that
			// it is available on ServletContext shutdown.
			if (this.context == null) {


				// 创建 WebApplicationContext
				this.context = createWebApplicationContext(servletContext);
			}
			if (this.context instanceof ConfigurableWebApplicationContext) {


				ConfigurableWebApplicationContext cwac = (ConfigurableWebApplicationContext) this.context;
				if (!cwac.isActive()) {


					// The context has not yet been refreshed -> provide services such as
					// setting the parent context, setting the application context id, etc
					if (cwac.getParent() == null) {


						// The context instance was injected without an explicit parent ->
						// determine parent for root web application context, if any.
						ApplicationContext parent = loadParentContext(servletContext);
						cwac.setParent(parent);
					}
					// 刷新上下文环境
					configureAndRefreshWebApplicationContext(cwac, servletContext);
				}
			}
		//  将创建好的 WebApplicationContext 保存到 servletContext 中
			servletContext.setAttribute(WebApplicationContext.ROOT_WEB_APPLICATION_CONTEXT_ATTRIBUTE, this.context);
			// 映射当前的类加载器 与 创建的实例到全局变量 currentContextPerThread 中。
			ClassLoader ccl = Thread.currentThread().getContextClassLoader();
			if (ccl == ContextLoader.class.getClassLoader()) {


				currentContext = this.context;
			}
			else if (ccl != null) {


				currentContextPerThread.put(ccl, this.context);
			}

			if (logger.isInfoEnabled()) {


				long elapsedTime = System.currentTimeMillis() - startTime;
				logger.info("Root WebApplicationContext initialized in " + elapsedTime + " ms");
			}

			return this.context;
		}
		catch (RuntimeException | Error ex) {


			logger.error("Context initialization failed", ex);
			servletContext.setAttribute(WebApplicationContext.ROOT_WEB_APPLICATION_CONTEXT_ATTRIBUTE, ex);
			throw ex;
		}
	}
我们再来看看 this.context = createWebApplicationContext(servletContext); 方法的实现,其实现是ContextLoader#createWebApplicationContext。代码如下:
	private static final String DEFAULT_STRATEGIES_PATH = "ContextLoader.properties";
	...
	// 静态代码块
	static {


		// Load default strategy implementations from properties file.
		// This is currently strictly internal and not meant to be customized
		// by application developers.
		try {


			ClassPathResource resource = new ClassPathResource(DEFAULT_STRATEGIES_PATH, ContextLoader.class);
			defaultStrategies = PropertiesLoaderUtils.loadProperties(resource);
		}
		catch (IOException ex) {


			throw new IllegalStateException("Could not load 'ContextLoader.properties': " + ex.getMessage());
		}
	}

	// 创建 webApplicationContext
	protected WebApplicationContext createWebApplicationContext(ServletContext sc) {


		Class<?> contextClass = determineContextClass(sc);
		if (!ConfigurableWebApplicationContext.class.isAssignableFrom(contextClass)) {


			throw new ApplicationContextException("Custom context class [" + contextClass.getName() +
					"] is not of type [" + ConfigurableWebApplicationContext.class.getName() + "]");
		}
		return (ConfigurableWebApplicationContext) BeanUtils.instantiateClass(contextClass);
	}

	...

	protected Class<?> determineContextClass(ServletContext servletContext) {


		// 这里获取 contextClassName。默认情况下没有配置则为null。我们自然是没有配置,所以这里为null
		String contextClassName = servletContext.getInitParameter(CONTEXT_CLASS_PARAM);
		if (contextClassName != null) {


			try {


				return ClassUtils.forName(contextClassName, ClassUtils.getDefaultClassLoader());
			}
			catch (ClassNotFoundException ex) {


				throw new ApplicationContextException(
						"Failed to load custom context class [" + contextClassName + "]", ex);
			}
		}
		else {


			// 默认策略获取  contextClassName 。通过上面的静态代码块我们可以知道defaultStrategies 读取的是 ContextLoader.properties 文件中的内容
			contextClassName = defaultStrategies.getProperty(WebApplicationContext.class.getName());
			try {


				// 通过反射获取到实例
				return ClassUtils.forName(contextClassName, ContextLoader.class.getClassLoader());
			}
			catch (ClassNotFoundException ex) {


				throw new ApplicationContextException(
						"Failed to load default context class [" + contextClassName + "]", ex);
			}
		}
	}
我们这里可以知道:在没有配置 contextClassName 的情况下,ContextLoader 会加载同级目录下的ContextLoader.properties 文件,并以 WebApplicationContext.class.getName() 作为key值来获取value。
我们这里可以看到,默认的WebApplicationContext 是 XmlWebApplicationContext 。

也就是说,createWebApplicationContext 在Spring mvc 默认情况下获取的是WebApplicationContext 类型实际上是XmlWebApplicationContext 。
我们到此也可以知道 ,我们配置 ContextLoaderListener 监听器的作用就是在启动Web容器的时候,自动装配 WebApplicationContext 的配置信息,但这里仅仅是创建了WebApplicationContext 实例,WebApplicationContext 具体的初始化过程在DispatcherServlet的init 方法中。在后续文章中会介绍