使用UGUI有两年时间了,几乎的忘记了有图集这么回事,直到DrawCall扛不住了。
今天就来扒一扒怎么通过操作图集来减少DrawCall。
打开Edit>>Project Setting>>Editor
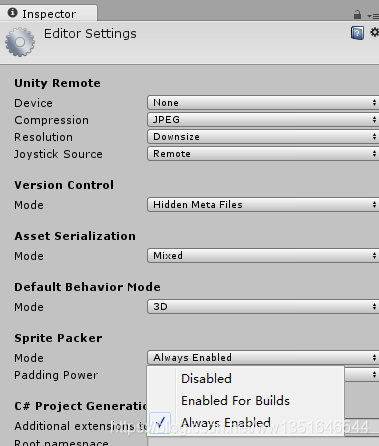
Sprite Packer选项是是否要把图片打成图集
Disable:是默认的不打
Enabled For Builds:打包的时候启用
Always Enabled:这个是一直启用
在这里选择Always Enabled启用图集打包
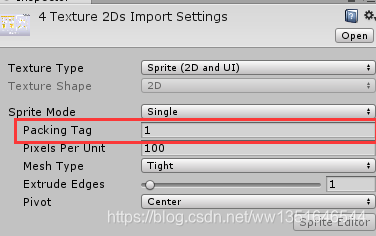
再打图片中的打包标签选择这个就可以打包到同一个图集了。
这时候可以试一下使用四个Image组件把四张小图放进去
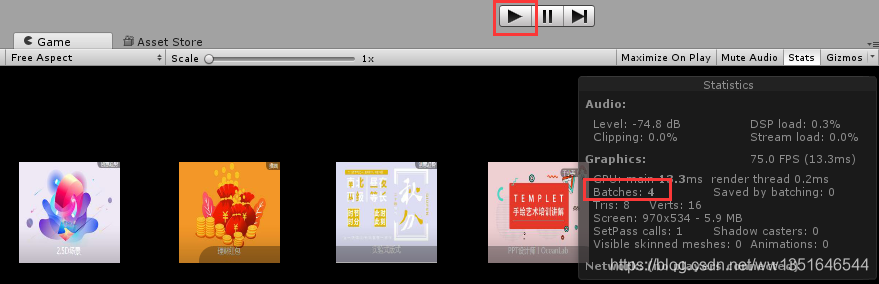
没运行起来,嘿嘿还是4个drawcall
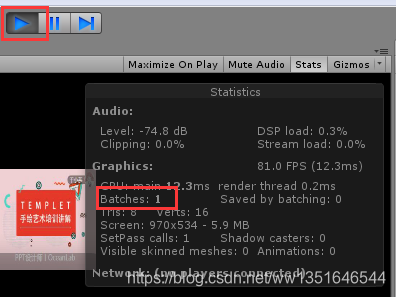
当运行起来的时候就就变回一个啦,Ok起效果了。
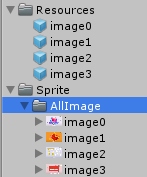
注意:图片不能放在Resources里,不然不会补打入图集的切记切记~!
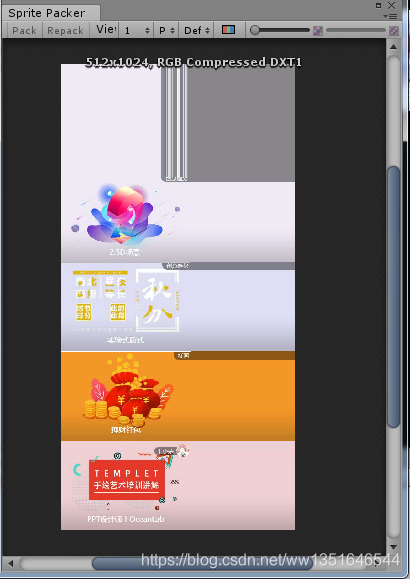
可以通过Windows>>Sprite Packer来查看图集的样子
使用Resourece动态加载
怎么使用Resources动态的加载图片呢,可以使用这样的做法创建一个prefab挂载SpiteRenderer组件把图片挂进去,当加载的时候使用:
Resources.Load<GameObject>("Resources下的图片地址").GetComponent<SpriteRenderer>().sprite;
取得图片进行赋值
下面是取值创建的完成代码
[MenuItem("PackSprite/PackSprite")]
        static private void MakeAtlas()
        {
            //输出目录
            string spriteDir = Application.dataPath + "/Resources/";

            if (!Directory.Exists(spriteDir)) Directory.CreateDirectory(spriteDir);

            //读取的目录
            DirectoryInfo rootDirInfo = new DirectoryInfo(Application.dataPath + "/Sprite");
            Debug.Log("有到这来:" + rootDirInfo.Name);
            foreach (DirectoryInfo dirInfo in rootDirInfo.GetDirectories())
            {
                foreach (FileInfo pngFile in dirInfo.GetFiles("*.jpg", SearchOption.AllDirectories))
                {
                    string allPath = pngFile.FullName;
                    string assetPath = allPath.Substring(allPath.IndexOf("Assets"));
                    Sprite sprite = AssetDatabase.LoadAssetAtPath<Sprite>(assetPath);
                    GameObject go = new GameObject(sprite.name);
                    go.AddComponent<SpriteRenderer>().sprite = sprite;
                    allPath = spriteDir + "/" + sprite.name + ".prefab";
                    string prefabPath = allPath.Substring(allPath.IndexOf("Assets"));
                    PrefabUtility.CreatePrefab(prefabPath, go);
                    GameObject.DestroyImmediate(go);
                }
            }
        }
下面是读取的代码
喜欢写在点击里点一下鼠标触发,个人爱好..
void Update(){
        if (Input.GetMouseButtonDown(2)) {
            CreatObj(GetSprite("image0"));
            CreatObj(GetSprite("image1"));
            CreatObj(GetSprite("image2"));
            CreatObj(GetSprite("image3"));
        }
}

private void CreatObj(Sprite sprite){
        GameObject go = new GameObject(sprite.name);
        go.transform.SetParent(transform);
        go.layer = LayerMask.NameToLayer("UI");
        go.transform.localScale = Vector3.one;
        Image image = go.AddComponent<Image>();
        image.sprite = sprite;
        image.SetNativeSize();
}

private Sprite GetSprite(string spriteName){
        	return Resources.Load<GameObject>(spriteName).GetComponent<SpriteRenderer>().sprite;
}
AssetBundle更新
下面来是打包成Bundle要用于代码热更嘛~
 [MenuItem("PackSprite/PackAssetbundle")]
        static private void BuildAssetBundle2()
        {
            string dir = Application.dataPath + "/StreamingAssets";

            if (!Directory.Exists(dir))
            {
                Directory.CreateDirectory(dir);
            }
            DirectoryInfo rootDirInfo = new DirectoryInfo(Application.dataPath + "/Sprite");
            foreach (DirectoryInfo dirInfo in rootDirInfo.GetDirectories())
            {
                List<Sprite> assets = new List<Sprite>();
                string path = dir + "/" + dirInfo.Name + ".assetbundle";
                foreach (FileInfo pngFile in dirInfo.GetFiles("*.jpg", SearchOption.AllDirectories))
                {
                    string allPath = pngFile.FullName;
                    string assetPath = allPath.Substring(allPath.IndexOf("Assets"));
                    assets.Add(AssetDatabase.LoadAssetAtPath<Sprite>(assetPath));
                }
                if (BuildPipeline.BuildAssetBundle(null, assets.ToArray(), path, BuildAssetBundleOptions.UncompressedAssetBundle | BuildAssetBundleOptions.CollectDependencies, GetBuildTarget()))
                {
                }
            }
        }
        static private BuildTarget GetBuildTarget()
        {
            BuildTarget target = BuildTarget.WebPlayer;
#if UNITY_STANDALONE
            target = BuildTarget.StandaloneWindows;
#elif UNITY_IPHONE
			target = BuildTarget.iPhone;
#elif UNITY_ANDROID
			target = BuildTarget.Android;
#endif
            return target;
        }
加载部分
CreatObj(loadSprite("image0"));
CreatObj(loadSprite("image1"));
CreatObj(loadSprite("image2"));
CreatObj(loadSprite("image3"));

private void CreatObj(Sprite sprite){
	同上:
}

private Sprite loadSprite(string spriteName)
    {
        if (assetbundle == null) return null;
#if USE_ASSETBUNDLE
		if(assetbundle == null)
			assetbundle = AssetBundle.CreateFromFile(Application.streamingAssetsPath +"/Main.assetbundle");
				return assetbundle.Load(spriteName) as Sprite;
#else
        Debug.Log("地址:"+ "Sprite/" + spriteName);
        return Resources.Load<GameObject>(spriteName).GetComponent<SpriteRenderer>().sprite;
#endif
    }