OpenGL.Shader:4-GPU过场动画,浅析并行运算
本篇内容由两个简单的例子,继续学习着色器编码规范。以及着色器的概念延伸——并行运算。对应项目地址:https://github.com/MrZhaozhirong/NativeCppApp
第一个例子的效果图。一样还是基于之前文章内容的正方体的模型数据,相关代码就不放上来了,有需要的同学到github上领取。现在就着重的分析学习着色器程序的相关代码。
#include "GPUMixShaderProgram.h"
#include "ShaderHelper.h"

/**
 * 正方体动态渐变 着色器程序
 */
GPUMixShaderProgram::GPUMixShaderProgram()
{
    const char * vertexShaderResourceStr  = "uniform mat4    u_Matrix;\n\
                                             attribute vec4  a_Position;\n\
                                             attribute vec2  a_uv;\n\
                                             varying vec2    out_uv;\n\
                                             void main()\n\
                                             {\n\
                                                 out_uv      =   a_uv;\n\
                                                 gl_Position =   u_Matrix * a_Position;\n\
                                             }";
    const char * fragmentShaderResourceStr= "precision mediump float;\n\
                                             uniform sampler2D _texture0;\n\
                                             uniform sampler2D _texture1;\n\
                                             uniform float     _mix;\n\
                                             varying vec2      out_uv;\n\
                                             void main()\n\
                                             {\n\
                                                 vec4 color0    =  texture2D(_texture0, out_uv);\n\
                                                 vec4 color1    =  texture2D(_texture1, out_uv);\n\
                                                 vec4 dstColor  =  color0 * (1.0 - _mix)  + color1 * _mix;\n\
                                                 gl_FragColor   =  mix(color0, color1, _mix);\n\
                                             }";

    //                                           gl_FragColor   =   dstColor;
    programId = ShaderHelper::buildProgram(vertexShaderResourceStr, fragmentShaderResourceStr);

    uMatrixLocation     = glGetUniformLocation(programId, "u_Matrix");
    aPositionLocation   = glGetAttribLocation(programId, "a_Position");
    uMixLocation        = glGetUniformLocation(programId, "_mix");
    aTexUvLocation      = glGetAttribLocation(programId, "a_uv");
    uTextureUnit0       = glGetUniformLocation(programId, "_texture0");
    uTextureUnit1       = glGetUniformLocation(programId, "_texture1");
}

void GPUMixShaderProgram::setMVPUniforms(float* matrix){
    glUniformMatrix4fv(uMatrixLocation, 1, GL_FALSE, matrix);
}

void GPUMixShaderProgram::setMixUniform(double mix){
    glUniform1f(uMixLocation, static_cast<GLfloat>(mix));
}
调用过程如下:
void NativeGLRender::renderOnDraw(double elpasedInMilliSec)
{
    mWindowSurface->makeCurrent();
    glClear(GL_DEPTH_BUFFER_BIT | GL_COLOR_BUFFER_BIT);
    // GPUMixShaderProgram和GPUFlatSlidingProgram所需
    double _hasElasped = elpasedInMilliSec/1000 * 0.1f;
    if (_hasElasped > 1.0f)
    {
        _hasElasped = 1.0f;
    }
    gpuMixShaderProgram->ShaderProgram::userProgram();
    glActiveTexture(GL_TEXTURE0);
    glBindTexture(GL_TEXTURE_2D, texture_0_id);
    glUniform1i(gpuMixShaderProgram->uTextureUnit0, 0);
    glActiveTexture(GL_TEXTURE1);
    glBindTexture(GL_TEXTURE_2D, texture_1_id);
    glUniform1i(gpuMixShaderProgram->uTextureUnit1, 1);

    CELL::Matrix::multiplyMM(modelViewProjectionMatrix, viewProjectionMatrix, cube->modelMatrix);
    gpuMixShaderProgram->setMVPUniforms(modelViewProjectionMatrix);
    gpuMixShaderProgram->setMixUniform(_hasElasped); // 设置混合因子
    cube->bindData(gpuFlatSlidingProgram);
    cube->draw();
    mWindowSurface->swapBuffers();
}
这次的着色器程序的功能处理,着重放在片元着色器上,顶点着色器只是简单的把相关数据透传给片元着色器。其实这个效果就是从第一张图混合逐渐变成第二张目标图。混合因子_mix是通过OpenGL.API,随着时间的变化传递到着色器程序。
precision mediump float;
uniform sampler2D _texture0;
uniform sampler2D _texture1;
uniform float _mix;
varying vec2 out_uv;
void main()
{
vec4 color0 = texture2D(_texture0, out_uv); // 提取纹理1对应着色点的色值
vec4 color1 = texture2D(_texture1, out_uv); // 提取纹理2对应着色点的色值
vec4 dstColor = color0 * (1.0 - _mix) + color1 * _mix; // 自行进行混合的数学计算
gl_FragColor = mix(color0, color1, _mix); // 利用系统自带的mix混合函数进行混合计算
}
其次我把mix函数的源码自己写出来了,就是main核函数中的第三行代码。到这好像略懂了,但好像又没全懂。我想补充说明的是内置函数texture2D是根据纹理坐标out_uv线性采样的,虽然只有四个纹理坐标点,但经过光栅化之后的采样点其实是和着色点的个数相同。这个例子可能不太能说明这句话,不明白不要紧,我们继续看第二个例子。
 第二例子效果图,对应着色器程序
#include "GPUFlatSlidingProgram.h"
#include "ShaderHelper.h"

GPUFlatSlidingProgram::GPUFlatSlidingProgram()
{
    const char * vertexShaderResourceStr  = "uniform mat4    u_Matrix;\n\
                                             attribute vec4  a_Position;\n\
                                             attribute vec2  a_uv;\n\
                                             varying vec2    out_uv;\n\
                                             void main()\n\
                                             {\n\
                                                 out_uv      =   a_uv;\n\
                                                 gl_Position =   u_Matrix * a_Position;\n\
                                             }";

    const char * fragmentShaderResourceStr= "precision mediump float;\n\
                                             uniform sampler2D _texture0;\n\
                                             uniform sampler2D _texture1;\n\
                                             uniform float     offset;\n\
                                             varying vec2      out_uv;\n\
                                             void main()\n\
                                             {\n\
                                                 vec4 color = vec4(0,0,0,1);\n\
                                                 if(out_uv.x <= offset )\n\
                                                    color = texture2D(_texture1, vec2(out_uv.x + (1.0 - offset), out_uv.y));\n\
                                                 else\n\
                                                    color = texture2D(_texture0, vec2(out_uv.x - offset, out_uv.y));\n\
                                                 gl_FragColor   =  color; \n\
                                             }";

    programId = ShaderHelper::buildProgram(vertexShaderResourceStr, fragmentShaderResourceStr);

    uMatrixLocation     = glGetUniformLocation(programId, "u_Matrix");
    aPositionLocation   = glGetAttribLocation(programId,  "a_Position");
    aTexUvLocation      = glGetAttribLocation(programId,  "a_uv");
    uOffset             = glGetUniformLocation(programId, "offset");
    uTextureUnit0       = glGetUniformLocation(programId, "_texture0");
    uTextureUnit1       = glGetUniformLocation(programId, "_texture1");
}

void GPUFlatSlidingProgram::setMVPUniforms(float* matrix){
    glUniformMatrix4fv(uMatrixLocation, 1, GL_FALSE, matrix);
}

void GPUFlatSlidingProgram::setOffsetUniform(double offset){
    glUniform1f(uOffset, static_cast<GLfloat>(offset));
}
调用过程和上方一致,只是不再是设置混合因子_mix,这次是时间偏移量offset。 还是着重分析片元着色器。
precision mediump float;
uniform sampler2D _texture0;
uniform sampler2D _texture1;
uniform float offset;
varying vec2 out_uv;
void main()
{
vec4 color = vec4(0,0,0,1);
if(out_uv.x <= offset ) {
color = texture2D(_texture1, vec2(out_uv.x + (1.0 - offset), out_uv.y));
} else {
color = texture2D(_texture0, vec2(out_uv.x - offset, out_uv.y));
}
gl_FragColor = color;
}
offset从0逐渐变化到1,取纹理的横坐标用于判断,在offset的左方显示空间,我们抽取texture1的0 ~ out_uv.x + (1.0 - offset) 的区域进行采样;在offset的右方显示空间,提取texture0的0 ~ out_uv.x - offset的区域进行采样;看不懂没关系,看看下方的简易说明图。
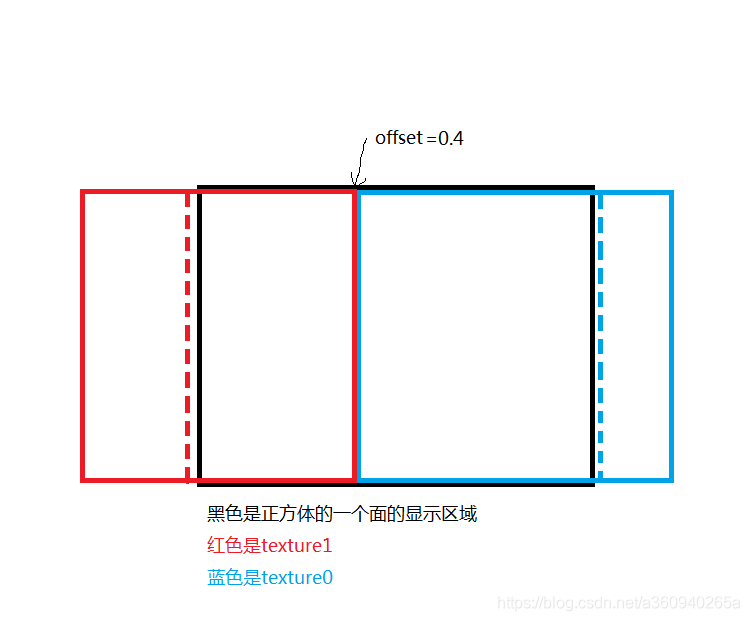
当offset=0.4时,先看显示的右边区域,所有大于0.4的纹理坐标(0.5~6~7~8~9~1.0)先减去偏移offset的值=(0.1~2~3~4~5),再对纹理texture0采样颜色点,当offset=0.5后,纹理坐标缩减一位数(0.1~2~3~0.4),texture0显示区域一直向左缩减,视觉效果就是向右平移;
当offset=0.4时,在显示的左边区域(uv.x<=offset),所有小于0.4的纹理坐标(0~0.1~0.2~0.3~0.4)先全部+1跨一张图的纹理范围,变成(1~1.1~1.2~1.3~1.4),再然后减去0.4=(0.6~7~8~9~1.0),最后以这组坐标对纹理texture1进行采样颜色值。当offset=0.5后,纹理坐标多加一位数(0~0.1~0.2~0.3~0.4~0.5)=>(1~1.1~1.2~1.3~1.4~1.5)=>(0.5~6~7~8~9~1.0)。texture1已有边界为基准,不断的向左扩张。
通过这个例子,如果同学你还没头晕的话,那恭喜你掌握了并行运算的基础概念了,而且是两层级的并行。因为片元着色器就是以着色点为单位执行的,然后硬件的GPU渲染不可能是一个个像素点去着色,所以片元着色器的编写基本就要带上并行的思维,在NIVIDA的CUDA并行运算库中的关键 核函数 其实就相当于片元着色程序了。有兴趣的同学可以自己百度CUDA扩展视野。
通过两个例子,学习了片元着色程序的编码规范,和一些运用技巧,并衍生了一些概念,融会贯通。