使用idea快速构建springboot 配置MySQL连接
思路如下:
1、build.gradle==>配置系统导入包
2、application.priperties==>配置连接mysql数据库信息
3、bean=>定义数据类型
4、mapper==>定义接口类型
5、controller==>调用接口,返回页面
6、html==>页面设定
构建
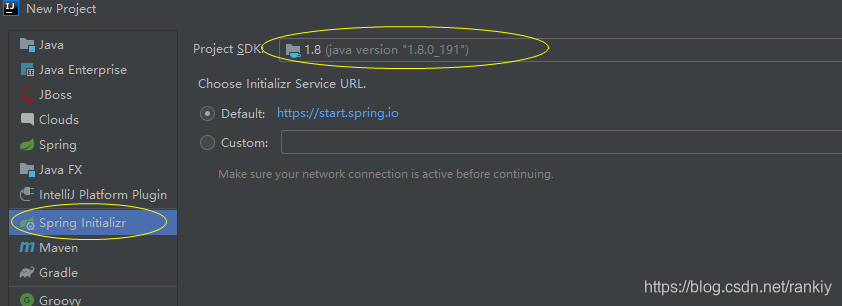
idea–>file–>objdec–new Project–>spring Initializr–>查看下图操作–>无图就下一步
使用spring Initialiar 自动构建项目,使用SDK1.8创建
配置组和名称(随意)
选择构建方式为:Gradle Project
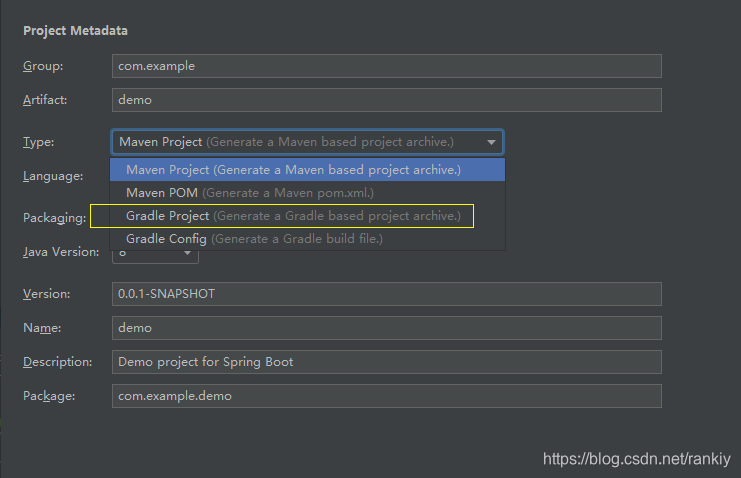
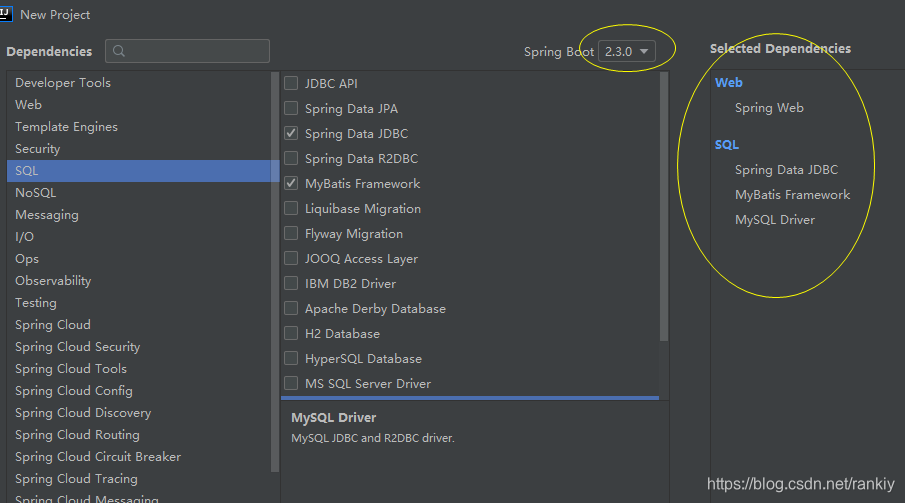
选择项目初始化的信息
文件:build.gradle
plugins {


    id 'org.springframework.boot' version '2.3.0.RELEASE'
    id 'io.spring.dependency-management' version '1.0.9.RELEASE'
    id 'java'
}

group = 'com.spboot'
version = '0.0.1-SNAPSHOT'
sourceCompatibility = '1.8'

repositories {


    mavenCentral()
}

//加载的项目包文件
dependencies {


    implementation 'org.springframework.boot:spring-boot-starter-data-jdbc'
    implementation 'org.springframework.boot:spring-boot-starter-web'
    implementation 'org.mybatis.spring.boot:mybatis-spring-boot-starter:2.1.3'
    runtimeOnly 'mysql:mysql-connector-java'
    testImplementation('org.springframework.boot:spring-boot-starter-test') {


        exclude group: 'org.junit.vintage', module: 'junit-vintage-engine'
    }

}
二 、连接mysql配置
全部构建完文件结构如下:

步骤2,文件:application.properties
#配置端口
server.port=8080
#配置数据库
spring.datasource.driver-class-name=com.mysql.cj.jdbc.Driver
spring.datasource.username=root
spring.datasource.password=123456
spring.datasource.url=jdbc:mysql://192.168.188.129:3307/mybatis?useSSL=false
步骤3 数据类型:Department
package com.spboot.spbuildmysql.bean;

public class Department {


	//定义数据类型,设定set,get方法
    private Integer id;
    private String departmentName;

    public Integer getId() {


        return id;
    }

    public void setId(Integer id) {


        this.id = id;
    }

    public String getDepartmentName() {


        return departmentName;
    }

    public void setDepartmentName(String departmentName) {


        this.departmentName = departmentName;
    }
}
步骤4 定义接口:DepartmentMapper
package com.spboot.spbuildmysql.mapper;

import com.spboot.spbuildmysql.bean.Department;
import org.apache.ibatis.annotations.*;

@Mapper //扫描接口
public interface DepartmentMapper {


    @Select("select * from department where id=#{id}")
    public Department getDeptById(Integer id);
}
步骤5调用接口,返回页面。DepartController
package com.spboot.spbuildmysql.controller;

import com.spboot.spbuildmysql.bean.Department;
import com.spboot.spbuildmysql.mapper.DepartmentMapper;
import org.springframework.beans.factory.annotation.Autowired;
import org.springframework.web.bind.annotation.GetMapping;
import org.springframework.web.bind.annotation.PathVariable;
import org.springframework.web.bind.annotation.RestController;

@RestController  //注解后可以使用浏览器直接访问。
public class DepartController {


	//自动注入,接口导入
    @Autowired
    DepartmentMapper departmentMapper;

	//构建返回页面,使用浏览器打开
    @GetMapping("/depart/{id}")
    public Department getDepartment(@PathVariable Integer id){


        return departmentMapper.getDeptById(id);
    }
}
步骤6页面设置(略)
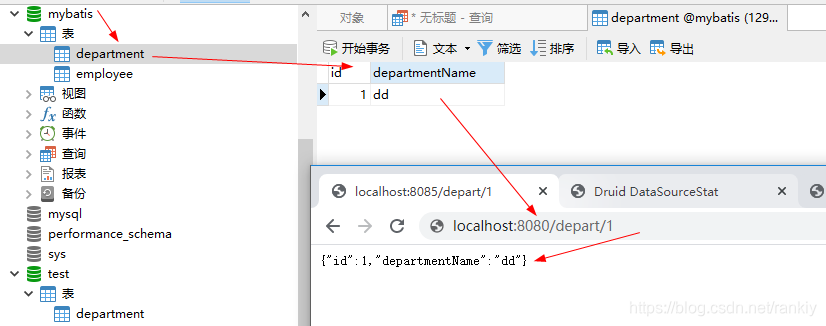
使用浏览器,打开网址:localhost:8080/depart/1
从数据库读取数据,页面返回信息