转载自pyqt5中动画的使用
一、pyqt5中动画的继承关系图
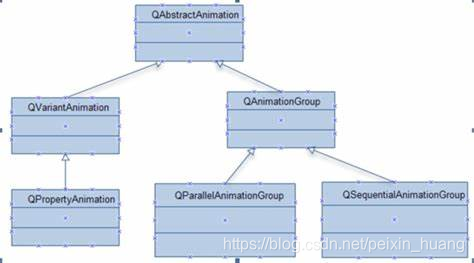
二、关于QAbstractAnimation父类的认识
- 1、主要作用
- 继承此类, 实现一些自定义动画
- 所有动画共享的功能
- 2、功能作用
- 循环操作
- setLoopCount(count):设置循环次数
- currentLoop():当前循环
- currentLoopTime():当前循环时间
- 时间操作
- duration():单次时长
- totalDuration():动画总时长
- currentTime():当前时长
- 动画方向
- setDirection(QAbstractAnimation.Forward/QAbstractAnimation.Backward)
- 动画状态state()
- QAbstractAnimation.Stopped:动画停止
- QAbstractAnimation.Paused:动画暂停
- QAbstractAnimation.Running:动画运行
- 循环操作
三、QPropertyAnimation属性动画的使用
主要用于实现某个属性值从x到y的动画变化
-
1、定义动画的主要步骤
- 创建一个动画,并设置目标、属性
- 设置属性值的开始、插值、结束
- 动画时长
- 启动动画
-
2、构造函数使用方式
- 1.QPropertyAnimation(parent: QObject = None)
设置动画目标:setTargetObject(self, QObject)
设置动画属性(位置、大小等):setPropertyName(self, Union[QByteArray, bytes, bytearray]) - 2.QPropertyAnimation(QObject, Union[QByteArray, bytes, bytearray], parent: QObject = None)
- 1.QPropertyAnimation(parent: QObject = None)
-
3、常见的属性
- geometry
- pos
- size
- windowOpacity
-
4、设置开始值和结束值
- setStartValue(self, Any)
- setEndValue(self, Any)
- setKeyValueAt(self, float, Any)
- setKeyValues(self, object)
-
5、设置动画时长
- setDuration(int mesc)
-
6、启动动画
- start()
-
7、简单案例(位置的)
import sys
from PyQt5.Qt import *


class Window(QWidget):
    def __init__(self, *args, **kwargs):
        super().__init__(*args, **kwargs)
        self.setWindowTitle('动画')
        self.resize(500, 500)
        self.move(400, 200)
        self.btn = QPushButton(self)
        self.init_ui()

    def init_ui(self):
        self.btn.resize(100, 100)
        self.btn.move(0, 0)
        self.btn.setStyleSheet('QPushButton{border: none; background: pink;}')

        # 1.定义一个动画
        animation = QPropertyAnimation(self)
        animation.setTargetObject(self.btn)
        animation.setPropertyName(b'pos')
        # 使用另外一种构造函数方式创建
        # animation = QPropertyAnimation(self.btn, b'pos', self)

        # 2.设置属性值
        animation.setStartValue(QPoint(0, 0))
        animation.setEndValue(QPoint(400, 400))

        # 3.设置时长
        animation.setDuration(3000)

        # 4.启动动画
        animation.start()


if __name__ == "__main__":
    app = QApplication(sys.argv)
    window = Window()
    window.show()
    sys.exit(app.exec_())
- 8、使用插值的动画
import sys
from PyQt5.Qt import *


class Window(QWidget):
    def __init__(self, *args, **kwargs):
        super().__init__(*args, **kwargs)
        self.setWindowTitle('使用插值')
        self.resize(500, 500)
        self.move(400, 200)
        self.btn = QPushButton(self)
        self.init_ui()

    def init_ui(self):
        self.btn.resize(50, 50)
        self.btn.move(0, 0)
        self.btn.setStyleSheet('QPushButton{border: none; background: pink;}')

        # 1.创建动画
        animation = QPropertyAnimation(self.btn, b'pos', self)

        # 2.定义动画插值
        animation.setKeyValueAt(0, QPoint(0, 0))
        animation.setKeyValueAt(0.25, QPoint(450, 0))
        animation.setKeyValueAt(0.5, QPoint(450, 450))
        animation.setKeyValueAt(0.75, QPoint(0, 450))
        animation.setKeyValueAt(1, QPoint(0, 0))
        # 3.动画时长
        animation.setDuration(5000)
        # 4.启动动画
        animation.start()

if __name__ == "__main__":
    app = QApplication(sys.argv)
    window = Window()
    window.show()
    sys.exit(app.exec_())
四、QAnimationGroup动画组的使用
可以将一组动画, 同时播放或者按顺序播放
-
1、使用的步骤
- 根据上面的方式创建单独的动画(但不启动)
- 定义一个动画组
- 将之前的动画添加到动画组中
- 启动动画组
-
2、动画运行几种状态
- 并行动画QParallelAnimationGroup
- 串行动画QSequentialAnimationGroup
-
3、一个动画组的案例
-
在这里插入代码片
import sys
from PyQt5.Qt import *


class Window(QWidget):
    def __init__(self, *args, **kwargs):
        super().__init__(*args, **kwargs)
        self.setWindowTitle('动画组')
        self.resize(500, 500)
        self.move(400, 200)
        self.btn1 = QPushButton(self)
        self.btn2 = QPushButton(self)
        self.init_ui()

    def init_ui(self):
        self.btn1.resize(50, 50)
        self.btn1.move(0, 0)
        self.btn1.setStyleSheet('QPushButton{border: none; background: pink;}')

        self.btn2.resize(50, 50)
        self.btn2.move(50, 50)
        self.btn2.setStyleSheet('border: none; background: cyan')

        # 按钮1的动画
        animation1 = QPropertyAnimation(self.btn1, b'pos', self)
        animation1.setKeyValueAt(0, QPoint(0, 0))
        animation1.setKeyValueAt(0.25, QPoint(450, 0))
        animation1.setKeyValueAt(0.5, QPoint(450, 450))
        animation1.setKeyValueAt(0.75, QPoint(0, 450))
        animation1.setKeyValueAt(1, QPoint(0, 0))
        animation1.setDuration(5000)
        # animation1.start()

        # 按钮2的动画
        animation2 = QPropertyAnimation(self.btn2, b'pos', self)
        animation2.setKeyValueAt(0, QPoint(50, 50))
        animation2.setKeyValueAt(0.25, QPoint(400, 50))
        animation2.setKeyValueAt(0.5, QPoint(400, 400))
        animation2.setKeyValueAt(0.75, QPoint(50, 400))
        animation2.setKeyValueAt(1, QPoint(50, 50))
        animation2.setDuration(3000)
        # animation2.start()

        animation_group = QSequentialAnimationGroup(self)
        animation_group.addAnimation(animation1)
        animation_group.addAnimation(animation2)
        animation_group.start()


if __name__ == "__main__":
    app = QApplication(sys.argv)
    window = Window()
    window.show()
    sys.exit(app.exec_())
五、关于QAbstractAnimation中事件的操作
-
1、启动动画start()
-
2、暂停动画pause()
-
3、继续启动动画resume()
-
4、停止动画stop()
-
5、基本案例
import sys
from PyQt5.Qt import *


class Window(QWidget):
    def __init__(self, *args, **kwargs):
        super().__init__(*args, **kwargs)
        self.setWindowTitle('动画组')
        self.resize(500, 500)
        self.move(400, 200)
        self.btn1 = QPushButton(self)
        self.btn2 = QPushButton(self)
        self.init_ui()

    def init_ui(self):
        self.btn1.resize(50, 50)
        self.btn1.move(0, 0)
        self.btn1.setStyleSheet('QPushButton{border: none; background: pink;}')

        self.btn2.resize(50, 50)
        self.btn2.move(50, 50)
        self.btn2.setStyleSheet('border: none; background: cyan')

        # 按钮1的动画
        animation1 = QPropertyAnimation(self.btn1, b'pos', self)
        animation1.setKeyValueAt(0, QPoint(0, 0))
        animation1.setKeyValueAt(0.25, QPoint(450, 0))
        animation1.setKeyValueAt(0.5, QPoint(450, 450))
        animation1.setKeyValueAt(0.75, QPoint(0, 450))
        animation1.setKeyValueAt(1, QPoint(0, 0))
        animation1.setDuration(5000)
        # animation1.start()

        # 按钮2的动画
        animation2 = QPropertyAnimation(self.btn2, b'pos', self)
        animation2.setKeyValueAt(0, QPoint(50, 50))
        animation2.setKeyValueAt(0.25, QPoint(400, 50))
        animation2.setKeyValueAt(0.5, QPoint(400, 400))
        animation2.setKeyValueAt(0.75, QPoint(50, 400))
        animation2.setKeyValueAt(1, QPoint(50, 50))
        animation2.setDuration(8000)
        # animation2.start()

        animation_group = QParallelAnimationGroup(self)
        animation_group.addAnimation(animation1)
        animation_group.addAnimation(animation2)
        animation_group.start()

        self.btn1.clicked.connect(animation_group.pause)
        self.btn2.clicked.connect(animation_group.resume)


if __name__ == "__main__":
    app = QApplication(sys.argv)
    window = Window()
    window.show()
    sys.exit(app.exec_())