Spring中的事务管理
1、事务
1.1 、事务是什么
事务是应用程序中一系列严密的操作,所有操作必须成功完成,否则在每个操作中所作的所有更改都会被撤消。也就是事务具有原子性,一个事务中的一系列的操作要么全部成功,要么一个都不做。
1.2、事务的四大特性
事务应该具有4个属性:原子性、一致性、隔离性、持久性。这四个属性通常称为ACID特性。
- 原子性(atomicity)。一个事务是一个不可分割的工作单位,事务中包括的操作要么都做,要么都不做。
- 一致性(consistency)。事务必须是使数据库从一个一致性状态变到另一个一致性状态。一致性与原子性是密切相关的。
- 隔离性(isolation)。一个事务的执行不能被其他事务干扰。即一个事务内部的操作及使用的数据对并发的其他事务是隔离的,并发执行的各个事务之间不能互相干扰。
- 持久性(durability)。持久性也称永久性(permanence),指一个事务一旦提交,它对数据库中数据的改变就应该是永久性的。接下来的其他操作或故障不应该对其有任何影响。
1.3、例子
甲乙两个人转钱,正常情况下:甲输入乙的账号,输入金额,然后甲的账户扣除相应的钱,乙的账户扣除相应的钱;
但是就是有特殊情况,甲在输入账号的时候输错了,就会发生一个情况,甲的钱扣掉了,但是乙没有收到钱,肯定就会出现问题;这就是事务相关的问题:
1.4、解决办法:
在进行转账的时候,我们可以进行事务判断,当其中有一方出现异常时,及时的进行回滚(rollback()),在成功后再进行提交(commit())
2、代码举例
这里用mabatis操作进行演示:
首先我们需要一个转账的接口
/**
*@auther Nical
*/
public interface ChangMoney {


    boolean giveMoney(int on,int to,int money);
}
接着我们需要有一个实现类:
/**
*@auther Nical
*/
@Component
public class ChangeMoneyImpl implements ChangMoney {


    @Override
    public boolean giveMoney(int on, int to, int money) {


        SqlSession sqlSession=sqlSessionUtil.openSession();
        UserinfoMapper mapper = sqlSession.getMapper(UserinfoMapper.class);
        //转钱人的信息
        Userinfo userinfo =mapper .selectByPrimaryKey(on);
        int i=0;
        if (userinfo!=null){


            //设置转钱人的余额
            userinfo.setMoney(userinfo.getMoney()-money);
            //受影响的行数
            i = mapper.updateByPrimaryKey(userinfo);
        }

        //被转钱人的信息
        Userinfo userinfo2 =mapper .selectByPrimaryKey(to);
        int j=0;
        if (userinfo2!=null){


            //设置转钱人的余额
            userinfo2.setMoney(userinfo2.getMoney()+money);
            //受影响的行数
            j = mapper.updateByPrimaryKey(userinfo2);
        }
        if (i>0&&j>0){


            return true;
        }else {


            return false;
        }
    }
}
下面是mybatis的配置文件,记得实现下载相关的jar包或者导入maven;
<?xml version="1.0" encoding="UTF-8"?>
<!DOCTYPE configuration
PUBLIC "-//mybatis.org//DTD Config 3.0//EN"
"http://mybatis.org/dtd/mybatis-3-config.dtd">
<configuration>
<typeAliases>
<package name="pojo"/>
</typeAliases>
<!-- 配置mybatis的环境信息 -->
<environments default="development">
<environment id="development">
<!-- 配置JDBC事务控制,由mybatis进行管理 -->
<transactionManager type="JDBC"></transactionManager>
<!-- 配置数据源,采用dbcp连接池 -->
<dataSource type="POOLED">
<property name="driver" value="com.mysql.jdbc.Driver"/>
<property name="url" value="jdbc:mysql://localhost:3306/test?useUnicode=true&characterEncoding=utf8"/>
<property name="username" value="root"/>
<property name="password" value="123456"/>
</dataSource>
</environment>
</environments>
<!-- 加载mapper -->
<mappers>
<package name="mapper"/>
</mappers>
</configuration>
接着我们需要一个能产生Sqlsession的工具类,方便测试类以及事务管理器进行判断提交等操作:
/**
*@auther Nical
*/
public class sqlSessionUtil {


    private static SqlSession sqlSession = null;
    static{


        String resource = "SqlMapConfig.xml";
        InputStream inputStream = null;
        try {


            inputStream = Resources.getResourceAsStream(resource);
        } catch (IOException e) {


            e.printStackTrace();
        }
        //2、根据配置文件创建SqlSessionFactory
        SqlSessionFactory sqlSessionFactory = new SqlSessionFactoryBuilder().build(inputStream);
        //3、SqlSessionFactory创建SqlSession
        sqlSession = sqlSessionFactory.openSession();
    }

    public static SqlSession openSession()  {


       return sqlSession;
    }
}
然后我们就可以写Spring的事务管理器啦
注意导包喔!
/**
*@auther Nical
*/
public class TransactionManager implements MethodInterceptor {


    @Override
    public Object invoke(MethodInvocation method) throws Throwable {


        SqlSession sqlSession = sqlSessionUtil.openSession();
        //调用目标方法
        boolean result = (boolean) method.proceed();
        if(result) {


            sqlSession.commit();
            System.out.println("====提交事务===");
        }else {


            sqlSession.rollback();
            System.out.println("====回滚事务===");
        }
        return result;
    }
}
接着就需要一个产生事务管理器的动态代理啦:
下面是其配置文件:
<?xml version="1.0" encoding="UTF-8"?>
<beans xmlns="http://www.springframework.org/schema/beans"
   xmlns:xsi="http://www.w3.org/2001/XMLSchema-instance"
   xmlns:context="http://www.springframework.org/schema/context"
   xsi:schemaLocation="http://www.springframework.org/schema/beans
    https://www.springframework.org/schema/beans/spring-beans.xsd
    http://www.springframework.org/schema/context
    https://www.springframework.org/schema/context/spring-context.xsd">
<!--  1、启动注解扫描-->
   <context:annotation-config/>
   <context:component-scan base-package="change"/>
   <!-- 1)目标 -->
   <bean id="target" class="change.ChangeMoneyImpl"></bean>
   <!-- 2)事务管理器 -->
   <bean id="transactionManager" class="proxy.TransactionManager"></bean>
   <!--3)代理  -->

 <bean  id="ChangeMoneyImpProxy" class="org.springframework.aop.framework.ProxyFactoryBean">
    <property name="proxyInterfaces"  value="change.ChangMoney"></property>
    <!-- 1)注入目标对象 -->
    <property name="target"  ref="target"/>
    <!-- 2)事务管理器对象  -->
    <property name="interceptorNames">
        <array>
            <value>transactionManager</value>
        </array>
    </property>
</bean>
</beans>
最后我们去测试类中运行测试:
/**
*@auther Nical
*/
@RunWith(SpringJUnit4ClassRunner.class)
@ContextConfiguration({

    "classpath:beans.xml"})
public class Test1 {


    @Autowired
    @Qualifier("ChangeMoneyImpProxy")
    ChangMoney changeMoney;
    @Test
    public void test1(){


        boolean result = changeMoney.giveMoney(1, 2, 300);
        System.out.println(result);
    }
}
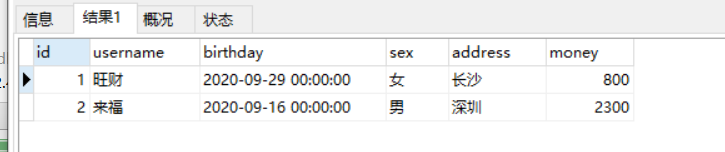
下面是我的表数据:

所以以上代码中进行转账肯定是可以成功的:
运行结果:
====提交事务===
true
同时数据库中的数据:
当我们更改了 giveMoney(1, 2, 300)中的参数,换成giveMoney(1, 3, 300)
运行结果:
====回滚事务===
false
数据库中的数据:
但是以上中的事务处理方法并不是最好的解决办法,下堂课我们来学习注解事务 @TransactionManager (企业常用用法)
https://blog.csdn.net/m0_50217781/article/details/111378661