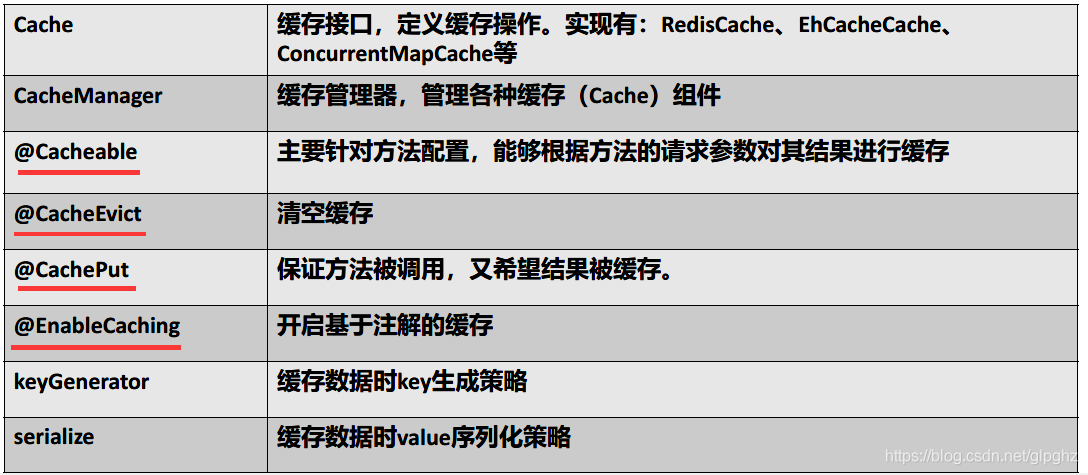
SpringBoot——缓存
源码链接:SpringBoot缓存练习
一、缓存简介
缓存是指可以进⾏⾼速数据交换的存储器,使⽤它可以更快速的操作和访问数据。
应用程序未加入缓存时,用户访问数据时会直接访问数据库:

当加入缓存后,可以有效缓解数据库的压力:

缓存的优点:
- 使⽤缓存可以避免访问数据库,节省数据库服务器的资源;
- 性能更快,缓存属于内存级的服务器,⽽ DB 牵扯到更多的业务逻辑判断和磁盘操作,因此缓存的性能更⾼。
二、SpringBoot中的缓存
1、JSR107 缓存规范
(Java Specification Requests,JSR)Java 规范提案
Java Caching定义了5个核心接口:
- CachingProvider:定义了创建、配置、获取、管理和控制多个CacheManager。一个应用可以在运行期访问多个CachingProvider。
- CacheManager:定义了创建、配置、获取、管理和控制多个唯一命名的Cache,这些Cache存在于CacheManager的上下文中。一个CacheManager仅被一个CachingProvider所拥有。
- Cache:一个类似Map的数据结构并临时存储以Key为索引的值,一个Cache仅被一个CacheManager所拥有。
- Entry:一个存储在Cache中的key-value对。
- Expiry:每一个存储在Cache中的条目有一个定义的有效期,一旦超过这个时间,条目为过期的状态,一旦过期,条目将不可访问、更新和删除。缓存有效期可以通过ExpiryPolicy设置。

2、Spring的缓存抽象
Spring从3.1开始定义了org.springframework.cache.Cache
和org.springframework.cache.CacheManager接口来统一不同的缓存技术;并支持使用JCache(JSR-107)注解简化我们开发。
- Cache接口为缓存的组件规范定义,包含缓存的各种操作集合;
- Cache接口下Spring提供了各种xxxCache的实现;如RedisCache,EhCacheCache,ConcurrentMapCache等;
- 每次调用需要缓存功能的方法时,Spring会检查指定的目标方法是否已经被调用过,如果有就直接从缓存中获取方法调用后的结果;如果没有就调用方法并缓存结果后返回给用户,下次调用直接从缓存中获取。
(1)缓存中的常用注解以及概念:
(2) @Cacheable/@CachePut/@CacheEvict 主要的参数
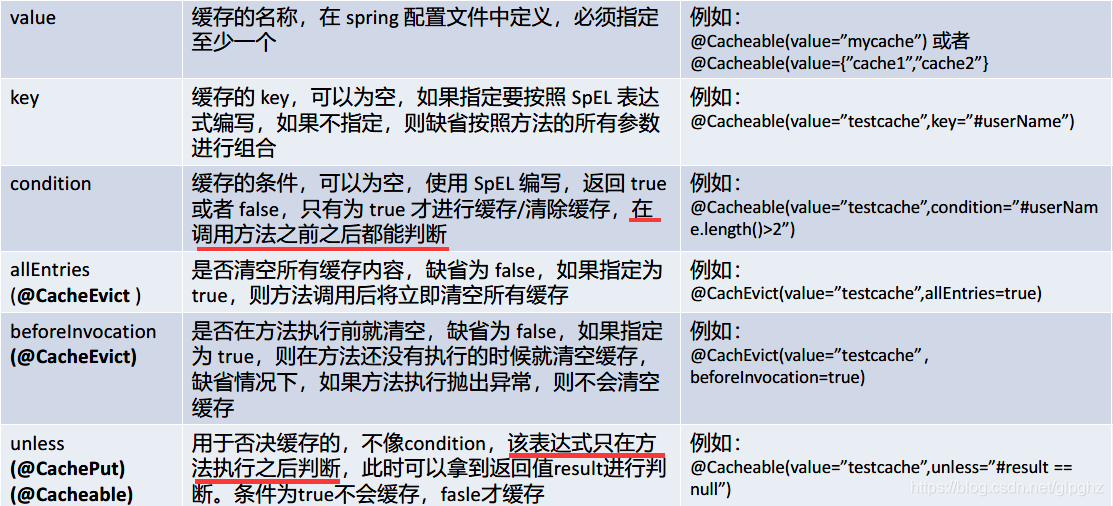
(3) SPEL表达式
- 当前被调用的方法名:
#root.methodName - 当前被调用的方法:
#root.method.name - 当前被调用的目标对象:
#root.target - 当前被调用的目标对象类:
#root.targetClass - 当前被调用的方法的参数列表:
#root.args[0] - 当前方法调用使用的缓存列表(如
@Cacheable(value={"cache1","cache2"})),则有两个cache:#root.caches[0].name - 方法参数的名字. 可以直接#参数名,也可以使用
#p0或#a0的形式,0代表参数的索引:#iban、#a0、#p0 - 方法执行后的返回值(仅当方法执行之后的判断有效,如‘unless’ ,’put’,’evict’,beforeInvocation=false ):
#result
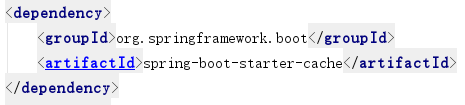
2、SpringBoot缓存使用
引入依赖:
搭建结构:

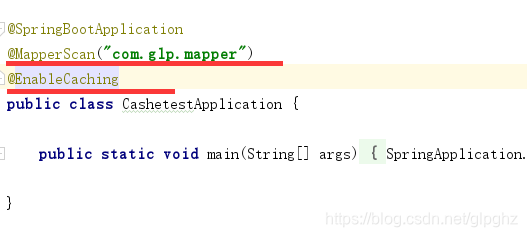
(1)开启缓存
主启动器类上配置@EnableCaching开启缓存。
@MapperScan指定mapper接口的路径。
(2) 缓存的操作方法:添加、修改、删除
@Cacheable:查询
- cacheNames/value:指定缓存组件的名字;
- key:缓存数据使用的key,可以指定。默认即使用方法参数的值
- condition:指定符合条件的情况下才缓存;如condition="#id>0"
@CachePut:更新
修改了数据库的某个数据,同时更新缓存
- value:缓存名
- key:确保更新的key和已经存在缓存中的key(
#id)一致即可做到同时更新数据库数据和缓存中的数据
@CacheEvict:删除
- key:指定要清除的数据(对应上key可实现同时删除数据库和缓存中的数据)
在 Service 层增加三个缓存操作的⽅法:添加缓存、修改缓存、删除缓存,
编写service:
//@CacheConfig(cacheNames="emp") //抽取缓存的公共配置
@Service
public class EmpService {
@Autowired
EmployeeMapper employeeMapper;
@Cacheable(cacheNames = "emp",key="#id")
public Employee getEmp(Integer id){
System.out.println("查询第"+id+"个用户");
return employeeMapper.getEmployee(id);
}
//先调用目标方法,再将结果缓存起来
@CachePut(value = "emp",key = "#result.id")
public Employee updateEmp(Employee employee){
employeeMapper.updateEmp(employee);
return employee;
}
@CacheEvict(value = "emp",key = "#id")
public void deleteEmp(Integer id){
employeeMapper.deleteEmployee(id);
}
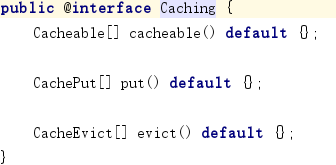
@Caching(
cacheable = {
@Cacheable(value = "emp", key = "#lastName")
},
put = {
@CachePut(value = "emp",key = "#result.id"),
@CachePut(value = "emp",key = "#result.email")
}
)
public Employee getEmpByName(String lastName){
return employeeMapper.getEmpByName(lastName);
}
}
注:
- @Caching:组合组件,可以设置多个缓存策略
- @CacheConfig:缓存配置,可以在类上面指定公共的缓存配置。
编写controller层:
@RestController
public class EmpController {


    @Autowired
    EmpService empService;


    @GetMapping("/emp/{id}")
    public Object getEmp(@PathVariable("id") Integer id){


        return empService.getEmp(id);
    }


    @GetMapping("/emp")
    public Object updateEmp(Employee employee){


        empService.updateEmp(employee);
        return employee;
    }

    @GetMapping("/del/{id}")
    public void deleteEmp(@PathVariable("id") Integer id){


        empService.deleteEmp(id);
    }


    @GetMapping("/emp/name/{lastName}")
    public Object getEmpByName(@PathVariable("lastName") String lastName){


        return empService.getEmpByName(lastName);
    }
}
- @Cacheable缓存查询:访问
http://localhost:8080/emp/1:发现只有第一次调用时后台才打印:“查询第1个用户”,后面不管查询几次其实都是访问的缓存了。 - @CacheEvict缓存清除:访问
http://localhost:8080/del/1时,缓存和数据库中的内容都被删除了,这时再访问http://localhost:8080/emp/1就查询不到数据了。@CacheEvict中有个allEntries属性,当allEntries==true时,调用@CacheEvict方法会将所有的缓存都删除。beforeInvocation属性默认为false,清除缓存默认在方法执行之后执行。
三、SpringBoot——缓存的工作原理
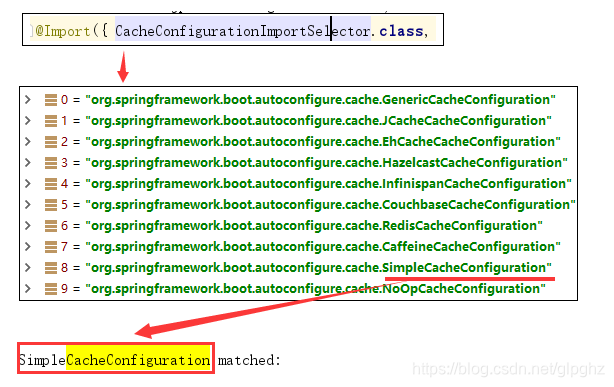
1、缓存自动配置类CacheAutoConfiguration
缓存的自动配置类:CacheAutoConfiguration
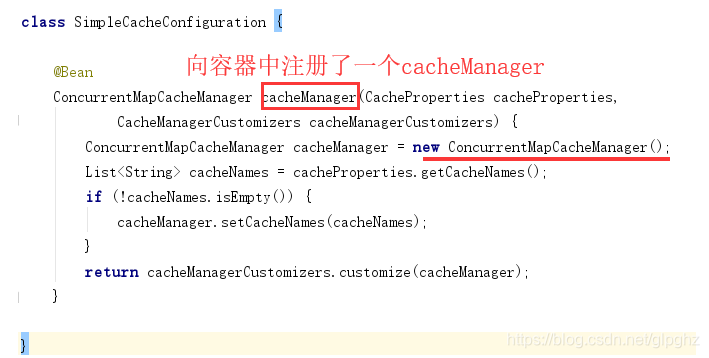
在使用缓存时,加载了很多的配置类,其中只有SimpleCacheConfiguration配置类是生效的。
2、@Cacheable执行流程:
(1)先获取Cache组件名称
第一次执行时,对应的Cache并不存在,所以需要创建一个ConcurrentMapCache。
ConcurrentMapCacheManager:
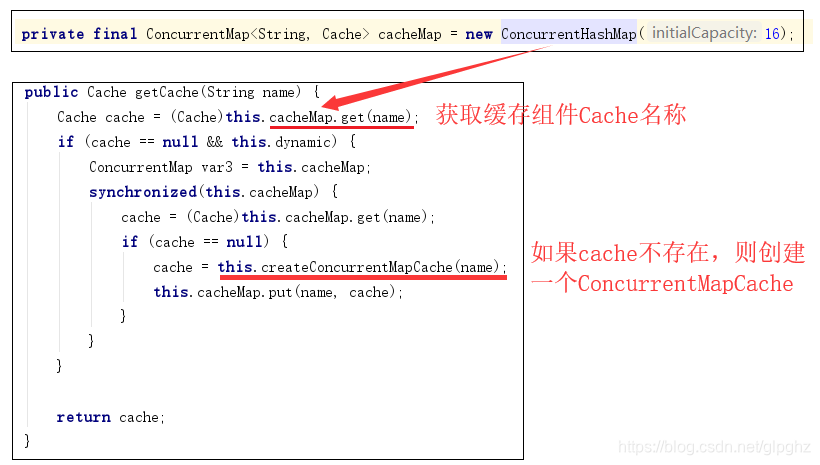
(2)通过key值获得缓存
第一次执行,缓存并存在,所以查不到缓存。
ConcurrentMapCache:
通过key获得值,即ConcurrentMapCache通过操作底层的ConcurrentMap来进行缓存操作。

注:
默认使用SimpleKeyGenerator生成key:
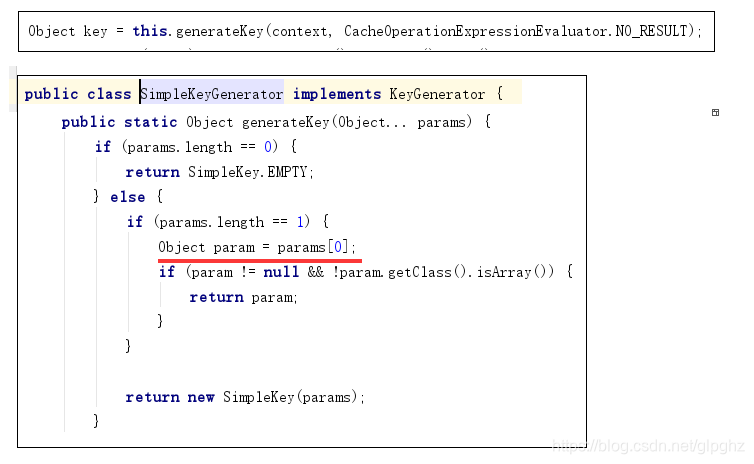
(3)如果没有查到缓存就调用目标方法
(4)将目标方法返回的值放进缓存中
小结:
@Cacheable标注的方法执行之前先来检查缓存中有没有这个数据,默认按照参数的值作为key去查询缓存,如果没有就运行方法并将结果放入缓存。
四、整合Redis缓存中间件
1、安装Redis
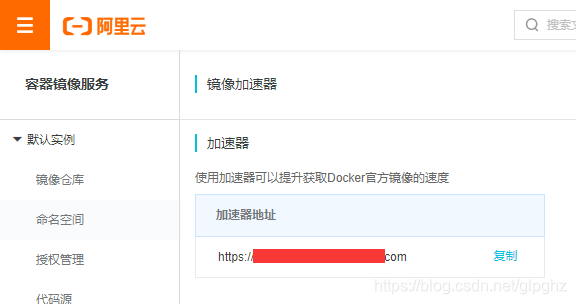
(1)通过Docker镜像加速拉取Redis.
登录https://cr.console.aliyun.com/cn-hangzhou/instances/mirrors,打开容器镜像服务,获取阿里云的镜像加速地址:
获取之后,使用如下命令拉取redis:
docker pull 阿里云专属地址/library/redis

例如:https://ezgxiyys.mirror.aliyuncs.com
docker pull ezaaaets.mirror.aliyuncs.com/library/redis
(2)启动Redis
docker run -d -p 6379:6379 --name myredis
ezgxiyys.mirror.aliyuncs.com/library/redis(镜像名)
2、整合Redis
(1)引入依赖:
  <dependency>
       <groupId>org.springframework.boot</groupId>
      <artifactId>spring-boot-starter-data-redis</artifactId>
 </dependency>
导入依赖后,RedisAutoConfiguration自动配置类就自动生效了。

- RedisAutoConfiguration在 RedisOperations 存在的情况下(项目中引入了 Spring Data Redis)才会生效。
- 提供了两个 Bean ,RedisTemplate 中的两个泛型都是 Object,意味者存储的 key 和 value 都可以是一个对象。平时操作String类型的数据比较多,所以单独抽取出一个两个泛型都是 String的StringRedisTemplate,意味者 StringRedisTemplate 的 key 和 value 都只能是字符串。
(2)基本操作
操作五大基本数据类型:
opsForValue:字符串
opsForList:列表
opsForSet:集合
opsForHash:散列
opsForZSet:有序集合
(3)默认序列化机制
Redis保存对象时,默认使用Jdk的序列化方式进行保存。
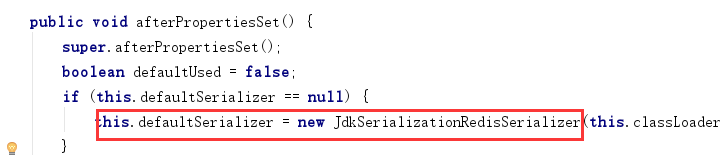
被保存的对象类需要实现Serializable接口,保存的结果如下:

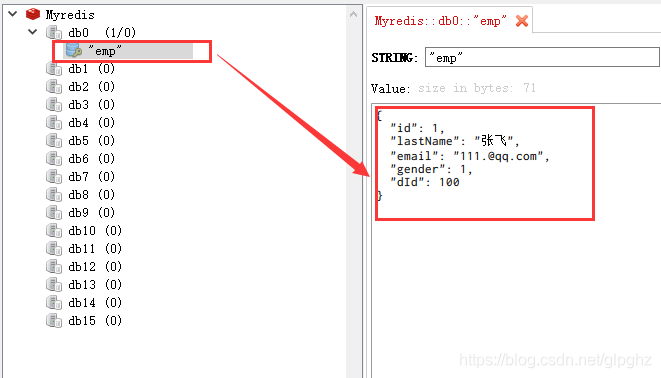
(4)自定义序列化机制
自定义序列化机制:
测试:

(5)自定义CacheManager
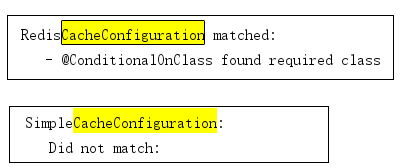
没有引入Redis之前,CacheManager默认使用SimpleCacheConfiguration生成。而引入Redis后,RedisCacheConfiguration就会生效,提前向容器中引入RedisCacheManager,而使得SimpleCacheConfiguration失效。
RedisCacheManager创建RedisCache作为缓存组件,RedisCache通过操作Redis进行数据的缓存。
此时再访问http://localhost:8080/emp/1,就可以通过Redis进行缓存了。
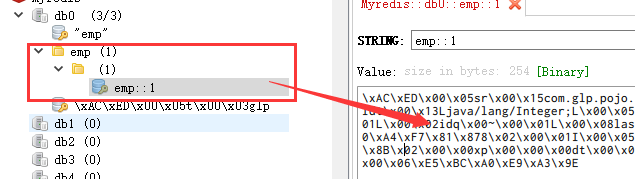
RedisCacheManager默认也是使用jdk的序列化方式:

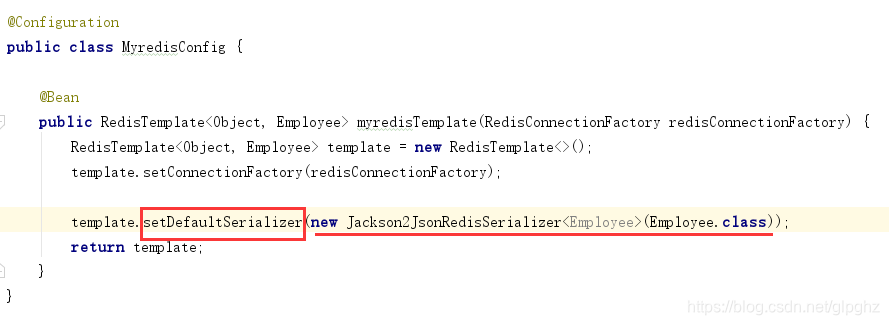
我们可以通过自定义一个RedisCacheManager,来实现缓存的序列化。
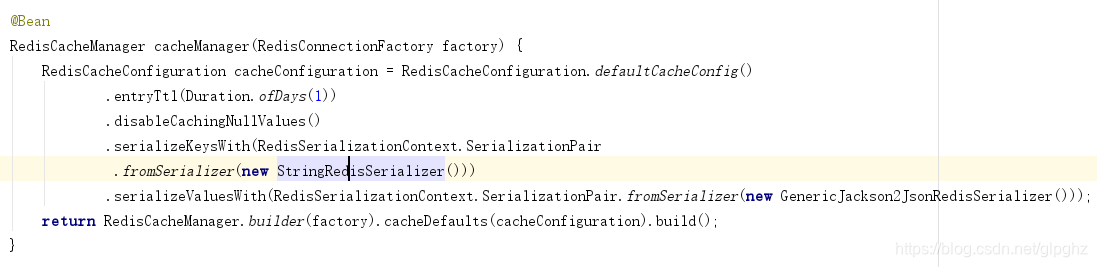
完整代码如下:
@Configuration
public class MyredisConfig {


    @Bean
    public RedisTemplate<Object, Employee> myredisTemplate(RedisConnectionFactory redisConnectionFactory) {


        RedisTemplate<Object, Employee> template = new RedisTemplate<>();
        template.setConnectionFactory(redisConnectionFactory);

        template.setDefaultSerializer(new Jackson2JsonRedisSerializer<Employee>(Employee.class));
        return template;
    }

    @Bean
    RedisCacheManager cacheManager(RedisConnectionFactory factory) {


        RedisCacheConfiguration cacheConfiguration = RedisCacheConfiguration.defaultCacheConfig()
                .entryTtl(Duration.ofDays(1))
                .disableCachingNullValues()
                .serializeKeysWith(RedisSerializationContext.SerializationPair
                 .fromSerializer(new StringRedisSerializer()))
                .serializeValuesWith(RedisSerializationContext.SerializationPair.fromSerializer(new GenericJackson2JsonRedisSerializer()));
        return RedisCacheManager.builder(factory).cacheDefaults(cacheConfiguration).build();
    }
}
注:
- 使用redis作为缓存中间件,第一次查询数据的时候,实体类会被序列化存入缓存中,当第二次查数据时,会直接去缓存中查找被序列化的数据,然后反序列化被我们获取。我们在缓存中看到的序列化数据不直观,如果想看到类似json的数据格式,就需要自定义序列化规则。
- SpringBoot1.xx和2.XX之间的变化比较大,详情参考博客:https://blog.csdn.net/Pique1896/article/details/106953841/