学习目标:
1.使用循环器视图
2.使用案例演示
学习内容:
1.循环器视图.
setAdapter : 设置列表项的适配器。有关适配器的详细说明见下一标题。 setLayoutManager :
设置列表项的布局管理器。目前有三种,分别是:线性布局管理器LinearLayoutManager、网格布局管理器GridLayoutManager、瀑布流网格布局管理器StaggeredGridLayoutManager。有关布局管理器的详细说明见本文的后半部分。
addItemDecoration : 添加列表项的分割线。 removeItemDecoration : 移除列表项的分割线。
setItemAnimator : 设置列表项的增删动画。 addOnItemTouchListener :
添加列表项的触摸监听器。因为RecyclerView没有实现列表项的点击接口,所以开发者可通过这里的触摸监听器来监控用户手势。
removeOnItemTouchListener : 移除列表项的触摸监听器。
2.案例演示
1.创建一个新的项目,添加对recyclerview库的依赖
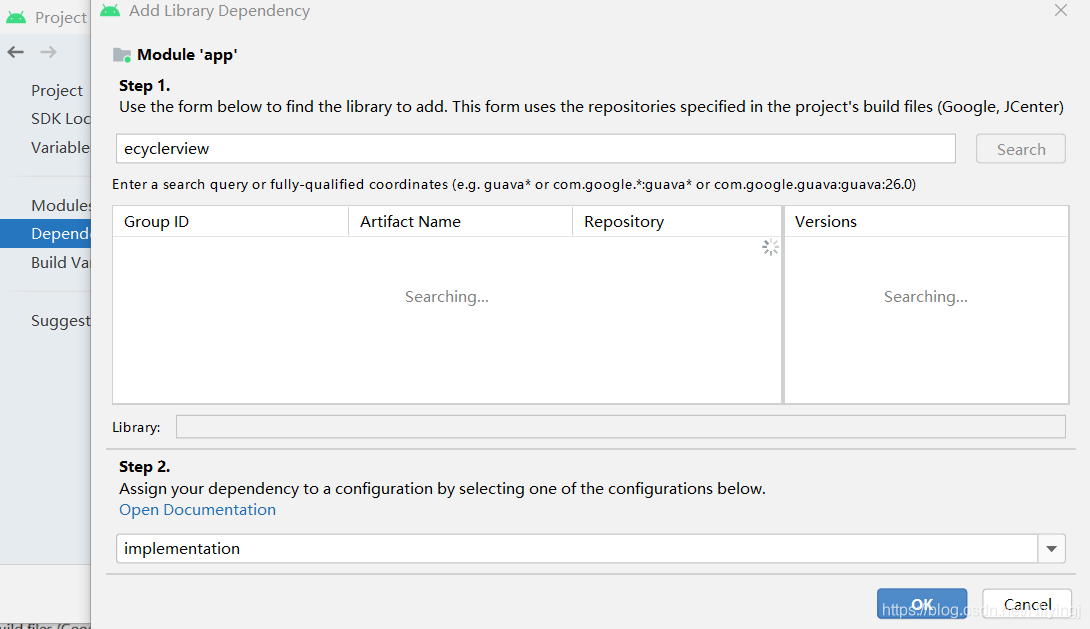
要多等一会,加载较慢。
2.在activity_main.xml文件中写入
<?xml version="1.0" encoding="utf-8"?>
<LinearLayout xmlns:android="http://schemas.android.com/apk/res/android"
    xmlns:tools="http://schemas.android.com/tools"
    android:layout_width="match_parent"
    android:layout_height="match_parent"
    android:background="@drawable/background"
    android:padding="15dp"
    tools:context=".MainActivity">

    <androidx.recyclerview.widget.RecyclerView
        android:id="@+id/rvStudent"
        android:layout_width="match_parent"
        android:layout_height="match_parent"/>
</LinearLayout>
3.在layout中创建新的xml,在主方法使用到,框架
<?xml version="1.0" encoding="utf-8"?>
<LinearLayout xmlns:android="http://schemas.android.com/apk/res/android"
    android:layout_width="match_parent"
    android:layout_height="wrap_content"
    android:gravity="center_vertical"
    android:orientation="horizontal">

    <ImageView
        android:id="@+id/ivStudentIcon"
        android:layout_width="60dp"
        android:layout_height="60dp" />

    <LinearLayout
        android:layout_width="match_parent"
        android:layout_height="wrap_content"
        android:layout_marginTop="10dp"
        android:layout_marginBottom="10dp"
        android:gravity="center_vertical"
        android:orientation="vertical">

        <TextView
            android:id="@+id/tvStudentName"
            android:layout_width="wrap_content"
            android:layout_height="wrap_content"
            android:layout_marginBottom="10dp"
            android:textColor="#0000ff"
            android:textSize="25sp" />

        <TextView
            android:id="@+id/tvStudentPhone"
            android:layout_width="wrap_content"
            android:layout_height="wrap_content"
            android:layout_marginLeft="30dp"
            android:textColor="#555555"
            android:textSize="20sp" />
    </LinearLayout>
</LinearLayout>
3.主方法写入
package com.example.myapplication;;

import android.annotation.SuppressLint;
import android.os.Bundle;
import android.view.LayoutInflater;
import android.view.View;
import android.view.ViewGroup;
import android.widget.ImageView;
import android.widget.TextView;
import android.widget.Toast;

import androidx.annotation.NonNull;
import androidx.appcompat.app.AppCompatActivity;
import androidx.recyclerview.widget.DividerItemDecoration;
import androidx.recyclerview.widget.LinearLayoutManager;
import androidx.recyclerview.widget.OrientationHelper;
import androidx.recyclerview.widget.RecyclerView;

import java.util.ArrayList;
import java.util.List;

public class MainActivity extends AppCompatActivity {


    private RecyclerView rvStudent; // 学生循环器视图(展示)
    private RecyclerView.Adapter adapter; // 循环器适配器(桥梁)
    private List<Student> students; // 学生列表(数据源)

    @SuppressLint("WrongConstant")
    @Override
    protected void onCreate(Bundle savedInstanceState) {


        super.onCreate(savedInstanceState);
        // 利用布局资源文件设置用户界面
        setContentView(R.layout.activity_main);

        // 通过资源标识符获取控件实例
        rvStudent = findViewById(R.id.rvStudent);

        // 获取学生列表作为数据源
        students = getStudents();

        // 创建线性布局管理器
        LinearLayoutManager layoutManager = new LinearLayoutManager(this);
        // 设置线性布局管理器方向属性(默认是VERTICAL)
        layoutManager.setOrientation(OrientationHelper.VERTICAL);
        // 给循环器视图设置布局管理器
        rvStudent.setLayoutManager(layoutManager);

        // 初始化循环器适配器
        adapter = new RecyclerView.Adapter() {


            /**
             * 视图容器
             */
            class ViewHolder extends RecyclerView.ViewHolder {


                private ImageView ivStudentIcon;
                private TextView tvStudentName;
                private TextView tvStudentPhone;

                public ViewHolder(@NonNull View itemView, ImageView ivStudentIcon, TextView tvStudentName, TextView tvStudentPhone) {


                    super(itemView);
                    this.ivStudentIcon = ivStudentIcon;
                    this.tvStudentName = tvStudentName;
                    this.tvStudentPhone = tvStudentPhone;
                }

                public ImageView getIvStudentIcon() {


                    return ivStudentIcon;
                }

                public TextView getTvStudentName() {


                    return tvStudentName;
                }

                public TextView getTvStudentPhone() {


                    return tvStudentPhone;
                }
            }

            @NonNull
            @Override
            public RecyclerView.ViewHolder onCreateViewHolder(@NonNull ViewGroup parent, int viewType) {


                // 获取视图对象(将列表项模板转换成视图)
                View view = LayoutInflater.from(parent.getContext()).inflate(R.layout.student_list_item, parent, false);
                // 获取视图里的控件
                ImageView ivStudentIcon = view.findViewById(R.id.ivStudentIcon);
                TextView tvStudentName = view.findViewById(R.id.tvStudentName);
                TextView tvStudentPhone = view.findViewById(R.id.tvStudentPhone);

                // 创建视图容器
                RecyclerView.ViewHolder viewHolder = new ViewHolder(view, ivStudentIcon, tvStudentName, tvStudentPhone);

                // 返回视图容器
                return viewHolder;
            }

            @Override
            public void onBindViewHolder(@NonNull RecyclerView.ViewHolder holder, int position) {


                // 获取学生数据
                Student student = students.get(position);

                // 获取控件实例
                ImageView ivStudentIcon = ((ViewHolder)holder).getIvStudentIcon();
                TextView tvStudentName = ((ViewHolder)holder).getTvStudentName();
                TextView tvStudentPhone = ((ViewHolder)holder).getTvStudentPhone();

                // 设置控件属性
                ivStudentIcon.setImageResource(student.getStudentIcon());
                tvStudentName.setText(student.getStudentName());
                tvStudentPhone.setText(student.getStudentPhone());

                // 给控件设置监听器
                ivStudentIcon.setOnClickListener(new View.OnClickListener() {


                    @Override
                    public void onClick(View v) {


                        Toast.makeText(MainActivity.this, student.getStudentName()
                                + " : " + student.getStudentPhone(), Toast.LENGTH_SHORT).show();
                    }
                });
                tvStudentName.setOnClickListener(new View.OnClickListener() {


                    @Override
                    public void onClick(View v) {


                        Toast.makeText(MainActivity.this, student.getStudentName()
                                + " : " + student.getStudentPhone(), Toast.LENGTH_SHORT).show();
                    }
                });
                tvStudentPhone.setOnClickListener(new View.OnClickListener() {


                    @Override
                    public void onClick(View v) {


                        Toast.makeText(MainActivity.this, student.getStudentName()
                                + " : " + student.getStudentPhone(), Toast.LENGTH_SHORT).show();
                    }
                });
            }

            @Override
            public int getItemCount() {


                return students.size();
            }
        };

        // 给循环器视图设置适配器
        rvStudent.setAdapter(adapter);

        // 给循环器视图添加列表项分隔线
        rvStudent.addItemDecoration(new DividerItemDecoration(this, DividerItemDecoration.VERTICAL));
    }

    /**
     * @return 学生列表
     */
    private List<Student> getStudents() {


        // 创建学生列表
        List<Student> students = new ArrayList<>();
        // 声明学生
        Student student = null;

        // 创建第1个学生
        student = new Student();
        student.setStudentIcon(R.drawable.img1);
        student.setStudentName("李晓红");
        student.setStudentPhone("15878782345");
        // 将学生添加到学生列表
        students.add(student);

        // 创建第2个学生
        student = new Student();
        student.setStudentIcon(R.drawable.img2);
        student.setStudentName("王晓玲");
        student.setStudentPhone("15956567890");
        // 将学生添加到学生列表
        students.add(student);

        // 创建第3个学生
        student = new Student();
        student.setStudentIcon(R.drawable.img3);
        student.setStudentName("董大伟");
        student.setStudentPhone("13567891230");
        // 将学生添加到学生列表
        students.add(student);

        // 创建第4个学生
        student = new Student();
        student.setStudentIcon(R.drawable.img4);
        student.setStudentName("尚洪文");
        student.setStudentPhone("18856789032");
        // 将学生添加到学生列表
        students.add(student);

        // 创建第5个学生
        student = new Student();
        student.setStudentIcon(R.drawable.img5);
        student.setStudentName("唐语涵");
        student.setStudentPhone("15967893450");
        // 将学生添加到学生列表
        students.add(student);

        // 创建第6个学生
        student = new Student();
        student.setStudentIcon(R.drawable.img6);
        student.setStudentName("郑智化");
        student.setStudentPhone("15867678904");
        // 将学生添加到学生列表
        students.add(student);

        // 创建第7个学生
        student = new Student();
        student.setStudentIcon(R.drawable.img7);
        student.setStudentName("童安格");
        student.setStudentPhone("13845674560");
        // 将学生添加到学生列表
        students.add(student);

        // 返回学生列表
        return students;
    }
}
4.创建一个新的类
package com.example.myapplication;


public class Student {


    private int studentIcon;
    private String studentName;
    private String studentPhone;

    public int getStudentIcon() {


        return studentIcon;
    }

    public void setStudentIcon(int studentIcon) {


        this.studentIcon = studentIcon;
    }

    public String getStudentName() {


        return studentName;
    }

    public void setStudentName(String studentName) {


        this.studentName = studentName;
    }

    public String getStudentPhone() {


        return studentPhone;
    }

    public void setStudentPhone(String studentPhone) {


        this.studentPhone = studentPhone;
    }

    @Override
    public String toString() {


        return "Student{" +
                "studentIcon=" + studentIcon +
                ", studentName='" + studentName + '\'' +
                ", studentPhone='" + studentPhone + '\'' +
                '}';
    }
}
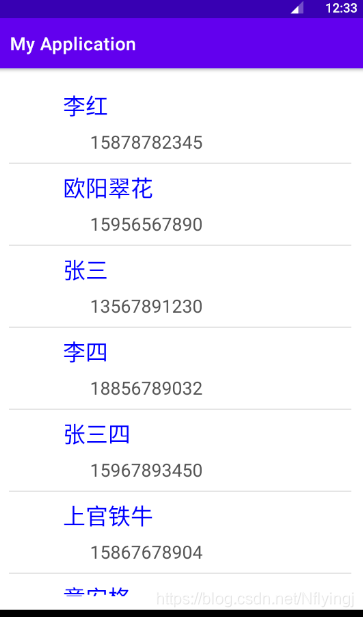
运行结果
明天去了解网络接口,实现android stuidio 连接网络接口,使用post,get方法请求。