前言
上一篇回顾:OpenGL学习(七)通过assimp库读取多种格式的模型
在上一篇博客中,我们实现了最简单的网格对象 Mesh,并且从 assimp 库接收我们需要的信息,同时进行绘制。这意味着我们逐渐步入现代。
今天我们要利用 phong 光照模型,实现对物体的光照效果的模拟,让场景更加真实。
注:
本篇博客代码基于上一篇博客:OpenGL学习(七)通过assimp库读取多种格式的模型
Model 类的小小改动
在开始之前,我们要对我们昨天(上一篇博客)新鲜封装的 model 类进行一些改动。在昨天,我们直接传递了一个模型变换矩阵 model 到着色器,因为我们只绘制一个物体,足够了。
希望你不会发现上一篇博客我偷懒了,这本来就应该是在 Model 类定义的时候应该完成的。。。
如果要绘制多个不同的物体,那么问题来了。不同的物体我们需要传递不同的模型变换矩阵,于是我们把这一步骤放到了 Model 类的 draw 函数中。
我们添加三个成员,表示一个模型对象的平移,旋转,缩放:
class Model
{


public:
	// ...
    glm::vec3 translate=glm::vec3(0,0,0), rotate = glm::vec3(0, 0, 0), scale = glm::vec3(1, 1, 1);
    // ...
紧接着我们在 draw 函数中,绘制之前,传递本模型的模型变换矩阵即可:
// 传模型矩阵
glm::mat4 unit(    // 单位矩阵
    glm::vec4(1, 0, 0, 0),
    glm::vec4(0, 1, 0, 0),
    glm::vec4(0, 0, 1, 0),
    glm::vec4(0, 0, 0, 1)
);
glm::mat4 scale = glm::scale(unit, this->scale);
glm::mat4 translate = glm::translate(unit, this->translate);

glm::mat4 rotate = unit;    // 旋转
rotate = glm::rotate(rotate, glm::radians(this->rotate.x), glm::vec3(1, 0, 0));
rotate = glm::rotate(rotate, glm::radians(this->rotate.y), glm::vec3(0, 1, 0));
rotate = glm::rotate(rotate, glm::radians(this->rotate.z), glm::vec3(0, 0, 1));

// 模型变换矩阵
glm::mat4 model = translate * rotate * scale;
GLuint mlocation = glGetUniformLocation(program, "model");    // 名为model的uniform变量的位置索引
glUniformMatrix4fv(mlocation, 1, GL_FALSE, glm::value_ptr(model));   // 列优先矩阵
遇到任何问题?回顾之前的博客:OpenGL学习(三)三维绘制与模型变换矩阵
对于多个模型,我们创建一个全局 vector 变量,名叫 models,她存储不同的 Model 对象。
std::vector<Model> models;
我们在初始化的时候,就应该指定模型的平移旋转缩放参数,同时将 Model 对象加入 models :
Model tree1 = Model();
tree1.translate = glm::vec3(0.25, 0, -1);
tree1.scale = glm::vec3(0.00025, 0.00025, 0.00025);
tree1.load("models/tree/tree02.obj");
models.push_back(tree1);
在 display 中,我们直接绘制所有的 Model 对象即可:
for (auto m : models)
{


    m.draw(program);
}
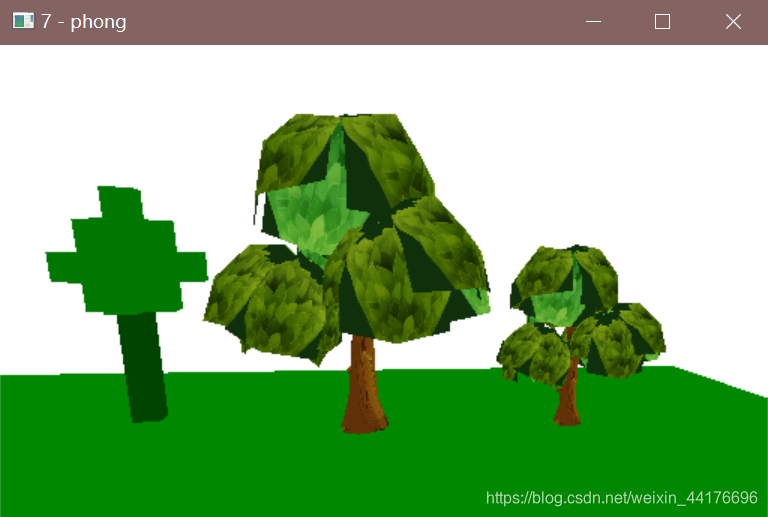
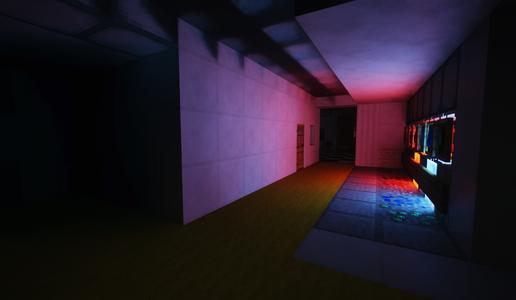
我们现在可以自由的绘制多个模型:
phong 光照模型
在现实世界中,光线从各种光源出发,经过无数次反弹,最终进入眼镜。这种现象对于计算机来说几乎不可解,因为复杂度高的一。
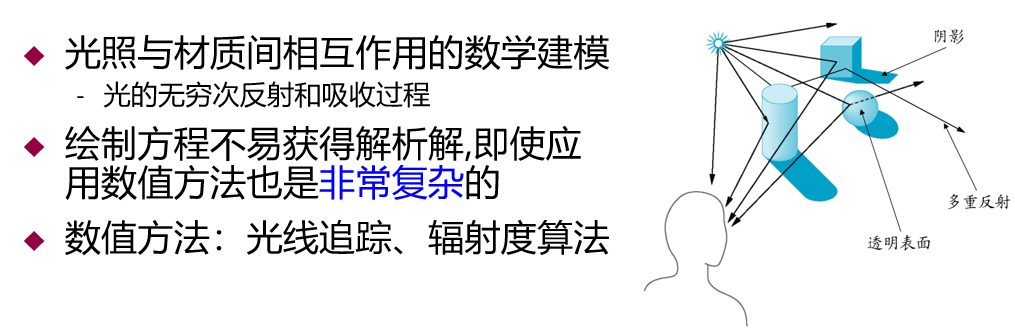
时下流行的方法是从摄像机方向,逐像素,向场景中投射(一条或者多条)光线,光线沿途不断反弹,每次反弹都搜集信息(比如碰撞点的颜色),直到满足某些条件就终止。常用的方法有蒙卡洛特路径追踪,辐射度方法等。这些方法统称为光线追踪,简称光追。
光线追踪最大的难点就是求交,即当前光线何时碰撞到实体?碰撞的实体颜色是什么?此外,光追需要大量的迭代才能够拟合,这意味着我们要向一个像素发送若干条光线(128,256,甚至更多)才能够达到不错的效果,计算量也是一大难点!
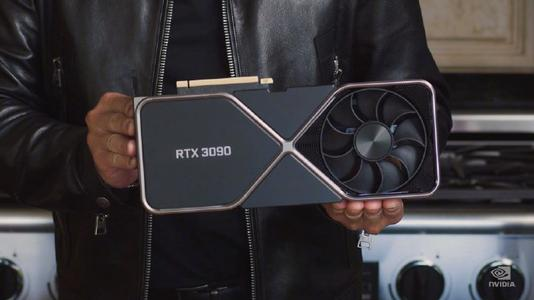
至于求交等大量计算的工作,图形界的大佬们提出了体积树(BVH)的方式来进行空间划分求交,而老黄等一众显卡开发商则将这些操作 “焊死” 在显卡的集成电路和驱动程序中,就如同 OpenGL 的裁剪,光栅化等操作。于是乎,RTX 系显卡就会有一些单元叫做 “光追单元”,这个和经典显卡的几何单元,光栅化单元异曲同工。。。
我们可以注意到了,这些新式的东西,并不在 OpenGL 流水线的范畴内。这意味着我们只有使用其他的图形 API(比如 Vulkan)才能有机会使用这些新东东。唔,OpenGL 毕竟是上个时代的了(雾)

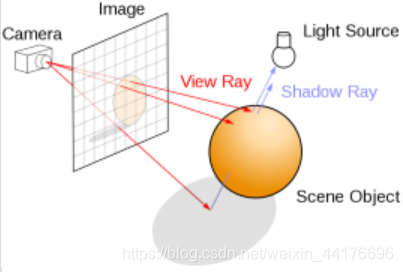
如果你读过我之前写的这篇博客:从零开始编写minecraft光影包(9)高级水面绘制 反射与屏幕空间反射,你可能会说了,我们不是已经实现了光线追踪嘛?
其实这种叫做屏幕空间光线追踪,它的信息都来自于我们的屏幕空间,换句话说,我们只能记录那些我们看到的东西,这也是传统的 OpenGL 流水线约束造成的。对于屏幕空间外的信息我们一无所知!
那么传统的 OpenGL 流水线有没有光追呢?有!Minecraft 光影 SEUS 的作者 SE 大佬就实现了。至于天才 SE 的 PTGI 是怎么记录屏幕空间外的信息,唔。。。我不清楚,估计是用了 shadow 阴影帧缓冲的颜色附件?毕竟这是唯一我能够想到的获取屏幕空间外信息的方式
回想我们玩游戏的时候,屏幕空间外的物品,仍然会将阴影投影到我们的屏幕上。这样一解释就合理了。
啊啊啊啊扯远了扯远了,我爬我爬 dbq Orz 咚咚咚
phong 光照简介
因为经典的全局光照模型太过复杂,而且对于 OpenGL 流水线来说非常难实现,于是早些年的图形程序员提出了一个简单的模型,叫做 phong 光照模型,该模型能够以极低的代价模拟真实的光照场景,在计算机游戏实时渲染领域是性价比极高的模型。直到现在,很多计算机游戏仍然是沿用这一套模型。
phong 光照模型将物体的光线分为三大类,分别是:
- 环境光 ambient
- 漫反射光 diffuse
- 镜面高光 specular
其中环境光 ambient 是一个固定的数值,漫反射光 diffuse 和光源的角度,物体的法向量有关,而镜面高光则和 specular 视线方向,光源角度有关。
最后的光照总和可以用如下的公式简单的描述:
l i g h t = a m b i e n t + d i f f u s e + s p e c u l a r light = ambient + diffuse + specular light=ambient+diffuse+specular
环境光
其中环境光 ambient 是一个固定的数值,物体的每一个像素众生平等。环境光是为了模拟那些经过 n 次反射的光,就如同你半夜起来上厕所,周围不是全黑的,通常是有一丝亮度的,这就是环境光。
环境光的计算十分简单:
a m b i e n t = K a ambient = Ka ambient=Ka
其中 Ka 是环境光的系数,由物体的材质决定。
漫反射
而漫反射光则需要考虑光源和物体的位置关系了。根据物理定律,光线直射物体的时候,反射的光最多,而光线平视物体的时候,我们几乎无法接收到反射光。
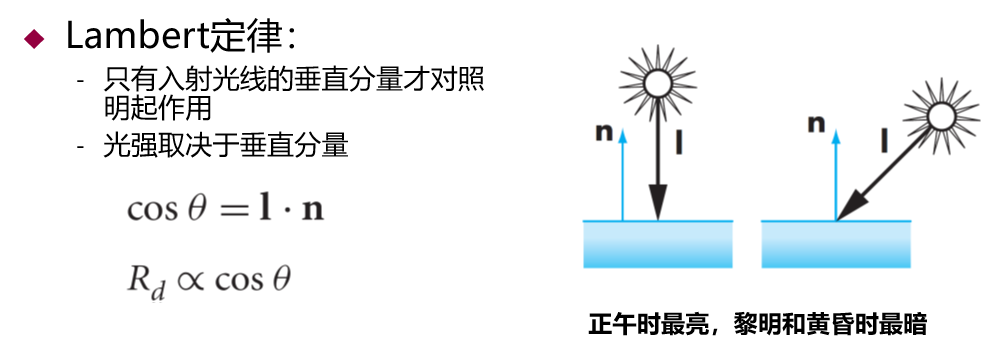
假设光线方向为 L,L’ 为光线的反方向,法线方向为 N,我们可以得出,当光线垂直摄入时,即 N 和 L 成 180 度,即 N 和 L’ 成 0 度时,最亮!
于是有:
d i f f u s e = c o s ( t h e t a ) ∗ K d = d o t ( − L , N ) ∗ K d diffuse = cos(theta) * Kd = dot(-L, N) * Kd diffuse=cos(theta)∗Kd=dot(−L,N)∗Kd
其中 -L 是 L’ 即入射光的反方向,而 Kd 则是材质的漫反射系数。
高光
高光的原理是反射光线之后,大部分光线都会位于反射光线附近,这部分会高亮过其他地方:
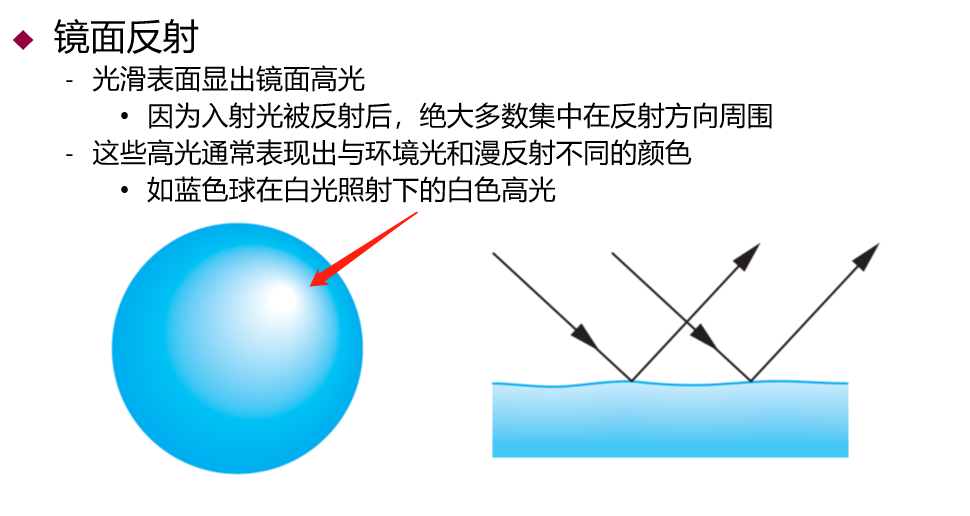
如何判断高光什么时候入眼呢?我们视线方向,和反射光线的方向越近(θ 越小),就能够看到越多的高光!
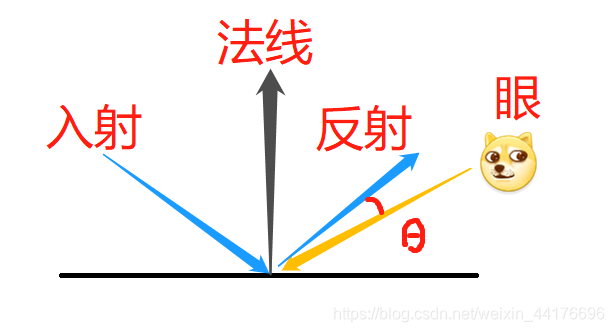
注:
这里取的是反射光线的反方向!
我们令反射光线为 R,视线方向为 V,于是有高光公式:
s p e c u l a r = c o s ( t h e t a ) ∗ K s = d o t ( − R , V ) ∗ K s specular = cos(theta) * Ks = dot(-R, V) * Ks specular=cos(theta)∗Ks=dot(−R,V)∗Ks
其中我们给 cos(θ) 做一个指数,即 cos 的 a 次方,其中 a 是高光衰减系数。所以最终有:
k s cos α ϕ \boldsymbol{k}_{s}\cos ^{\alpha} \boldsymbol{\phi} kscosαϕ
在着色器中实现 phong 光照
我们直接套公式即可:首先在顶点着色器,我们获取法线和坐标并且 pass 到片段着色器。注意法线直接乘以模型矩阵,是不完全正确的。在等轴缩放的时候,我们可以这么用!
顶点着色器:
#version 330 core

// 顶点着色器输入
layout (location = 0) in vec3 vPosition;
layout (location = 1) in vec2 vTexcoord;
layout (location = 2) in vec3 vNormal;

out vec3 worldPos;
out vec2 texcoord;
out vec3 normal;

uniform mat4 model;         // 模型变换矩阵
uniform mat4 view;          // 模型变换矩阵
uniform mat4 projection;    // 模型变换矩阵

void main()
{


    gl_Position = projection * view * model * vec4(vPosition, 1.0);

    // 传递到片段着色器
    texcoord = vTexcoord;
    worldPos = (model * vec4(vPosition, 1.0)).xyz;
    normal = (model * vec4(vNormal, 0.0)).xyz;
}
在片段着色器中,我们编写一个函数,计算光照系数,其中第参数是:像素的世界坐标,摄像机位置,光源位置,像素的法线在世界空间下的方向。然后我们代公式即可。
片段着色器:
#version 330 core

in vec3 worldPos;   // 当前片元的世界坐标
in vec2 texcoord;   // 纹理坐标
in vec3 normal;     // 法向量

out vec4 fColor;    // 片元输出像素的颜色

uniform sampler2D texture;  // 纹理图片

uniform vec3 lightPos;  // 光源位置
uniform vec3 cameraPos; // 相机位置

float phong(vec3 worldPos, vec3 cameraPos, vec3 lightPos, vec3 normal)
{


    vec3 N = normalize(normal);
    vec3 V = normalize(worldPos - cameraPos);
    vec3 L = normalize(worldPos - lightPos);
    vec3 R = reflect(L, N);

    float ambient = 0.3;
    float diffuse = max(dot(N, -L), 0) * 0.7;
    float specular = pow(max(dot(-R, V), 0), 50.0) * 1.1;

    return ambient + diffuse + specular;
}

void main()
{


    fColor.rgb =  texture2D(texture, texcoord).rgb;
    fColor.rgb *= phong(worldPos, cameraPos, lightPos, normal);
}
别忘了在 c++ 代码中,我们操控光源。我们传送光源位置和相机位置进着色器:
// 传递光源位置
glUniform3fv(glGetUniformLocation(program, "lightPos"), 1, glm::value_ptr(lightPos));

// 传递相机位置
glUniform3fv(glGetUniformLocation(program, "cameraPos"), 1, glm::value_ptr(cameraPosition));
同时我们记得增加控制光源移动的接口:

最后我们用一个模型,将他始终绑定在光源的位置,以表示我们光源的位置。唔。。。就选最后一个模型罢:
models.back().translate = lightPos;
重新加载程序:

好耶!
完整代码
c++
// std c++
#include <iostream>
#include <string>
#include <fstream>
#include <vector>
#include <map>
#include <sstream>
#include <iostream>

// glew glut
#include <GL/glew.h>
#include <GL/freeglut.h>

// glm
#include <glm/glm.hpp>
#include <glm/gtc/matrix_transform.hpp>
#include <glm/gtc/type_ptr.hpp>

// SOIL
#include <SOIL2/SOIL2.h>

// assimp
#include <assimp/Importer.hpp>
#include <assimp/scene.h>
#include <assimp/postprocess.h>

// --------------------- end of include --------------------- //

class Mesh
{


public:
    // OpenGL 对象
    GLuint vao, vbo, ebo;
    GLuint diffuseTexture;  // 漫反射纹理

    // 顶点属性
    std::vector<glm::vec3> vertexPosition;
    std::vector<glm::vec2> vertexTexcoord;
    std::vector<glm::vec3> vertexNormal;

    // glDrawElements 函数的绘制索引
    std::vector<int> index;

    Mesh() {

    }
    void bindData()
    {


        // 创建顶点数组对象
        glGenVertexArrays(1, &vao); // 分配1个顶点数组对象
        glBindVertexArray(vao);  	// 绑定顶点数组对象

        // 创建并初始化顶点缓存对象 这里填NULL 先不传数据
        glGenBuffers(1, &vbo);
        glBindBuffer(GL_ARRAY_BUFFER, vbo);
        glBufferData(GL_ARRAY_BUFFER,
            vertexPosition.size() * sizeof(glm::vec3) +
            vertexTexcoord.size() * sizeof(glm::vec2) +
            vertexNormal.size() * sizeof(glm::vec3),
            NULL, GL_STATIC_DRAW);

        // 传位置
        GLuint offset_position = 0;
        GLuint size_position = vertexPosition.size() * sizeof(glm::vec3);
        glBufferSubData(GL_ARRAY_BUFFER, offset_position, size_position, vertexPosition.data());
        glEnableVertexAttribArray(0);   // 着色器中 (layout = 0) 表示顶点位置
        glVertexAttribPointer(0, 3, GL_FLOAT, GL_FALSE, 0, (GLvoid*)(offset_position));
        // 传纹理坐标
        GLuint offset_texcoord = size_position;
        GLuint size_texcoord = vertexTexcoord.size() * sizeof(glm::vec2);
        glBufferSubData(GL_ARRAY_BUFFER, offset_texcoord, size_texcoord, vertexTexcoord.data());
        glEnableVertexAttribArray(1);   // 着色器中 (layout = 1) 表示纹理坐标
        glVertexAttribPointer(1, 2, GL_FLOAT, GL_FALSE, 0, (GLvoid*)(offset_texcoord));
        // 传法线
        GLuint offset_normal = size_position + size_texcoord;
        GLuint size_normal = vertexNormal.size() * sizeof(glm::vec3);
        glBufferSubData(GL_ARRAY_BUFFER, offset_normal, size_normal, vertexNormal.data());
        glEnableVertexAttribArray(2);   // 着色器中 (layout = 2) 表示法线
        glVertexAttribPointer(2, 3, GL_FLOAT, GL_FALSE, 0, (GLvoid*)(offset_normal));

        // 传索引到 ebo
        glGenBuffers(1, &ebo);
        glBindBuffer(GL_ELEMENT_ARRAY_BUFFER, ebo);
        glBufferData(GL_ELEMENT_ARRAY_BUFFER, index.size() * sizeof(GLuint), index.data(), GL_STATIC_DRAW);

        glBindVertexArray(0);
    }
    void draw(GLuint program)
    {


        glBindVertexArray(vao);

        // 传纹理
        glActiveTexture(GL_TEXTURE0);
        glBindTexture(GL_TEXTURE_2D, diffuseTexture);
        glUniform1i(glGetUniformLocation(program, "texture"), 0);

        // 绘制
        glDrawElements(GL_TRIANGLES, this->index.size(), GL_UNSIGNED_INT, 0);
        glBindVertexArray(0);
    }
};

class Model
{


public:
    std::vector<Mesh> meshes;
    std::map<std::string, GLuint> textureMap;
    glm::vec3 translate=glm::vec3(0,0,0), rotate = glm::vec3(0, 0, 0), scale = glm::vec3(1, 1, 1);
    Model() {

    }
    void load(std::string filepath)
    {


        Assimp::Importer import;
        const aiScene* scene = import.ReadFile(filepath, aiProcess_Triangulate);
        // 异常处理
        if (!scene || scene->mFlags == AI_SCENE_FLAGS_INCOMPLETE || !scene->mRootNode)
        {


            std::cout << "读取模型出现错误: " << import.GetErrorString() << std::endl;
            exit(-1);
        }
        // 模型文件相对路径
        std::string rootPath = filepath.substr(0, filepath.find_last_of('/'));

        // 循环生成 mesh
        for (int i = 0; i < scene->mNumMeshes; i++)
        {


            // 引用当前mesh
            meshes.push_back(Mesh());
            Mesh& mesh = meshes.back();

            // 获取 assimp 的读取到的 aimesh 对象
            aiMesh* aimesh = scene->mMeshes[i];

            // 我们将数据传递给我们自定义的mesh
            for (int j = 0; j < aimesh->mNumVertices; j++)
            {


                // 顶点
                glm::vec3 vvv;
                vvv.x = aimesh->mVertices[j].x;
                vvv.y = aimesh->mVertices[j].y;
                vvv.z = aimesh->mVertices[j].z;
                mesh.vertexPosition.push_back(vvv);

                // 法线
                vvv.x = aimesh->mNormals[j].x;
                vvv.y = aimesh->mNormals[j].y;
                vvv.z = aimesh->mNormals[j].z;
                mesh.vertexNormal.push_back(vvv);

                // 纹理坐标: 如果存在则加入。assimp 默认可以有多个纹理坐标 我们取第一个(0)即可
                glm::vec2 vv(0, 0);
                if (aimesh->mTextureCoords[0])
                {


                    vv.x = aimesh->mTextureCoords[0][j].x;
                    vv.y = aimesh->mTextureCoords[0][j].y;
                }
                mesh.vertexTexcoord.push_back(vv);
            }

            // 如果有材质,那么传递材质
            if (aimesh->mMaterialIndex >= 0)
            {


                // 获取当前 aimesh 的材质对象
                aiMaterial* material = scene->mMaterials[aimesh->mMaterialIndex];

                // 获取 diffuse 贴图文件路径名称 我们只取1张贴图 故填 0 即可
                aiString aistr;
                material->GetTexture(aiTextureType_DIFFUSE, 0, &aistr);
                std::string texpath = aistr.C_Str();
                texpath = rootPath + '/' + texpath;   // 取相对路径

                // 如果没生成过纹理,那么生成它
                if (textureMap.find(texpath) == textureMap.end())
                {


                    // 生成纹理
                    GLuint tex;
                    glGenTextures(1, &tex);
                    glBindTexture(GL_TEXTURE_2D, tex);
                    glTexParameteri(GL_TEXTURE_2D, GL_TEXTURE_MIN_FILTER, GL_LINEAR);
                    glTexParameteri(GL_TEXTURE_2D, GL_TEXTURE_MAG_FILTER, GL_LINEAR);
                    glTexParameteri(GL_TEXTURE_2D, GL_TEXTURE_WRAP_S, GL_MIRRORED_REPEAT);
                    glTexParameteri(GL_TEXTURE_2D, GL_TEXTURE_WRAP_T, GL_MIRRORED_REPEAT);
                    int textureWidth, textureHeight;
                    unsigned char* image = SOIL_load_image(texpath.c_str(), &textureWidth, &textureHeight, 0, SOIL_LOAD_RGB);
                    glTexImage2D(GL_TEXTURE_2D, 0, GL_RGB, textureWidth, textureHeight, 0, GL_RGB, GL_UNSIGNED_BYTE, image);   // 生成纹理
                    delete[] image;

                    textureMap[texpath] = tex;
                }

                // 传递纹理
                mesh.diffuseTexture = textureMap[texpath];
            }

            // 传递面片索引
            for (GLuint j = 0; j < aimesh->mNumFaces; j++)
            {


                aiFace face = aimesh->mFaces[j];
                for (GLuint k = 0; k < face.mNumIndices; k++)
                {


                    mesh.index.push_back(face.mIndices[k]);
                }
            }

            mesh.bindData();
        }
    }
    void draw(GLuint program)
    {


        // 传模型矩阵
        glm::mat4 unit(    // 单位矩阵
            glm::vec4(1, 0, 0, 0),
            glm::vec4(0, 1, 0, 0),
            glm::vec4(0, 0, 1, 0),
            glm::vec4(0, 0, 0, 1)
        );
        glm::mat4 scale = glm::scale(unit, this->scale);
        glm::mat4 translate = glm::translate(unit, this->translate);

        glm::mat4 rotate = unit;    // 旋转
        rotate = glm::rotate(rotate, glm::radians(this->rotate.x), glm::vec3(1, 0, 0));
        rotate = glm::rotate(rotate, glm::radians(this->rotate.y), glm::vec3(0, 1, 0));
        rotate = glm::rotate(rotate, glm::radians(this->rotate.z), glm::vec3(0, 0, 1));

        // 模型变换矩阵
        glm::mat4 model = translate * rotate * scale;
        GLuint mlocation = glGetUniformLocation(program, "model");    // 名为model的uniform变量的位置索引
        glUniformMatrix4fv(mlocation, 1, GL_FALSE, glm::value_ptr(model));   // 列优先矩阵

        for (int i = 0; i < meshes.size(); i++)
        {


            meshes[i].draw(program);
        }
    }
};

// ---------------------------- end of class definition ---------------------------- //

std::vector<Model> models;

GLuint program; // 着色器程序对象

// 相机参数
glm::vec3 cameraPosition(0, 0, 0);      // 相机位置
glm::vec3 cameraDirection(0, 0, -1);    // 相机视线方向
glm::vec3 cameraUp(0, 1, 0);            // 世界空间下竖直向上向量
float pitch = 0.0f;
float roll = 0.0f;
float yaw = 0.0f;

// 光源
glm::vec3 lightPos = glm::vec3(0, 0.5, 0);

// 视界体参数
float left = -1, right = 1, bottom = -1, top = 1, zNear = 0.01, zFar = 100.0;

int windowWidth = 512;  // 窗口宽
int windowHeight = 512; // 窗口高

bool keyboardState[1024];   // 键盘状态数组 keyboardState[x]==true 表示按下x键

// --------------- end of global variable definition --------------- //

// 读取文件并且返回一个长字符串表示文件内容
std::string readShaderFile(std::string filepath)
{


    std::string res, line;
    std::ifstream fin(filepath);
    if (!fin.is_open())
    {


        std::cout << "文件 " << filepath << " 打开失败" << std::endl;
        exit(-1);
    }
    while (std::getline(fin, line))
    {


        res += line + '\n';
    }
    fin.close();
    return res;
}

// 获取着色器对象
GLuint getShaderProgram(std::string fshader, std::string vshader)
{


    // 读取shader源文件
    std::string vSource = readShaderFile(vshader);
    std::string fSource = readShaderFile(fshader);
    const char* vpointer = vSource.c_str();
    const char* fpointer = fSource.c_str();

    // 容错
    GLint success;
    GLchar infoLog[512];

    // 创建并编译顶点着色器
    GLuint vertexShader = glCreateShader(GL_VERTEX_SHADER);
    glShaderSource(vertexShader, 1, (const GLchar**)(&vpointer), NULL);
    glCompileShader(vertexShader);
    glGetShaderiv(vertexShader, GL_COMPILE_STATUS, &success);   // 错误检测
    if (!success)
    {


        glGetShaderInfoLog(vertexShader, 512, NULL, infoLog);
        std::cout << "顶点着色器编译错误\n" << infoLog << std::endl;
        exit(-1);
    }

    // 创建并且编译片段着色器
    GLuint fragmentShader = glCreateShader(GL_FRAGMENT_SHADER);
    glShaderSource(fragmentShader, 1, (const GLchar**)(&fpointer), NULL);
    glCompileShader(fragmentShader);
    glGetShaderiv(fragmentShader, GL_COMPILE_STATUS, &success);   // 错误检测
    if (!success)
    {


        glGetShaderInfoLog(fragmentShader, 512, NULL, infoLog);
        std::cout << "片段着色器编译错误\n" << infoLog << std::endl;
        exit(-1);
    }

    // 链接两个着色器到program对象
    GLuint shaderProgram = glCreateProgram();
    glAttachShader(shaderProgram, vertexShader);
    glAttachShader(shaderProgram, fragmentShader);
    glLinkProgram(shaderProgram);

    // 删除着色器对象
    glDeleteShader(vertexShader);
    glDeleteShader(fragmentShader);

    return shaderProgram;
}

// 鼠标滚轮函数
void mouseWheel(int wheel, int direction, int x, int y)
{


    // zFar += 1 * direction * 0.1;
    glutPostRedisplay();    // 重绘
}

// 鼠标运动函数
void mouse(int x, int y)
{


    // 调整旋转
    yaw += 35 * (x - float(windowWidth) / 2.0) / windowWidth;
    yaw = glm::mod(yaw + 180.0f, 360.0f) - 180.0f;    // 取模范围 -180 ~ 180

    pitch += -35 * (y - float(windowHeight) / 2.0) / windowHeight;
    pitch = glm::clamp(pitch, -89.0f, 89.0f);

    glutWarpPointer(windowWidth / 2.0, windowHeight / 2.0);
    glutPostRedisplay();    // 重绘
}

// 键盘回调函数
void keyboardDown(unsigned char key, int x, int y)
{


    keyboardState[key] = true;
}
void keyboardDownSpecial(int key, int x, int y)
{


    keyboardState[key] = true;
}
void keyboardUp(unsigned char key, int x, int y)
{


    keyboardState[key] = false;
}
void keyboardUpSpecial(int key, int x, int y)
{


    keyboardState[key] = false;
}
// 根据键盘状态判断移动
void move()
{


    float cameraSpeed = 0.0015f;
    if (keyboardState['w']) cameraPosition += cameraSpeed * cameraDirection;
    if (keyboardState['s']) cameraPosition -= cameraSpeed * cameraDirection;
    if (keyboardState['a']) cameraPosition -= cameraSpeed * glm::normalize(glm::cross(cameraDirection, cameraUp));
    if (keyboardState['d']) cameraPosition += cameraSpeed * glm::normalize(glm::cross(cameraDirection, cameraUp));
    if (keyboardState[GLUT_KEY_CTRL_L]) cameraPosition.y -= cameraSpeed;
    if (keyboardState[' ']) cameraPosition.y += cameraSpeed;
    if (keyboardState['i']) lightPos.x += cameraSpeed;
    if (keyboardState['I']) lightPos.x -= cameraSpeed;
    if (keyboardState['o']) lightPos.y += cameraSpeed;
    if (keyboardState['O']) lightPos.y -= cameraSpeed;
    glutPostRedisplay();    // 重绘
}

// 初始化
void init()
{


    // 生成着色器程序对象
    std::string fshaderPath = "shaders/fshader.fsh";
    std::string vshaderPath = "shaders/vshader.vsh";
    program = getShaderProgram(fshaderPath, vshaderPath);
    glUseProgram(program);  // 使用着色器

    Model tree1 = Model();
    tree1.translate = glm::vec3(0.25, 0, -1);
    tree1.scale = glm::vec3(0.00025, 0.00025, 0.00025);
    tree1.load("models/tree/tree02.obj");
    models.push_back(tree1);

    Model tree2 = Model();
    tree2.translate = glm::vec3(1, 0, -1);
    tree2.scale = glm::vec3(0.00015, 0.00015, 0.00015);
    tree2.load("models/tree/tree02.obj");
    models.push_back(tree2);

    Model plane = Model();
    plane.translate = glm::vec3(0, -0.1, 0);
    plane.rotate = glm::vec3(0, -90, 0);
    plane.load("models/plane/plane.obj");
    models.push_back(plane);

    Model vlight = Model();
    vlight.translate = glm::vec3(1, 0, -1);
    vlight.scale = glm::vec3(0.15, 0.15, 0.15);
    vlight.load("models/Indoor plant 3/Low-Poly Plant_.obj");
    models.push_back(vlight);

    glEnable(GL_DEPTH_TEST);  // 开启深度测试

    glClearColor(1.0, 1.0, 1.0, 1.0);   // 背景颜色
}

// 显示回调函数
void display()
{


    glClear(GL_COLOR_BUFFER_BIT | GL_DEPTH_BUFFER_BIT);       // 清空窗口颜色缓存

    move(); // 移动控制 -- 控制相机位置

    // 计算欧拉角以确定相机朝向
    cameraDirection.x = cos(glm::radians(pitch)) * sin(glm::radians(yaw));
    cameraDirection.y = sin(glm::radians(pitch));
    cameraDirection.z = -cos(glm::radians(pitch)) * cos(glm::radians(yaw)); // 相机看向z轴负方向

    // 传视图矩阵
    glm::mat4 view = glm::lookAt(cameraPosition, cameraPosition + cameraDirection, cameraUp);
    GLuint vlocation = glGetUniformLocation(program, "view");
    glUniformMatrix4fv(vlocation, 1, GL_FALSE, glm::value_ptr(view));

    // 传投影矩阵
    glm::mat4 projection = glm::perspective(glm::radians(70.0f), (GLfloat)windowWidth / (GLfloat)windowHeight, zNear, zFar);
    GLuint plocation = glGetUniformLocation(program, "projection");
    glUniformMatrix4fv(plocation, 1, GL_FALSE, glm::value_ptr(projection));

    // 传递光源位置
    glUniform3fv(glGetUniformLocation(program, "lightPos"), 1, glm::value_ptr(lightPos));

    // 传递相机位置
    glUniform3fv(glGetUniformLocation(program, "cameraPos"), 1, glm::value_ptr(cameraPosition));

    models.back().translate = lightPos;

    for (auto m : models)
    {


        m.draw(program);
    }

    glutSwapBuffers();                  // 交换缓冲区
}

// -------------------------------- main -------------------------------- //

int main(int argc, char** argv)
{


    glutInit(&argc, argv);              // glut初始化
    glutInitDisplayMode(GLUT_RGBA | GLUT_DEPTH);
    glutInitWindowSize(windowWidth, windowHeight);// 窗口大小
    glutCreateWindow("7 - phong"); // 创建OpenGL上下文

#ifdef __APPLE__
#else
    glewInit();
#endif

    init();

    // 绑定鼠标移动函数 --
    //glutMotionFunc(mouse);  // 左键按下并且移动
    glutPassiveMotionFunc(mouse);   // 鼠标直接移动
    //glutMouseWheelFunc(mouseWheel); // 滚轮缩放

    // 绑定键盘函数
    glutKeyboardFunc(keyboardDown);
    glutSpecialFunc(keyboardDownSpecial);
    glutKeyboardUpFunc(keyboardUp);
    glutSpecialUpFunc(keyboardUpSpecial);

    glutDisplayFunc(display);           // 设置显示回调函数 -- 每帧执行
    glutMainLoop();                     // 进入主循环

    return 0;
}
着色器
顶点:
#version 330 core

// 顶点着色器输入
layout (location = 0) in vec3 vPosition;
layout (location = 1) in vec2 vTexcoord;
layout (location = 2) in vec3 vNormal;

out vec3 worldPos;
out vec2 texcoord;
out vec3 normal;

uniform mat4 model;         // 模型变换矩阵
uniform mat4 view;          // 模型变换矩阵
uniform mat4 projection;    // 模型变换矩阵

void main()
{


    gl_Position = projection * view * model * vec4(vPosition, 1.0);

    // 传递到片段着色器
    texcoord = vTexcoord;
    worldPos = (model * vec4(vPosition, 1.0)).xyz;
    normal = (model * vec4(vNormal, 0.0)).xyz;
}
片元:
#version 330 core

in vec3 worldPos;   // 当前片元的世界坐标
in vec2 texcoord;   // 纹理坐标
in vec3 normal;     // 法向量

out vec4 fColor;    // 片元输出像素的颜色

uniform sampler2D texture;  // 纹理图片

uniform vec3 lightPos;  // 光源位置
uniform vec3 cameraPos; // 相机位置

float phong(vec3 worldPos, vec3 cameraPos, vec3 lightPos, vec3 normal)
{


    vec3 N = normalize(normal);
    vec3 V = normalize(worldPos - cameraPos);
    vec3 L = normalize(worldPos - lightPos);
    vec3 R = reflect(L, N);

    float ambient = 0.3;
    float diffuse = max(dot(N, -L), 0) * 0.7;
    float specular = pow(max(dot(-R, V), 0), 50.0) * 1.1;

    return ambient + diffuse + specular;
}

void main()
{


    fColor.rgb =  texture2D(texture, texcoord).rgb;
    fColor.rgb *= phong(worldPos, cameraPos, lightPos, normal);
}