⚠ 完整代码在这里 ⚠
https://github.com/AKGWSB/SZU-DBSC-LAB3
目录
前言
唔 销售管理系统?销售来点作用啊
这个实验比较复杂,用到的东西比较杂,今天 mark 一下。。。
主要是周末做了好久太难顶了。。。最近摸鱼了,有时间再更新图形学系列罢(摸了
要求
1、建立数据库以及相应的数据表,包括职工表、顾客表、产品表、供应表、采购表 以及日志表,并按需求设置主键和外键,其中日志表主要描述用户的具体操作信 息。(5 分)
2、编写一个过程显示每个表中的元组。例如编写 show_products()显示在 products 表 中所有产品。(6 分)
3、编写一个过程报告任何给定产品的每月销售信息。例如对于给定的产品 ID,您 需要报告产品名称、月份(月份的前三个字母)、年份、每月销售总量、每月销售总 金额以及每月的平均销售价格。(4 分)
4、编写将元组添加到购买表和产品表中的过程。例如,使用 add_purchase(pur_no, c_id,e_id,p_id,pur_qty)在购买表中添加一个元组,其中 pur_no,c_id,e_id, p_id 和 pur_qty 为该过程的参数,并且应该根据数据库中的数据自动计算 total_price, 并且 ptime 应该是当前时间。(7 分)
5、自动往日志表 logs 中添加记录。(使用触发器实现) (9 分)
6、当实际进行购买之前,应确保要购买的数量小于等于手头的数量,否则,应显示 一条用以提示库存数量不足的提示信息,并且拒绝购买请求。(4 分)
7、在采购表中添加元组后,应相应地修改产品表中的 qoh 列的值。(16 分)
8、在有异常情况存在时,应弹出适当的窗口用以提示错误信息。例如,某人想查 找客户的购买记录但输入了不存在的客户 ID,此时程序应报告出现问题的原因。 (4 分)
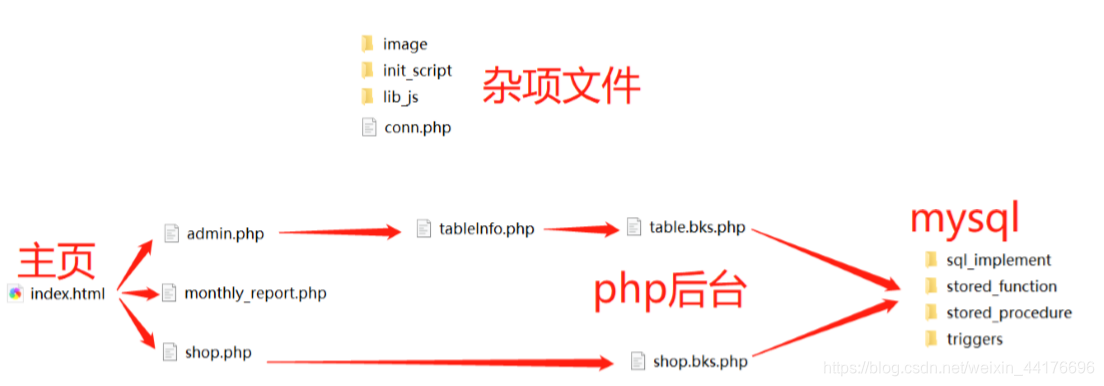
项目结构规划
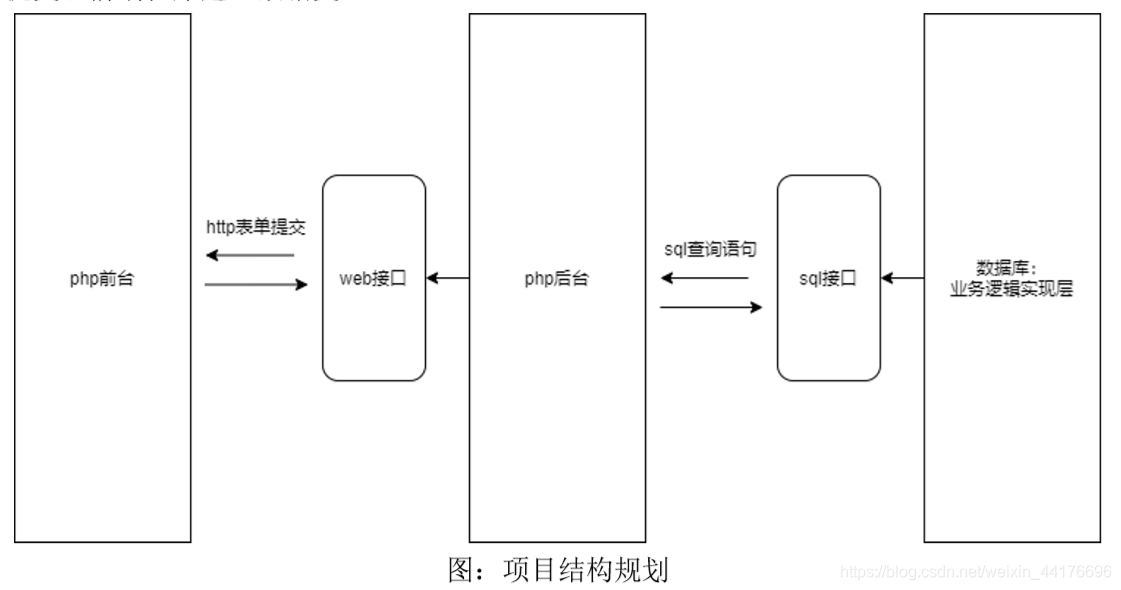
在数据库中通过 sql 实现一系列业务逻辑,并且封装并提供一致的向外 sql 接口(函数 or 过程) ,然后后端程序统一调用该过程从而实现业务逻辑。
此外,后端程序通过 http 表单 提交和前端程序建立数据交互。
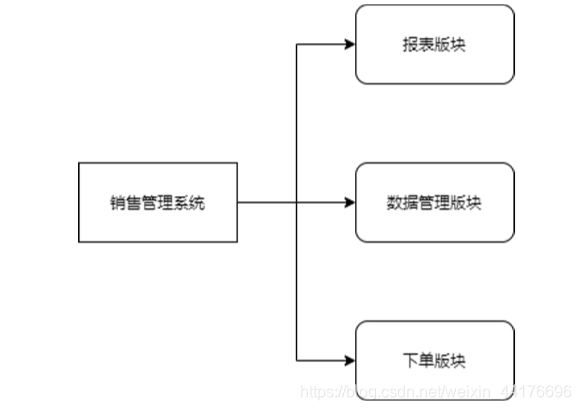
项目功能分析: 整个项目分为三个版块,分别是:
- 后台数据管理
- 打印报表
- 下单
其中后台数据管理版块负责后台数据的维护,比如增删改操作,而打印报表版块则根据提交 的产品 id,按照年份和月份打印对应的销售记录报表。下单版块则负责为系统添加一笔新订 单,并且完成相应的事务操作。
项目目录结构介绍: 项目目录大致分为如下的几个文件:
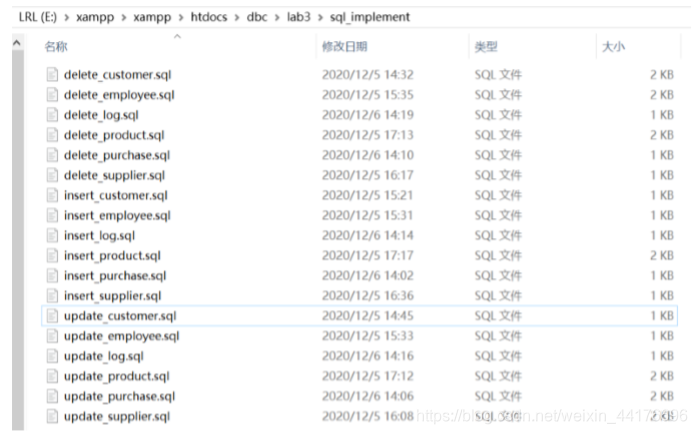
先来介绍几个文件夹。每个文件夹包含若干 sql 脚本。
其中 init_script 是初始化 sql 脚本, 包括建立数据库,添加数据等操作。
sql_implement 则是几张表的对外增删改接口,以存储 过程实现。
stored_function 则包含业务逻辑的操作,比如购买一件商品或者是打印报表。
stored_procedure 则是不包含参数的过程,比如全表打印。
triggers 则是注册的触发器,当增 删改操作进行时,执行对应的动作(比如记录日志) 。
然后关注到 web 接口相关的代码。table.bks.php 和 shop.bks.php 是 web 程序的 php 后台。
其中 table.bks.php 负责处理表的数据管理,比如增删改操作,而 shop.bks.php 负责处理下 单请求。
tableInfo.php 和 shop.php 则是他们对应的前台界面。monthly_report.php 则是报表 打印页面,负责根据提交的产品 id,打印对应产品的报表。
下面给出整个项目的文件之间的逻辑关系:
数据库创建与数据准备
在该部分,我们编写两个脚本,分别为 createTables.sql 和 addData.sql,分别完成数据表的 创建,并且添加一些数据到表中。
下面是 createTables.sql 的内容:
# change all eid, cid, pid, pur, key_value to int types in the future
drop database if exists lab3;
create database if not exists lab3;
use lab3;

create table employees (
    eid int not null,
    ename varchar(15),
    city varchar(15),
    primary key(eid)
);

create table customers (
    cid int not null,
    cname varchar(15),
    city varchar(15),
    visits_made int,
    last_visit_time datetime,
    primary key(cid)
);

create table suppliers (
    sid int not null,
    sname varchar(15) not null,
    city varchar(15),
    telephone_no char(11),
    primary key(sid),
    unique(sname)
);

create table products (
    pid int not null,
    pname varchar(15) not null,
    qoh int not null,
    qoh_threshold int,
    original_price decimal(6,2),
    discnt_rate decimal(3,2),
    sid int,
    primary key(pid),
    foreign key (sid) references suppliers (sid)
);

create table purchases (
    pur int not null auto_increment,
    cid int not null,
    eid int not null,
    pid int not null,
    qty int,
    ptime datetime,
    total_price decimal(7,2),
    primary key (pur),
    foreign key (cid) references customers(cid),
    foreign key (eid) references employees(eid),
    foreign key (pid) references products(pid)
);

create table logs (
    logid int not null auto_increment,
    who varchar(10) not null,
    time datetime not null,
    table_name varchar(20) not null,
    operation varchar(6) not null,
    key_value int,
    primary key (logid)
);
下面是 addData.sql 的内容:
use lab3;

# ---- insert into employees:
insert into `employees`
(`eid`, `ename`, `city`)
values
(90071, "bobWang", "GuangZhou"),
(90072, "samZhang", "ShangHai"),
(90073, "ZeMinJiang", "ShangHai"),
(90074, "DaSiMa", "WuHu"),
(90075, "MalaTang", "ChengDu");

# ---- insert into customers:
insert into `customers`
(`cid`, `cname`, `city`, `visits_made`, `last_visit_time`)
values
(114, "ShiYouLao", "HengYang", 3, "2020-12-2 16:03"),
(514, "SCWang", "MaoMing", 2, "2020-12-1 12:12"),
(191, "GaoKuaiDian", "BeiJin", 5, "2020-11-29 06:19"),
(981, "TuanTuan", "NewYork", 9, "2020-12-6 22:59");

# ---- insert into suppliers:
insert into `suppliers`
(`sid`, `sname`, `city`, `telephone_no`)
values
(8081, "HuaWei", "DongGuan", "13670778081"),
(4396, "XiaoMi", "ShangHai", "15343214396"),
(7777, "Apple", "BeiJIn", "18922007777");

# ---- insert into products:
insert into `products`
(`pid`, `pname`, `qoh`, `qoh_threshold`, `original_price`, `discnt_rate`, `sid`)
values
(3306, "mate40", 2147, 999, 778.00, 0.95, 8081),
(3307, "mate40pro", 364, 19, 556.00, 0.95, 8081),
(7158, "RedMi", 100, 50, 220.00, 0.85, 4396),
(7159, "SE-8", 100, 99, 440.00, 0.75, 4396),
(443, "iphoneX", 110, 23, 987.00, 1.00, 7777),
(444, "iphone12", 67, 28, 998.00, 1.00, 7777);
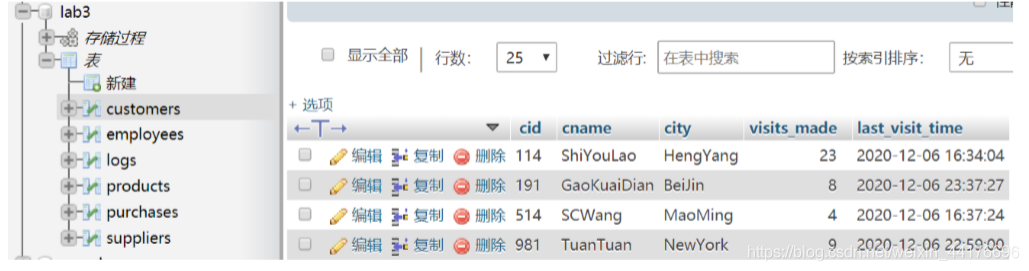
在执行之后,可以看到表中已经有数据:
编写 show_xxxx 过程以全表打印
我们编写 6 个过程,分别打印 6 张表的数据。他们存放在 stored_procedure 目录下:
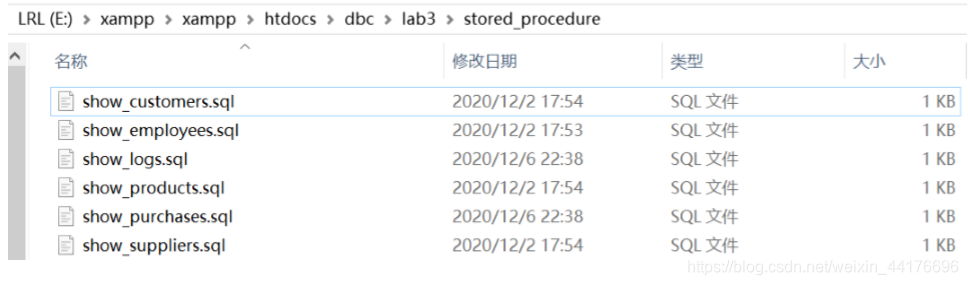
以 customers 表为例,show_customers.sql 的内容是:
use lab3;
drop procedure if exists show_customers;

delimiter //
create procedure show_customers()
begin
    select * from customers;
end //
delimiter ;
因为代码过于相似,这里只展示 customers 表的全表打印过程
编写 report_monthly_sale 函数以打印报表
我们编写 report_monthly_sale 函数,他的入口参数是产品 id,输出是 6 列信息,分别是 产品名称,月份,年份,销量,总价,均价。我们编写 report_monthly_sale.sql 并且存储在 stored_function 目录下,下面是它的内容:
use lab3;
drop procedure if exists report_monthly_sale;

delimiter //
create procedure report_monthly_sale(in p_id int)
begin
    select
        products.pname,
        SUBSTR(DATE_FORMAT(purchases.ptime, "%M"), 1, 3),
        DATE_FORMAT(purchases.ptime, "%Y"),
        SUM(qty),
        SUM(total_price),
        SUM(total_price)/SUM(qty)
    from products, purchases
    where products.pid=p_id and products.pid=purchases.pid
    group by DATE_FORMAT(purchases.ptime, "%Y"), DATE_FORMAT(purchases.ptime, "%m");
end//
delimiter ;
编写 add_purchase 函数以实现添加一笔购买记录
我们编写 add_purchase.sql,它存储在 stored_function 目录下。值得注意的是,该过程负责 进行容错判断(比如是否超量,产品是否存在等) ,因此返回的字段永远有两个:
- st 表示查询状态,0 / 1 失败 or 成功
- msg 表示提示信息,比如当前查询是因为什么而导致失败的
此外,该过程只负责添加一条购买记录。而扣除产品数量,更新顾客信息的操作则被放在 了 purchases 表的 insert 触发器中执行。在下面我们会详细解释。先来看 add_purchase.sql 的代码:
use lab3;
drop procedure if exists add_purchase;

delimiter //
create procedure add_purchase(
    in c_id int,
    in e_id int,
    in p_id int,
    in pur_qty int
)
add_purchase:
begin
    # 初始化返回结果
    declare st, res int default 0;
    declare msg varchar(32) default "query fail";

    # 验证 cid 是否存在
    select count(cid) from customers where cid=c_id limit 1 into res;
    if res<1 then
        set msg = "customer not found!";
        select st, msg;
        leave add_purchase;
    end if;

    # 验证 eid 是否存在
    select count(eid) from employees where eid=e_id limit 1 into res;
    if res<1 then
        set msg = "employee not found!";
        select st, msg;
        leave add_purchase;
    end if;

    # 验证 pid 是否存在
    select count(pid) from products where pid=p_id limit 1 into res;
    if res<1 then
        set msg = "product not found!";
        select st, msg;
        leave add_purchase;
    end if;

    # 验证 pur_qty 是否超出 qoh
    select qoh from products where pid=p_id into res;
    if res<pur_qty then
        set msg = "purchase quantity out of limit!";
        select st, msg;
        leave add_purchase;
    end if;

    # 获取总价格
    select original_price*discnt_rate from products where pid=p_id into res;
    set res = res*pur_qty;

    # 增加记录到 purchases 表
    insert into purchases (cid, eid, pid, qty, ptime, total_price) values (c_id, e_id, p_id, pur_qty, now(), res);

    # 返回成功
    set st = 1;
    set msg = "add purchase success!";
    select st, msg;
end//
delimiter ;
为 purchases 表的 insert 操作注册触发器以实现业务逻辑
在我们添加一条购买记录后,我们实际上并没有在 add_purchase 中修改产品和顾客的信 息
我们需要在 purchases 表被 insert 之后完成这个操作。于是我们编写 trigger_insert.sql 文 件,其中为除了 logs 外的 5 张表都注册了插入触发器。我们来看 purchases 表的触发器:
# 为 purchases 表注册 insert 触发器
# 注意这里我们实现业务逻辑,包括
#   1.减少存货量
#   2.修改顾客信息
#   3.补货
create trigger triger_insert_purchases
after insert on purchases for each row
begin
    declare res int default 0;

    # 先插入记录进logs
    insert into logs (`who`, `time`, `table_name`, `operation`, `key_value`)
    values
    (USER(), NOW(), "purchases", "insert", NEW.pur);

    # 减少商品存量
    update products set qoh=qoh-NEW.qty where pid=NEW.pid;

    # 修改顾客信息
    update customers set visits_made=visits_made+1, last_visit_time=now() where cid=NEW.cid;

    # 补货
    select count(*) from products
    where pid=New.pid and qoh<qoh_threshold
    into res;
    if res>0 then
        # 这里直接带 old_qoh = qoh+NEW.qty 进去算
        update products set qoh=2*(qoh+NEW.qty) where pid=NEW.pid;
    end if;
end//
注册触发器以记录 logs
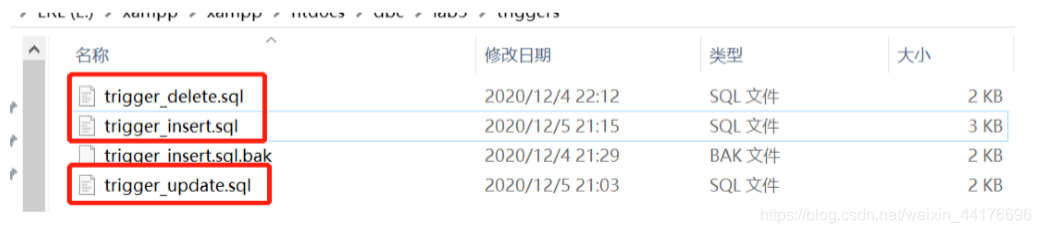
我们在 trigger 目录下放有三个文件,分别是 trigger_delete.sql, trigger_insert.sql, trigger_update.sql,分别对应增删改操作的触发器:
以 customers 表为例,我们为其注册三个触发器:
# 为 customers 表注册 insert 触发器
create trigger triger_insert_customers
after insert on customers for each row
begin
    insert into logs (`who`, `time`, `table_name`, `operation`, `key_value`)
    values
    (USER(), NOW(), "customers", "insert", NEW.cid);
end//

# 为 customers 表注册 update 触发器
create trigger triger_update_customers
after update on customers for each row
begin
    insert into logs (`who`, `time`, `table_name`, `operation`, `key_value`)
    values
    (USER(), NOW(), "customers", "update", NEW.cid);
end//

# 为 customers 表注册 delete 触发器
create trigger triger_delete_customers
after delete on customers for each row
begin
    insert into logs (`who`, `time`, `table_name`, `operation`, `key_value`)
    values
    (USER(), NOW(), "customers", "delete", OLD.cid);
end//
因为除了 purchases 表的 insert 操作需要特殊处理以外,其他触发器的注册都十分相似。我 们这里仅展示 customers 表的代码
为增删改操作编写 sql 接口
我们编写 18 个.sql 脚本,分别对应 6 张表的增删改操作。对于每个接口,我们都有如下的 返回值,以方便容错并且告知用户操作是否成功:
- st 表示查询状态,0 / 1 失败 or 成功
- msg 表示提示信息,比如当前查询是因为什么而导致失败的
以 customers 表为例,我们来看看 update_customers.sql 的内容。
其中我们输入的是 customers 表的所有字段,然后我们检查是否存在目标记录,如果不存在我们将会提供容错 并且返回错误信息,如果存在那么我们直接更新:
use lab3;
drop procedure if exists insert_customer;

delimiter //
create procedure insert_customer(
    in _cid int,
    in _cname varchar(15),
    in _city varchar(15),
    in _visit_made int,
    in _last_visit_time datetime
)
insert_customer:
begin
    # 初始化返回结果
    declare st, res int default 0;
    declare msg varchar(32) default "query fail";

    # 检查是否存在 cid 相同的记录
    select count(cid) from customers where cid=_cid limit 1 into res;
    if res>0 then
        set msg = "customer already exists!";
        select st, msg;
        leave insert_customer;
    end if;

    # 执行插入语句
    insert into customers
    (`cid`, `cname`, `city`, `visits_made`, `last_visit_time`)
    values
    (_cid, _cname, _city, _visit_made, _last_visit_time);

    # 返回成功
    set st = 1;
    set msg = "insert customer success!";
    select st, msg;
end//
delimiter ;
因为文件过多,我们仅展示 customers 表的 update 接口。因为他们的代码都是相似的。
编写数据管理模块
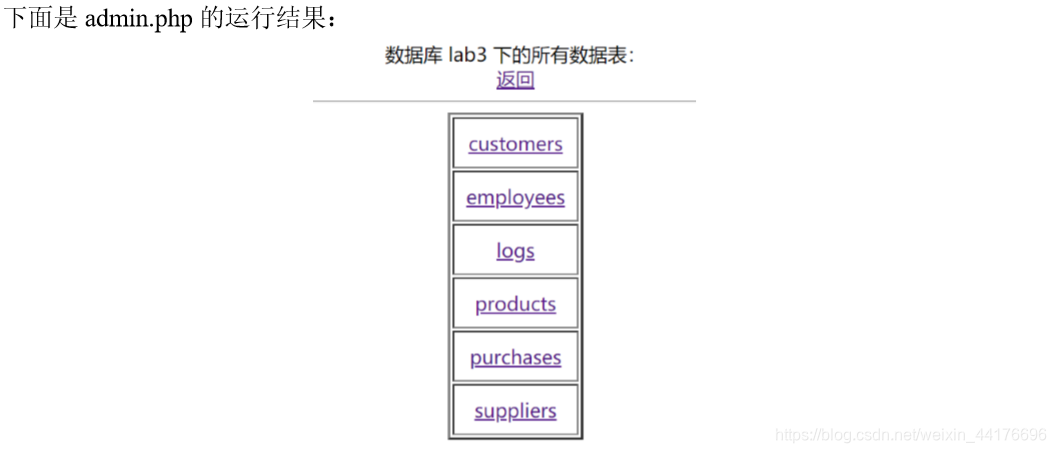
数据管理模块由三个文件组成。admin.php 是表的概要页面。该页面展示所有表的信息,并 且提供跳转链接到表详情页。下面是 admin.php 的内容:
<div align="center">
数据库 lab3 下的所有数据表:
<br><a href=index.html>返回</a><hr><table border="2">
<?php
include("conn.php");

// 获取表名
$res = mysqli_query($conn, "show tables");
$row = mysqli_num_rows($res);
for($i=0; $i<$row; $i++) {


    $tableName = mysqli_fetch_array($res)[0];
    // 拼凑 a 标签 -- 方便跳转
    echo '<tr><td>';
    echo '<a href="tableInfo.php?tableName=' . $tableName . '">' . $tableName . '</a>';
    echo '</td></tr>';
}

?>
</table>
<hr>
</div>
<style>
    tr {


        text-align: center;
    }
    td {


        padding: 10px;
    }
</style>
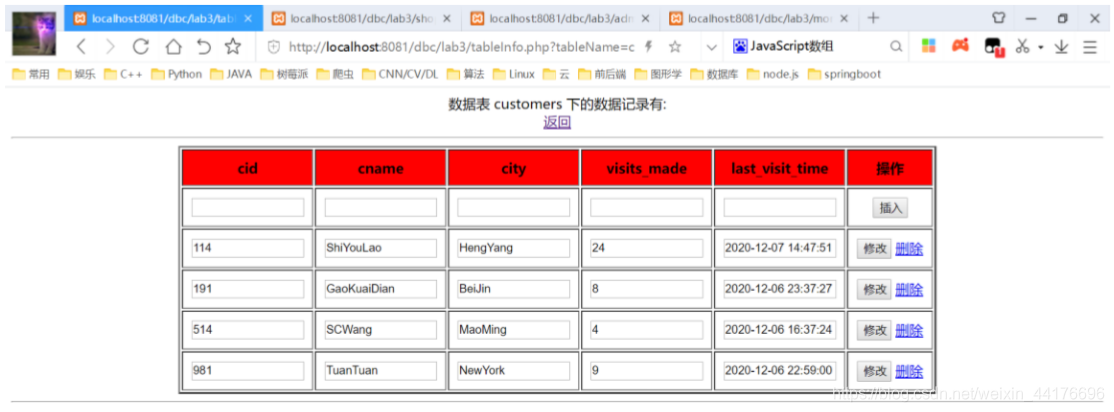
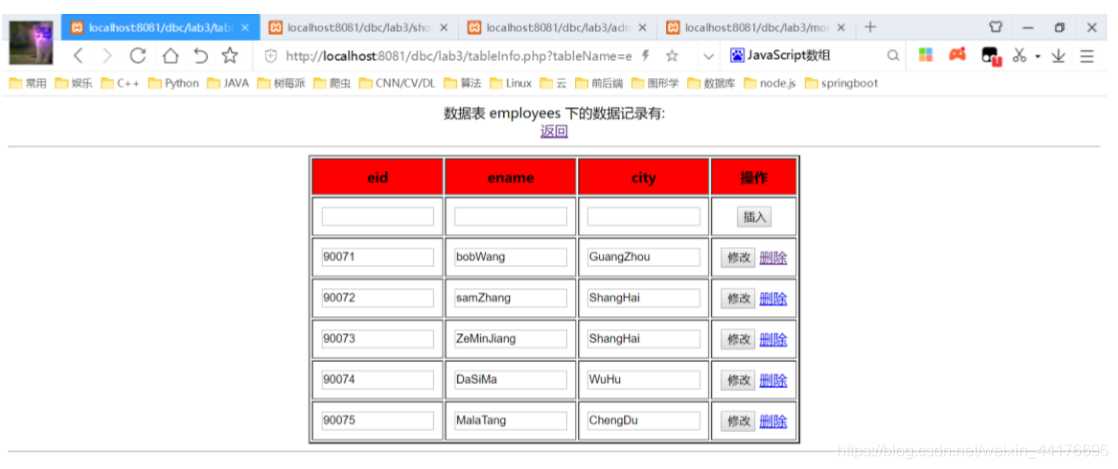
然后我们编写 tableInfo.php,该页面接收一个名为 tableName 的参数,并且查询对应的 表,同时打印数据。
我们首先根据表名,调用刚刚注册的 show_xxxx 过程,以分别显示每张表的信息。此外, 我们还提供了增加,修改和删除的表单提交。通过表单提交信息到 table.bks.php 后台以完 成对应的操作。
下面是 tableInfo.php 的代码:
<div align="center"><table border="2">
<?php
include("conn.php");

// 检验提交参数
if(!isset($_GET["tableName"])) {


    die("请选择数据表");
}
$tableName = $_GET["tableName"];

echo "数据表 " . $tableName . " 下的数据记录有:<br><a href=admin.php>返回</a><hr>";

// 打印表头
$columns = array();
$res = mysqli_query($conn, "show columns from " . $tableName);
$row = mysqli_num_rows($res);
echo '<tr style="background-color:red">';
for($i=0; $i<$row; $i++) {


    $dbrow = mysqli_fetch_array($res);
    echo '<td><b>' . $dbrow[0] . '</b></td>';
    array_push($columns, $dbrow[0]);
}
echo '<td><b>操作</b></td>';
echo '</tr><form method="GET" action="table.bks.php"><tr>';

// 打印插入栏
foreach($columns as $key) {


    echo '<td><input name="' . $key . '" value=""></td>';
}
// 按钮
echo '<td><input type="submit" value="插入" style="width:40px">';
// 隐藏字段: 表名和操作类型
echo '<input name="tableName" value="' . $tableName . '" style="display:none;">';
echo '<input name="opType" value="insert" style="display:none;">';
echo '</tr></form>';

// 打印数据
$res = mysqli_query($conn, "call show_" . $tableName);
$row = mysqli_num_rows($res);
// 遍历每行
for($i=0; $i<$row; $i++) {


    echo '<form method="GET" action="table.bks.php"><tr>';
    $dbrow = mysqli_fetch_array($res);

    $url = "table.bks.php?tableName=" . $tableName . '&'; // 构造get提交的url

    // 按列循环打印属性
    for($j=0; $j<count($columns); $j++) {


        $key = $columns[$j];    // 属性名
        $val = $dbrow[$key];    // 属性值值
        echo '<td><input name="' . $key . '" value="' . $val . '"></td>';

        $url .= $key . '=' . $val . '&';
    }

    $url .= 'opType=delete';

    // 隐藏字段: 表名和操作类型
    echo '<input name="tableName" value="' . $tableName . '" style="display:none;">';
    echo '<input name="opType" value="update" style="display:none;">';
    // 按钮
    echo '<td><input type="submit" value="修改" style="width:40px"> ';
    echo '<a href="' . $url . '">删除</a></td>';
    echo '</tr></form>';
}
?>
</table>
<?php
if($row==0) {


    echo "表中没有记录";
}
?>
<hr></div>
<style>
    tr {


        text-align: center;
    }
    td {


        padding: 10px;
    }
    input {


        width: 130px;
    }
</style>
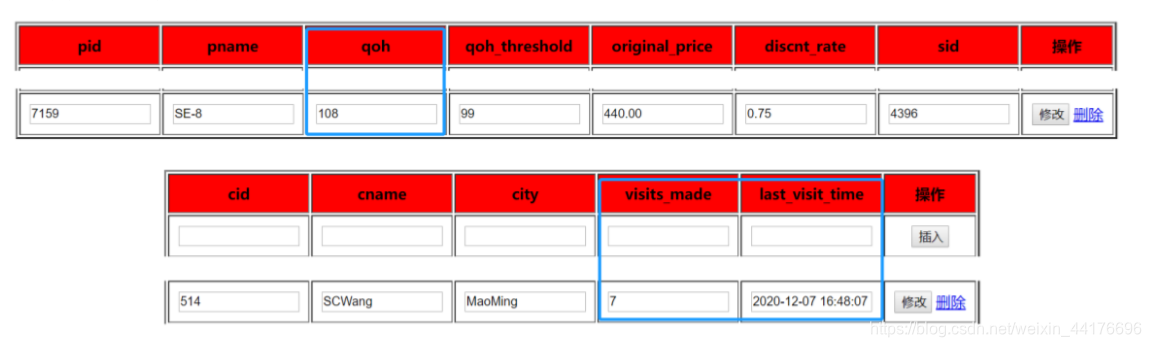
我们从 admin.php 点击并且进入 tableInfo 页面,可以看到如下的结果,我们一个页面可以 查询任意表的信息,这就是模块化的好处:
然后我们开始编写后台 table.bks.php 的代码。
- 我们首先从 tableInfo.php 中接收一条记录的信息(不管是什么操作,我们先接收 该条记录的信息)和对应的操作类型。
- 我们根据提交的操作类型(增加删除或者修改),调用刚刚上面注册的 insert_xxx 或者是 update_xxx 或者是 delete_xxx 存储过程以完成对应的操作。
对于 sql 存储过程的输出,我们原封不动的返回即可。因为我们注册的所有 sql 接口具有相 同的返回字段(st 和 msg)所以我们可以复用这段代码到任何表。
下面来看 table.bks.php 的代码:
<?php
include("conn.php");

if(!isset($_GET["tableName"])) {


    die("请选择数据表");
}
$tableName = $_GET["tableName"];

// 获取字段名
$columns = array();
$res = mysqli_query($conn, "show columns from " . $tableName);
$row = mysqli_num_rows($res);
for($i=0; $i<$row; $i++) {


    $dbrow = mysqli_fetch_array($res);
    array_push($columns, $dbrow[0]);
}

// 获取主键名称
$sql = "SELECT column_name FROM INFORMATION_SCHEMA.`KEY_COLUMN_USAGE` WHERE table_name='" . $tableName . "' AND constraint_name='PRIMARY'";
$res = mysqli_query($conn, $sql);
$primaryKeyName = mysqli_fetch_array($res)[0];

// 删除操作 -- 调用存储过程 delete_xxxx()
if($_GET["opType"]=="delete") {


    $sql = "call delete_" . $tableName;
}

// 更新操作 -- 调用存储过程 update_xxxx()
if($_GET["opType"]=="update") {


    $sql = "call update_" . $tableName;
}

// 插入操作 -- 调用存储过程 insert_xxxx()
if($_GET["opType"]=="insert") {


    $sql = "call insert_" . $tableName;
}

// 构造 sql 语句
$sql = substr($sql, 0, -1); // 去掉 s 字符
$sql .= '(';

// 构造参数
$parameters = "";
foreach($columns as $key) {


    $parameters .= '"' . $_GET[$key] . '",';
}
$parameters = substr($parameters, 0, -1); // 去掉 , 字符

// 填参数
if($_GET["opType"]=="delete") {


    $sql .= $_GET[$primaryKeyName];   // 删除过程需要单个参数
} else {


    $sql .= $parameters;    // 所有参数
}
$sql .= ')';

// 执行操作
$res = mysqli_query($conn, $sql);
// 获取 sql 接口的返回信息
$fetch_array = mysqli_fetch_array($res);
$st = $fetch_array[0];
$msg = $fetch_array[1];

// 响应
if($st==1) {


    $st = "成功";
} else {


    $st = "失败";
}
echo '<script>alert("状态: ' .$st . '\n信息: ' . $msg . '");window.location.href=document.referrer;</script>';
?>
我们来测试一下。我们修改 ShiYouLao 顾客的地址为 LiuZhou,我们点击修改,可以看到 后台输出的信息,我们修改成功:
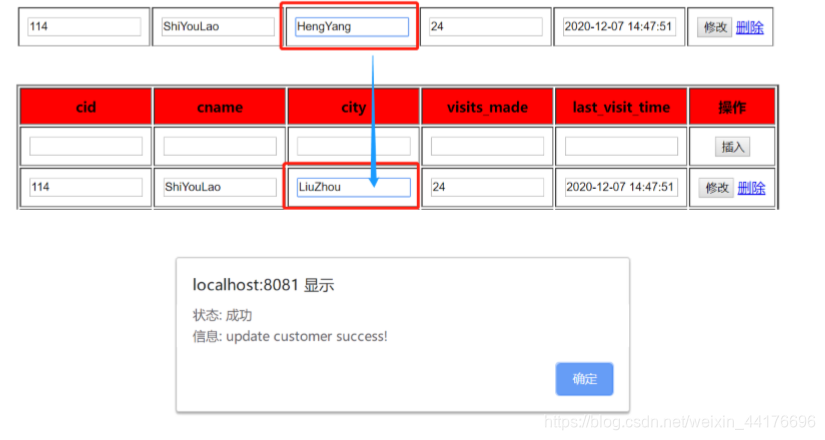
回到页面,我们发现数据修改成功:

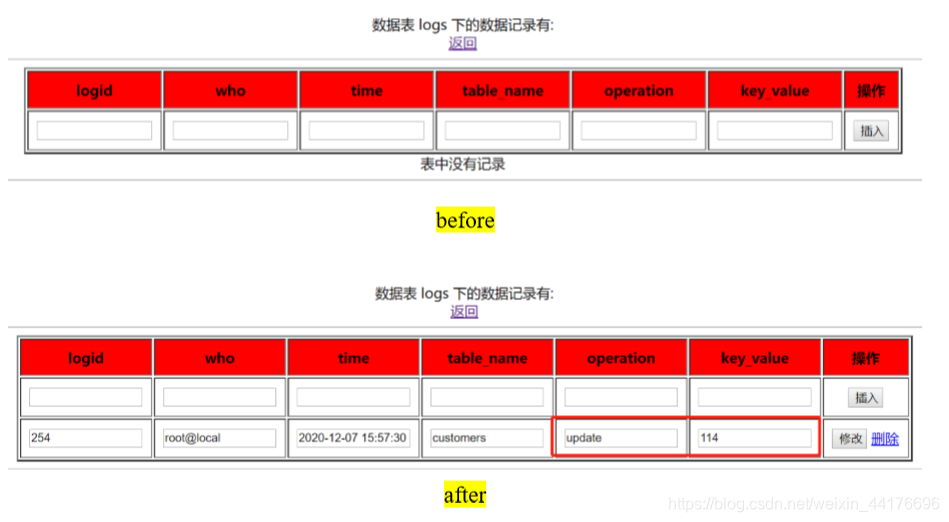
与此同时我们观察 logs 表的记录多了一条:
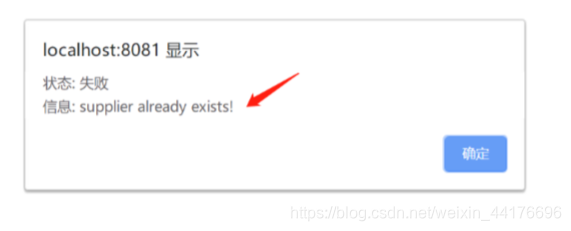
以插入数据为例,我们插入一条数据,但是这条数据(的主键)已经存在:
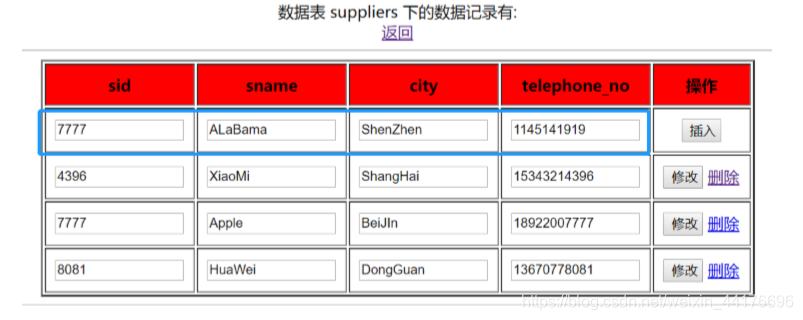
我们可以看到后台的容错逻辑开始工作了。我们拒绝了此次插入的请求:
这次我们插入正常的记录:
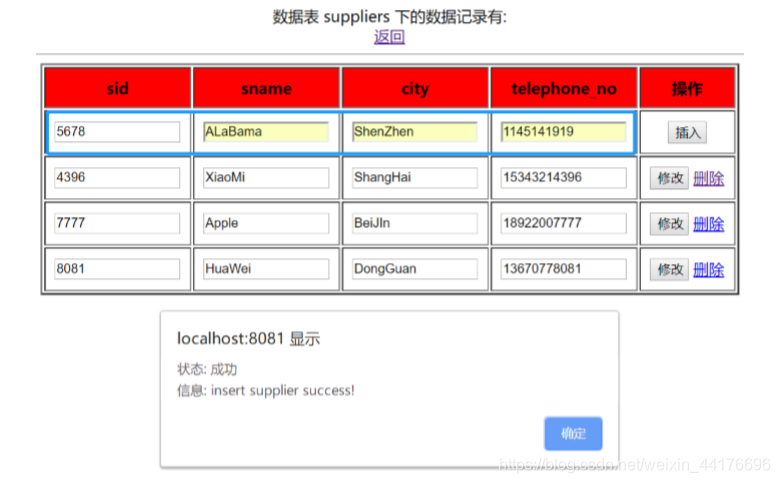
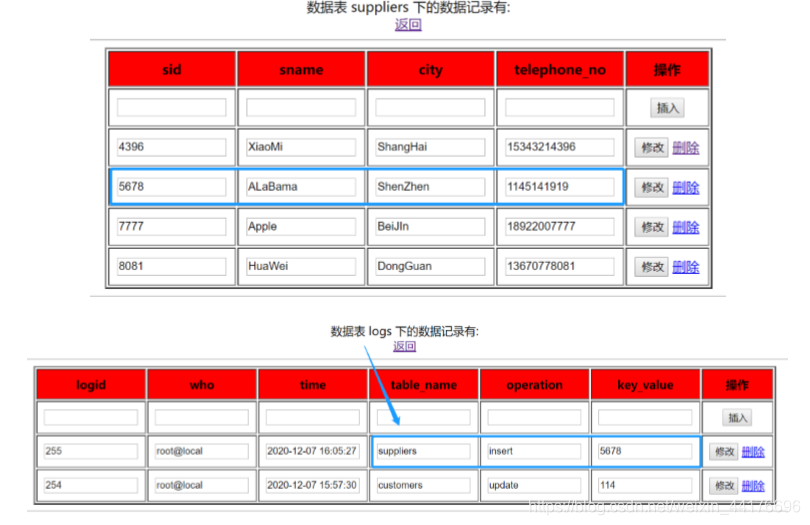
成功!并且我们的表中确实多了一条记录,与此同时,logs 表也记录了我们的操作:
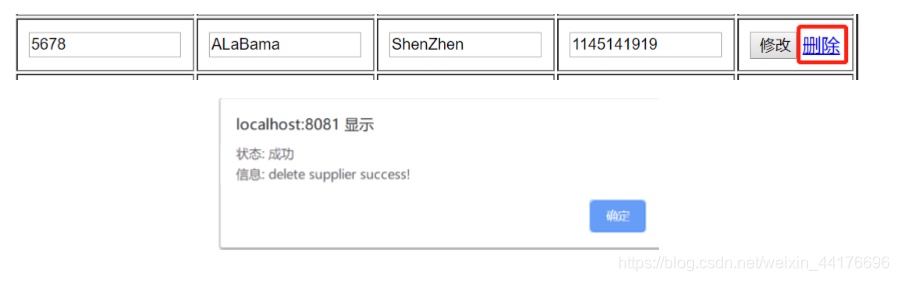
然后我们尝试删除该记录:
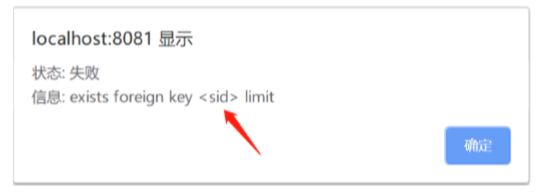
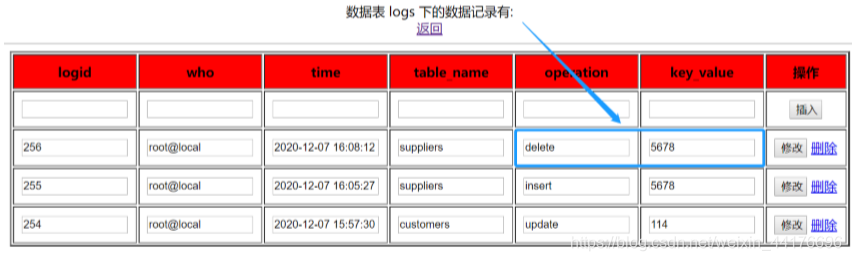
我们删除成功。但是如果我们删除一条有外键约束的记录呢?比如 Apple,有 products 表中 的产品依赖于该供应商。

可以看到删除失败,我们注册的 delete_xxx 过程很好的进行了容错,并且拒绝了错误的操作
我们的日志也显示,被拒绝掉的错误操作(删除 sid=7777 的记录)并没有实际发生。而合理 的操作(删除 sid=5678 的记录)被实际记录下来了。
编写下单模块
下单模块分为两部分。shop.php 是前台,而 shop.bks.php 是后台。
其中前台页面查询 products 表的信息,并且打印商品详情。此外,还查询了 customers 和 employees 表的信息,并且提供了下拉表,供用户选择员工和顾客。
值得注意的是,我们也是通过表单提 交,将信息传到 shop.bks.php 并且实现对应的逻辑的。下面是 shop.php 的代码:
<a href=index.html>返回</a><hr>
<?php
include("conn.php");

// 获取 customers 的数据
$customers = array();
$res = mysqli_query($conn, "select * from customers");
$row = mysqli_num_rows($res);
for($i=0; $i<$row; $i++) {


    $customers[$i] = mysqli_fetch_assoc($res);
}

// 获取 employees 的数据
$employees = array();
$res = mysqli_query($conn, "select * from employees");
$row = mysqli_num_rows($res);
for($i=0; $i<$row; $i++) {


    $employees[$i] = mysqli_fetch_assoc($res);
}

// 打印数据
$res = mysqli_query($conn, "select * from products, suppliers where products.sid=suppliers.sid");
$row = mysqli_num_rows($res);
// 遍历每行
for($i=0; $i<$row; $i++) {


    echo '<form method="GET" action="shop.bks.php"><div>';
    $product = mysqli_fetch_assoc($res);

    // 打印产品信息
    $imgIndex = (int)($i%9);    // 图片名称索引
    echo '<img src="image/' . $imgIndex . '.jpg">';
    echo '<span class="pname">' . $product["pname"] . '</span> ';
    echo '<span class="sname_city">' . $product["sname"] . ' <br> ' . $product["city"] . '</span> ';
    echo '<span class="op"><s>' . $product["original_price"] . '</s></span> ';
    echo '<span class="cp">' . $product["original_price"] * $product["discnt_rate"]  . '</span> ';

    // 隐藏表单 -- 提交产品id(pid)
    echo '<input name="pid" value=' . $product["pid"] . ' style="display:none;">';

    // 选择客户列表
    echo '<span class="customers">选择客户:<br><select name="cid">';
    echo '<option value="-1">请选择</option>';
    foreach($customers as $c) {


        echo '<option value="' . $c["cid"] . '">' . $c["cname"]. '</option>';
    }
    echo '</select></span>';

    // 选择员工列表
    echo '<span class="employees">经手员工:<br><select name="eid">';
    echo '<option value="-1">请选择</option>';
    foreach($employees as $e) {


        echo '<option value="' . $e["eid"] . '">' . $e["ename"]. '</option>';
    }
    echo '</select></span>';

    // 数量
    echo '<span class="qty">购买数量:<br><input name="qty" value="1">';
    echo ' / ' . $product["qoh"] . '</span>';

    // 购买按钮
    echo '<input type="submit" value="下单">';

    echo '</div><hr></form>';
}
?>

<style>
    div {


        display: table-cell;
        height: 200px;
        vertical-align: middle;
        text-align: center
    }
    img {


        vertical-align: middle;
        width: 180px;
        #height: 180px;
    }
    .pname {


        display: inline-block;
        width: 200px;
        font-size: 32px;
        padding: 20px;
    }
    .sname_city {


        display: inline-block;
        width: 100px;
        border: 2px black solid;
        padding: 10px;
        border-radius: 20px;
    }
    .op {


        margin-left: 20px;
        display: inline-block;
        width: 50px;
        color: gray;
    }
    .cp {


        display: inline-block;
        width: 50px;
        color: red;
        font-size: 24px;
    }
    .customers {


        margin-left: 40px;
        #background-color: red;
        display: inline-block;
        width: 120px;
    }
    .employees {


        display: inline-block;
        width: 120px;
    }
    .qty {


        display: inline-block;
        width: 150px;

    }
    input {


        width: 60px;
        padding: 5px;
    }
    select {


        padding: 5px;
    }
</style>
这里需要用到 亿 点 点 前端知识。。。
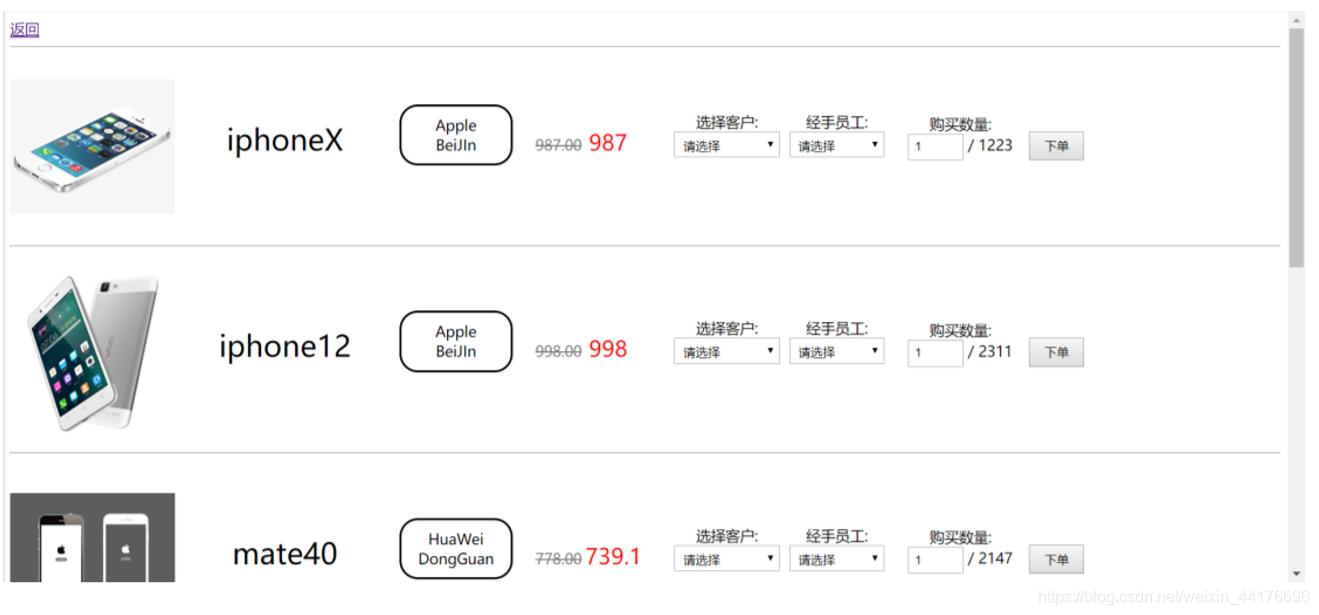
可以看到页面的运行结果。其中所有的内容都是根据数据库的数据动态生成的。此外,红 色的字体是 原价 x 折扣 之后的价格:
我们编写 shop.bks.php 后台,完成下单操作。
我们从前台接收 cid, eid, pid, qty,然后调用注 册的 add_purchase 函数来完成下单的操作。下面是 shop.bks.php 的代码:
<?php
include("conn.php");

$cid = $_GET["cid"];
$eid = $_GET["eid"];
$pid = $_GET["pid"];
$qty = $_GET["qty"];

$res = mysqli_query($conn, 'call add_purchase(' . $cid . ',' . $eid . ',' . $pid . ',' . $qty . ')');
$row = mysqli_num_rows($res);
// 获取 sql 接口的返回信息
$fetch_array = mysqli_fetch_array($res);
$st = $fetch_array[0];
$msg = $fetch_array[1];

// 响应
if($st==1) {


    $st = "成功";
} else {


    $st = "失败";
}
echo '<script>alert("状态: ' .$st . '\n信息: ' . $msg . '");window.location.href=document.referrer;</script>';
?>
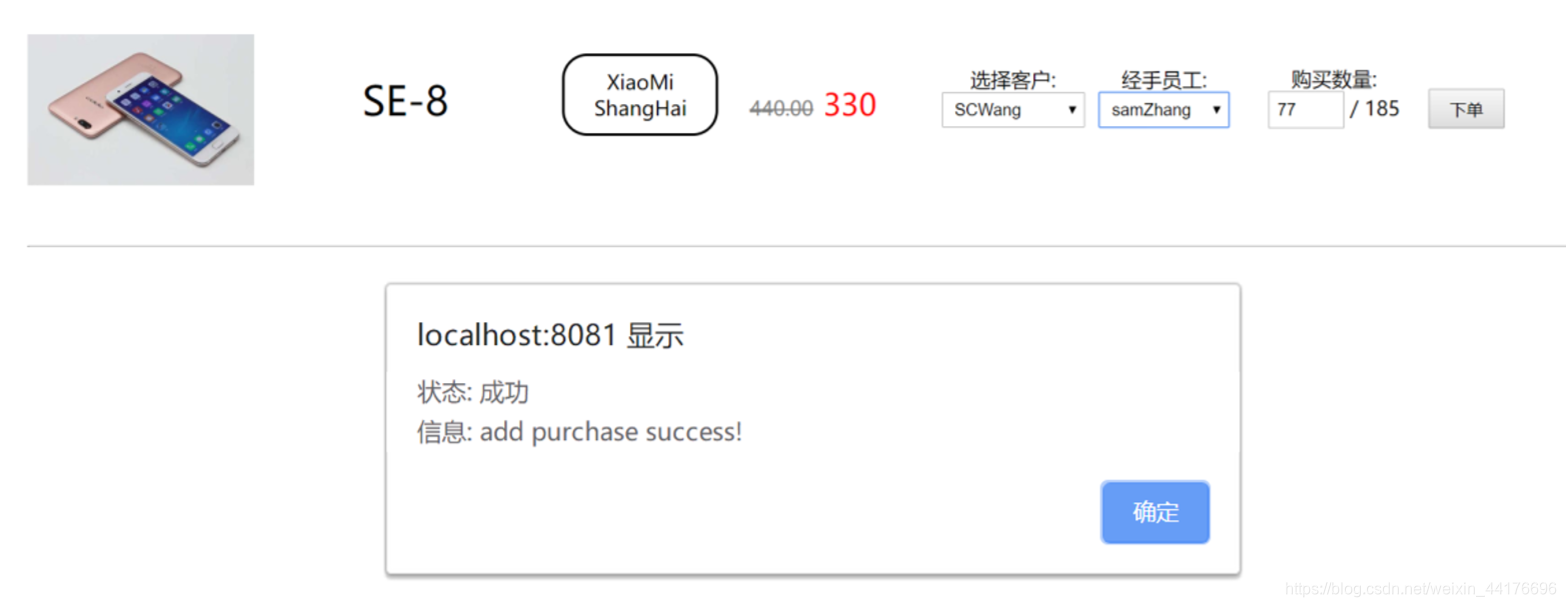
我们尝试进行下单操作:
然后我们看到产品的数目减少了:

我们翻阅日志,确实发现多了如下的(三条)记录:
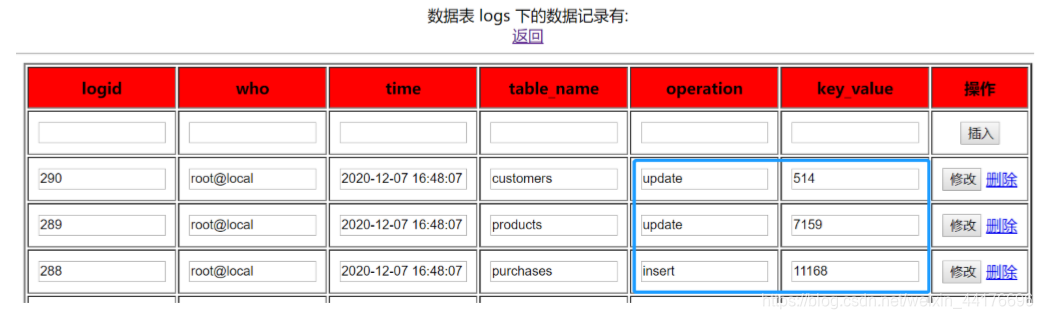
首先我们插入了一条 purchases 记录,该过程是 add_purchase 函数中完成的。

然后可以看到 customers 和 products 表的数据被修改了,这是在 purchases 表的 insert 触发 器中完成的操作。
编写报表模块
报表模块 monthly_report.php 需要接收一个 pid 表示要查询的产品的 id。
然后该页面会调用 我们注册的 report_monthly_sale 函数,根据 pid 返回对应的按月和年 group by 的报表。
下 面是 monthly_report.php 的代码:
<script type="text/javascript" src="lib_js/jscharts_mb.js"></script>
<div align="center">
<h2>查询报表 -- 输入产品id</h2>
<form method="GET">
<input name="pid"><input type="submit" value="查询">
</form><a href=index.html>返回</a><hr>
<?php
include("conn.php");
if(!isset($_GET["pid"]) || $_GET["pid"]=='') {
die("请选择产品");
} else {
$pid = $_GET["pid"];
}
$data = array(); // 按年份分类存储数据
// 查询报表
$columns = array();
$res = mysqli_query($conn, 'call report_monthly_sale(' . $pid . ')');
$row = mysqli_num_rows($res);
for($i=0; $i<$row; $i++) {
$dbrow = mysqli_fetch_array($res);
$year = $dbrow[2];
// 按照年份分组
if(!isset($data[$year])) {
$data[$year] = array(); // 不存在则新建
}
// fetch_array 转为纯 array 方便 JSON 序列化
$arr = array();
for($j=0; $j<6; $j++) {
$arr[$j] = $dbrow[$j];
}
array_push($data[$year], $arr); // 存在则加入
}
// 判断是否查询为空
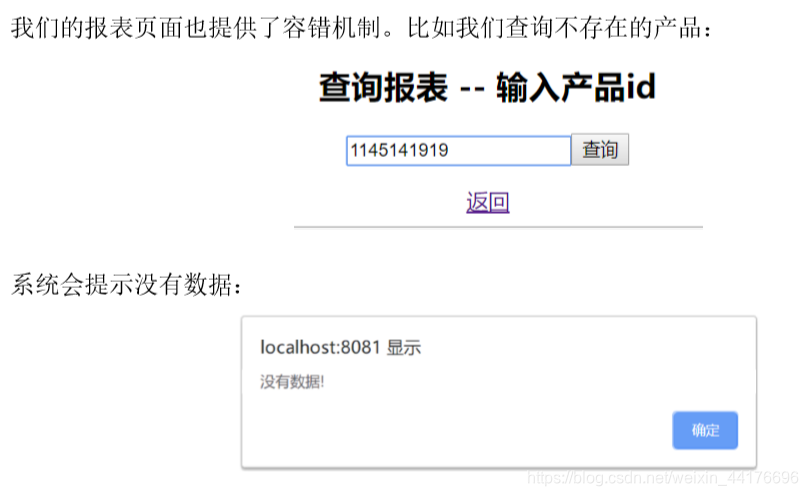
if(count($data)==0) {
die('<script>alert("没有数据!");</script>');
}
// 将数据通过JSON传递给JavaScript
echo "<script>var data=JSON.parse('" . json_encode($data) . "');</script>";
// debug
// echo "console.log(data);</script>"; echo 'json_encode($data)';
// 分年份打印表
foreach($data as $year => $yearTable) {
// 打印表头
echo '<h3>' . $year . '年报表</h3><table border="2"><tr><td>产品名称</td><td>月份</td><td>年份</td><td>销量</td><td>总价</td><td>均价</td></tr>';
// 打印行数据
foreach($yearTable as $row) {
echo '<tr>';
// 打印列
for($j=0; $j<6; $j++) {
echo '<td>' . $row[$j] . '</td>';
}
echo '</tr>';
}
echo '</table>';
echo '<div id="' . $year . '1" style="display:inline-block;"></div>'; // 打印表格容器
echo '<div id="' . $year . '2" style="display:inline-block;"></div><hr>';
}
?>
</div>
<script type="text/javascript">
// 月份映射与颜色映射
var mmap = {
"Jan":1, "Feb":2, "Mar":3, "Apr":4, "May":5, "Jun":6, "Jul":7, "Aug":8, "Sep":9, "Oct":10, "Nov":11, "Dec":12};
var cmap = {
"Jan":"#FFFF00", "Feb":"#FFC125", "Mar":"#FF83FA", "Apr":"#FF4500 ", "May":"#FFB90F", "Jun":"#BF3EFF", "Jul":"#98FB98", "Aug":"#7FFF00", "Sep":"#8B8378", "Oct":"#76EE00", "Nov":"#1E90FF", "Dec":"#00CDCD"};
// 遍历每年的数据 -- 每年的数据为一张表
for(var year in data) {
var chartData = new Array();
var chartColor = new Array();
var rows = data[year];
//console.log(rows); // debug
for(var i=0; i<rows.length; i++) {
var row = rows[i]; // 每一行数据
//console.log(row); // debug
var point = [row[1], parseFloat(row[4])]; // 插入 [月份, 总额]
chartData.push(point);
chartColor.push(cmap[row[1]]);
}
//console.log(chartData); // debug
var chart1 = new JSChart(year.toString()+'1', 'bar');
chart1.setDataArray(chartData);
chart1.colorizeBars(chartColor);
chart1.draw();
var chart2 = new JSChart(year.toString()+'2', 'pie');
chart2.setDataArray(chartData);
chart2.colorizePie(chartColor);
chart2.draw();
}
</script>
<style>
tr {
text-align: center;
}
td {
padding: 10px;
}
</style>
我们使用 jscharts 库来绘制图表,其中库文件存放于 lib_js 目录下。
这里我们用了一个技巧 向 JavaScript 代码发送 php 获取到的数据,那就是 JSON。
我们在 php 端先获取数据,然后 通过 JSON 编码,将 php 数据以字符串的形式传到 JavaScript 代码中,然后 JavaScript 进 行解码,获得查询的数据,并且利用 jscharts 库进行报表的绘制。
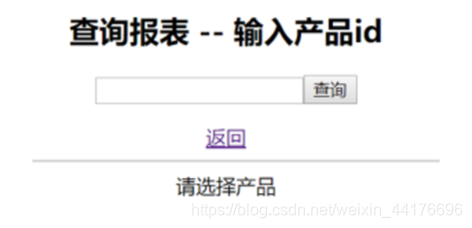
我们进入页面,此时还未选择产品
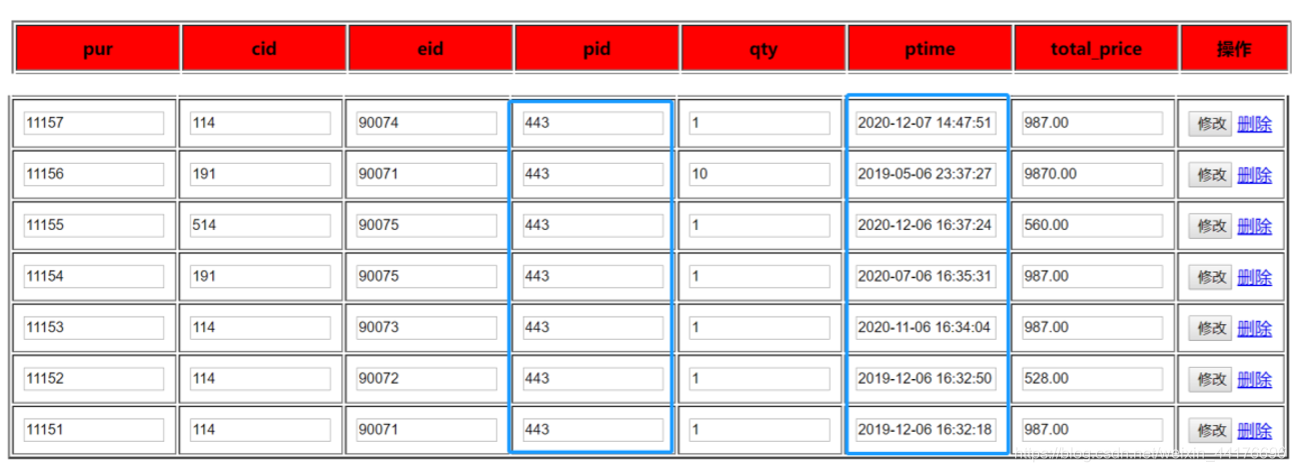
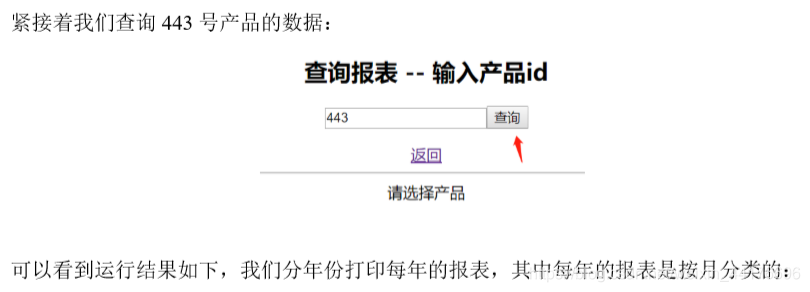
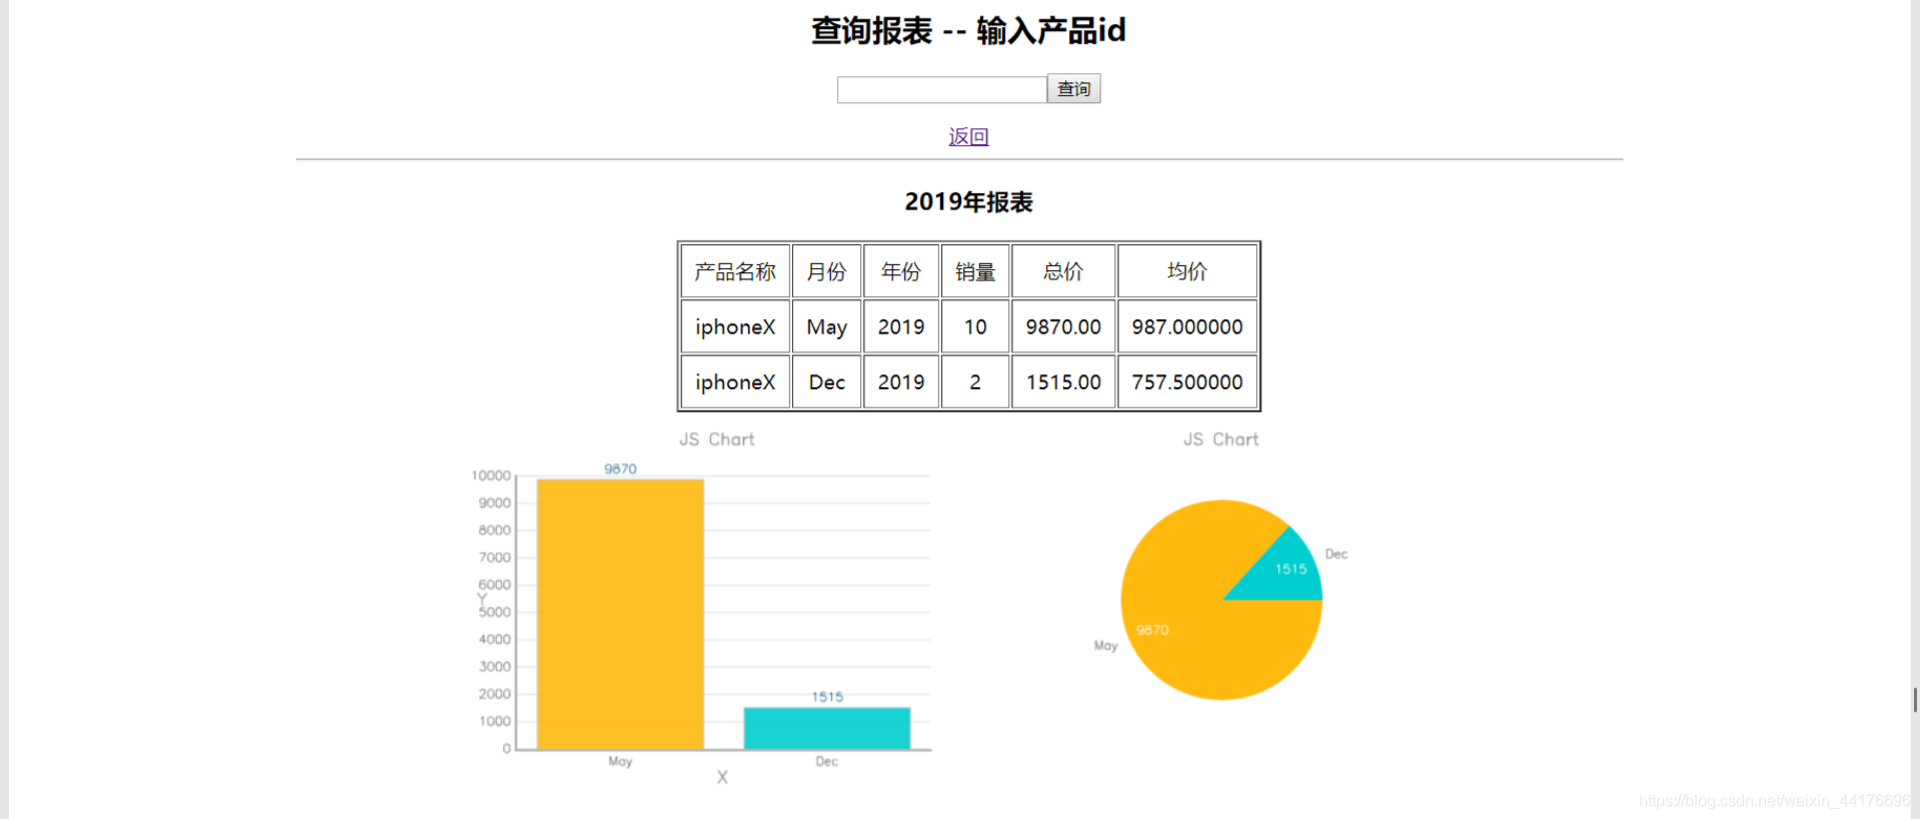
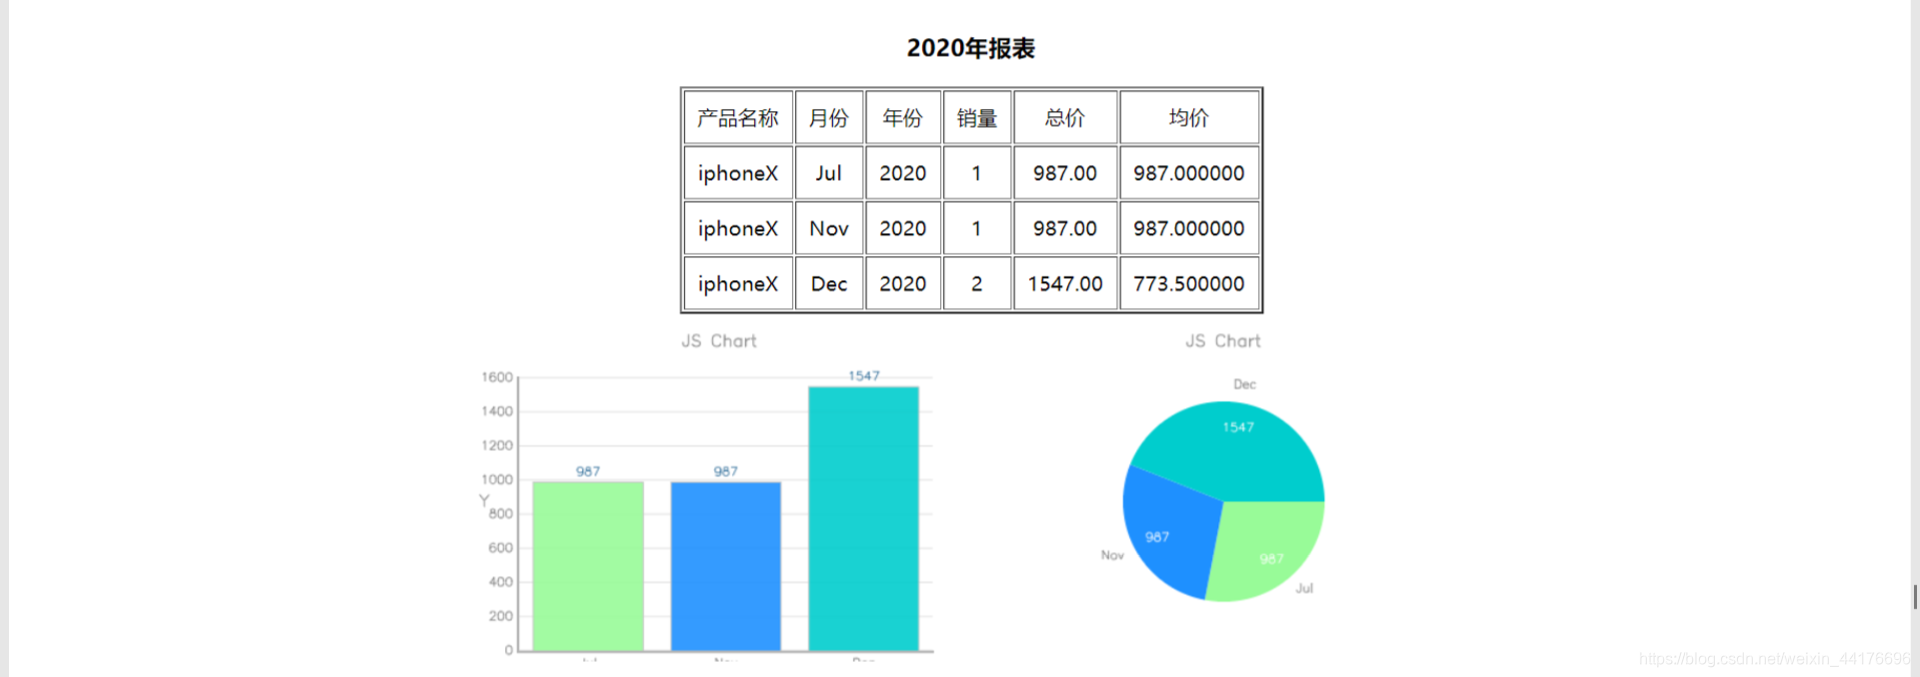
我们以 443 号产品为例,我们手动造假一些数据(因为要制造 2019 年的数据),包含 2019 和 2020 年的数据。其中 2019 年有两个月的记录,2020 年有三个月的记录:
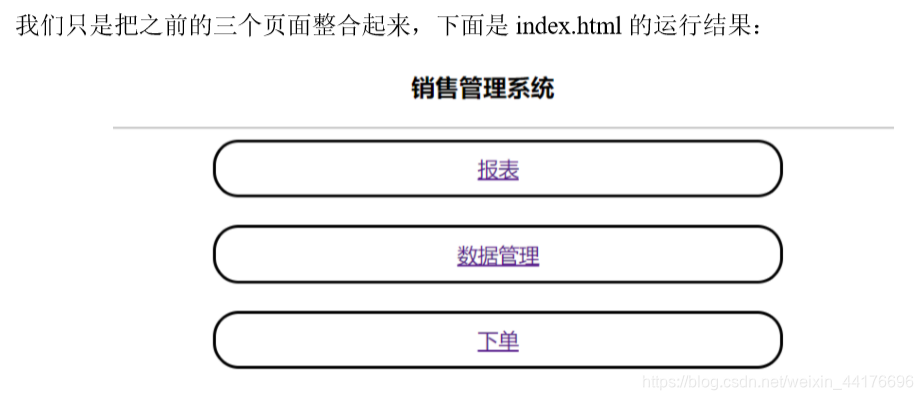
主页
这部分的代码相当无聊:
<!DOCTYPE html>
<html>
<head>
	<title></title>
</head>
<body align="center">
    <h3>销售管理系统</h3><hr>
    <a href="monthly_report.php"><div class="item">报表</div></a><br>
    <a href="admin.php"><div class="item">数据管理</div></a><br>
    <a href="shop.php"><div class="item">下单</div></a><br>
</body>
</html>

<style>
.item {


    text-align: center;
    border: 2px black solid;
    padding: 10px;
    border-radius: 20px;
    width: 30%;
    margin-left: 35%;
}
</style>
快速部署
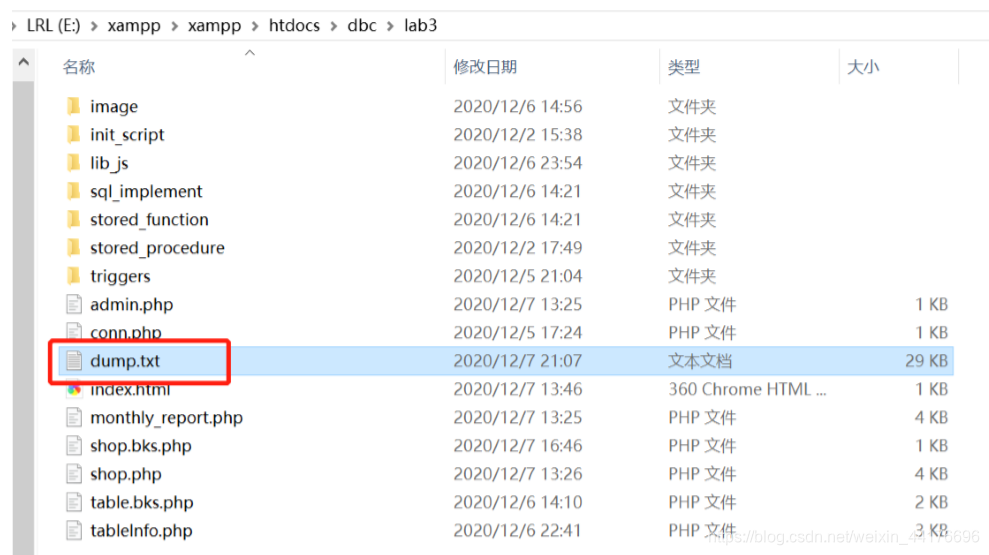
因为注册这么多的 sql 脚本真是太恼火了,于是我导出了所有 sql 脚本。按顺序建立数据 表,并且注册的函数与过程。所有的 sql 代码都在 dump.txt 中了。在提交的代码中,可以 找到该 txt 文件。
只需要运行命令 mysql -u root -p < dump.txt 即可完成快速部署!