文章偏长,建议收藏再看哦!
喜欢的点个赞嘻嘻。
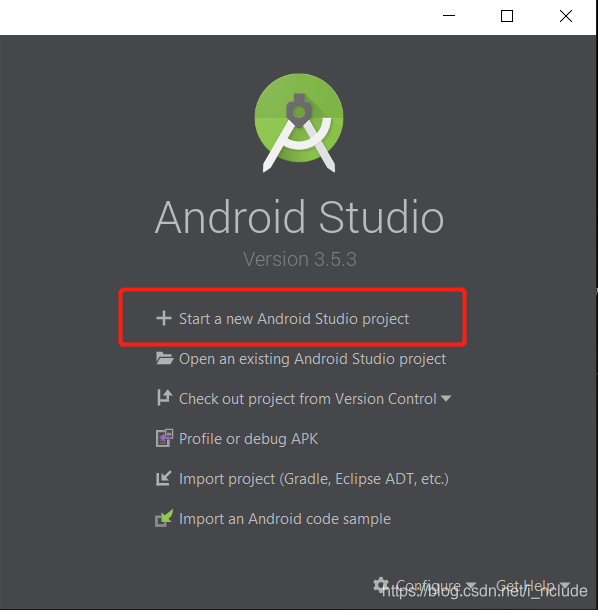
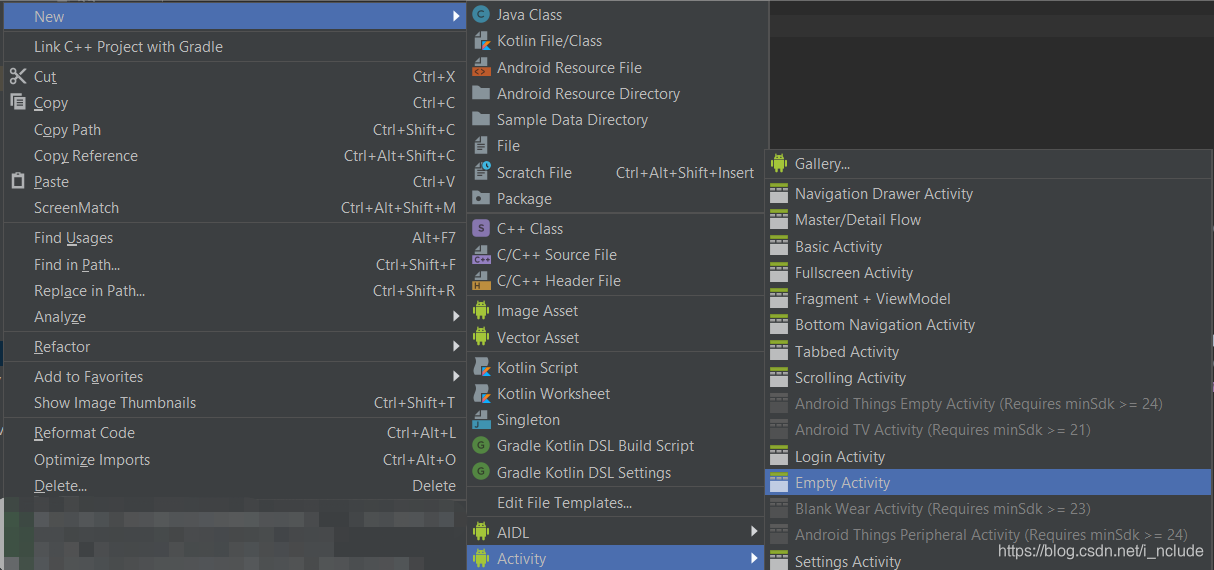
第一步,打开android studio
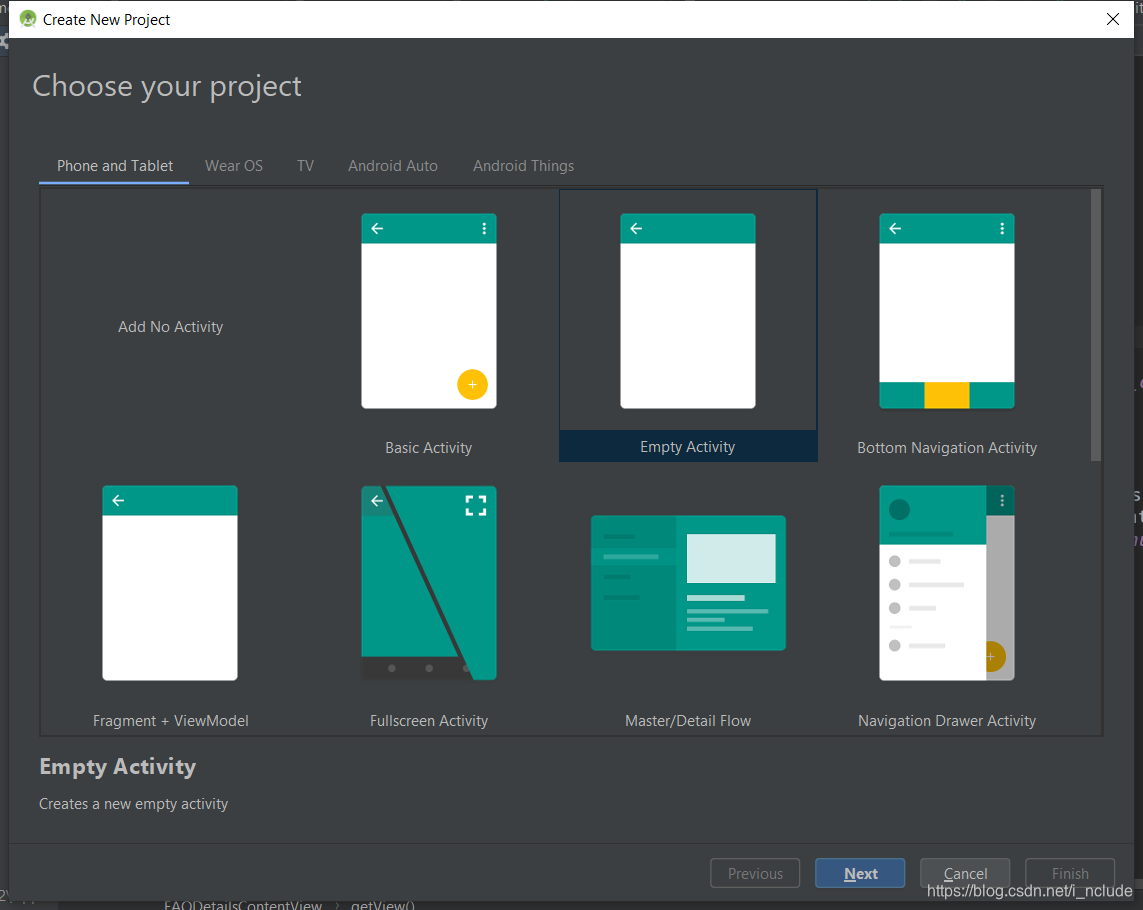
第二步:建立一个空的Activity
第三步:配置项目
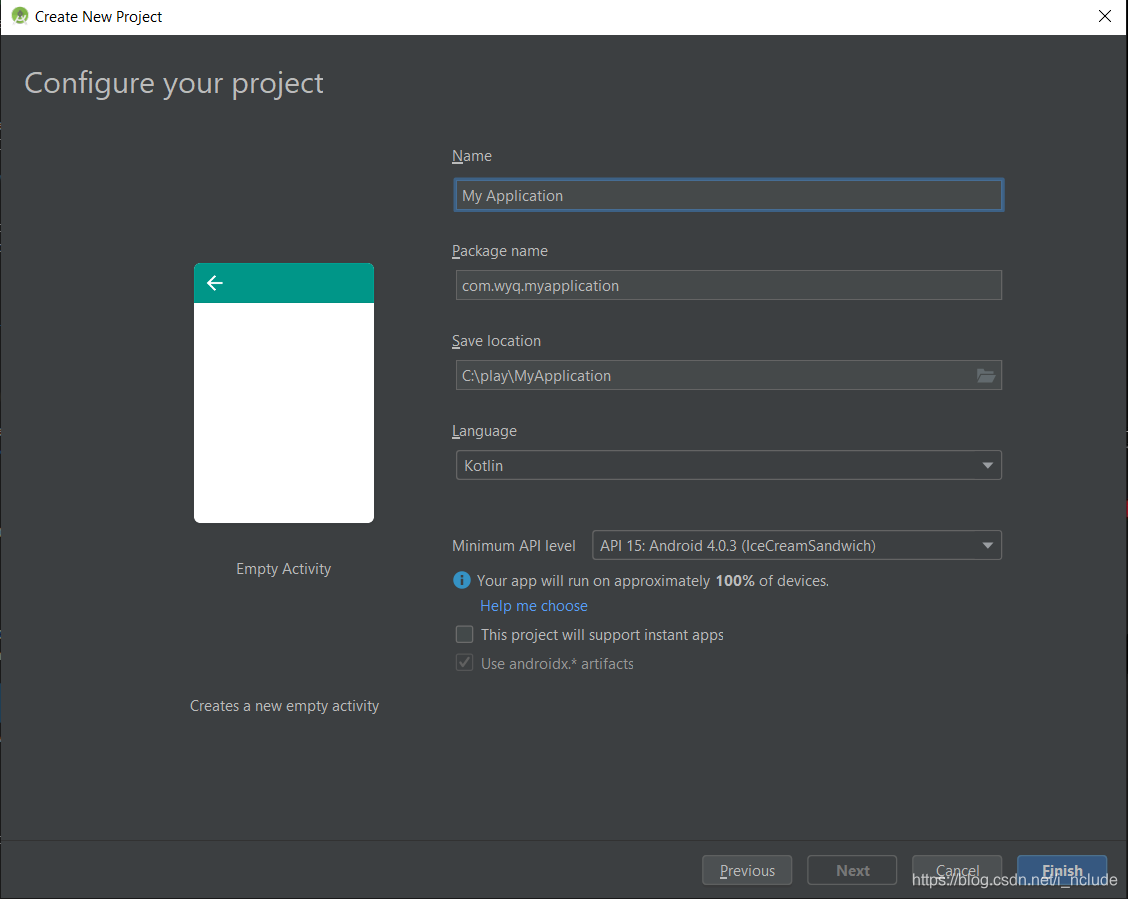
项目名(name):这个自己什么项目不知道吗?不知道的拉出去鞭尸
Packages name命名规则:(这里忽视我的命名规则嘻嘻)
一般命名规则:

com.公司名.项目名.模块名....

对于个人项目,分为:

1.individual(个体):
指个体项目,由个人发起,但非个人独立完成,可公开或私有项目,版权属于发起人

形式:indi.发起者名.项目名.模块名....

2.personal (个人私人):
指个人项目,由个人发起,并独立完成,可分享的项目,版权属于个人

形式:pers.个人.项目名.模块名....

3.private(私人):
指私有项目,由个人发起并独立完成,不用于分享的非公开项目,版权属于个人

形式:priv.个人.项目名.模块名....
SaveLocation ( 保存项目地址 ):
一般建立一个:workspace目录存放
Language
语言的话,我这里选择的是kotlin,毕竟是谷歌推荐的官方语言,以后也是趋势。当然java也不能丢下。
This project will support instant apps:
这个勾选上,在这个项目生成App内部可以通过appLink直接链接到其他App。
Use AndroidX artifacts:
使用AndroidX的API支持库。这个需要勾选上,不然很多对以前的支持包使用时会报错,最新的Android Studio默认是勾选上的。AndroidX是对Android Support Library的升级。Android Support Library中的API,它们的包名都是在android.support.*下面的,而AndroidX库中所有API的包名都变成了在androidx.*下面。Android Support Library有一些API支持4.0以前版本。但是现在大多数机器已经是4.0以后版本了,所以可以使用新的AndroidX的API支持库,已有应用只需要修改导包路径即可。
点击右上角Run执行按钮,没有找到虚拟机,需要创建。
这里选中这个图标
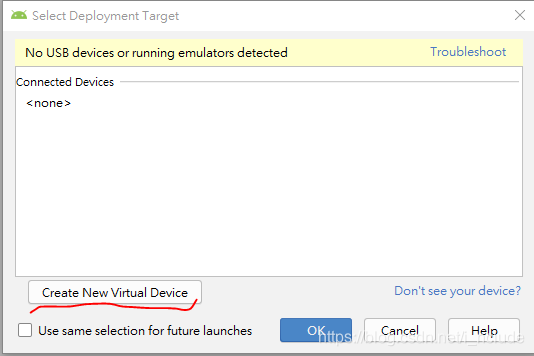
点击Creat New Virtual Device
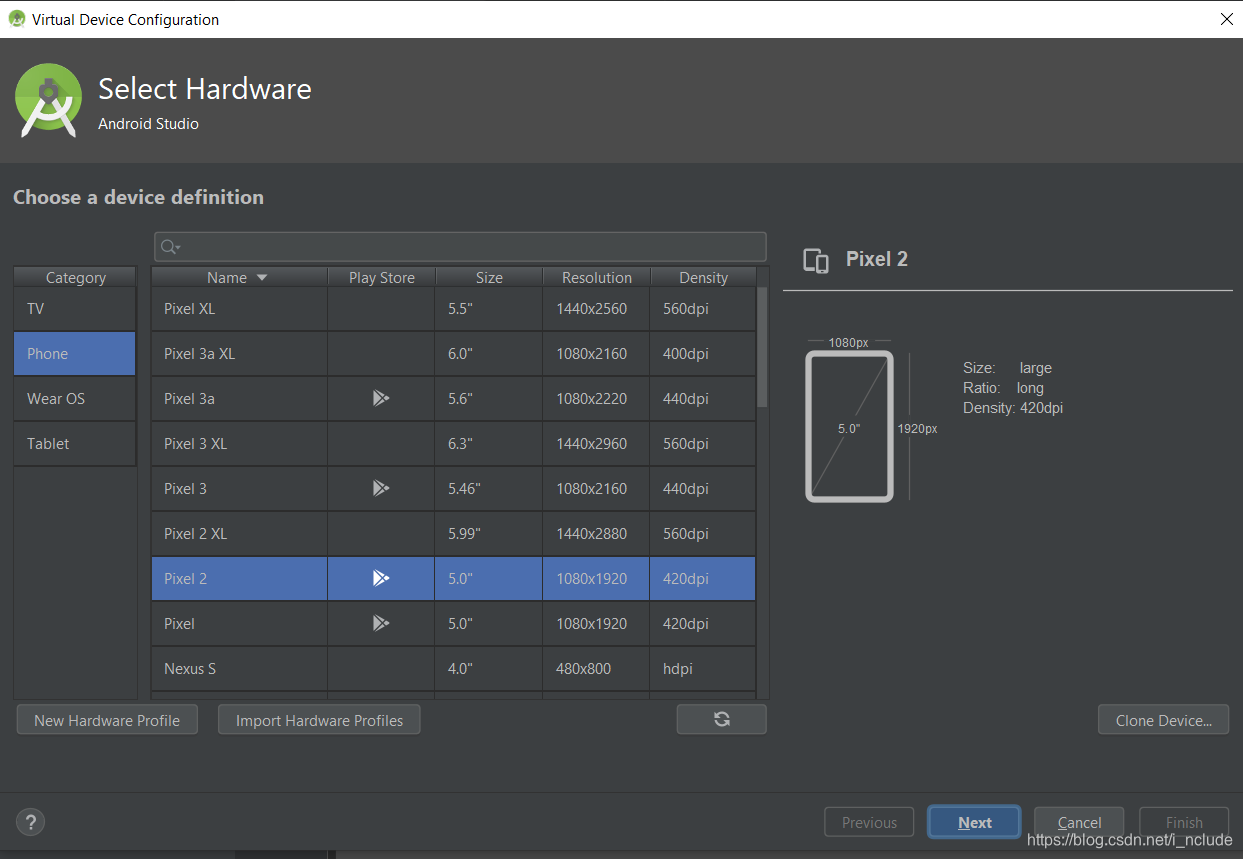
这里是选择你所需要的机型
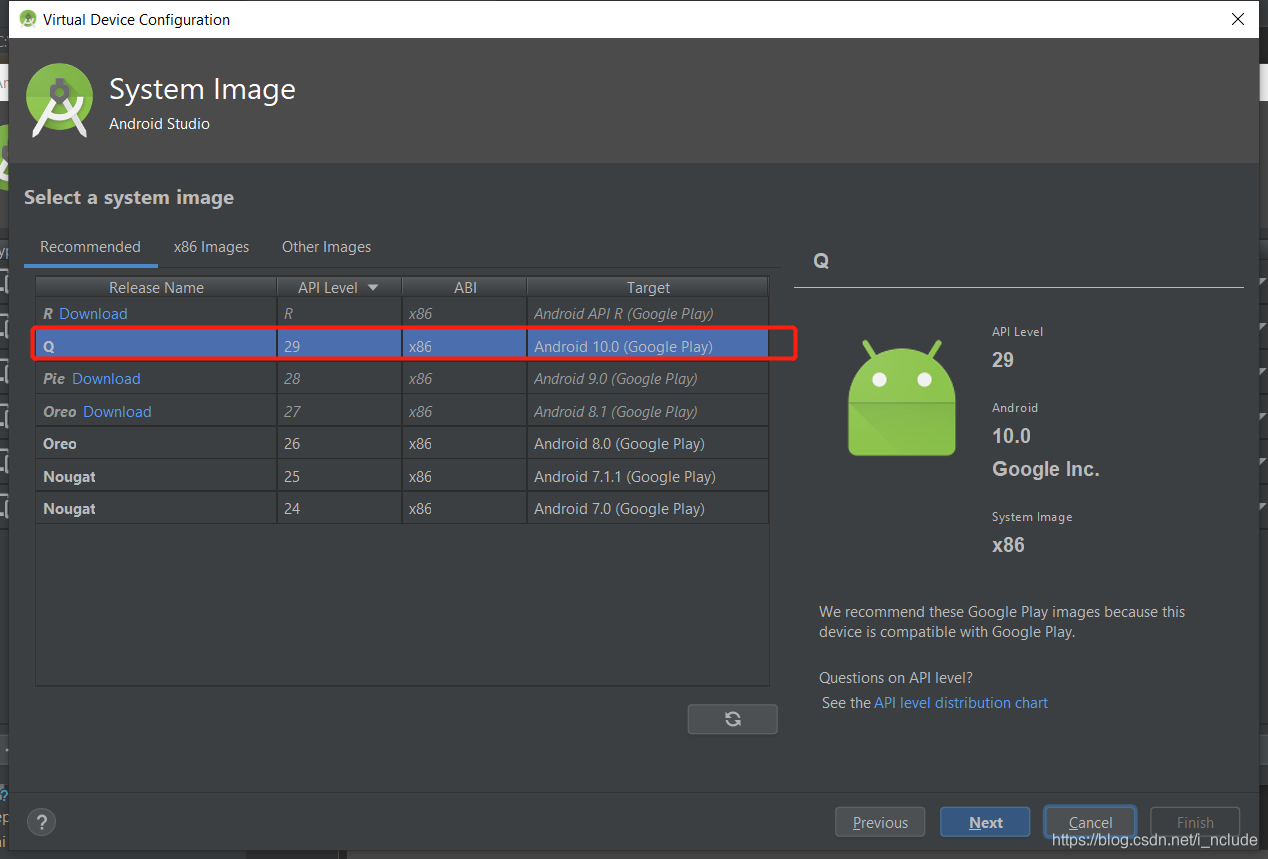
这里选择手机的系统版本,我选择的是android 10.0最新的
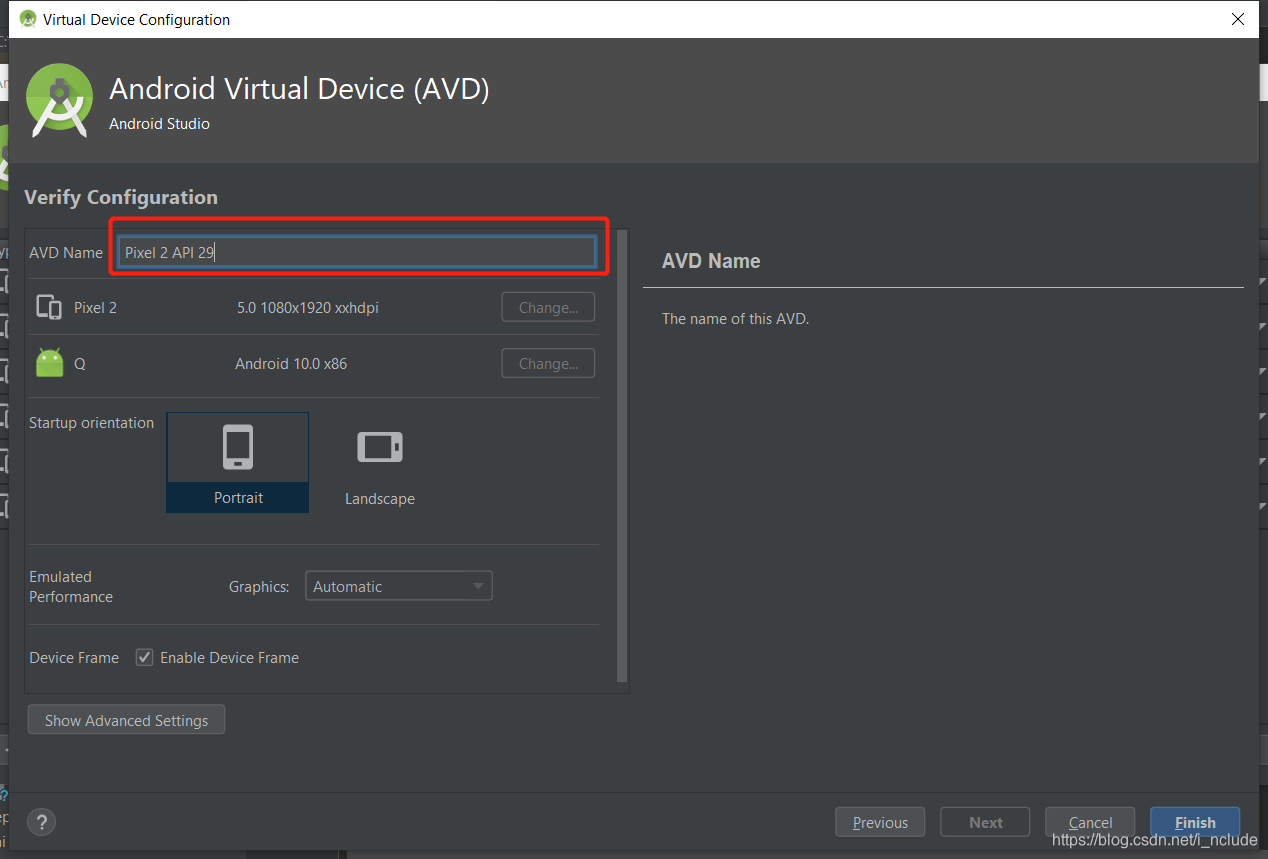
最后可以给你的设备起个名字,finish。
我一般这样创建一个新的Activity,因为懒。。。不用配置
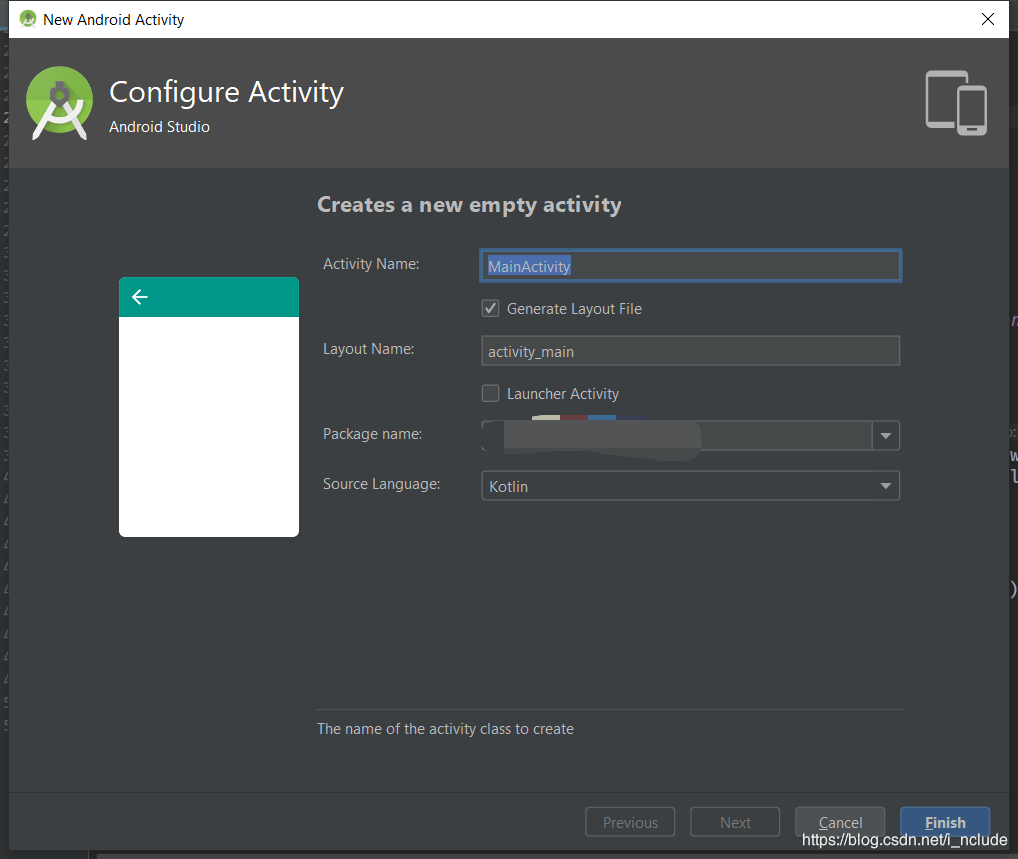
勾选Generate Layout File是什么意思?
表示会自动为FirstActivity创建一个对应的布局文件。
勾选Launcher Activity是什么意思?
表示会自动将FirstActivity设置为当前项目的主活动。
直接finish就好。
Andriod布局管理详情(1)–LinearLayout线性布局
*Andriod的布局方式共有6种,分别是LinearLayout(线性布局)、TableLayout(表格布局)、FrameLayout(帧布局)、RelativeLayout(相对布局)、GridLayout(网格布局)以及AbsoluteLayout(绝对布局)。
LinearLayout常用属性介绍

属性1:android:orientation 指定线性布局的方向(水平或者垂直)
属性2:android:width 线性布局的容器宽度
属性3:android:height 线性布局的容器高度
属性4:android:background 线性布局的背景
属性5:android:gravity 线性布局中,子容器相对于父容器所在的位置
1属性值:
android:orientation="horizontal"           指定线性布局方向:水平

android:orientation="vertical"               指定线性布局方向:垂直
2.属性值:
android:width="xxxdp"

指定线性布局的容器宽度为:xxxdp

android:width="wrap_content"

 指定线性布局的容器宽度为:根据容器内容宽度大小来填充屏幕宽度

android:width="match_parent"

 指定线性布局的容器宽度为:撑满整个屏幕宽度
3.属性值:
android:height="xxxdp"

 指定线性布局的容器高度为:xxxdp

android:height="wrap_content"

 指定线性布局的容器高度为:根据容器内容高度大小来填充屏幕高度

android:height="match_parent"

指定线性布局的容器高度为:撑满整个屏幕高度
4.属性值:
android:background="#000"

指定线性布局的背景为:黑色(rgb颜色)

android:background="@android:color/black"

指定线性布局的背景为:黑色(引用android系统自带的原始黑色)

andrid:backgrund="@color/colorPrimary"

指定线性布局的背景为:(根据res/color.xml 中的colorPrimary所定义的颜色设置)
5属性值:
android:gravity="center"

指定线性布局中,子容器相对于父容器所在的位置为:正中心

android:gravity="cente_verticalr"

指定线性布局中,子容器相对于父容器所在的位置为:垂直方向的正中心

android:gravity="center_horizontal"

 指定线性布局中,子容器相对于父容器所在的位置为:水平方向的正中心

android:gravity="left"

指定线性布局中,子容器相对于父容器所在的位置为:最左边(默认)

android:gravity="right"

指定线性布局中,子容器相对于父容器所在的位置为:最右边

android:gravity="top"

指定线性布局中,子容器相对于父容器所在的位置为:最上方(默认)

android:gravity="bottom"

 指定线性布局中,子容器相对于父容器所在的位置为:最下方
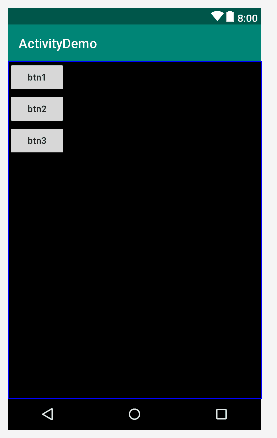
垂直方向:
<?xml version="1.0" encoding="utf-8"?>
<LinearLayout xmlns:android="http://schemas.android.com/apk/res/android"
    android:layout_width="match_parent"
    android:layout_height="match_parent"
    android:background="#000"
    android:orientation="vertical">

    <Button
        android:id="@+id/btn1"
        android:layout_width="wrap_content"
        android:layout_height="wrap_content"
        android:text="btn1"
        android:textAllCaps="false" />

    <Button
        android:id="@+id/btn2"
        android:layout_width="wrap_content"
        android:layout_height="wrap_content"
        android:text="btn2"
        android:textAllCaps="false" />

    <Button
        android:id="@+id/btn3"
        android:layout_width="wrap_content"
        android:layout_height="wrap_content"
        android:text="btn3"
        android:textAllCaps="false" />

</LinearLayout>
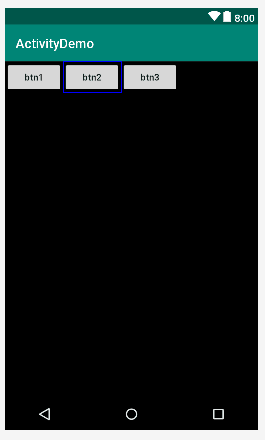
水平方向:
<?xml version="1.0" encoding="utf-8"?>
<LinearLayout xmlns:android="http://schemas.android.com/apk/res/android"
    android:layout_width="match_parent"
    android:layout_height="match_parent"
    android:background="#000"
    android:orientation="horizontal">

    <Button
        android:id="@+id/btn1"
        android:layout_width="wrap_content"
        android:layout_height="wrap_content"
        android:text="btn1"
        android:textAllCaps="false" />

    <Button
        android:id="@+id/btn2"
        android:layout_width="wrap_content"
        android:layout_height="wrap_content"
        android:text="btn2"
        android:textAllCaps="false" />

    <Button
        android:id="@+id/btn3"
        android:layout_width="wrap_content"
        android:layout_height="wrap_content"
        android:text="btn3"
        android:textAllCaps="false" />

</LinearLayout>
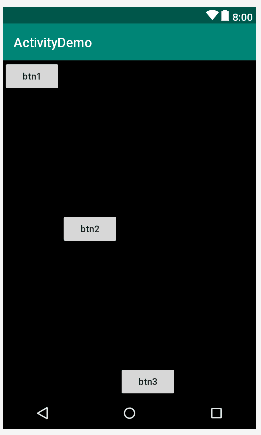
线性方向:水平,可以通过控件的android:layout_gravity属性的值来改变控件在垂直方向上的位置
<?xml version="1.0" encoding="utf-8"?>
<LinearLayout xmlns:android="http://schemas.android.com/apk/res/android"
    android:layout_width="match_parent"
    android:layout_height="match_parent"
    android:background="#000"
    android:orientation="horizontal">

    <Button
        android:id="@+id/btn1"
        android:layout_width="wrap_content"
        android:layout_height="wrap_content"
        android:layout_gravity="top"
        android:text="btn1"
        android:textAllCaps="false" />

    <Button
        android:id="@+id/btn2"
        android:layout_width="wrap_content"
        android:layout_height="wrap_content"
        android:layout_gravity="center_vertical"
        android:text="btn2"
        android:textAllCaps="false" />

    <Button
        android:id="@+id/btn3"
        android:layout_width="wrap_content"
        android:layout_height="wrap_content"
        android:layout_gravity="bottom"
        android:text="btn3"
        android:textAllCaps="false" />

</LinearLayout>
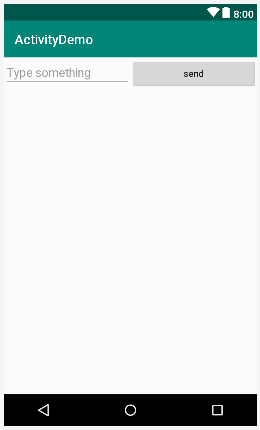
线性方向:水平,通过设置控件的android:layout_weight属性来设置控件与控件之间,在宽度上的权重比例大小,这里就将EditText控件与Button控件的宽度比例设置为1:1,前提是必须先将这两个控件的android:layout_width=“0dp”.
代码:
<?xml version="1.0" encoding="utf-8"?>
<LinearLayout xmlns:android="http://schemas.android.com/apk/res/android"
    android:layout_width="match_parent"
    android:layout_height="match_parent"
    android:orientation="horizontal">

    <EditText
        android:id="@+id/et1"
        android:layout_width="0dp"
        android:layout_height="wrap_content"
        android:layout_weight="1"
        android:hint="Type something" />

    <Button
        android:layout_width="0dp"
        android:layout_height="wrap_content"
        android:layout_weight="1"
        android:text="send"
        android:textAllCaps="false" />

</LinearLayout>
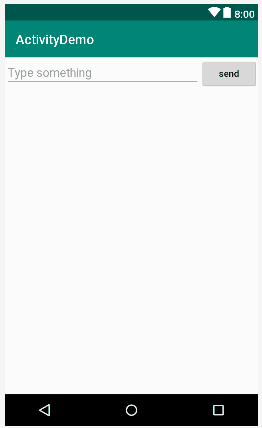
如果只是将EditText控件的
android:layout_width=“0dp”
android:layout_weight=“1”
而Button控件的
android:layout_width="wrap_content“”
android:layout_weight属性不设置(注意这里没设置了)
<?xml version="1.0" encoding="utf-8"?>
<LinearLayout xmlns:android="http://schemas.android.com/apk/res/android"
    android:layout_width="match_parent"
    android:layout_height="match_parent"
    android:orientation="horizontal">

    <EditText
        android:id="@+id/et1"
        android:layout_width="0dp"
        android:layout_height="wrap_content"
        android:layout_weight="1"
        android:hint="Type something" />

    <Button
        android:layout_width="wrap_content"
        android:layout_height="wrap_content"
        android:text="send"
        android:textAllCaps="false" />

</LinearLayout>
关于android:id="@+id/xx"的理解
@+id/height
“@”符号是提示XML解析器应该把后面的字符串解析成标识符号。
“+”符号代表将添加一个标识符号。
“id/”表示这个标识符号回被归类在“id”下面。
“height"是这个界面主见的“android:id”。
以后的程序中,会使用“R.id.height”来取得这个界面组件。因此”@+id/height"的意思是我们在此创建了名为“height”的标识符,可以通过这个标识符来控制所对应的界面组件,“R”类会自动配置一个地址给这个界面组件。“R”类的内容,这可以通过查看“R.java”文件得知。
你竟然看完了?????