上一篇:写给新手的SpringBoot完整教程——01入门篇
写给新手的SpringBoot完整教程——02SpringBoot配置篇
一.配置文件
1.配置文件概述
上一讲我们已经使用SpringBoot Initializer的方式创建了一个项目,而这个项目的Resources目录下就有一个application.properities配置文件,而事实上SpringBoot项目还哟哟另外一种配置文件application.yml,(注意上面两种配置文件的文件名是不允许改变的,为固定写法)。配置文件的作用就在与修改默认配置。
简单介绍一下之前我们没有接触过的.yml文件;
我们可以直观的比较三种格式的写法:

而我们以前的xml文件则是这么配置:
<server>
	<port>8088</port>
</server>
2.YAML语法介绍
YAML(YAML Ain't Markup Language)
	YAML  A Markup Language:是一个标记语言
	YAML   isn't Markup Language:不是一个标记语言;
标记语言:
	以前的配置文件;大多都使用的是  xxxx.xml文件;
	YAML:以数据为中心,比json、xml等更适合做配置文件;
I.基本语法
k:(空格)v:表示一个键值对;以空格的缩进来表示层级关系,只要是左对齐的就表示在同一层级。
server:
port: 8088
path: /hello
注意yml的属性与值是大小写敏感的(一定要注意空格)
II.值的写法
常量:数字,字符串,布尔类型:
k: v:就是字面直接来写,字符串不需要加上单引号或者双引号
“”:双引号,不会转义双引号里面的特殊字符,会输出为特殊字符的字面意思,如
name: “jack \n tom”,输出为jack 换行 tom
‘’:单引号,会转义特殊字符,特殊字符最终只是一个普通字符数据输出:
name: “jack \n tom” 输出为jack \n tom
对象,Map(键值对):
当对象作为值的时候,我们通过控制缩进来实现,如下:
friends:
	name: jack
	age: 20
另外一种写法是行内写法:
friends: {name: jack,age: 20}
数组(List,Set):
直接上样例:
books:
	- math
	- english
	- chinese
books: [math,english,chinese]
3.ymal文件值读取注入到类对象
首先我们创建Bean对象:
package com.jack.springbootquick.bean;
import org.springframework.boot.context.properties.ConfigurationProperties;
import org.springframework.stereotype.Component;
import java.util.Date;
import java.util.List;
import java.util.Map;
/**
 * 将配置文件里面的属性映射到Book的每一个属性里面去
 *我们使用@ConfigurationProperties来实现,而prefix的值就是指定
 * 了与配置文件当中的哪一个(在这里就是值Book)进行映射,但是这个注解要想生效就必须
 * 要使得Book组件为容器里面的组件,那么我们需要加上@Component
 */
@ConfigurationProperties(prefix = "book")
@Component
public class Book {


    String name;
    Date time;
    Double price;
    Map<String,String> map;
    List<String> list;
    Math math;

    public String getName() {


        return name;
    }

    public void setName(String name) {


        this.name = name;
    }

    public Date getTime() {


        return time;
    }

    public void setTime(Date time) {


        this.time = time;
    }

    public Double getPrice() {


        return price;
    }

    public void setPrice(Double price) {


        this.price = price;
    }

    public Map<String, String> getMap() {


        return map;
    }

    public void setMap(Map<String, String> map) {


        this.map = map;
    }

    public List<String> getList() {


        return list;
    }

    public void setList(List<String> list) {


        this.list = list;
    }

    public Math getMath() {


        return math;
    }

    public void setMath(Math math) {


        this.math = math;
    }

    @Override
    public String toString() {


        return "Book{" +
                "name='" + name + '\'' +
                ", time=" + time +
                ", price=" + price +
                ", map=" + map +
                ", list=" + list +
                ", math=" + math +
                '}';
    }
}
package com.jack.springbootquick.bean;
import org.springframework.boot.context.properties.ConfigurationProperties;
import org.springframework.stereotype.Component;
@Component
@ConfigurationProperties(prefix = "math")
public class Math{


    String teacherName;
    Integer nums;
    @Override
    public String toString() {


        return "Math{" +
                "teacherName='" + teacherName + '\'' +
                ", nums=" + nums +
                '}';
    }

    public String getTeacherName() {


        return teacherName;
    }

    public void setTeacherName(String teacherName) {


        this.teacherName = teacherName;
    }

    public Integer getNums() {


        return nums;
    }

    public void setNums(Integer nums) {


        this.nums = nums;
    }
}
测试类如下:
import com.jack.springbootquick.bean.Book;
import org.junit.Test;
import org.junit.runner.RunWith;
import org.springframework.beans.factory.annotation.Autowired;
import org.springframework.boot.test.context.SpringBootTest;
import org.springframework.test.context.junit4.SpringRunner;
@RunWith(SpringRunner.class)
@SpringBootTest
public class SpringbootquickApplicationTests {


    @Autowired
    Book book;
    @Test
    public void contextLoads() {


        System.out.println(book);
    }
}
注意:我之前一直是报空值(null),最后我发现问题在于Test要用Junit包的,而不是org.junit.jupiter.api下面的Test注解。
然后导包:
<!--导入配置文件处理器,配置文件进行绑定就会有提示-->
<dependency>
    <groupId>org.springframework.boot</groupId>
    <artifactId>spring-boot-configuration-processor</artifactId>
    <optional>true</optional>
</dependency>
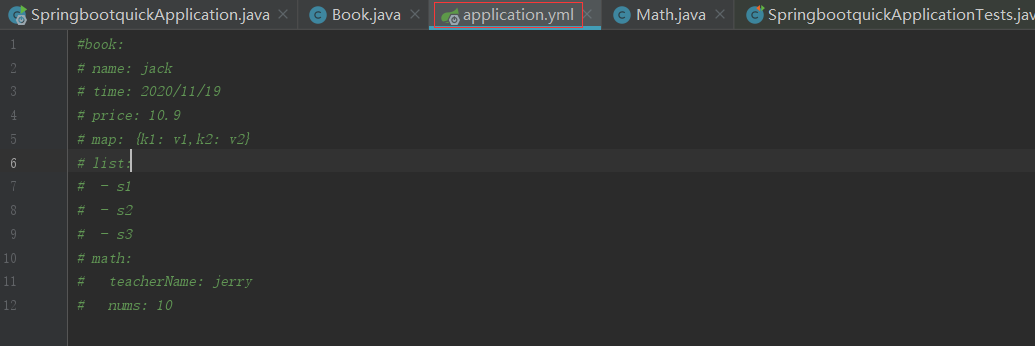
导包之后我们开始编写application.yaml文件内容如下(由于导了依赖我们写ymal文件时就会有提示):
book:
 name: jack
 time: 2020/11/19
 price: 10.9
 map: {k1: v1,k2: v2}
 list:
  - s1
  - s2
  - s3
 math:
   teacherName: jerry
   nums: 10
输出结果如下:

4.properties文件值读取注入到类对象中
我们要先把前面application.yml的book内容注释掉
那么application.properties的内容为:
#配置Book的值
book.name=李四
book.time=2020/11/19
book.price=10.9
book.list=s1,s2,s3
book.map.k1=v1
book.map.k2=v2
book.math.teacherName=jerry
book.math.nums=10
其他代码依然使用yml时的内容,测试结果为:

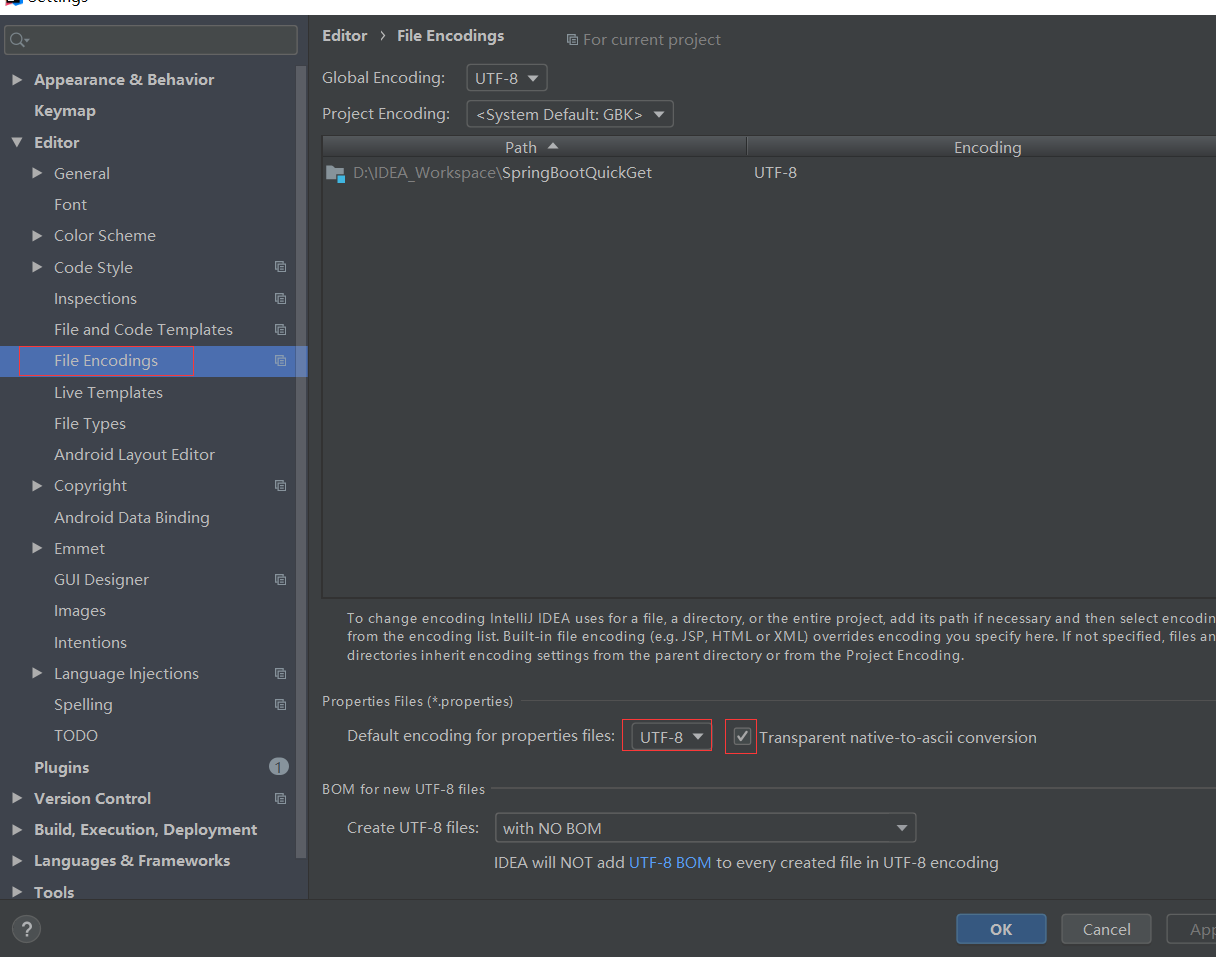
出现了乱码的现象(注意在yml文件方式下不会乱码,虽然上一小节没有演示),这是由于我们的IDEA是UTF-8的编码,而properties为GBK编码的缘由。作如下修改:

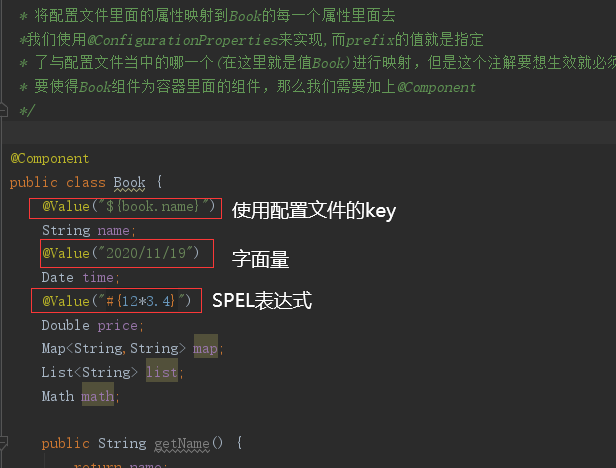
5.使用@Value将配置文件值读取注入到类对象中
我们将@ConfigurationProperties(prefix = "book")删除掉,Book类上面的@Component保留,然后使用@Value(为Spring底层的一个注解,可以使用${key},字面量,#{spel})来给Book的属性注入值。
如果对于Spring的使用忘记了可以参考我的博客https://blog.csdn.net/qq_44932835/article/details/107502103

6.@Value获取值和@ConfigurationProperties获取值比较
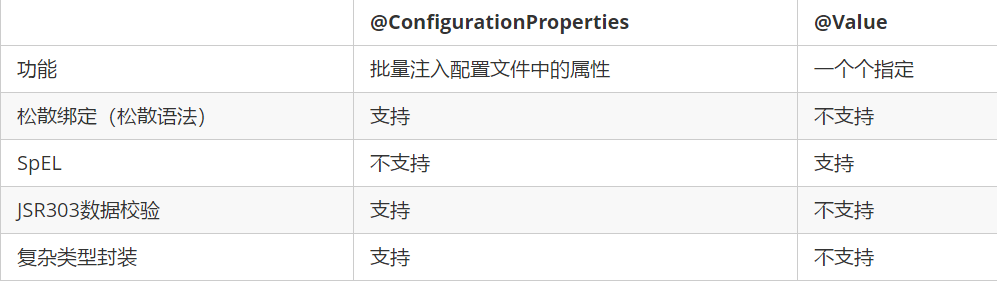
配置文件yml还是properties他们都能获取到值;
如果说,我们只是在某个业务逻辑中需要获取一下配置文件中的某项值,使用@Value;
如果说,我们专门编写了一个javaBean来和配置文件进行映射,我们就直接使用@ConfigurationProperties;
所谓松散绑定简单理解就是是否可以将下面类似的属性名视为一致:
last-name
lastName
last_name
JSR303数据校验我们做如下演示:
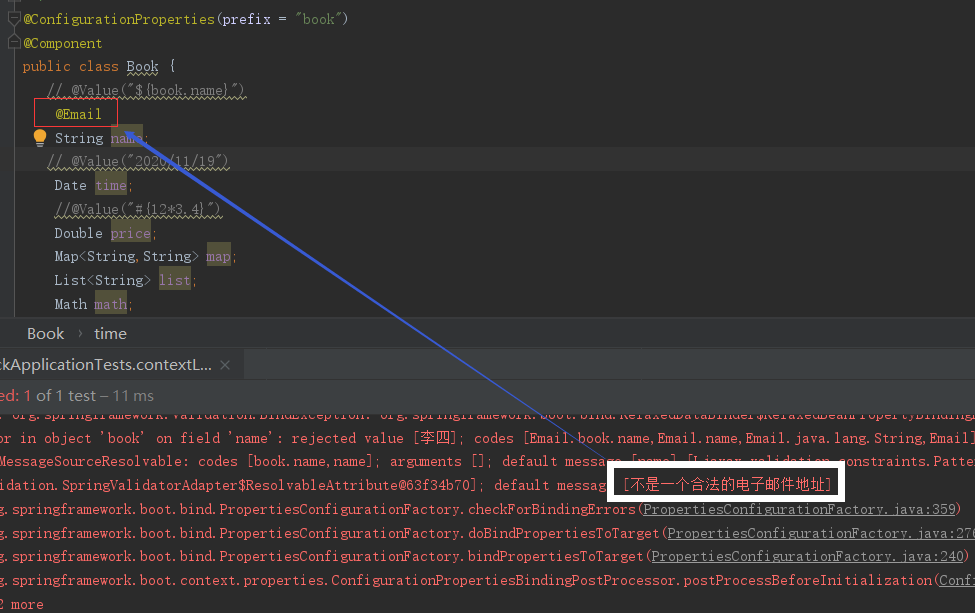

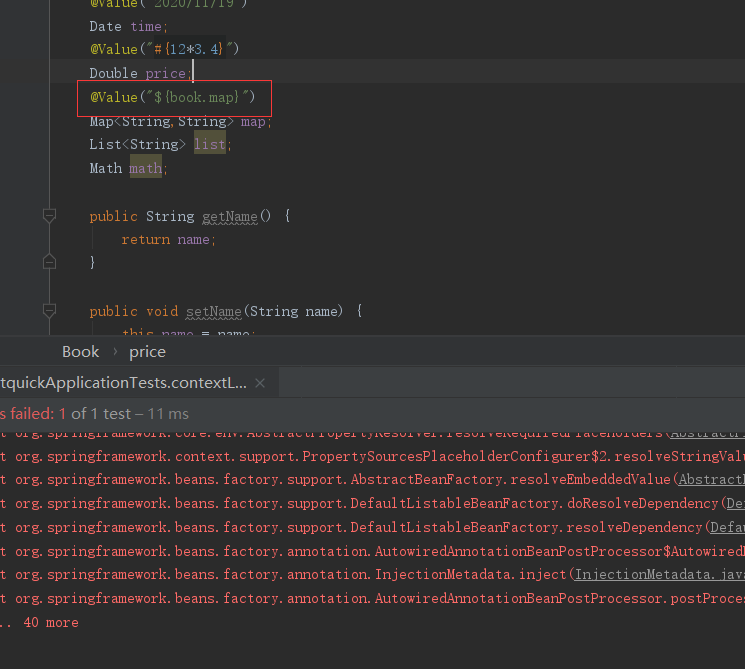
@Value不支持复杂类型(List是支持的)如下演示:
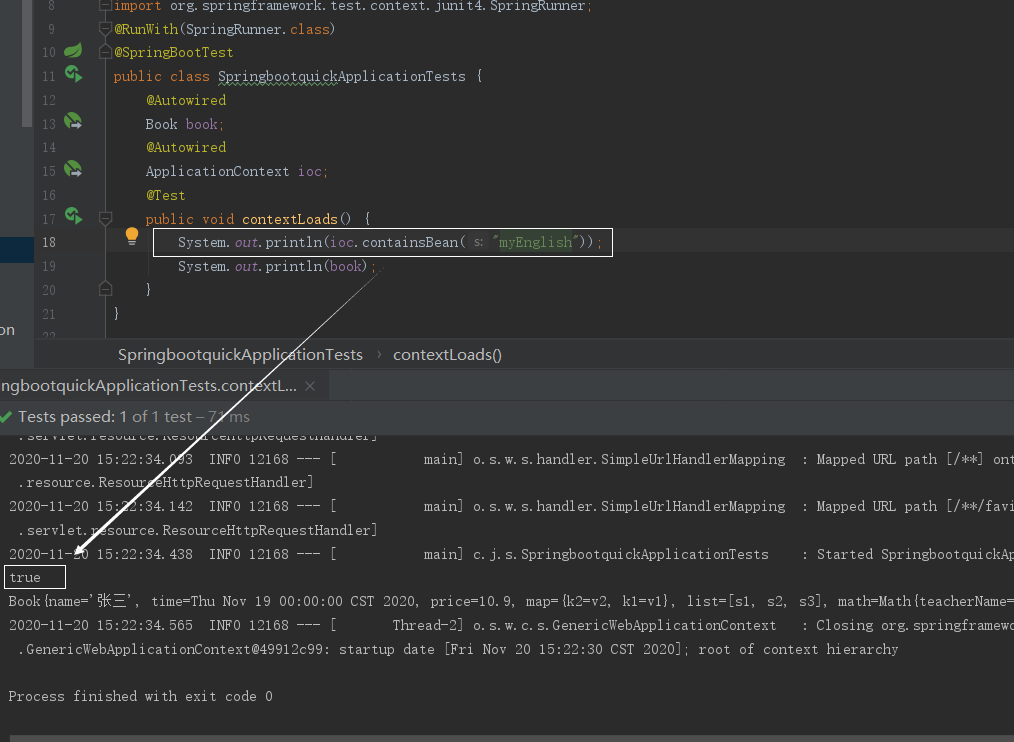
7.@PropertySource和@ImportResource的使用
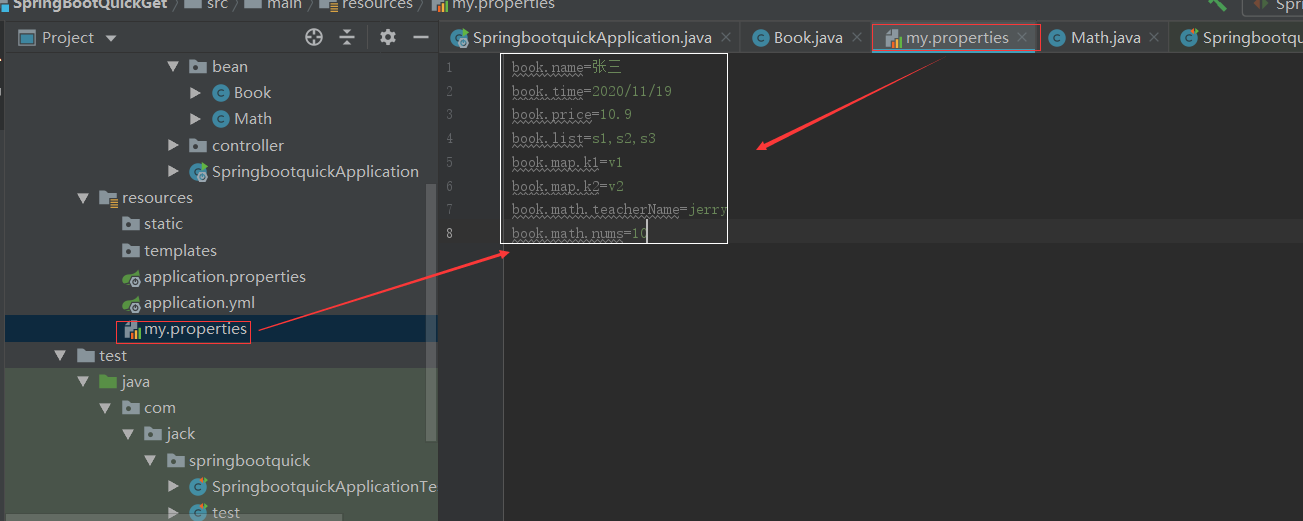
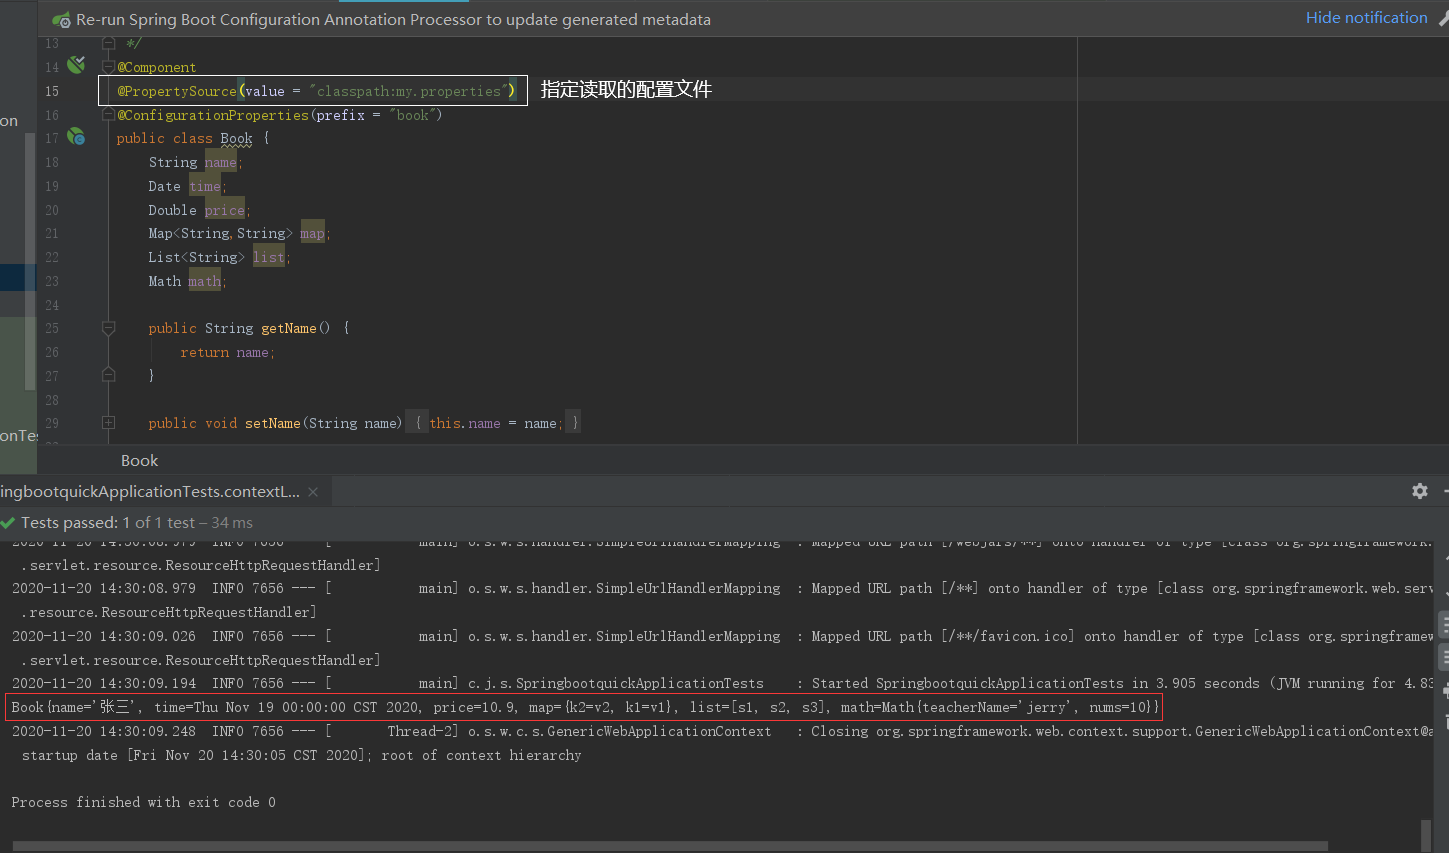
I.@PropertySource
该注解是用于指定我们要读取的文件。
首先我们需要把application.properties,application.yml的内容都注释掉,因为他们的优先级要高于我们自己创建配置文件,而前者又比后者的优先级高。
II.@ImportResource
该注解的作用是导入Spring的配置文件,并使得文件内容生效。SpringBoot本身是没有Spring的配置文件的,而且我们自己写的也不会生效,那么这个时候我们就要使用该直接来帮助我们了。
首先我们先不要使用该注解作如下演示:
创建Bean:
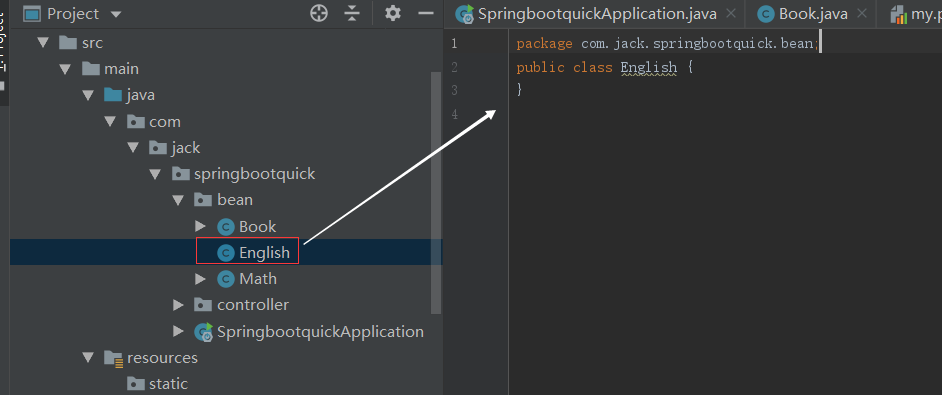
编写beans.xml:

<?xml version="1.0" encoding="UTF-8"?>
<beans xmlns="http://www.springframework.org/schema/beans"
       xmlns:xsi="http://www.w3.org/2001/XMLSchema-instance"
       xsi:schemaLocation="http://www.springframework.org/schema/beans http://www.springframework.org/schema/beans/spring-beans.xsd">
<bean id="english" class="com.jack.springbootquick.bean.English"></bean>
</beans>
最后我们来测试一下:
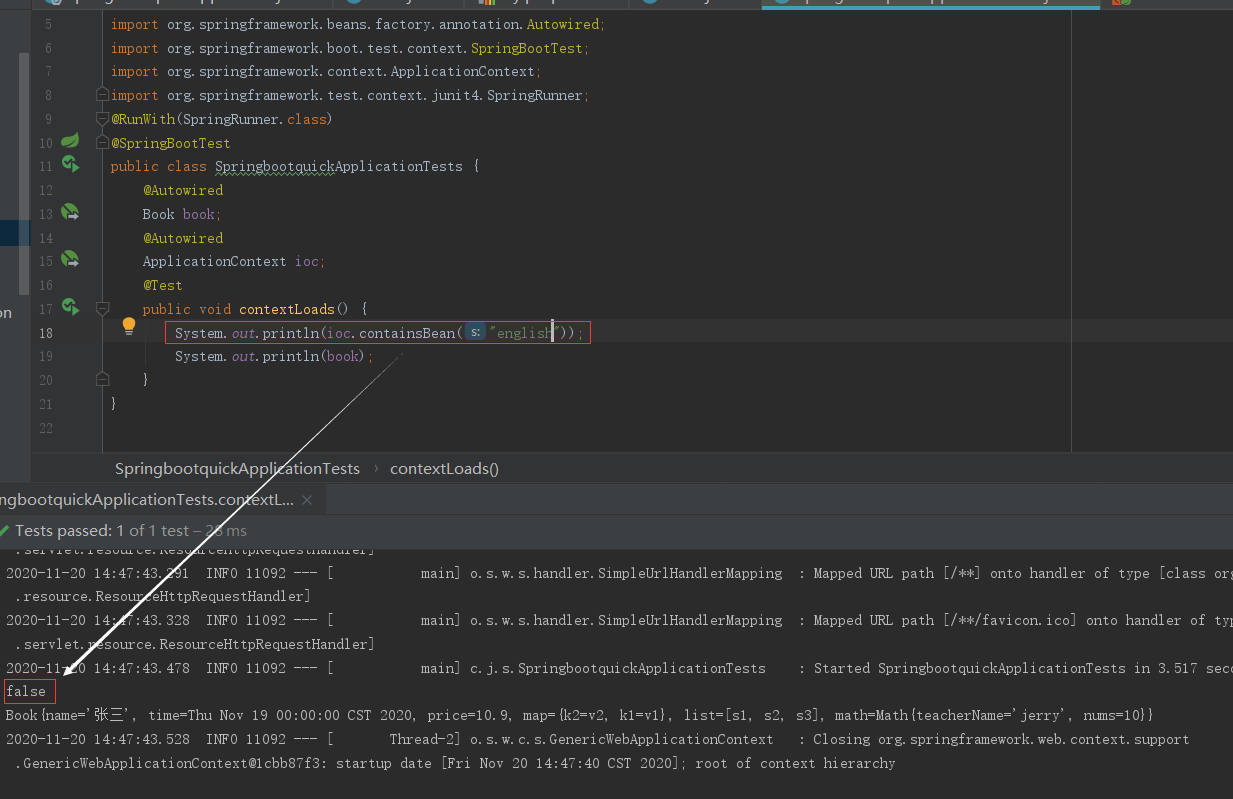
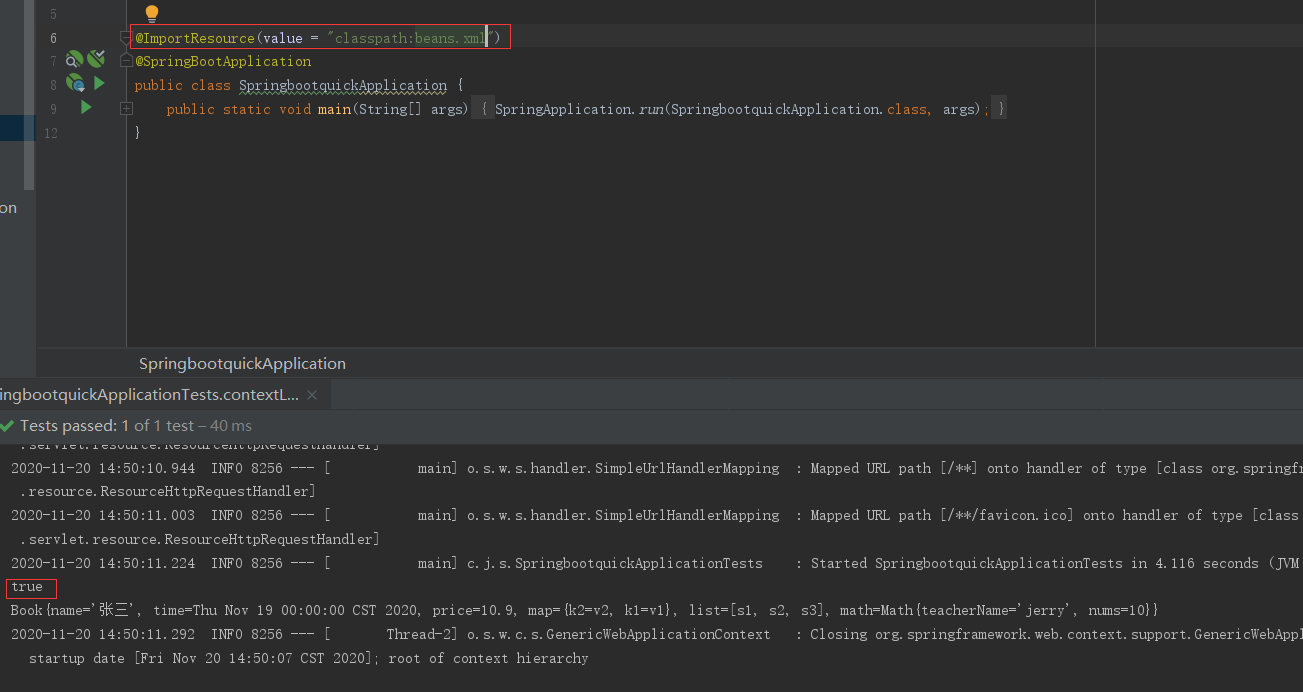
我们在主配置类上面加上@ImportSource注解再次测试如下:
二.配置类的使用
虽然我们可以使用@ImportResource来使用Spring的配置文件的方式向容器中注入组件,但是SpringBoot并不推荐使用这种方式,更推荐使用配置类的方式(全注解的方式)。
使用@Configuration和@Bean组合
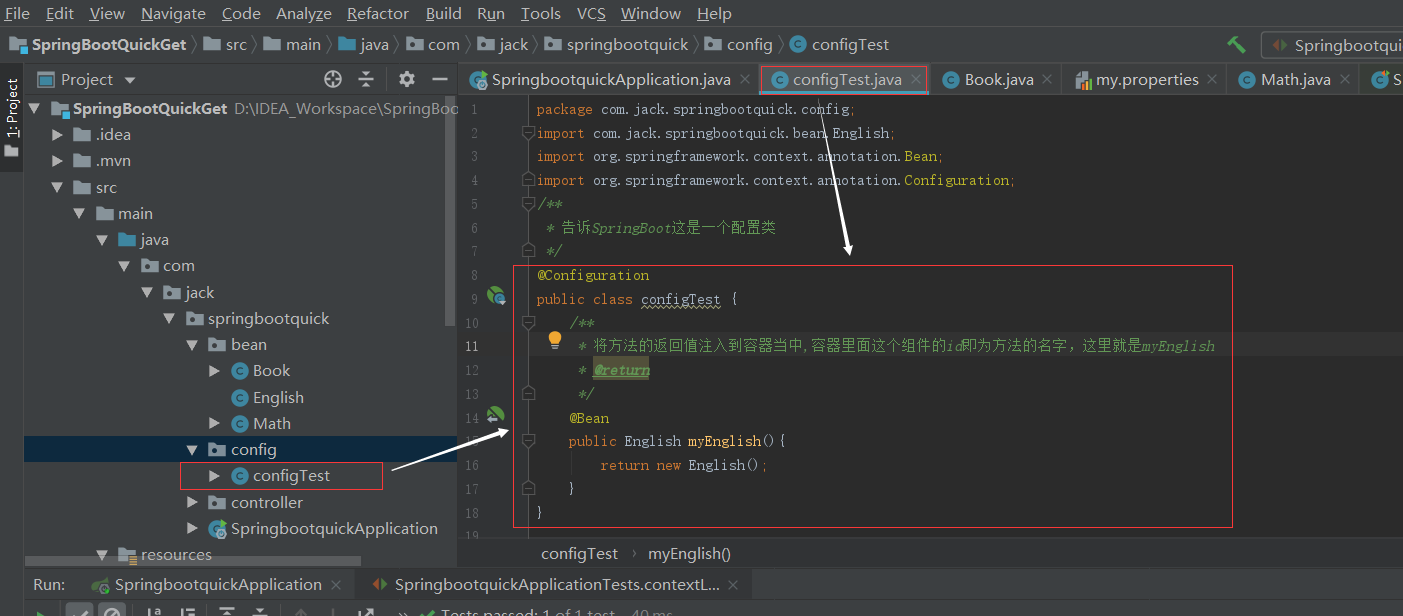
测试结果如下:
三.配置文件占位符
首先声明这一节介绍的内容在application.yml和application.properties文件里面都可以使用。
随机数与指定默认值
${

    random.value}、${

    random.int}、${

    random.long}
${

    random.int(10)}、${

    random.int[1024,65536]}
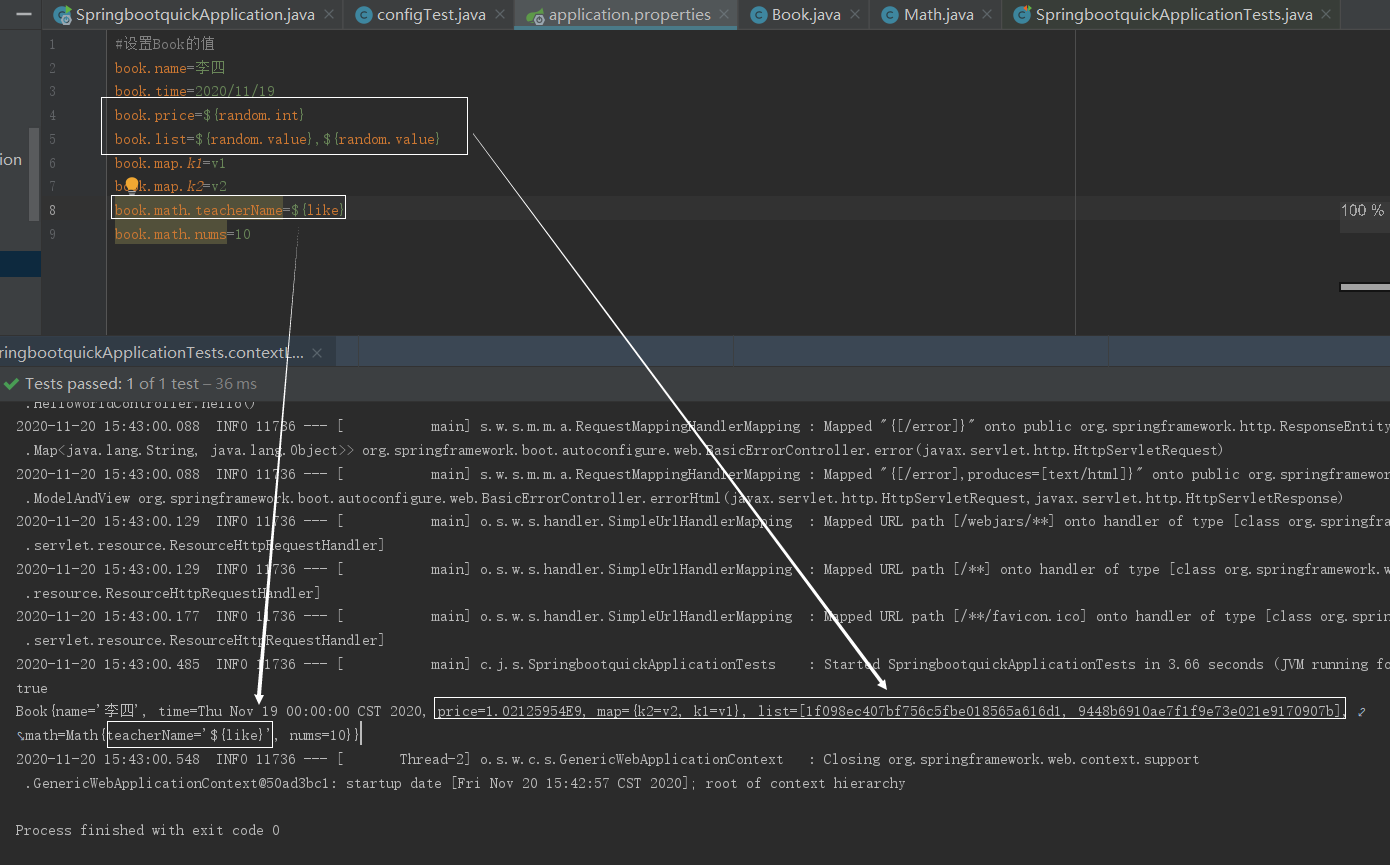
这里可能对于那个${like},会有点疑惑,这个like是我随便写的,当没有给这个like赋值的时候就直接把${like}当成一个值了,下面再给出一个例子就明白了:
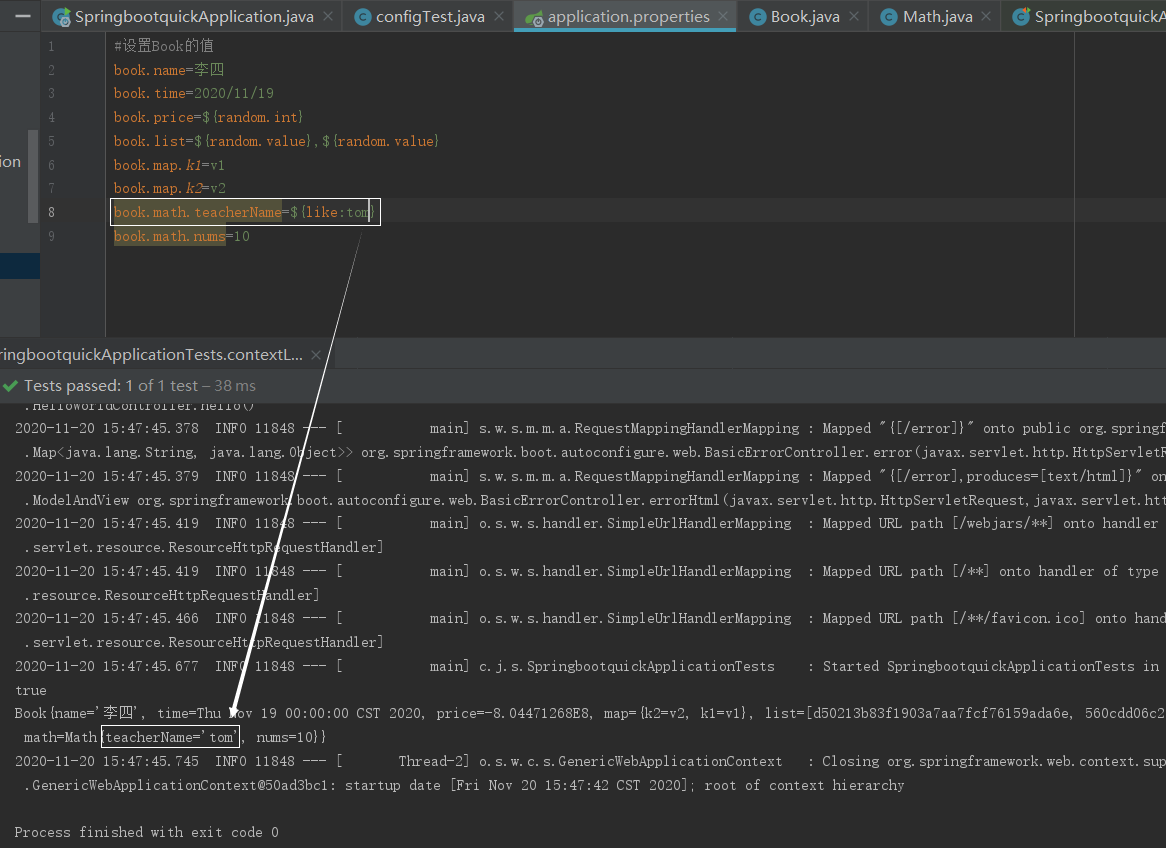
当没有给like赋值的时候这里就取了它的默认值tom。
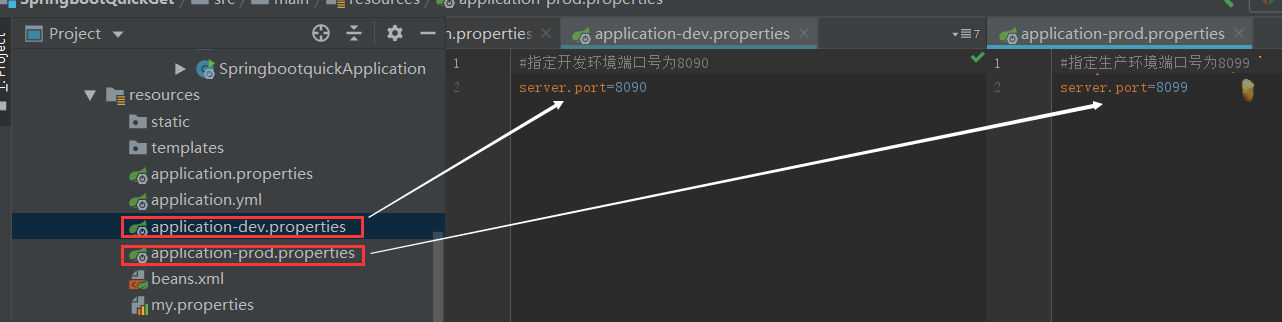
四.Profile文件的使用
1.多Profile文件
我们在主配置文件编写的时候可以是文件名可以是application-{profile}.properties/yml,而默认情况使用的是application.properties里面的内容
但是光这样新建了文件并不能起作用,我们还需要激活,如下:

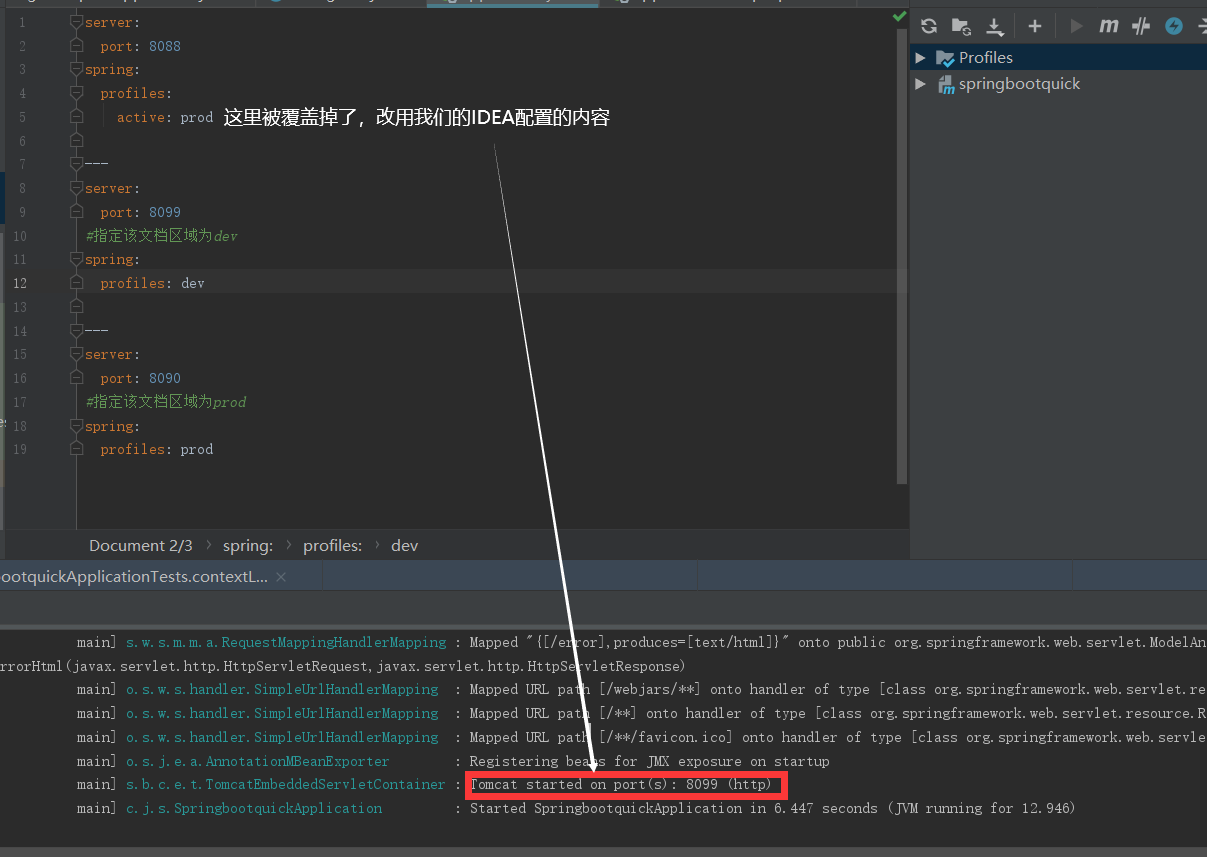
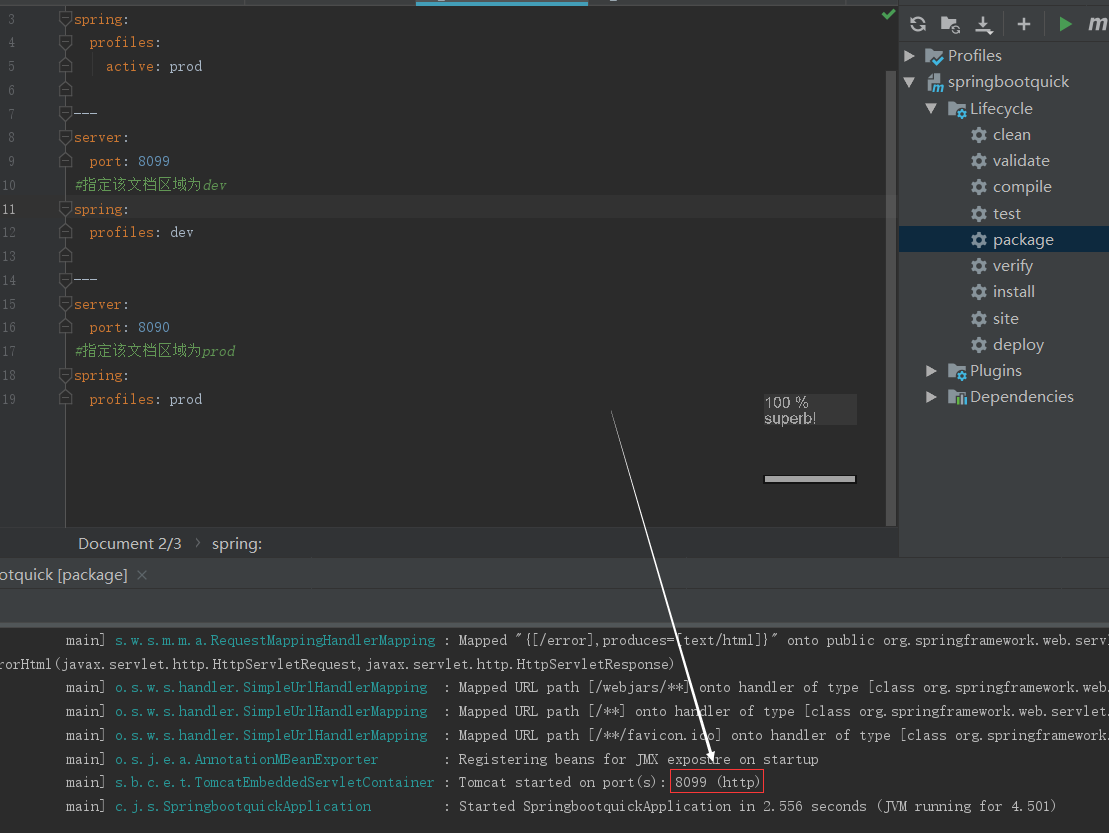
2.yml支持多文档块方式
先把application.properties的激活部分注释掉。同时application-dev.properties application-prod.properties的内容也注释掉(如果不注释掉properties文件的优先级比较高那么yaml文件的文档块就不会生效了)。

3.激活指定Profile
前面我们其实已经涉及到了部分的激活相关的使用了,接下来我们介绍IDEA配置与命令行的方式。
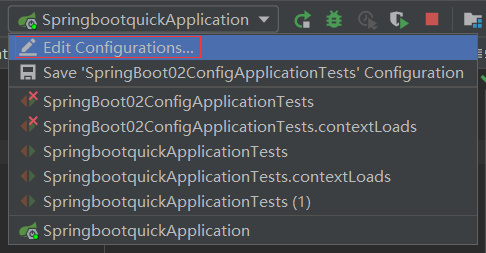
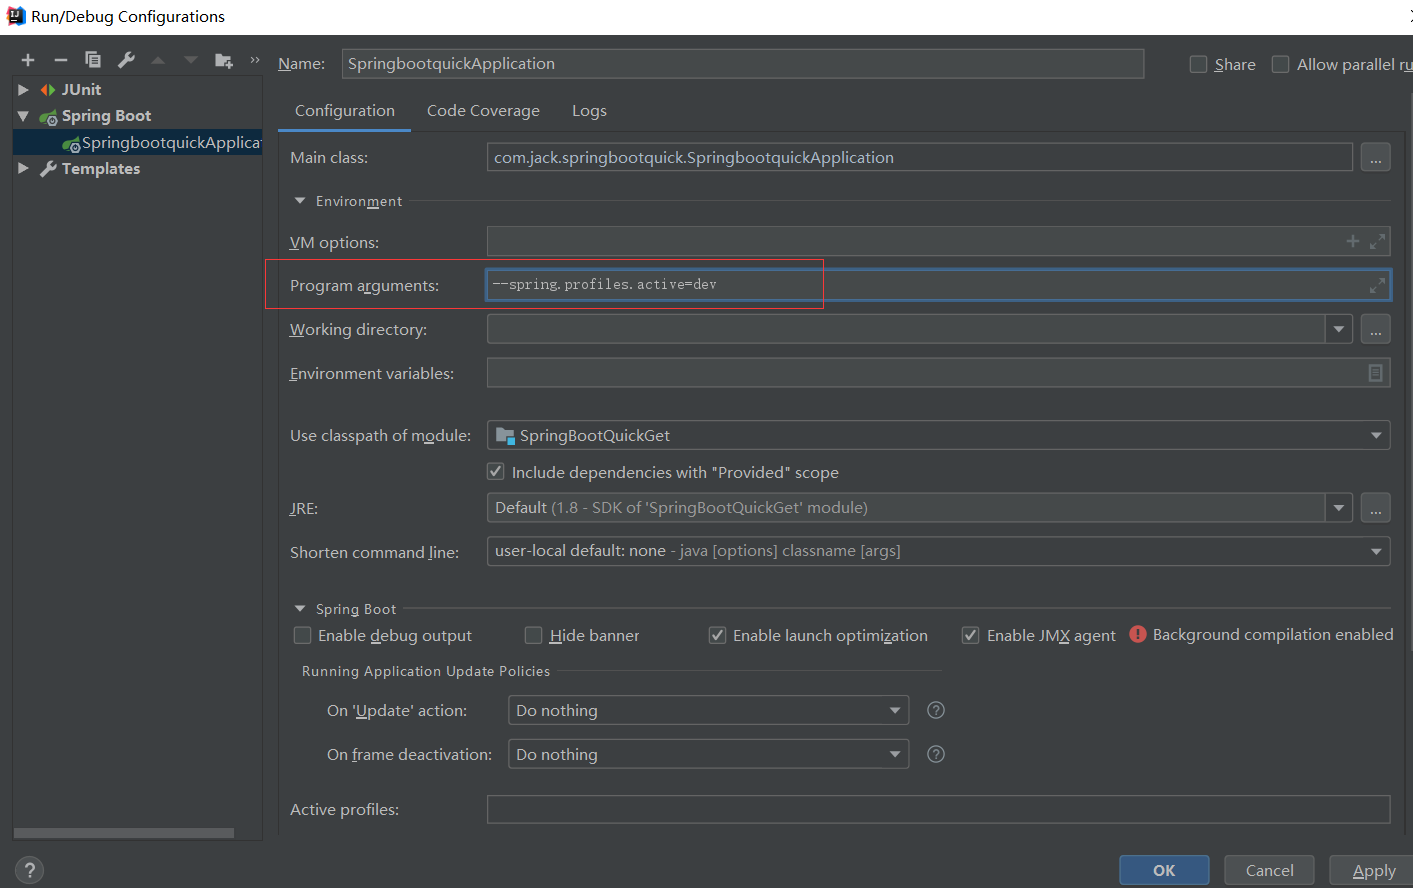
接下来介绍IDEA虚拟机参数配置:

接下来介绍命令行的方式:java -jar D:\IDEA_Workspace\SpringBootQuickGet\target\springbootquick-0.1.jar --spring.profiles.active=dev
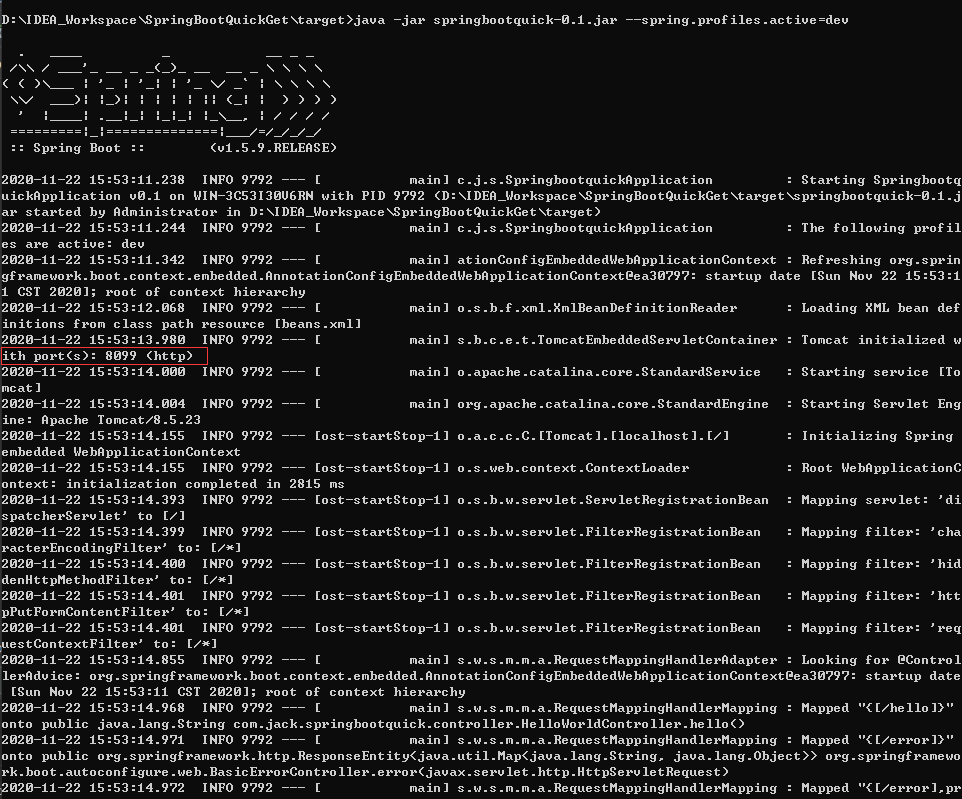
五.配置文件加载优先级
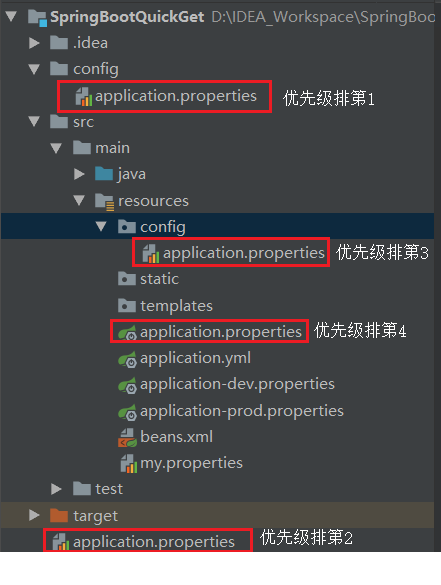
SpringBoot会根据上面文件的位置来选择优先级最高的读取,而优先级低的则会被覆盖(上面的config包名字不能改动,.properties也可以是.yml),但是如果高优先级没有的配置低优先级的文件有,也会去使用低优先级的配置,这个叫做配置互补,下面举个例子:

在控制台我们得到:
Tomcat started on port(s): 8080 (http)
访问如下:

我们还可以通过spring.config.location来改变默认的配置文件位置,这个一般在运维的时候使用,就是项目打包后,使用命令行的方式来与默认的配置互补使用:
java -jar D:\IDEA_Workspace\SpringBootQuickGet\target\springbootquick-0.1.jar --spring.config.location = D:/application.properties