目录
spring boot 官方 guide
高人写的 spring boot 学习材料
spring boot是基于spring开发项目的起点。spring boot的设计是为了让你尽可能快的跑起来你的应用程序而尽可能减少你的配置文件。
spring boot 解决了spring的问题
- 起步依赖(对pom.xml的优化):
- 使用spring boot只需要在pom文件里添加一个stater依赖即可。操作方便
- 自动配置
- spring boot会自动将一些配置类的bean注册进ioc容器,我们只需要在需要使用的地方用
@Autowired或者@Resourse注解来注入。 - spring boot项目会把一些默认的内容进行配置,在使用过程中一般情况下不需要进行配置,除非要进行个性化配置。
- spring boot会自动将一些配置类的bean注册进ioc容器,我们只需要在需要使用的地方用
单元测试和热部署
单元测试
- pom.xml
<dependency> <groupId>org.springframework.boot</groupId> <artifactId>spring-boot-starter-test</artifactId> <scope>test</scope> </dependency> - Test类上添加
@RunWith(SpringRunner.class) // 测试启动器,并加载Spring Boot测试注解 @SpringBootTest - 测试方法内如果需要使用ioc容器中的bean,需要在Test类中使用
@Autowired进行注入。
热部署
- pom.xml
<!-- 引入热部署依赖 --> <dependency> <groupId>org.springframework.boot</groupId> <artifactId>spring-boot-devtools</artifactId> </dependency> - 打开项目自动编译
【File】=>【Settings】=>【Compiler】=>打开
Build project automatically选项 - 打开程序运行时子自动编译功能
Ctrl+Shift+Alt+/打开Maintenance选项框,并打开Registry页面,勾选compiler.automake.allow.when.app.running复选框 - 可能有的版本需要在程序代码更新后,手动点击
build按钮
application.properties文件配置
- pojo配置application.properties内容提示
- pom.xml
<dependency> <groupId>org.springframework.boot</groupId> <artifactId>spring-boot-configuration-processor</artifactId> <optional>true</optional> </dependency> - 在pojo类上添加注解
@Component和@ConfigurationProperties(prefix="person") - 在application.properties文件中,输入前缀person时,会在后面进行配置提示。
引入自定义配置文件
- java类中如果需要读取配置名称不是application开头的配置文件的内容时需要添加如下配置
@PropertySource("classpath:test.properties")
随机数设置及参数间引用
- 随机数设置
my.secret=${random.value} // 配置随机值
my.number=${random.int} // 配置随机整数
my.bignumber=${random.long} // 配置随机long类型数
my.uuid=${random.uuid} // 配置随机uuid类型数
my.number.less.than.ten=${random.int(10)} // 配置小于10的随机整数
my.number.in.range=${random.int[1024,65536]} // 配置范围在[1024,65536]之间的随机整数
- 参数间引用
app.name=MyApp
app.description=${app.name} is a Spring Boot application
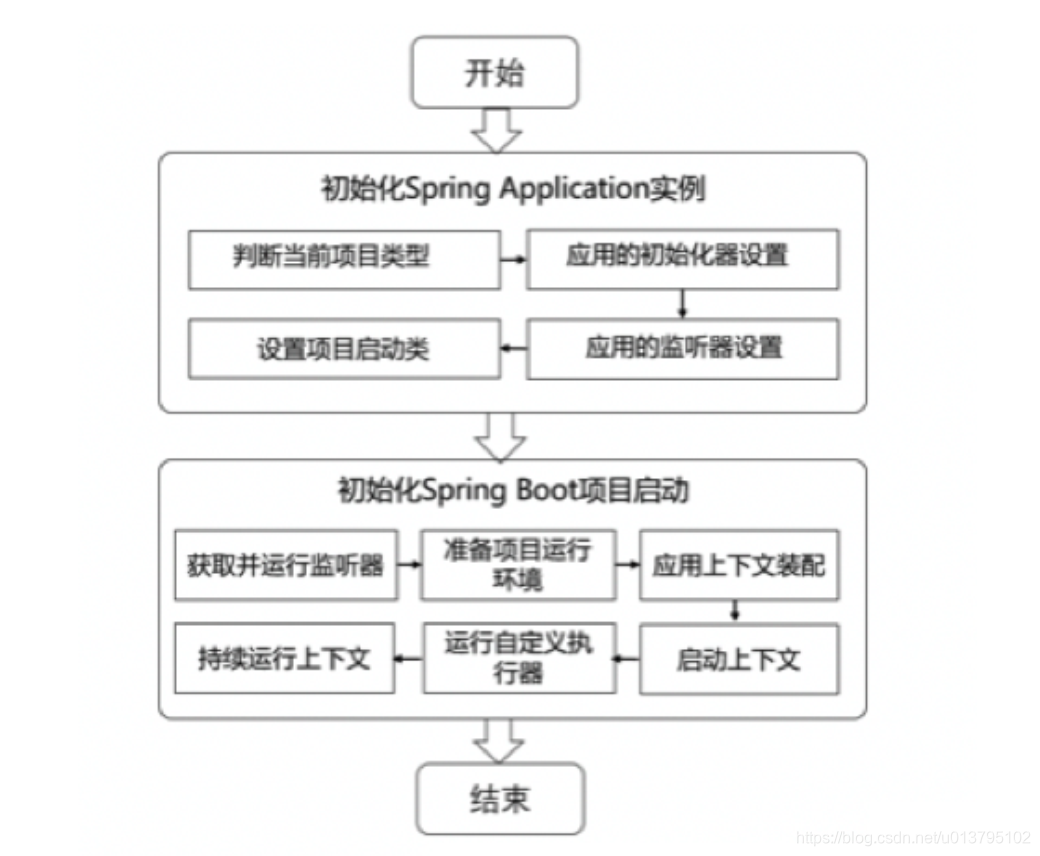
spring boot 项目启动流程图
- SpringApplication实例的初始化创建
- 把项目启动类.class设置为属性存储起来
- 判断当前webApplicationType应用的类型
- 设置监听器(Listener)
- 用于判断并设置项目main()方法启动的主程序启动类
- 项目的初始化启动
- 获取并运行监听器
- 根据SpringApplicationRunListener以及参数来准备环境
- 创建Spring容器
- Spring容器前置处理
- 刷新容器
- Spring容器后置处理
- 发出结束执行的事件
- 执行Runners
Spring boot视图技术
<!DOCTYPE html>
<html lang="en" xmlns:th="http://www.thymeleaf.org">
	<head>
		<meta charset="UTF-8">
		<link rel="stylesheet" type="text/css" media="all"
		href="../../css/gtvg.css" th:href="@{/css/gtvg.css}" />
		<title>Title</title>
	</head>
	<body>
		<p th:text="${hello}">欢迎进入Thymeleaf的学习</p>
	</body>
</html>
标签
| th:标签 | 说明 |
|---|---|
| th:insert | 布局标签,替换内容到引入的文件 |
| th:replace | 页面片段包含(类似JSP中的include标签) |
| th:each | 元素遍历(类似JSP中的c:forEach标签) |
| th:if | 条件判断,如果为真 |
| th:unless | 条件判断,如果为假 |
| th:switch | 条件判断,进行选择性匹配 |
| th:case | 条件判断,进行选择性匹配 |
| th:value | 属性值修改,指定标签属性值 |
| th:href | 用于设定链接地址 |
| th:src | 用于设定链接地址 |
| th:text | 用于指定标签显示的文本内容 |
标准表达式
| 说明 | 表达式语法 |
|---|---|
| 变量表达式 | ${…} |
| 选择变量表达式 | *{…} |
| 消息表达式 | #{…} |
| 链接URL表达式 | @{…} |
| 片段表达式 | ~{…} |
pom.xml 引入依赖
<dependency>
	<groupId>org.springframework.boot</groupId>
	<artifactId>spring-boot-starter-thymeleaf</artifactId>
</dependency>
application.properties
spring.thymeleaf.cache = true #启用模板缓存
spring.thymeleaf.encoding = UTF-8 #模板编码
spring.thymeleaf.mode = HTML5 #应用于模板的模板模式
spring.thymeleaf.prefix = classpath:/templates/ #指定模板页面存放路径
spring.thymeleaf.suffix = .html #指定模板页面名称的后缀
多语言国际化配置文件
在项目的类路径resources下创建名称为i18n的文件夹,并在该文件夹中根据需要编写对应的多语
言国际化文件login.properties、login_zh_CN.properties和login_en_US.properties文件
login.tip=请登录
login.username=用户名
login.password=密码
login.rememberme=记住我
login.button=登录
application.properties
# 配置国际化文件基础名
spring.messages.basename=i18n.login