position 属性指定了元素的定位类型。position 属性的五个值:static,relative,fixed,absolute,sticky
今天想巩固下js基础,从头写一个登录,却发现CSS样式定位没有搞清楚(以前都用的ui框架),emm......只能先了解下再来记录,下文呢就先对定位进行说明,随后给出利用JS和CSS写登录框及遮罩层的代码样例。
目录
1.static 定位
HTML 元素的默认值,即没有定位,遵循正常的文档流对象。静态定位的元素不会受到 top, bottom, left, right影响。

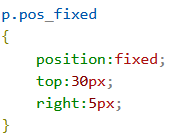
2.fixed 定位
元素的位置相对于浏览器窗口是固定位置。即使窗口是滚动的它也不会移动:
注意:
Fixed 定位在 IE7 和 IE8 下需要描述 !DOCTYPE 才能支持。
Fixed定位使元素的位置与文档流无关,因此不占据空间。
Fixed定位的元素和其他元素重叠。
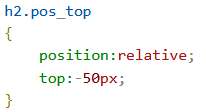
3.relative 定位
相对定位元素的定位是相对其正常位置。移动相对定位元素,但它原本所占的空间不会改变。相对定位元素经常被用来作为绝对定位元素的容器块。
口诀:子绝父相 ---- 即如果某个dom元素使用了绝对定位,其直接父元素务必要设置相对定位
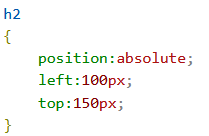
4.absolute 定位
绝对定位的元素的位置相对于最近的已定位父元素,如果元素没有已定位的父元素,那么它的位置相对于<html>:
absolute 定位使元素的位置与文档流无关,因此不占据空间。
absolute 定位的元素和其他元素重叠。
5.sticky 定位
sticky 英文字面意思是粘,粘贴,所以可以把它称之为粘性定位。
position: sticky; 基于用户的滚动位置来定位。
粘性定位的元素是依赖于用户的滚动,在 position:relative 与 position:fixed 定位之间切换。
它的行为就像 position:relative; 而当页面滚动超出目标区域时,它的表现就像 position:fixed;,它会固定在目标位置。
元素定位表现为在跨越特定阈值前为相对定位,之后为固定定位。
这个特定阈值指的是 top, right, bottom 或 left 之一,换言之,指定 top, right, bottom 或 left 四个阈值其中之一,才可使粘性定位生效。否则其行为与相对定位相同。
注意: Internet Explorer, Edge 15 及更早 IE 版本不支持 sticky 定位。 Safari 需要使用 -webkit- prefix (查看以下实例)。

元素的定位与文档流无关,所以它们可以覆盖页面上的其它元素,z-index属性指定了一个元素的堆叠顺序(哪个元素应该放在前面,或后面)具有更高堆叠顺序的元素总是在较低的堆叠顺序元素的前面。
6.实现登录框居中
left: 50%;
top: 50%;
margin-left: -150px;
margin-top: -75px;
示例:
#login_box {
      width: 300px;
      height: 150px;
      background: #eee;
      border: 1px solid #ccc;
      position: absolute;
      left: 50%;top: 50%;
      margin-left: -150px;
      margin-top: -75px;
      display: none;
    }
这几行在#login_box中的目的是使其在浏览器中水平居中显示。(无论浏览器被如何拉伸,该login_box始终保持居中)
原理(对齐浏览器的中心点与#login_box的中心点,这样就使得.foot在浏览器中水平居中了):
left:50%; 使#login_box 左边框 距离浏览器左边50% ,所以login_box整体并不是位于浏览器中间,所以需要使用margin-left: -150px; 使#login_box向左移动150像素(即login_box自身宽度的一半)。这样box整体就位于浏览器中间了。遮罩层也是同理。
完整代码:
重点看:shadow和myLogin样式是如何设置的
<!DOCTYPE html>
<html>
<head>
    <meta charset="UTF-8">
    <meta name="viewport" content="width=device-width, initial-scale=1.0">
    <title>Document</title>
</head>
<body>
  <button id="btnOpenLogin">打开登录框</button>
  <!-- 遮罩层 -->
  <div class="shadow" id="shadow"></div>
  <!-- 对话框 -->
  <div class="myLogin" id="myLogin">
      <!-- 登录头 -->
      <div class="loginHead fontColor" >
         <span class="userLogin">用户登录</span>
         <span class="loginClose" id="loginClose">×</span>
      </div>
       <!-- 登陆核心 -->
      <form action="">
        <div class="inputTxt">
            <!-- 账号 -->
            <div class="loginUserPassName fontColor">
                <span>账号:</span>
                <input type="text"  placeholder="请输入账号" value="">
            </div>
            <!-- 密码 -->
            <div class="loginUserPassName fontColor">
                <span>密码:</span>
                <input type="password"  placeholder="请输入密码" value="">
            </div>
          </div>
      </form>
     <!-- 登录按钮 -->
     <div class="btnLoginInfo fontColor">
        <input type="submit" class="btnLogin" value="登 录"></input>
        <input type="button" class="btnRegist" value="注 册"></input>
     </div>
  </div>
</body>
<!-- JS代码 -->
<script>
    //获取元素
    let loginButton=document.getElementById('btnOpenLogin');
    let shadowDiv=document.getElementById('shadow');
    let myLoginDiv=document.getElementById('myLogin');
    let myClose=document.getElementById('loginClose');
    //点击登录框按钮进行登录
    loginButton.onclick=function(){
        shadowDiv.style.display='block';
        myLoginDiv.style.display='block';
    }
    //关闭对话框
    shadowDiv.onclick=myClose.onclick=()=>{
        shadowDiv.style.display='none';
        myLoginDiv.style.display='none';
    }
</script>
<!-- 样式 -->
<style>
 .shadow{
     position: fixed;
     left: 0px;
     top: 0px;
     width: 100%;
     height: 100%;
     background-color: #000;
     opacity: 0.6;
     display: none;
 }
 .myLogin{
     position: fixed;
     width: 500px;
     height: 180px;
     left: 50%;
     top: 50%;
     margin-left: -250px;
     margin-top: -90px;
     background-color: #ffffff;
     border-radius: 10px;
     display: none;
 }
 /* 字体颜色 */
 .fontColor{
     color: #666666;
 }
 /* start登陆头 */
 .loginHead{
    position: relative;
    margin-top: 10px;
 }
 .loginClose{
    position: absolute;
    right: 10px;
 }
 .userLogin{
    position: absolute;
    right: 210px;
 }
/* end登陆头 */
/* start登录核心部分 */
.inputTxt{
    /* background-color: coral; */
    margin-top: 50px;
    text-align: center;
    font-size: 14px;
    color: #666666;
}
.inputTxt input{
    border-radius: 10px;
    border: 1px solid  #666666;
    text-align: center;
    outline: none;
}
.inputTxt input:focus,.inputTxt input:hover{
    border-radius: 10px;
    border: 1px solid cyan;
    text-align: center;
    outline: none;
}
.loginUserPassName{
    margin-top: 20px;
}
.loginClose:hover{
    cursor: pointer;
    color: red;
}
/* end登录核心部分 */
/* start登录部分按钮 */
.btnLoginInfo{
    /* background-color: darkmagenta; */
    text-align: center;
}
.btnLoginInfo input{
    margin-top: 20px;
    margin-left: 20px;
    width: 80px;
    height: 30px;
    border-radius: 5px;
    background-color: #ffffff;
    border: 1px solid #666666;
}
.btnLoginInfo input:hover{
    border: 1px solid cyan;
}
/* 去除点击按钮时候的默认黑边框 */
input[type=button],input[type=submit]{
    outline:none;
}


</style>
</html>
7.效果图

8.总结
以上就是我利用CSS与JS实现登录框和遮罩层的全部内容,同时对CSS定位进行了说明,如有更好的想法,希望大佬们留言补充。