一、前言:
命令模式的注意事项和细节:
- 将发起请求的对象与执行请求的对象解耦。
- 发起请求的对象就是调用者,调用者只需调用命令对象的 execute() 方法就可以让接受者工作,而不必知道接受者具体是如何实现的。
- 容易设计一个命令队列,只要把命令对象放入队列,就可以多线程的执行命令。
- 容易实现对请求的撤销与重做。
二、命令模式:
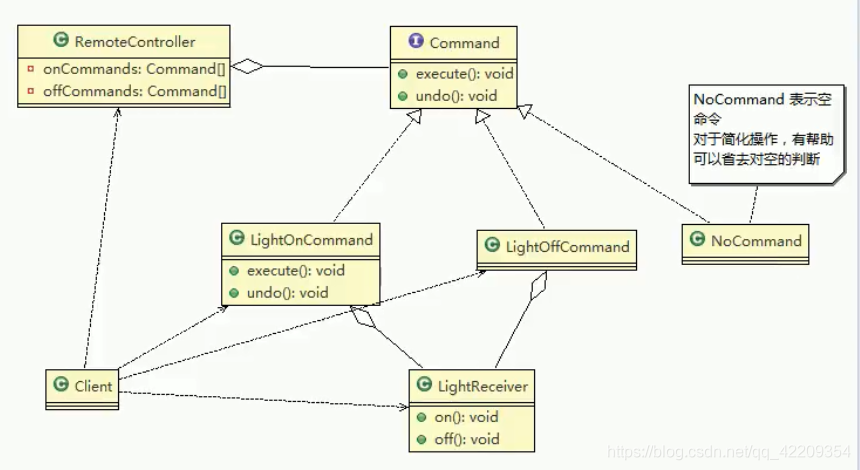
2.1、UML 图:
2.2、代码实例:
Step 1) 创建 Command 接口:
public interface Command {


    public void execute();
    public void undo();
}
Step 2) 创建 LightOnCommand 实现类:
public class LightOnCommand implements Command{


    LightReceive light;

    public LightOnCommand(LightReceive light) {


        this.light = light;
    }

    @Override
    public void execute() {


        light.on();
    }

    @Override
    public void undo() {


        light.off();
    }
}
Step 3) 创建 LightOffCommand 实现类:
public class LightOffCommand implements Command{


    LightReceive light;

    public LightOffCommand(LightReceive light) {


        this.light = light;
    }

    @Override
    public void execute() {


        light.off();
    }

    @Override
    public void undo() {


        light.on();
    }
}
Step 4) 创建 NoCommand 实现类:
public class NoCommand implements Command{


    @Override
    public void execute() {


    }

    @Override
    public void undo() {


    }
}
Step 5) 创建 RemoteController 类:
public class RemoteController {


    Command[] onCommands;
    Command[] offCommands;

    Command undoCommand;

    public RemoteController(){


        onCommands = new Command[5];
        offCommands = new Command[5];

        for(int i=0; i<5; i++){


            onCommands[i] = new NoCommand();
            offCommands[i] = new NoCommand();
        }
    }

    public void setCommand(int no, Command onCommand, Command offCommand){


        onCommands[no] = onCommand;
        offCommands[no] = offCommand;
    }

    public void onButtonWasPushed(int no){


        onCommands[no].execute();
        undoCommand = onCommands[no];
    }

    public void offButtonWasPushed(int no){


        offCommands[no].execute();
        undoCommand = offCommands[no];
    }

    public void undoButtonWasPushed(){


        undoCommand.undo();
    }
}
Step 6) 创建 LightReceive 类:
public class LightReceive {


    public void on(){


        System.out.println("点灯打开了!");
    }

    public void off(){


        System.out.println("点灯关闭了!");
    }
}
Step 7) 创建 main 方法:
public class Client {


    public static void main(String[] args) {


        LightReceive lightReceive = new LightReceive();

        LightOnCommand lightOnCommand = new LightOnCommand(lightReceive);
        LightOffCommand lightOffCommand = new LightOffCommand(lightReceive);

        RemoteController remoteController = new RemoteController();
        remoteController.setCommand(0, lightOnCommand, lightOffCommand);

        System.out.println("---------------按下灯的开按钮-----------------");
        remoteController.onButtonWasPushed(0);

        System.out.println("---------------按下灯的关按钮-----------------");
        remoteController.offButtonWasPushed(0);

        System.out.println("---------------按下撤销按钮-----------------");
        remoteController.undoButtonWasPushed();
    }
}
• 由 ChiKong_Tam 写于 2020 年 10 月 20 日