安卓自定义布局显示流式搜索记录
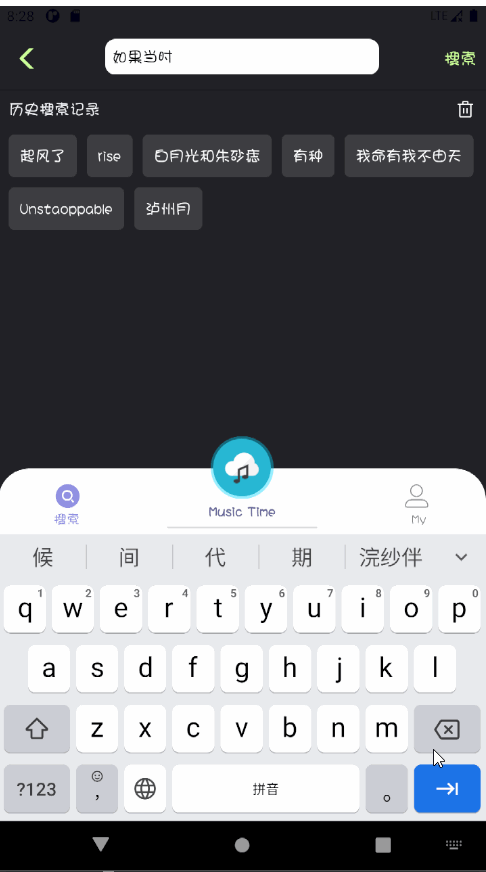
老规矩,先上效果图(环境:API 30 , AS 4.0)
OKK,开始动手!
第一步:自定义流式布局 XFlowLayout ,继承ViewGroup,然后重写 onMeasure()和onLayout()方法
import android.content.Context;
import android.graphics.Rect;
import android.util.AttributeSet;
import android.view.View;
import android.view.ViewGroup;

import java.util.ArrayList;
import java.util.List;

/**
 * <p>
 *      自定义的流式布局,用来显示搜索历史记录
 * </p>
 */
public class XFlowLayout extends ViewGroup {


    private static final String TAG = "XFlowLayout";

    /**
     * 子项位置列表
     */
    private List<Rect> mChildrenPositionList = new ArrayList<>();

    /**
     * 显示的最大行数,默认无限
     */
    private int mMaxLines = Integer.MAX_VALUE;

    /**
     * 子项可见数
     */
    private int mVisibleItemCount;

    public XFlowLayout(Context context) {


        super(context);
    }

    public XFlowLayout(Context context, AttributeSet attrs) {


        super(context, attrs);
    }

    public XFlowLayout(Context context, AttributeSet attrs, int defStyleAttr) {


        super(context, attrs, defStyleAttr);
    }

    @Override
    protected void onMeasure(int widthMeasureSpec, int heightMeasureSpec) {


        // 清除之前的位置
        mChildrenPositionList.clear();
        // 测量所有子元素
        measureChildren(widthMeasureSpec, heightMeasureSpec);

        int widthSize = MeasureSpec.getSize(widthMeasureSpec);
        int widthMode = MeasureSpec.getMode(widthMeasureSpec);
        int heightSize = MeasureSpec.getSize(heightMeasureSpec);
        int heightMode = MeasureSpec.getMode(heightMeasureSpec);

        int[] a = helper(widthSize);
        int measuredHeight = 0;
        // EXACTLY 模式:对应指定大小和 match_parent
        if (heightMode == MeasureSpec.EXACTLY) {


            measuredHeight = heightSize;
        }
        // AT_MOST 模式,对应 wrap_content
        else if (heightMode == MeasureSpec.AT_MOST) {


            measuredHeight = a[0];
        }
        int measuredWidth = 0;
        if (widthMode == MeasureSpec.EXACTLY) {


            measuredWidth = widthSize;
        } else if (widthMode == MeasureSpec.AT_MOST) {


            measuredWidth = a[1];
        }

        setMeasuredDimension(measuredWidth, measuredHeight);
    }

    /**
     * 在 wrap_content 情况下,得到布局的测量高度和测量宽度
     * 返回值是一个有两个元素的数组 a,a[0] 代表测量高度,a[1] 代表测量宽度
     */
    private int[] helper(int widthSize) {


        boolean isOneRow = true;    // 是否是单行
        int width = getPaddingLeft();   // 记录当前行已有的宽度
        int height = getPaddingTop();   // 记录当前行已有的高度
        int maxHeight = 0;      // 记录当前行的最大高度
        int currLine = 1;       // 记录当前行数

        for (int i = 0; i < getChildCount(); i++) {


            View child = getChildAt(i);
            // 获取当前子元素的 margin
            LayoutParams params = child.getLayoutParams();
            MarginLayoutParams mlp;
            if (params instanceof MarginLayoutParams) {


                mlp = (MarginLayoutParams) params;
            } else {


                mlp = new MarginLayoutParams(params);
            }
            // 记录子元素所占宽度和高度
            int childWidth = mlp.leftMargin + child.getMeasuredWidth() + mlp.rightMargin;
            int childHeight = mlp.topMargin + child.getMeasuredHeight() + mlp.bottomMargin;
            maxHeight = Math.max(maxHeight, childHeight);

            // 判断是否要换行
            if (width + childWidth + getPaddingRight() > widthSize) {


                // 加上该行的最大高度
                height += maxHeight;
                // 重置 width 和 maxHeight
                width = getPaddingLeft();
                maxHeight = childHeight;
                isOneRow = false;
                currLine++;
                if (currLine > mMaxLines) {


                    break;
                }
            }
            // 存储该子元素的位置,在 onLayout 时设置
            Rect rect = new Rect(width + mlp.leftMargin,
                    height + mlp.topMargin,
                    width + childWidth - mlp.rightMargin,
                    height + childHeight - mlp.bottomMargin);
            mChildrenPositionList.add(rect);

            // 加上该子元素的宽度
            width += childWidth;
        }

        int[] res = new int[2];
        res[0] = height + maxHeight + getPaddingBottom();
        res[1] = isOneRow ? width + getPaddingRight() : widthSize;

        return res;
    }

    @Override
    protected void onLayout(boolean changed, int l, int t, int r, int b) {


        // 布置子 View 的位置
        int n = Math.min(getChildCount(), mChildrenPositionList.size());
        for (int i = 0; i < n; i++) {


            View child = getChildAt(i);
            Rect rect = mChildrenPositionList.get(i);
            child.layout(rect.left, rect.top, rect.right, rect.bottom);
        }
        mVisibleItemCount = n;
    }

    /**
     * 设置 Adapter
     */
    public void setAdapter(Adapter adapter) {


        // 移除之前的视图
        removeAllViews();
        // 添加 item
        int n = adapter.getItemCount();
        for (int i = 0; i < n; i++) {


            ViewHolder holder = adapter.onCreateViewHolder(this);
            adapter.onBindViewHolder(holder, i);
            View child = holder.itemView;
            addView(child);
        }
    }

    /**
     * 设置最多显示的行数
     */
    public void setMaxLines(int maxLines) {


        mMaxLines = maxLines;
    }

    /**
     * 获取显示的 item 数
     */
    public int getVisibleItemCount() {


        return mVisibleItemCount;
    }

    public abstract static class Adapter<VH extends ViewHolder> {


        public abstract VH onCreateViewHolder(ViewGroup parent);

        public abstract void onBindViewHolder(VH holder, int position);

        public abstract int getItemCount();

    }

    /**
     * 视图搭载器
     */
    public abstract static class ViewHolder {


        public final View itemView;

        public ViewHolder(View itemView) {


            if (itemView == null) {


                throw new IllegalArgumentException("itemView为空");
            }
            this.itemView = itemView;
        }
    }
}
参考RecyclerView的设计,我们也在XFlowLayout中定义了一个视图搭载器ViewHolder和一个适配器Adapter,然后用起来就和RecyclerView一样啦~~~~~
第二步:仿照RecyclerView的使用步骤,得写一个子项的布局文件
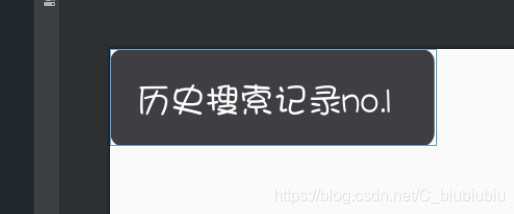
clf_history_item.xml
效果图:
<?xml version="1.0" encoding="utf-8"?>

<TextView android:id="@+id/tv_clf_record_name"
    android:layout_width="wrap_content"
    android:layout_height="wrap_content"
    android:background="@drawable/selector_his"
    android:text="asdasdasd"
    android:textSize="15sp"
    android:textColor="#ffffff"
    android:padding="11dp"
    xmlns:android="http://schemas.android.com/apk/res/android" />
第三步:写适配器,模仿RecyclerView的适配器写法;需要注意的是要在适配器中设置子项之间的距离
/**
 * <p>
 *     流式布局的适配器
 *     需要在这里给子项设置margin,xml设置不生效
 * </p>
 */
public class XFlowAdapter extends XFlowLayout.Adapter<XFlowAdapter.FlowViewHolder> {


    private static final String TAG = "XFlowAdapter";

    private List<HistoryRecord> mHistoryList = new ArrayList<>();
    private Context mContext;
    private OnSearchFromHistory mListener;

    public XFlowAdapter(List<HistoryRecord> mHistoryList,  Context mContext) {


        this.mHistoryList = mHistoryList;
        this.mContext = mContext;
    }

    @Override
    public FlowViewHolder onCreateViewHolder(ViewGroup parent) {


        View view = LayoutInflater.from(parent.getContext()).inflate(R.layout.clf_history_item, parent,false);
        // 设置margin
        setItemMargin(view);
        return new FlowViewHolder(view);
    }

    @Override
    public void onBindViewHolder(FlowViewHolder holder, int position) {


        holder.setData(position);
    }

    @Override
    public int getItemCount() {


        return mHistoryList.size();
    }

    /**
     * ViewHolder
     */
    class FlowViewHolder extends XFlowLayout.ViewHolder{


        private TextView tv_record_name;
        // 字段值,这个值是从历史记录表中取出的数据
        private String historyRecord;
        private int position;

        public FlowViewHolder(View itemView) {


            super(itemView);
            tv_record_name = itemView.findViewById(R.id.tv_clf_record_name);
            tv_record_name.setOnClickListener(new View.OnClickListener() {


                @Override
                public void onClick(View v) {


                    // 这里根据具体的点击子项执行什么逻辑
                    // 我这里是根据字段去执行搜索逻辑
                     mListener.onHistorySearch(historyRecord);
                }
            });
        }

        public void setData(int position) {


            this.position = position;
            historyRecord = mHistoryList.get(position).getRecordName();
            tv_record_name.setText(historyRecord);
        }
    }

    /**
     * 给子项设置margin
     *
     * @param view
     */
    public void setItemMargin(View view){


        ViewGroup.MarginLayoutParams marginLayoutParams = new ViewGroup.MarginLayoutParams(view.getLayoutParams());
        // 设置子项的margin
        int margin = dip2px(mContext, 5);
        marginLayoutParams.setMargins(margin, margin ,margin, margin);
        view.setLayoutParams(marginLayoutParams);
    }

    /**
     * 子项点击事件接口
     */
    public interface OnSearchFromHistory{


         /**
         * 搜索
         *
         * @param historyRecord
         */
        void onHistorySearch(String historyRecord);
    }

    /**
     * 设置子项点击事件
     *
     * @param listener
     */
    public void setOnSearchFromHistory(OnSearchFromHistory listener){


        this.mListener = listener;
    }

    /**
     * 根据手机的分辨率从 dip 的单位 转成为 px(像素)
     *
     * @param context
     * @param dpValue
     * @return
     */
    public  int dip2px(Context context, float dpValue) {


        final float scale = context.getResources().getDisplayMetrics().density;
        return (int) (dpValue * scale + 0.5f);
    }
}
OKK,到这里就可以开始使用了。GO!
第四步:布局使用,这里是我的demo里面的搜索页面SearchFragment,只要关注这个流式布局在哪展示就行了
效果图:

<?xml version="1.0" encoding="utf-8"?>
<RelativeLayout xmlns:android="http://schemas.android.com/apk/res/android"
    xmlns:app="http://schemas.android.com/apk/res-auto"
    xmlns:tools="http://schemas.android.com/tools"
    android:fitsSystemWindows="true"
    android:layout_width="match_parent"
    android:layout_height="match_parent"
    android:background="#222227"
    android:clickable="true"
    tools:context=".view.fragment.SearchFragment">

    <RelativeLayout
        android:id="@+id/ll_search"
        android:layout_width="match_parent"
        android:layout_height="60dp"
        android:layout_alignParentTop="true"
        android:background="#222227"
        android:elevation="10dp"
        android:paddingTop="11dp">

        <ImageView
            android:id="@+id/img_back"
            android:layout_width="20dp"
            android:layout_height="20dp"
            android:layout_alignParentLeft="true"
            android:layout_centerVertical="true"
            android:layout_marginLeft="20dp"
            android:background="@drawable/new_back_3" />

        <EditText
            android:id="@+id/edt_search"
            android:layout_width="270dp"
            android:layout_height="35dp"
            android:layout_centerHorizontal="true"
            android:background="@drawable/shape_edit_search"
            android:hint=" Find Your Music ~"
            android:paddingLeft="7dp"
            android:singleLine="true"
            android:textColor="#ffffff"
            android:textColorHint="#6c6c6c"
            android:textSize="15sp" />

        <TextView
            android:id="@+id/bt_click_to_search"
            android:layout_width="wrap_content"
            android:layout_height="wrap_content"
            android:layout_alignParentRight="true"
            android:layout_centerVertical="true"
            android:layout_marginRight="9dp"
            android:text="搜索"
            android:textColor="#CCFF99"

            android:textSize="16sp" />
    </RelativeLayout>

    <TextView
        android:id="@+id/tv_type"
        android:layout_width="wrap_content"
        android:layout_height="wrap_content"
        android:layout_below="@+id/ll_search"
        android:layout_marginLeft="22dp"
        android:layout_marginTop="8dp"
        android:layout_marginBottom="8dp"
        android:text="单曲"
        android:textColor="#ffffff"
        android:textSize="15sp"
        android:textStyle="bold"
        android:visibility="invisible" />

    <com.scwang.smart.refresh.layout.SmartRefreshLayout
        android:id="@+id/srl_refresh"
        android:layout_width="match_parent"
        android:layout_height="match_parent"
        android:layout_below="@+id/tv_type"
        android:background="#222227"
        app:srlEnablePreviewInEditMode="true">

        <com.scwang.smart.refresh.header.ClassicsHeader
            android:layout_width="match_parent"
            android:layout_height="wrap_content" />

        <androidx.recyclerview.widget.RecyclerView
            android:id="@+id/rcv_search_result"
            android:layout_width="match_parent"
            android:layout_height="match_parent"
            android:layout_marginTop="20dp"
            android:overScrollMode="never" />

        <com.scwang.smart.refresh.footer.ClassicsFooter
            android:layout_width="match_parent"
            android:layout_height="wrap_content" />
    </com.scwang.smart.refresh.layout.SmartRefreshLayout>

    <include
        layout="@layout/layout_loading"
        android:layout_width="wrap_content"
        android:layout_height="wrap_content"
        android:layout_centerInParent="true" />

    <RelativeLayout
        android:id="@+id/rl_history"
        android:layout_width="match_parent"
        android:layout_height="wrap_content"
        android:layout_below="@id/ll_search"
        android:layout_marginTop="10dp"
        android:visibility="visible">
        <TextView
            android:layout_width="wrap_content"
            android:layout_height="wrap_content"
            android:text="历史搜索记录"
            android:textColor="#f1f3f9"
            android:textSize="15sp"
            android:layout_marginLeft="10dp"
            />
        <ImageView
            android:id="@+id/img_delete_all"
            android:layout_height="20dp"
            android:layout_width="20dp"
            android:background="@drawable/select_delete"
            android:layout_alignParentRight="true"
            android:layout_marginRight="10dp"
            />
        <com.example.yan_music.widge.XFlowLayout
            android:layout_below="@id/img_delete_all"
            android:id="@+id/cfl_history"
            android:layout_width="match_parent"
            android:layout_height="wrap_content"
            android:background="#222227"
            android:layout_marginTop="10dp"
            android:layout_marginLeft="5dp"
            android:layout_marginRight="5dp"
             />
    </RelativeLayout>
</RelativeLayout>
第五步:代码使用,在代码里面初始化布局,适配器,设置数据源,展示布局
 ======  SearchFragment 中的部分代码 =====

/**
 * 搜索记录的流式布局+适配器+数据源
 */
private XFlowLayout cfl_history;
private XFlowAdapter mCflAdapter;
// HistoryRecord.java是个记录Bean类(自定义就行了)
private List<HistoryRecord> mHistoryList = new ArrayList<>();

...

 /**
  * 显示搜索历史记录
  */
    public void showSearchHistory() {


        // 将<历史记录数据库>中的所有记录查询出来并添加到历史记录列表mHistoryList
        List<HistoryRecord> queryList = LitePal.findAll(HistoryRecord.class);
        mHistoryList.addAll(queryList);
        rl_history.setVisibility(View.VISIBLE);
        mCflAdapter = new XFlowAdapter(mHistoryList, iSearchPresenterImp, mMainActivity);
        mCflAdapter.setOnSearchFromHistory(this);
        cfl_history.setAdapter(mCflAdapter);
        cfl_history.setMaxLines(20);
    }
到这里,实现完毕。