Java IO流
1、初识"流"
1.1、流的概念
在计算机世界中,我们常常会听到输入流、输出流的词汇,那么什么是"流"呢?
“流”,最早从C语言中引入的,是一种抽象概念,它代表了数据的无结构化传递。其可以看成是一个流动的数据缓冲区,数据从数据源方向经过缓冲区流向数据的目的地,在传送的过程中,其传送的方式是串行的,在Java中的java.io包中定义了。
Java中常见的接口与类,其中包括两个最基本的抽象类,他们分别是OutputStream与InputStream。其余的流都是分别从这两个基本类中继承而来。

1.2、流的分类
1、根据数据流向不同分类:输入流 和 输出流
- 输入流:从磁盘或者其它设备中将数据输入到进程中
- 输出流:将进程中的数据输出到磁盘或其它设备上保存

图示中的硬盘只是其中一种设备,还有非常多的设备都可以应用在IO流中,例如:打印机、硬盘、显示器、手
2、根据处理数据的基本单位不同分类:字节流 和 字符流
- 字节流:以字节(8 bit)为单位做数据的传输
- 字符流:以字符为单位(1字符 = 2字节)做数据的传输
字符流的本质也是通过字节流读取,Java 中的字符采用 Unicode 标准,在读取和输出的过程中,通过以字符为单位,查找对应的码表将字节转换为对应的字符。
面对字节流和字符流,很多读者都有疑惑:什么时候需要用字节流,什么时候又要用字符流?
① 字符流只针对字符数据进行传输,所以如果是文本数据,优先采用字符流传输。
② 除此之外,其它类型的数据(图片、音频等),最好还是以字节流传输。
在使用io流之前,我们先要了解File类的使用,因为在操作文件时,我们通常以File类的对象作为参数传递给流的构造器,进行文件的读取或写入操作。
2、File类的使用
2.1、File类的介绍
1、File类的一个对象,代表一个文件或一个文件目录(俗称:文件夹).
2、File 能新建、删除、重命名文件和目录,但 File 不能访问文件内容本身。 如果需要访问文件内容本身,则需要使用输入/输出流。
3、想要在Java程序中表示一个真实存在的文件或目录,那么必须有一个File对 象,但是Java程序中的一个File对象,可能没有一个真实存在的文件或目录。
4、File对象可以作为参数传递给流的构造器。
5、File类声明在java.io包下。
6、后续File类的对象常会作为参数传递到流的构造器中,指明读取或写入的"终点"。
2.2、File类常用的构造器
1、public File(String pathname) 以pathname为路径创建File对象,可以是绝对路径或者相对路径,如果 pathname是相对路径,则默认的当前路径在系统属性user.dir中存储。
File file = new File("hellp.txt"); // 相当于当前module
① 绝对路径:是一个固定的路径,从盘符开始
② 相对路径:是相对于某个位置开始
2、public File(String parent,String child) 以parent为父路径,child为子路径创建File对象。
3、public File(File parent,String child) 根据一个父File对象和子文件路径创建File对向。
4、代码示例
public class FileTest {


    @Test
    // 如何创建File类的实例
    /*
    相对路径:相较于某个路径下,指明的路径
    绝对路径:包含盘符在内的文件或文件夹的路径
     */
    public void test1(){


        // 构造器1
        File file1 = new File("hello.txt"); // 相对路径:相对于当前module
        // File file = new File("D:\\Java\\JavaSenior\\Day8\\src\\com\\lzh\\java1\\hello.txt"); // 绝对路径
        System.out.println(file1);

        // 构造器2
        File file2 = new File("D:\\Java\\JavaSenior","Day8");
        System.out.println(file2);

        // 构造器3
        File file3 = new File(file2,"test.txt");
        System.out.println(file3); // D:\Java\JavaSenior\Day8\test.txt

        // 注意:以上3个变量只是内存层面上对象,输出的只是虚拟地址。
    }
}
2.3、路径分隔符扩展
1、路径中的每级目录之间用一个路径分隔符隔开。
2、路径分隔符和系统有关:
  ① windows和DOS系统默认使用“\”来表示
  ② UNIX和URL使用“/”来表示
3、Java程序支持跨平台运行,因此路径分隔符要慎用。
4、为了解决这个隐患,File类提供了一个常量: public static final String separator。根据操作系统,动态的提供分隔。
File file1 = new File("d:\\howie\\info.txt");
File file2 = new File("d:" + File.separator + "howie" + File.separator + "info.txt");
File file3 = new File("d:/hwoie");
5、个人觉得File.separator常量,使用起来比较麻烦,需要拼接字符串,容易出错!
2.4、File类常用方法
1、获取功能
1 public String getAbsolutePath() // 获取绝对路径

2 public String getPath() // 获取路径

3 public String getName() // 获取名称

4 public String getParent() // 获取上层文件目录路径。若无,返回null

5 public long length() // 获取文件长度(即:字节数)。不能获取目录的长度。

6 public long lastModified() // 获取最后一次的修改时间,毫秒值(new Date(file.lastModified()) 可查看具体时间)

/*如下两个方法适用于文件目录*/

7 public String[] list() // 获取指定目录下的所有文件或者文件目录的名称数组

8 public File[] listFiles() // 获取指定目录下的所有文件或者文件目录的File数组
2、重命名
1 public boolean renameTo(File dest) // 把文件重命名为指定的文件路径
比如:boolean isRename = file1.renameTo(file2); // 要想保证返回true,需要file1在硬盘中存在,且file2在硬盘中不能存在。
3、判断相关
1 public boolean isDirectory() // 判断是否是文件目录

2 public boolean isFile() // 判断是否是文件

3 public boolean exists() // 判断是否存在

4 public boolean canRead() // 判断是否可读

5 public boolean canWrite() // 判断是否可写

6 public boolean isHidden() // 判断是否隐藏
测试:
在项目根目录下新建一个hello.txt文件
@Test
public void test1(){


    File file = new File("hello.txt");

    System.out.println(file.isDirectory()); // false
    System.out.println(file.isFile()); // true
    System.out.println(file.exists()); // true
    System.out.println(file.canRead()); // true
    System.out.println(file.isHidden()); // false
}
4、创建
1 public boolean createNewFile() // 创建文件。若文件存在,则不创建,返回false

2 public boolean mkdir() // 创建文件目录。如果此文件目录存在,就不创建了。 如果此文件目录的上层目录不存在,也不创建。

3 public boolean mkdirs() // 创建文件目录。如果上层文件目录不存在,一并创建。
注意事项:如果你创建文件或者文件目录没有写盘符路径,那么,默认在项目路径下。
测试:
@Test
public void test1() throws IOException {


    File file = new File("hello.txt");

    if(!file.exists()){


        file.createNewFile();
        System.out.println("创建成功!");
    }
}
5、删除
1 public boolean delete() // 删除文件或者文件夹

@Test
public void test1() throws IOException {


    File file = new File("hello.txt");

    if(!file.exists()){


        file.createNewFile();
        System.out.println("创建成功!");
        file.delete();
        System.out.println("删除成功!");
    }
删除注意事项: Java中的删除不走回收站。 要删除一个文件目录,请注意该文件目录内不能包含文件或者文件目录。
2.5、总结

File类涉及到文件或文件目录的创建、删除、重命名、修改时间、文件大小等方法。并未涉及到读入或读取文件内容的操作,如果需要读取或写入文件内容,必须使用io流来完成!
后续File类对象常会作为参数传递到流的构造器中,指明读取或写入的"终点"。
3、Java IO流
3.1、原理
1、I/O是Input/Output的缩写, I/O技术是非常实用的技术,用于处理设备之间的数据传输。如读/写文件,网络通讯等。
2、Java程序中,对于数据的输入/输出操作以“流(stream)”的 方式进行。
3、java.io包下提供了各种“流”类和接口,用以获取不同种类的数据,并通过标准的方法输入或输出数据。
4、原理图
- 输入input:读取外部数据(磁盘、光盘等存储设备的数据)到程序(内存)中。
- 输出output:将程序(内存)数据输出到磁盘、光盘等存储设备中。

3.2、再次认识流的分类
1、按操作数据单位不同分为:字节流(8 bit),字符流(16 bit)
2、按数据流的流向不同分为:输入流,输出流
3、按流的角色的不同分为:节点流,处理流
4、图解

3.3、4个抽象基类

1、Java的IO流共涉及40多个类,实际上非常规则,都是从如上4个 抽象基类派生的。
2、由这四个类派生出来的子类名称都是以其父类名作为子类名后缀。
3.4、常用的派生流

3.5、硬盘文件的操作(读/写)
在Java io流中,值得注意的是,我们不仅仅只限于在计算机硬盘操作,Java io流同样适用设备之间的数据传输,网络通讯等。
1、我们在项目的根目录下新建一个hello.txt并写上一些字符,并输出到控制台,体会使用io流读取文件。
@Test
public void test1() throws IOException {


    // 1、实例化File类的对象,指明要操作的类
    File file = new File("hello.txt");
    // System.out.println(file.getAbsoluteFile()); F:\java\day01\hello.txt
    // 2、提供具体的流
    FileReader fileReader = new FileReader(file);
    // 3、数据的读入
    int data = fileReader.read();
    while(data != -1){


        System.out.print((char)data);
        data = fileReader.read();
    }
    // 4、关闭流
    fileReader.close();
}
以上代码还有很大的优化空间,对于异常的抛出这里并不规范,在实际开发中为了保证流资源一定可以执行关闭操作,需要使用try-catch-finally处理。代码优化示例:
@Test
public void test2() throws FileNotFoundException {


    // 1. 实例化File类的对象,指明要操作的文件
    File file = new File("hello.txt"); // 相对路径,相当于当前module

    if(file.exists()) {


        // 2. 提供具体的流
        FileReader fileReader = new FileReader(file);
        // 3. 数据的读入 read():返回读入的一个字符。如果达到文件末尾,返回-1
        try {


            int data;
            while ((data = fileReader.read()) != -1) {


                System.out.print((char) data);
            }
        } catch (IOException e) {


            e.printStackTrace();
        } finally {


            // 4. 流的关闭操作(一定不要忘记)
            try {


                fileReader.close();
            } catch (IOException e) {


                e.printStackTrace();
            }
        }
    }
}
小结:
① read()的理解:返回读入的一个字符。如果达到文件末尾,返回-1。
② 异常处理:为了保证流资源一定可以执行关闭操作。需要使用try-catch-finally处理。
③ 读入的文件一定要存在,否则就会报FileNotFoundException。
2、FileReader中使用read(char[] cbuf)读入数据
@Test
// 对read()操作升级:使用read的重载方法
public void test1() {


    // 1. File类的实例化
    // 2. FileReader流的实例化
    // 3. 读入操作
    // 4. 资源回收(关闭流)
    FileReader fileReader = null;
    try {


        File file = new File("hello");
        fileReader = new FileReader(file);

        char[] buffer = new char[5];
        // read(char[] cbuf):返回每次读入cbuf数组中的字符的个数,如果达到文件末尾返回-1
        int len;
        while((len = fileReader.read(buffer)) != -1){


            for(int i = 0;i < len;i++){


                System.out.print(buffer[i]);
            }
            // 另一种写法
            /*
            String str = new String(buffer,0,len);
            System.out.print(str);
             */
        }
    } catch (IOException e) {


        e.printStackTrace();
    } finally {


        if(fileReader != null) // 避免空指针异常
            try {


                fileReader.close();
            } catch (IOException e) {


                e.printStackTrace();
            }
    }
}
3、从内存中写出数据到硬盘的文件里
说明:
- 输出操作,对应的File可以不存在的。并不会报异常
- File对应的硬盘中的文件如果果不存在,在输出的过程中,会自动创建此文件
- File对应的硬盘中的文件如果存在:
流使用的构造器是:FileWriter(file,false) / FileWriter(file)--> 对原有文件覆盖
流使用的构造器是:FileWriter(file,true)--> 追加文件内容
为什么会这样呢?答案在FileWriter的源码里!
@Test
public void fileWriterTest() {


    // 1. 提供File类的对象,指明写出到的文件
    // 2. 提供FileWriter类的对象,用于数据的写出
    // 3. 写出的操作
    // 4. 资源的回收(流的关闭)
    FileWriter fileWriter = null;
    try {


        File file = new File("hello");
        fileWriter = new FileWriter(file,false);

        fileWriter.write("write once run anywhere!".toCharArray());
        fileWriter.write("\n"+"you need have a dream!");
    } catch (IOException e) {


        e.printStackTrace();
    } finally {


        if(fileWriter != null)
            try {


                fileWriter.close();
            } catch (IOException e) {


                e.printStackTrace();
            }
    }
}
到此文本文件的读写我们已经搞定了,对于文本文件的io流操作很重要,现在我们再来写个例子巩固一下。
4、使用FileReader和FileWriter类实现文本文件的复制
@Test
public void copyFileTest() {


    // 1. 提供File类的对象,指明读入与写出的文件
    // 2. 提供FileReader、FileWriter类的对象,用于数据的写入与读出
    // 3. 数据的读入与写出操作
    // 4. 资源回收(留的关闭)

    FileReader  fileReader = null;
    FileWriter fileWriter = null;
    try {


        File readFile = new File("old.txt");
        if(!readFile.exists()){


            readFile.createNewFile();
        }
        File writeFile = new File("new.txt");

        fileReader = new FileReader(readFile);
        fileWriter = new FileWriter(writeFile,false);

        char[] buffer = new char[5];
        int len; // 记录每次读入到buffer数组中字符的个数
        while((len = fileReader.read(buffer)) != -1){


            fileWriter.write(buffer,0,len); // 每次写出len个字符
        }
    } catch (IOException e) {


        e.printStackTrace();
    } finally {


        try {


            if(fileReader != null)
                fileReader.close();
        } catch (IOException e) {


            e.printStackTrace();
        } finally {


            try {


                if(fileWriter != null)
                    fileWriter.close();
            } catch (IOException e) {


                e.printStackTrace();
            }
        }
    }
}
6、使用FileInputStream和FileOutputStream实现图片等字节数据
首先,对于以字节保存的数据我们是不能使用字符流来处理的。但是对于字符数据,我们是可以使用字节流来处理,但是可能会出现乱码。对于字节数据,我们应该使用字节流来处理,如FileInputStream和FileOutputStream。
结论:
1. 对于文本文件(.txt .java .c .cpp),使用字符流处理
2. 对于非文本文件(.jpg .mp3 .mp4 .avi .doc .ppt),使用字节流处理
演示图片的复制
/*
实现对图片(test.png)的复制
*/
@Test
public void fileInputOutputStream() {


    // 1 提供File类的对象,指明读入与写入的文件
    // 2 提供FileInputStream和FileOutputStream类的对象,用于数据的读入与写出
    // 3 数据的读入与写出操作
    // 4 回收资源(流的关闭)
    FileInputStream inputStream = null;
    FileOutputStream outputStream = null;
    try {


        File srcFile = new File("test.png");
        File destFile = new File("copy.png");

        inputStream = new FileInputStream(srcFile);
        outputStream = new FileOutputStream(destFile);

        byte[] buffer = new byte[5];
        int len; // 记录每次读入到buffer数组中字节的个数
        while((len = inputStream.read(buffer)) != -1){


            outputStream.write(buffer,0,len);
        }
        System.out.println("复制成功!");
    } catch (IOException e) {


        e.printStackTrace();
    } finally {


        if(inputStream != null){


            try {


                inputStream.close();
            } catch (IOException e) {


                e.printStackTrace();
            }
        }
        if(outputStream != null){


            try {


                outputStream.close();
            } catch (IOException e) {


                e.printStackTrace();
            }
        }
    }
}
4、处理流之缓冲流
4.1、概述
1、前面我们已经了解到,常用的字节流与字符流,也可以实现对象文本数据与非文本数据的读写,但是在实际开发过程中,我们一般不使用文件流(FileInputStream,FileOutputStream,FileReader,FileWriter),因为这几个派生流,在传输效率上比较慢,我们有传输效率更高的AIP,我们把它命名为缓冲流。
2、缓冲流也是处理流的一种,要“套接”在相应的节点流之上,根据数据操作单位可以把缓冲流分为

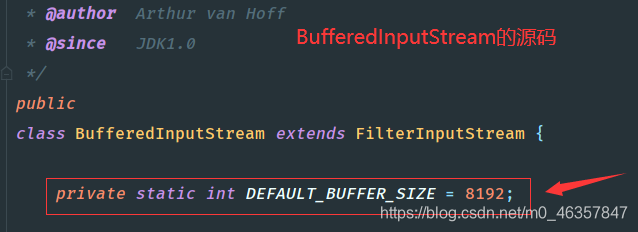
3、为了提高数据读写的速度,Java API提供了带缓冲功能的流类,在使用这些流类 时,会创建一个内部缓冲区数组,缺省使用8192个字节(8Kb)的缓冲区,这也是可以提高速度的原因。
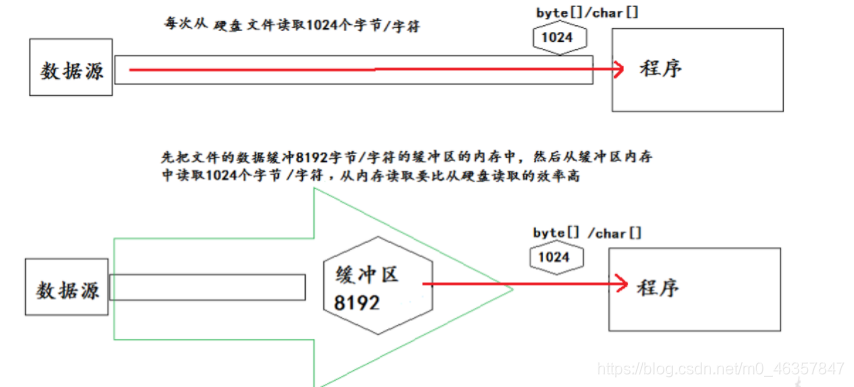
4、当读取数据时,数据按块读入缓冲区,其后的读操作则直接访问缓冲区。
5、当使用BufferedInputStream读取字节文件时,BufferedInputStream会一次性从文件中读取8192个(8Kb),存在缓冲区中,直到缓冲区装满了,才重新从文件中 读取下一个8192个字节数组。
6、向流中写入字节时,不会直接写到文件,先写到缓冲区中直到缓冲区写满, BufferedOutputStream才会把缓冲区中的数据一次性写到文件里。使用方法 flush()可以强制将缓冲区的内容全部写入输出流。
7、关闭流的顺序和打开流的顺序相反。只要关闭最外层流即可,关闭最外层流也会相应关闭内层节点流。
8、flush()方法的使用:手动将buffer中内容写入文件。
9、如果是带缓冲区的流对象的close()方法,不但会关闭流,还会在关闭流之前刷新缓冲区,关闭后不能再写。
10、图示
4.2、缓冲流的使用
1、使用缓冲流实现非文本文件(test.png)的复制
@Test
public void bufferStreamTest(){


	// 1 造文件(提供 File类的对象,指明读入与写入的文件)
	// 2 造流(提供BufferInputStream和BufferOutputStream类的对象,用于数据的读入与写出)
	// 3 数据读入与写入的具体操作
	// 4 资源回收(流的关闭) 注意:此时造了4个流,关闭顺序有要求
	BufferedInputStream bis = null;
	BufferedOutputStream bos = null;
	try {


	    File srcFile = new File("test.png");
	    File destFile = new File("new_test.png");
	    // 节点流
	    FileInputStream inputStream = new FileInputStream(srcFile);
	    FileOutputStream outputStream = new FileOutputStream(destFile);
	    // 缓冲流
	    bis = new BufferedInputStream(inputStream);
	    bos = new BufferedOutputStream(outputStream);

	    byte[] buffer = new byte[10];
	    int len;
	    while((len = bis.read(buffer)) != -1){


	        bos.write(buffer,0,len);
	    }
	    System.out.println("复制成功");
	} catch (IOException e) {


	    e.printStackTrace();
	} finally {


	    if(bis != null){


	        try {


	            bis.close();
	        } catch (IOException e) {


	            e.printStackTrace();
	        }
	    }
	    if(bos != null){


	        try {


	            bos.close();
	        } catch (IOException e) {


	            e.printStackTrace();
	        }
	    }
	}
	// 资源回收顺序要求:先关闭外侧流,在关闭内层流
	// 说明:关闭外侧流的同时,内层流也会自动进行关闭,关于内层流的关闭,可以省略
}
2、使用缓冲流实现文本文件(hello.txt)的复制
/*
使用BufferedReader和BufferedWriter实现文本文件的复制
 */
@Test
public void test(){


    BufferedReader bufferedReader = null;
    BufferedWriter bufferedWriter = null;
    try {


        // 造文件,造流(节点流与处理流)
        bufferedReader = new BufferedReader(new FileReader(new File("hello")));
        bufferedWriter = new BufferedWriter(new FileWriter(new File("hello2")));

        // 读写操作
        char[] buffer = new char[1024];
        int len;
        while((len = bufferedReader.read(buffer)) != -1){


            bufferedWriter.write(buffer,0,len);
            /*我们也可以使用 readLine 一行一行的读取数据,更多使用可以自行去学习*/
        }
        System.out.println("复制成功");
    } catch (IOException e) {


        e.printStackTrace();
    } finally {


        // 资源的回收(流的关闭)
        if(bufferedReader != null){


            try {


                bufferedReader.close();
            } catch (IOException e) {


                e.printStackTrace();
            }
        }
        if(bufferedWriter != null){


            try {


                bufferedWriter.close();
            } catch (IOException e) {


                e.printStackTrace();
            }
        }
    }
}
3、缓冲流的作用:提高流的读入、写入的速度。提高速度的原因:内部提供了一个缓冲区。
4、处理流,就是"套接"在已有的流的基础上。
4.3、比较节点流与缓冲流速度
为了证明我们的缓冲流读写速度比节点流(或文件流)快,可以简单的做个试验,把缓冲流与节点流的读写操作封装为一个方法。我们以复制非文本文件为例。
1、分装节点流:
/**
 * @description: 使用节点流复制非文本文件,只需提供源文件路径与目标文件路径即可完成复制
 * @author: laizhenghua
 * @date: 2020/11/27 12:58
 * @param: srcPath(源文件路径)
 * @param: destPath(目标文件路径)
 * @return: void
 */
public void copyFileWithInputOutputStream(String srcPath,String destPath){


    FileInputStream inputStream = null;
    FileOutputStream outputStream = null;
    try {


        File srcFile = new File(srcPath);
        File destFile = new File(destPath);

        inputStream = new FileInputStream(srcFile);
        outputStream = new FileOutputStream(destFile);

        byte[] buffer = new byte[5];
        int len; // 记录每次读入到buffer数组中字节的个数
        while((len = inputStream.read(buffer)) != -1){


            outputStream.write(buffer,0,len);
        }
        System.out.println("复制成功!");
    } catch (IOException e) {


        e.printStackTrace();
    } finally {


        if(inputStream != null){


            try {


                inputStream.close();
            } catch (IOException e) {


                e.printStackTrace();
            }
        }
        if(outputStream != null){


            try {


                outputStream.close();
            } catch (IOException e) {


                e.printStackTrace();
            }
        }
    }
}
2、封装缓冲流:
/**
 * @description: 使用缓冲流复制非文本文件,只需提供源文件路径与目标文件路径即可
 * @author: laizhenghua
 * @date: 2020/11/27 13:05
 * @param: srcPath(源文件路径)
 * @param: destPath(目标文件路径)
 * @return: void
 */
public void copyFileWithBufferedStream(String srcPath,String destPath){


    BufferedInputStream bis = null;
    BufferedOutputStream bos = null;

    try {


        // 1、提供File类对象,指明要操作的文件
        File srcFile = new File(srcPath);
        File destFile = new File(destPath);
        // 2、提供FileInputStream和FileOutputStream节点流,用做缓冲流的构造参数
        FileInputStream fis = new FileInputStream(srcFile);
        FileOutputStream fos = new FileOutputStream(destFile);
        // 3、提供操作字节的缓冲流,用于数据的读入与写出
        bis = new BufferedInputStream(fis);
        bos = new BufferedOutputStream(fos);
        // 4、数据的操作,读入与写出
        byte[] buffer = new byte[5];
        int len;
        while((len = bis.read(buffer)) != -1){


            bos.write(buffer,0,len);
        }
        System.out.println("复制成功!");
    } catch (IOException e) {


        e.printStackTrace();
    } finally {


        // 5、回收资源,注意这里需要关闭4个流,流关闭顺序是先关外层流在关闭内层流,对于内层流Java做了优化,关闭外层流的同时会自动关闭内层流
        if(bis != null){


            try {


                bis.close();
            } catch (IOException e) {


                e.printStackTrace();
            }
        }
        if(bos != null){


            try {


                bos.close();
            } catch (IOException e) {


                e.printStackTrace();
            }
        }
    }
}
3、到此我们的试验环境已经搭建完毕,接下来我们编写测试方法:
@Test
public void test(){


    long start = System.currentTimeMillis();
    String srcPath = "c.jpg"; // 相对于当前module
    String destPath = "new.jpg"; // 相对于当前module
    // copyFileWithInputOutputStream(srcPath,destPath); // 使用节点流复制图片
    copyFileWithBufferedStream(srcPath,destPath); // 使用缓冲流复制图片
    long end = System.currentTimeMillis();
    System.out.println("复制图片所花费时间为:" + (end - start));
}
我们分别使用节点流和缓冲流执行一次上面方法,就能对比出复制相同图片节点流与缓冲流的速度。
经测试发现:节点流花费时间为15。缓冲流花费时间为4。
结论就是缓冲流比节点流快出很多,实际开发中我们应该选择使用缓冲流去处理设备之间的数据传输。
4.4、图片的加密与解密操作
对于图片的加密与解密,这里我们实现的原理是对字节数据进行异或运算然后把计算后的数据保存起来,即为加密后的图片文件。我们还需要明白一点,两次异或运算后得到就是原数据,换句话说,我们把加密后的数据再次进行异或运算就是解密运算。
1、加密操作
@Test
public void test(){


    FileInputStream inputStream = null;
    FileOutputStream outputStream = null;
    try {


        // 图片的加密
        inputStream = new FileInputStream(new File("test.png"));
        outputStream = new FileOutputStream(new File("test_secret.png"));

        byte[] buffer = new byte[20];
        int len;
        while((len = inputStream.read(buffer)) != -1){


            // 对字节数据进行修改
            for(int i = 0;i < len;i++){


                buffer[i] = (byte) (buffer[i] ^ 5);
            }
            outputStream.write(buffer,0,len);
        }
    } catch (IOException e) {


        e.printStackTrace();
    } finally {


        // 资源的回收
        if(inputStream != null){


            try {


                inputStream.close();
            } catch (IOException e) {


                e.printStackTrace();
            }
        }
        if(outputStream != null){


            try {


                outputStream.close();
            } catch (IOException e) {


                e.printStackTrace();
            }
        }
    }
}
2、解密操作
@Test
// 对图片进行解密
public void test2(){


    FileInputStream inputStream = null;
    FileOutputStream outputStream = null;
    try {


        inputStream = new FileInputStream(new File("test_secret.png"));
        outputStream = new FileOutputStream(new File("new_Picture.png"));

        byte[] buffer = new byte[20];
        int len;
        while((len = inputStream.read(buffer)) != -1){


            for(int i = 0;i < len;i++){


                buffer[i] = (byte) (buffer[i] ^ 5);
            }
            outputStream.write(buffer,0,len);
        }
        System.out.println("解密成功");
    } catch (IOException e) {


        e.printStackTrace();
    } finally {


        if(inputStream != null){


            try {


                inputStream.close();
            } catch (IOException e) {


                e.printStackTrace();
            }
        }
        if(outputStream != null){


            try {


                outputStream.close();
            } catch (IOException e) {


                e.printStackTrace();
            }
        }
    }
}
5、处理流之转换流
5.1、转换流概述
1、转换流作用:提供了在字节流和字符流之间的转换。
2、Java API提供了两个转换流。

3、字节流中的数据都是字符时,转成字符流操作更高效。
4、很多时候我们使用转换流来处理文件乱码问题。实现编码和解码的功能。
/*
1、解码:字节、字节数组 ---> 字符数组、字符串
  编码:字符数组、字符串 ---> 字节、字节数组

2、字符集
    ① ASCII:美国标准信息交换码。
        用一个字节的7位可以表示。
    ② ISO8859-1:拉丁码表。欧洲码表
        用一个字节的8位表示。
    ③ GB2312:中国的中文编码表。最多两个字节编码所有字符
    ④ GBK:中国的中文编码表升级,融合了更多的中文文字符号。最多两个字节编码
    ⑤ Unicode:国际标准码,融合了目前人类使用的所有字符。为每个字符分配唯一的字符码。所有的文字都用两个字节来表示。
    ⑥ UTF-8:变长的编码方式,可用1-4个字节来表示一个字符。
 */
5.2、InputStreamReader
1、实现将字节的输入流按指定字符集转换为字符的输入流。
2、需要和InputStream“套接”。
3、构造器:
① public InputStreamReader(InputStream in)
② public InputSreamReader(InputStream in,String charsetName)
如: Reader reader = new InputStreamReader(System.in,”gbk”);
// 此时处理异常应该使用try-catch-finally
// 将字节的输入流转换为字符的输入流
@Test
public void test1() throws IOException {


    FileInputStream inputStream = new FileInputStream(new File("hello.txt")); // 当前module下的路径

    InputStreamReader reader = new InputStreamReader(inputStream); // 使用系统默认的字符集
    // 参数2,指明了字符集,具体使用哪个字符集,取决于文件保存时使用的字符集
    // InputStreamReader reader = new InputStreamReader(inputStream,"UTF-8");

    char[] buffer = new char[1024];
    int len;
    while((len = reader.read(buffer)) != -1){


        String str = new String(buffer,0,len);
        System.out.println(str);
    }

    reader.close();
}
5.3、OutputStreamWriter
1、实现将字符的输出流按指定字符集转换为字节的输出流。
2、需要和OutputStream“套接”。
3、构造器:
① public OutputStreamWriter(OutputStream out)
② public OutputSreamWriter(OutputStream out,String charsetName)
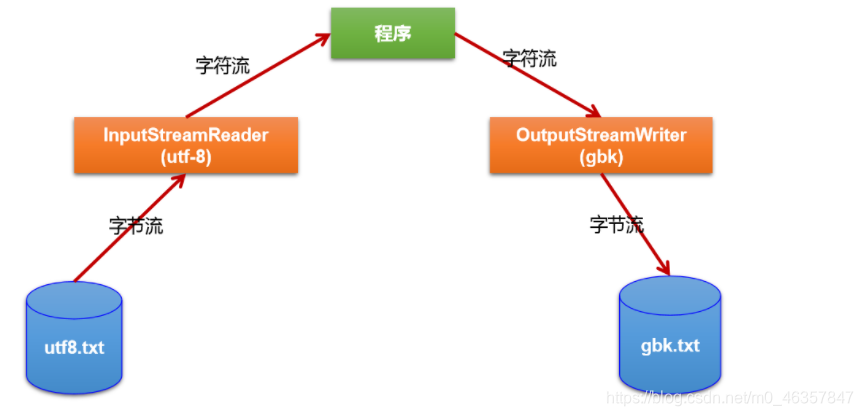
综合使用 InputStreamReader 和 OutputStreamWriter实现改变一个文件的字符集存储方式。
首先,我们要确保文件是以UTF-8的方式进行存储
@Test
public void test2(){


    InputStreamReader reader = null;
    OutputStreamWriter writer = null;
    try {


    	// 相当于是一个解码的过程
        reader = new InputStreamReader(new FileInputStream(new File("hello.txt")),"utf-8");
        // 相当于是一个编码的过程
        writer = new OutputStreamWriter(new FileOutputStream(new File("hello_gbk.txt")),"gbk");

        // 具体读写过程
        char[] buffer = new char[1024];
        int len;
        while((len = reader.read(buffer)) != -1){


            writer.write(buffer,0,len);
        }
    } catch (IOException e) {


        e.printStackTrace();
    } finally {


        if(reader != null){


            try {


                reader.close();
            } catch (IOException e) {


                e.printStackTrace();
            }
        }
        if(writer != null){


            try {


                writer.close();
            } catch (IOException e) {


                e.printStackTrace();
            }
        }
    }
}
小结:
1、可以将字符按指定编码格式存储。
2、可以对文本数据按指定编码格式来解读。
3、指定编码表的动作由构造器完成。
6、标准输入、输出流
6.1、概述
1、System.in和System.out分别代表了系统标准的输入和输出设备
2、默认输入设备是:键盘,输出设备是:显示器
3、System.in的类型是InputStream
4、System.out的类型是PrintStream,其实是OutputStream的子类 FilterOutputStream 的子类
5、重定向:通过System类的setIn,setOut方法对默认设备进行改变。
① public static void setIn(InputStream in)
② public static void setOut(PrintStream out)
6.2、标准输入、输出流的使用
/*
其他流的使用:
1 标准的输入、输出流
2 打印流
3 数据流

 */
public class OtherStreamTest {


    // 1 标准的输入、输出流
    public static void main(String[] args) {


        // System.out 标准的输入流,默认从键盘输入
        // System.in 标准的输出流,默认从控制台输出

        // System类的setIn(InputStream is) / setOut(PrintStream ps) 方式重新指定输入和输出的流
        /*
        练习:从键盘输入字符串,要求将读取到的整行字符串转成大写输出。然后继续 进行输入操作,
        直至当输入“e”或者“exit”时,退出程序。
        */

        // 方法1:使用Scanner实现
        // 方法2:System.in    System.in --> 转换流 --> BufferedReader的readLine()
        BufferedReader reader = null;
        try {


            InputStreamReader isr = new InputStreamReader(System.in); // 转换流
            reader = new BufferedReader(isr);

            String data;
            while (true) {


                System.out.print("请输入字符串:");
                data = reader.readLine();
                if ("e".equalsIgnoreCase(data) || "exit".equalsIgnoreCase(data)) {


                    System.out.println("程序结束");
                    break;
                }
                String newData = data.toUpperCase();
                System.out.println(newData);
            }
        } catch (IOException e) {


            e.printStackTrace();
        } finally {


            if (reader != null) {


                try {


                    reader.close();
                } catch (IOException e) {


                    e.printStackTrace();
                }
            }
        }
    }
}
7、对象流
7.1、对象流概述
1、对象流API:ObjectInputStream和OjbectOutputSteam
用于存储和读取基本数据类型数据或对象的处理流。它的强大之处就是可 以把Java中的对象写入到数据源中,也能把对象从数据源中还原回来。
2、序列化:用ObjectOutputStream类保存基本类型数据或对象的机制。
3、反序列化:用ObjectInputStream类读取基本类型数据或对象的机制。
4、ObjectOutputStream和ObjectInputStream不能序列化static和transient修饰的成员变量。
5、序列化与反序列化的使用实例
/*
对象流的使用:
1 对象流
    ObjectInputStream
    ObjectOutputStream

2 作用:用于存储和读取基本数据类型数据或对象的处理流。它的强大之处就是可 以把Java中的对象写入到数据源中,也能把对象从数据源中还原回来。

3 序列化过程:将内存中的java对象保存到磁盘中或通过网络传输出去。使用ObjectOutputStream实现
4 反序列化过程:将磁盘文件中的对象还原为内存中的一个java对象,使用ObjectInputStream实现

 */
public class ObjectInputOutputStreamTest {


    @Test
    // 序列化过程示例
    public void test1(){


        ObjectOutputStream writer = null;
        try {


            writer = new ObjectOutputStream(new FileOutputStream("object.dat"));

            writer.writeObject(new String("hello world"));
            writer.flush(); // 刷新操作
            System.out.println("写入成功");
        } catch (IOException e) {


            e.printStackTrace();
        } finally {


            if(writer != null){


                try {


                    writer.close();
                } catch (IOException e) {


                    e.printStackTrace();
                }
            }
        }
    }

    @Test
    // 反序列化过程
    public void test2(){


        ObjectInputStream reader = null;
        try {


            reader = new ObjectInputStream(new FileInputStream("object.dat"));
            Object obj = reader.readObject();

            String str = (String) obj;
            System.out.println(str);
        } catch (IOException e) {


            e.printStackTrace();
        } catch (ClassNotFoundException e) {


            e.printStackTrace();
        } finally {


            if(reader != null){


                try {


                    reader.close();
                } catch (IOException e) {


                    e.printStackTrace();
                }
            }
        }
    }
}
7.2、对象的序列化机制
1、对象序列化机制允许把内存中的Java对象转换成平台无关的二进制流,从而允许把这种二进制流持久地保存在磁盘上,或通过网络将这种二进制流传输到另一个网络节点。
//当其它程序获取了这种二进制流,就可以恢复成原来的Java对象。
2、序列化的好处在于可将任何实现了Serializable接口的对象转化为字节数据, 使其在保存和传输时可被还原。
3、序列化是RMI(Remote Method Invoke – 远程方法调用)过程的参数和返 回值都必须实现的机制,而 RMI 是 JavaEE 的基础。因此序列化机制是 JavaEE 平台的基础。
4、如果需要让某个对象支持序列化机制,则必须让对象所属的类及其属性是可 序列化的,为了让某个类是可序列化的,该类必须实现如下两个接口之一。 否则,会抛出NotSerializableException异常。
① Serializable
② Externalizable
5、使用对象流序列化对象
若某个类实现了 Serializable 接口,该类的对象就是可序列化的:
1、创建一个 ObjectOutputStream
2、调用 ObjectOutputStream 对象的 writeObject(对象) 方法输出可序列化对象
3、注意写出一次,操作flush()一次
反序列化
1、创建一个 ObjectInputStream
2、调用 readObject() 方法读取流中的对象
强调:如果某个类的属性不是基本数据类型或 String 类型,而是另一个 引用类型,那么这个引用类型必须是可序列化的,否则拥有该类型的 Field 的类也不能序列化。
6、自定义类使用对象流实现对象的传输
- 自定义可序列化Person类
/**
 * @description: Person实体类,必须要实现Serializable接口,是对象可序列化
 * @author: laizhenghua
 * @date: 2020/11/27 21:59
 */
public class Person implements Serializable {


    public static final long serialVersionUID = 424546548L; // 全局常量
    private String name;
    private String age;

    public Person(String name,String age){


        this.name = name;
        this.age = age;
    }
    ...
}
/*
1 要想java对象可序列化,需要满足如下条件:
    需要实现接口:Serializable
    当前类提供一个全局常量:static final long serialVersionUID = 42L; // 此常量名为序列版本号
    除了当前Person类需要实现Serializable接口值外,还必须保证其内部所有的属性也必须是可序列化的(默认情况下,基本数据类型是可序列化)

    补充:ObjectOutputStream和ObjectInputStream不能序列化static和transient修 饰的成员变量
 */
- 自定义类(Person)传输示例(磁盘层面)
/*
对象流的使用:
1 对象流
    ObjectInputStream
    ObjectOutputStream

2 作用:用于存储和读取基本数据类型数据或对象的处理流。它的强大之处就是可 以把Java中的对象写入到数据源中,也能把对象从数据源中还原回来。

3 序列化过程:将内存中的java对象保存到磁盘中或通过网络传输出去。使用ObjectOutputStream实现
4 反序列化过程:将磁盘文件中的对象还原为内存中的一个java对象,使用ObjectInputStream实现

 */
public class ObjectInputOutputStreamTest {


    @Test
    // 序列化过程示例
    public void test1(){


        ObjectOutputStream writer = null;
        try {


            writer = new ObjectOutputStream(new FileOutputStream("persons.dat"));

            writer.writeObject(new Person("李白",22));
            writer.flush(); // 刷新操作

            System.out.println("写入成功");
        } catch (IOException e) {


            e.printStackTrace();
        } finally {


            if(writer != null){


                try {


                    writer.close();
                } catch (IOException e) {


                    e.printStackTrace();
                }
            }
        }
    }

    @Test
    // 反序列化过程
    public void test2(){


        ObjectInputStream reader = null;
        try {


            reader = new ObjectInputStream(new FileInputStream("persons.dat"));
            Object obj = reader.readObject();

            Person person = (Person) obj;
            System.out.println(person);
        } catch (IOException e) {


            e.printStackTrace();
        } catch (ClassNotFoundException e) {


            e.printStackTrace();
        } finally {


            if(reader != null){


                try {


                    reader.close();
                } catch (IOException e) {


                    e.printStackTrace();
                }
            }
        }
    }
}
对实现Serializable接口的类静态常量serialVersionUID的说明:
1、实现了Serializable接口的对象,可将它们转换成一系列字节,并可在以后完全恢复回原来的样子。(重点)这一过程亦可通过网络进行。这意味着序列化机制能自动补偿操作系统间的差异。
2、换句话说,可以先在Windows机器上创 建一个对象,对其序列化,然后通过网络发给一台Unix机器,然后在那里准确无误地重新“装配”。不必关心数据在不同机器上如何表示,也不必 关心字节的顺序或者其他任何细节。
3、由于大部分作为参数的类如String、Integer等都实现了 java.io.Serializable的接口,也可以利用多态的性质,作为参数使接口更灵活。
8、随机存取文件流
8.1、RandomAccessFile概述
1、RandomAccessFile 声明在java.io包下,但直接继承于java.lang.Object类。并 且它实现了DataInput、DataOutput这两个接口,也就意味着这个类既可以读(输出流)也 可以写(输入流)。
2、RandomAccessFile 类支持 “随机访问” 的方式,程序可以直接跳到文件的任意 地方来读、写文件。
① 支持只访问文件的部分内容
② 可以向已存在的文件后追加内容
3、RandomAccessFile 对象包含一个记录指针,用以标示当前读写处的位置。 RandomAccessFile 类对象可以自由移动记录指针:
①long getFilePointer():获取文件记录指针的当前位置
②void seek(long pos):将文件记录指针定位到 pos 位置
4、构造器
① public RandomAccessFile(File file, String mode)
② public RandomAccessFile(String name, String mode)
5、创建 RandomAccessFile 类实例需要指定一个 mode 参数,该参数指定 RandomAccessFile 的访问模式:
r:以只读方式打开
rw:打开以便读取和写入
rwd:打开以便读取和写入;同步文件内容的更新
rws:打开以便读取和写入;同步文件内容和元数据的更新
6、如果模式为只读r。则不会创建文件,而是会去读取一个已经存在的文件, 如果读取的文件不存在则会出现异常。 如果模式为rw读写。如果文件不 存在则会去创建文件,如果存在则不会创建。
8.2、RandomAccessFile的使用示例
8.2.1、基本读写
@Test
public void test1() {


    RandomAccessFile reader = null;
    RandomAccessFile writer = null;
    try {


        reader = new RandomAccessFile(new File("test.png"),"r");
        writer = new RandomAccessFile(new File("new_test.png"),"rw");

        byte[] buffer = new byte[1024];
        int len;
        while((len = reader.read(buffer)) != -1){


            writer.write(buffer,0,len);
        }
        System.out.println("复制成功");
    } catch (IOException e) {


        e.printStackTrace();
    } finally {


        if(reader != null){


            try {


                reader.close();
            } catch (IOException e) {


                e.printStackTrace();
            }
        }
        if(writer != null){


            try {


                writer.close();
            } catch (IOException e) {


                e.printStackTrace();
            }
        }
    }
}
8.2.2、文件记录指针定位
@Test
public void test2() throws IOException {


    RandomAccessFile writer = new RandomAccessFile(new File("test.txt"),"rw");
    writer.seek(12); // 将指针调到角标为12的位置
    writer.write("hello world".getBytes()); // 覆盖数据的操作

    writer.close();
}
8.2.3、利用文件指针的特性,实现"数据插入"
/*
使用RandomAccessFile实现数据的插入效果
 */
@Test
public void test3() throws IOException {


    // 造流、造文件
    RandomAccessFile writer = new RandomAccessFile(new File("test.txt"),"rw");
    writer.seek(12);

    // 保存指针12后面的所有数据到StringBuilder中
    StringBuilder builder = new StringBuilder((int) new File("test.txt").length());
    byte[] buffer = new byte[1024];
    int len;
    while((len = writer.read(buffer)) != -1){


        builder.append(new String(buffer,0,len));
    }

    // 调回指针,写入数据
    writer.seek(12);
    writer.write("hello".getBytes()); // 此时指针在角标为12的位置

    // 再将StringBuilder中的数据写入到文件里
    writer.write(builder.toString().getBytes());

    // 回收资源
    writer.close();
}
8.2.4、小结
RandomAccessFile类的使用:
1、接继承于java.lang.Object类。并 且它实现了DataInput、DataOutput这两个接口,也就意味着这个类既可以读(输入流)也可以写(输出流)。
2、如果RandomAccessFile作为输出流时,写出到的文件如果不存在,则在执行过程中自动创建。如果写出到的文件存在,则会对原有的文件内容进行覆盖(默认情况下,是从头覆盖)。
3、可以通过相关操作,实现RandomAccessFile"插入"数据的效果。