本文包括更换Centos7为阿里镜像源,安装mysql7之“修改密码”,“远程连接”等操作;
基本在网上都能够查找到相关的资料,这里记录全流程,方便大家查阅。节省时间;
Centos7操作
设置静态IP
- 修改IP地址
- vi /etc/sysconfig/network-scripts/ifcfg-ens33
- BOOTPROTO=static
- ONBOOT=yes
- IPADDR=192.168.X.101
- GATEWAY=192.168.X.2
- DNS1=8.8.8.8
- DNS2=8.8.4.4
- NETMASK=255.255.255.0
- 修改DNS
vi /etc/resolv.conf
- nameserver 8.8.8.8
- nameserver 8.8.4.4
重启网卡:servie network restart
更换阿里源
cp /etc/yum.repos.d/CentOS-Base.repo /etc/yum.repos.d/CentOS-Base.repo.bak
备份原始的更新源
wget -O /etc/yum.repos.d/CentOS-Base.repo http://mirrors.aliyun.com/repo/Centos-7.repo
下载并设置更新源为aliyun
wget -P /etc/yum.repos.d/ http://mirrors.aliyun.com/repo/epel-7.repo
下载并设置EPEL源,此源中包含更多的软件
yum clean all
清理yum缓存
yum makecache
创建yum缓存
yum update
更新缓存
安装mysql
下载相关mysql源并安装
- 添加yum源
wget 'https://dev.mysql.com/get/mysql57-community-release-el7-11.noarch.rpm'
rpm -Uvh mysql57-community-release-el7-11.noarch.rpm
- 安装mysql
yum install mysql-community-server
- 启动mysql服务
#启动之前需要生成临时密码,需要用到证书,可能证书过期,需要进行更新操作
yum update -y
#启动mysql服务
service mysqld start /  systemctl start mysqld
#设置mysql开机启动
chkconfig mysqld on
- 使用临时密码登录并更新密码
grep "password" /var/log/mysqld.log
mysql -uroot -p
输入刚查看到的临时密码;
更新个人密码
set global validate_password_policy=0;
set global validate_password_length=1;
ALTER USER 'root'@'localhost' IDENTIFIED BY '000000';
开启远程连接
- 关闭防火墙
systemctl stop firewalld
- 远程连接
grant all privileges on *.* to 'root'@'%' identified by '000000' with grant option;
flush privileges;

默认数据库密码为000000
设置字符集为utf8
#在[mysqld]部分添加:
character-set-server=utf8
#在文件末尾新增[client]段,并在[client]段添加:
default-character-set=utf8

# 重启mysql
systemctl restart mysqld

# 验证修改字符集是否成功
show variables like 'character_set%';
出现下图即为成功

彻底删除流程
1、查看mysql的安装情况
rpm -qa | grep -i mysql
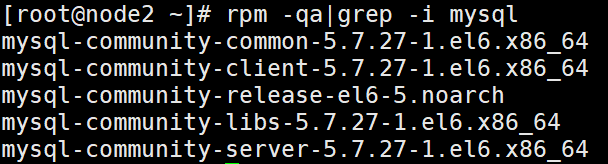
2、删除上图安装的软件
yum remove mysql-community-common-5.7.27-1.el6.x86_64
yum remove mysql-community-client-5.7.27-1.el6.x86_64
yum remove mysql57-community-release-el6-5.noarch
yum remove mysql-community-libs-5.7.27-1.el6.x86_64
yum removemysql-community-server-5.7.27-1.el6.x86_64
3、都删除成功之后,查找相关的mysql的文件
find / -name mysql
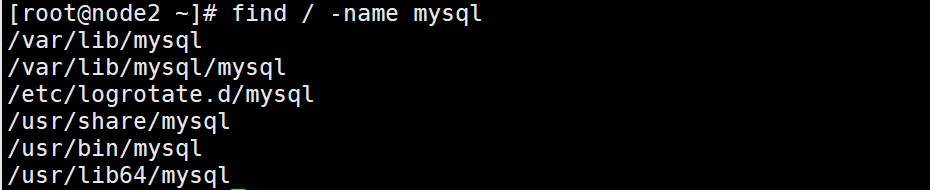
4、删除全部文件
rm -rf /var/lib/mysql
rm -rf /var/lib/mysql/mysql
rm -rf /etc/logrotate.d/mysql
rm -rf /usr/share/mysql
rm -rf /usr/bin/mysql
rm -rf /usr/lib64/mysql
- 删除/etc/my.cnf
rm -rf /etc/my.cnf
- 删除/var/log/mysqld.log(如果不删除这个文件,会导致新安装的mysql无法生存新密码,导致无法登陆)
rm -rf /var/log/mysqld.log
5、再次执行命令
rpm -qa | grep -i mysql
#如果没有显式则表示卸载完成