体验了Flutter的项目开发体验后,肯定会产生众多的困惑。我第一个想到的问题是,移动端宿主APP是如何将我们编写的Flutter代码整合进去的?
按平台来,本篇文章先来看看iOS项目如何集成Flutter代码的。我的代发分析基于此项目。
Pod
我们用Xcode打开iOS项目,主项目里面代码很少很简介。

我们第一个想到的肯定是用CocoaPod添加了一些依赖,接下来我们就来看看Podfile这个依赖的配置文件。
Podfile
// 1 检查环境变量文件Generated.xcconfig
def flutter_root
  generated_xcode_build_settings_path = File.expand_path(File.join('..', 'Flutter', 'Generated.xcconfig'), __FILE__)
  unless File.exist?(generated_xcode_build_settings_path)
    raise "#{generated_xcode_build_settings_path} must exist. If you're running pod install manually, make sure flutter pub get is executed first"
  end

  File.foreach(generated_xcode_build_settings_path) do |line|
    matches = line.match(/FLUTTER_ROOT\=(.*)/)
    return matches[1].strip if matches
  end
  raise "FLUTTER_ROOT not found in #{generated_xcode_build_settings_path}. Try deleting Generated.xcconfig, then run flutter pub get"
end

// 2 引入podhelper.rb
require File.expand_path(File.join('packages', 'flutter_tools', 'bin', 'podhelper'), flutter_root)

flutter_ios_podfile_setup

target 'Runner' do
  use_frameworks!
  use_modular_headers!

  // 3 执行podhelper.rb 中的 flutter_install_all_ios_pods 方法
  flutter_install_all_ios_pods File.dirname(File.realpath(__FILE__))
end

// 4 执行podhelper.rb 中的flutter_additional_ios_build_settings方法
post_install do |installer|
  installer.pods_project.targets.each do |target|
    flutter_additional_ios_build_settings(target)
  end
end
1. 检查环境变量文件—Generated.xcconfig
先要确保在iOS项目中的Flutter文件夹下有Generated.xcconfig这个文件,Generated.xcconfig这个文件是定义了一些Flutter和Dart相关的变量,例如FLUTTER_ROOT,FLUTTER_APPLICATION_PATH,FLUTTER_TARGET等,为后续的Pod依赖提供基础。
Generated.xcconfig
FLUTTER_ROOT= /Users/*/Documents/flutter
FLUTTER_APPLICATION_PATH=/Users/*/Documents/FlutterVideos/feibo_movie/feibo_movie
FLUTTER_TARGET=/Users/chongling.liu/Documents/FlutterVideos/feibo_movie/feibo_movie/lib/main.dart
FLUTTER_BUILD_DIR=build
SYMROOT=${SOURCE_ROOT}/../build/ios
OTHER_LDFLAGS=$(inherited) -framework Flutter
FLUTTER_FRAMEWORK_DIR=/Users/*/Documents/flutter/bin/cache/artifacts/engine/ios
FLUTTER_BUILD_NAME=1.0.0
FLUTTER_BUILD_NUMBER=1
DART_DEFINES=flutter.inspector.structuredErrors%3Dtrue
DART_OBFUSCATION=false
TRACK_WIDGET_CREATION=true
TREE_SHAKE_ICONS=false
PACKAGE_CONFIG=.packages
2. 引入podhelper.rb文件
podhelper.rb在FLUTTER_ROOT/packages/flutter_tools/bin文件夹下,文件中定义了一些Pod相关方法。
3. 执行podhelper.rb 中的 flutter_install_all_ios_pods 方法
flutter_install_all_ios_pods中调用了flutter_install_ios_engine_pod和flutter_install_ios_plugin_pods方法,这两个方法分别配置Flutter引擎和第三方库。
def flutter_install_all_ios_pods(ios_application_path = nil)
  flutter_install_ios_engine_pod(ios_application_path)
  flutter_install_ios_plugin_pods(ios_application_path)
end
flutter_install_ios_engine_pod中主要是将Flutter引擎即Flutter.framework和Flutter.podspec这两个文件从FLUTTER_ROOT/bin/cache/artifacts/engine/ios拷贝到iOS项目的Flutter文件夹下, 然后配置依赖
pod 'Flutter', :path => 'Flutter'
def flutter_install_ios_engine_pod(ios_application_path = nil)
    //省略...
    system('cp', '-r', File.expand_path('Flutter.framework', debug_framework_dir), copied_flutter_dir)
    system('cp', File.expand_path('Flutter.podspec',debug_framework_dir), copied_flutter_dir)

    pod 'Flutter', :path => 'Flutter'
end
flutter_install_ios_plugin_pods是配置Flutter库依赖的第三方iOS库或者iOS文件的依赖的方法。
说起来有点绕,举个栗子。我们的FLutter代码中使用了sqflite库,sqflite在iOS中底层调用的的FMDB这个库,所以需要配置FMDB的依赖。
def flutter_install_ios_plugin_pods(ios_application_path = nil)
  plugins_file = File.join(ios_application_path, '..', '.flutter-plugins-dependencies')
  plugin_pods = flutter_parse_plugins_file(plugins_file)
  plugin_pods.each do |plugin_hash|
    plugin_name = plugin_hash['name']
    plugin_path = plugin_hash['path']
    if (plugin_name && plugin_path)
      symlink = File.join(symlink_plugins_dir, plugin_name)
      File.symlink(plugin_path, symlink)

      pod plugin_name, :path => File.join('.symlinks', 'plugins', plugin_name, 'ios')
    end
  end
end
这个方法的流程是读取iOS文件同级目录下的.flutter-plugins-dependencies文件, 读取plugins字段下的ios数组,对数组的每个元素配置依赖。
pod 'sqflite', :path => 'FLUTTER_ROOT/.pub-cache/hosted/pub.dartlang.org/sqflite-1.3.2+3/ios'
.flutter-plugins-dependencies
{
    "plugins":{
        ...
        "ios":[
            {
                "name":"sqflite",
                "path":"/Users/*/Documents/flutter/.pub-cache/hosted/pub.dartlang.org/sqflite-1.3.2+3/",
                "dependencies":[

                ]
            }
            ...
        ]

    }
}
4. 执行podhelper.rb中的flutter_additional_ios_build_settings方法
这个就是将ENABLE_BITCODE设置为NO。
总结:
通过一系列的配置文件的读取,文件的拷贝等操作,Podfile会将flutter引擎和iOS的依赖库引入进来,最后的结果接近于:
target 'Runner' do

pod 'Flutter', :path => 'Flutter'
pod 'sqflite', :path => 'FLUTTER_ROOT/.pub-cache/hosted/pub.dartlang.org/sqflite-1.3.2+3/ios'
pod 'sqflite', :path => 'FLUTTER_ROOT/.pub-cache/hosted/pub.dartlang.org/shared_preferences-0.5.12+4/ios'
pod 'sqflite', :path => 'FLUTTER_ROOT/.pub-cache/hosted/pub.dartlang.org/fijkplayer-0.8.7/ios'

end

post_install do |installer|
    installer.pods_project.build_configurations.each do |config|
        config.build_settings['ENABLE_BITCODE'] = 'NO'
    end
end
提示:FMDB并没有出现在Podfile文件中,是因为
sqflite依赖于FMDB,所以会根据依赖的依赖安装FMDB。这是CocoaPod基础知识,iOS开发者应该很熟悉了,就不再这里说明了。
Plguin
APP项目的入口是AppDelegate,继承自Flutter.framework的FlutterAppDelegate。
@objc class AppDelegate: FlutterAppDelegate {
  override func application(
    _ application: UIApplication,
    didFinishLaunchingWithOptions launchOptions: [UIApplication.LaunchOptionsKey: Any]?
  ) -> Bool {
    GeneratedPluginRegistrant.register(with: self)
    return super.application(application, didFinishLaunchingWithOptions: launchOptions)
  }
}
1. 注册插件
AppDelegate在didFinishLaunchingWithOptions里面执行了GeneratedPluginRegistrant.register(with: self)一行代码。
GeneratedPluginRegistrant
+ (void)registerWithRegistry:(NSObject<FlutterPluginRegistry>*)registry {
  [FijkPlugin registerWithRegistrar:[registry registrarForPlugin:@"FijkPlugin"]];
  [FLTSharedPreferencesPlugin registerWithRegistrar:[registry registrarForPlugin:@"FLTSharedPreferencesPlugin"]];
  [SqflitePlugin registerWithRegistrar:[registry registrarForPlugin:@"SqflitePlugin"]];
  [FLTURLLauncherPlugin registerWithRegistrar:[registry registrarForPlugin:@"FLTURLLauncherPlugin"]];
}
GeneratedPluginRegistrant中的+ (void)registerWithRegistry:(NSObject<FlutterPluginRegistry>*)registry方法实现是执行flutter pub get的时候Flutter自动生成的,当然只有依赖与iOS原生进行交互的Flutter库才会注册插件。。
这个文件也可以手动去编辑,但是一般没有这个必要。
我们以SqflitePlugin为例介绍Plugin的注册流程。
SqflitePlugin
+ (void)registerWithRegistrar:(NSObject<FlutterPluginRegistrar>*)registrar {
    FlutterMethodChannel* channel = [FlutterMethodChannel
                                     methodChannelWithName:_channelName
                                     binaryMessenger:[registrar messenger]];
    SqflitePlugin* instance = [[SqflitePlugin alloc] init];
    [registrar addMethodCallDelegate:instance channel:channel];
}
FlutterMethodChannel是一个通道,Flutter可以通过它向iOS宿主App调用方法,然后获取结果。
流程入下图:
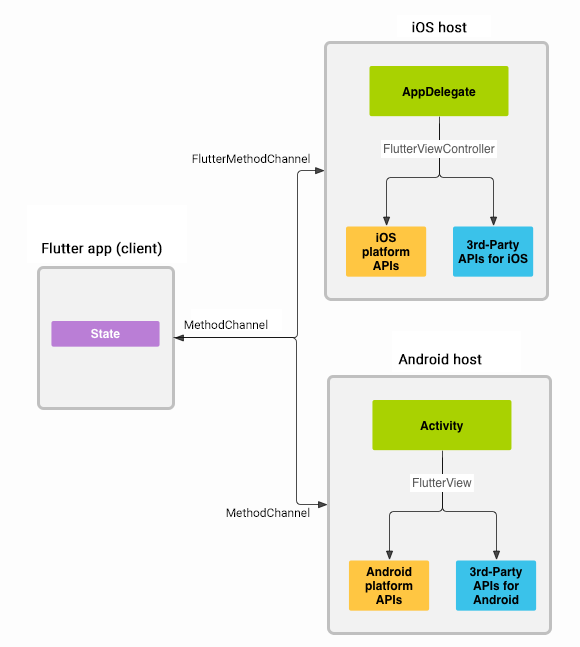
上面这段代码代表的含义是:
- 建立一个名字为SqflitePlugin的FlutterMethodChannel
- 将这个channel注册到FLutterEngine中,这样flutter代码就可以通过FLutterEngine调用这个channel的
- (void)handleMethodCall:(FlutterMethodCall*)call result:(FlutterResult)result{}方法。
FlutterEngine
- (void)addMethodCallDelegate:(NSObject<FlutterPlugin>*)delegate
                      channel:(FlutterMethodChannel*)channel {
  [channel setMethodCallHandler:^(FlutterMethodCall* call, FlutterResult result) {
    [delegate handleMethodCall:call result:result];
  }];
}
2. Flutter端方法的定义和调用
sqflite插件的pubspec.yaml文件中定义了SqflitePlugin这个名字,所以Flutter端的代码知道通过哪个MethodChannel向iOS代码发送消息。这个名字和iOS端是对应的。
pubspec.yaml
flutter:
  plugin:
    platforms:
      android:
        package: com.tekartik.sqflite
        pluginClass: SqflitePlugin
      ios:
        pluginClass: SqflitePlugin
      macos:
        pluginClass: SqflitePlugin
sqflite定义了很多方法,譬如insert方法。这些方法都是异步的,所以返回值需要用Future包裹。
Future<int> insert(String table, Map<String, dynamic> values,
      {String nullColumnHack, ConflictAlgorithm conflictAlgorithm});
操作数据库的时候Flutter代码可以直接调用insert方法,这时候FlutterEngine就将参数传递给了iOS代码,等待一步返回。
2. iOS端方法处理并返回值
由于在AppDelegate中注册了对应的插件SqflitePlugin,然后FlutterEngine会调用- (void)handleMethodCall:(FlutterMethodCall*)call result:(FlutterResult)result{}方法。
SqflitePlugin
- (void)handleMethodCall:(FlutterMethodCall*)call result:(FlutterResult)result {
    FlutterResult wrappedResult = ^(id res) {
        dispatch_async(dispatch_get_main_queue(), ^{
            result(res);
        });
    };

    ...
    else if ([_methodInsert isEqualToString:call.method]) {
        [self handleInsertCall:call result:wrappedResult];
    }
    ...
    else {
        result(FlutterMethodNotImplemented);
    }
}

// 执行插入操作
- (void)handleInsertCall:(FlutterMethodCall*)call result:(FlutterResult)result {

    SqfliteDatabase* database = [self getDatabaseOrError:call result:result];
    if (database == nil) {
        return;
    }
    dispatch_async(dispatch_get_global_queue(DISPATCH_QUEUE_PRIORITY_DEFAULT, 0), ^{
        [database.fmDatabaseQueue inDatabase:^(FMDatabase *db) {
            SqfliteMethodCallOperation* operation = [SqfliteMethodCallOperation newWithCall:call result:result];
            [self insert:database fmdb:db operation:operation];
        }];
    });

}
FMDB执行完插入操作后,将结果封装到FlutterResult中,返回给Flutter。
FlutterAppDelegate
我们的AppDelegate主要的任务是执行了插件的注册。让Flutter代码可以方便的调用Native代码。
而AppDelegate是继承自FlutterAppDelegate,那FlutterAppDelegate又做了哪些工作呢?
FlutterAppDelegate在Flutter.framework中,由于是打包成了库,我们只能看到头文件,如果我们需要看源码,则需要进入Flutter Engine中去查看源代码。
FlutterAppDelegate
@implementation FlutterAppDelegate {
  FlutterPluginAppLifeCycleDelegate* _lifeCycleDelegate;
}

// Returns the key window's rootViewController, if it's a FlutterViewController.
// Otherwise, returns nil.
- (FlutterViewController*)rootFlutterViewController {
  if (_rootFlutterViewControllerGetter != nil) {
    return _rootFlutterViewControllerGetter();
  }
  UIViewController* rootViewController = _window.rootViewController;
  if ([rootViewController isKindOfClass:[FlutterViewController class]]) {
    return (FlutterViewController*)rootViewController;
  }
  return nil;
}

#pragma mark - FlutterPluginRegistry methods. All delegating to the rootViewController

- (NSObject<FlutterPluginRegistrar>*)registrarForPlugin:(NSString*)pluginKey {
  FlutterViewController* flutterRootViewController = [self rootFlutterViewController];
  if (flutterRootViewController) {
    return [[flutterRootViewController pluginRegistry] registrarForPlugin:pluginKey];
  }
  return nil;
}

- (BOOL)hasPlugin:(NSString*)pluginKey {
  FlutterViewController* flutterRootViewController = [self rootFlutterViewController];
  if (flutterRootViewController) {
    return [[flutterRootViewController pluginRegistry] hasPlugin:pluginKey];
  }
  return false;
}

- (NSObject*)valuePublishedByPlugin:(NSString*)pluginKey {
  FlutterViewController* flutterRootViewController = [self rootFlutterViewController];
  if (flutterRootViewController) {
    return [[flutterRootViewController pluginRegistry] valuePublishedByPlugin:pluginKey];
  }
  return nil;
}
重要代码解释如下:
-
FlutterAppDelegate有一个FlutterPluginAppLifeCycleDelegate类型的
_lifeCycleDelegate属性,它的作用是分发App生命周期的改变。它的有一个重要的方法- (void)addDelegate:(NSObject<FlutterApplicationLifeCycleDelegate>*)delegate {}, 就是谁想知道App的生命周期就加进来,它会在App的生命周期发生改变的时候一一通知大家。 -
FlutterAppDelegate的根视图为一个FlutterViewController类型的对象
flutterRootViewController。 -
和Plugin相关的一系列代码,主要是将这些Plugin注册到
flutterRootViewController的FlutterEngine对象上。
这也很好理解MethodChannel是如何在 AppDelegate中连接起来,因为
flutterRootViewController加载的就是Flutter App编译的代码。
FlutterViewController
前面提到了FlutterAppDelegate的根视图是FlutterViewController。那这个FlutterViewController是如何去加载Flutter App的呢?
FlutterViewController
@implementation FlutterViewController {
  std::unique_ptr<fml::WeakPtrFactory<FlutterViewController>> _weakFactory;
  fml::scoped_nsobject<FlutterEngine> _engine;

  fml::scoped_nsobject<FlutterView> _flutterView;
  fml::scoped_nsobject<UIView> _splashScreenView;
}
FlutterViewController有几个重要的属性:
_engine就是FlutterEngine,负责渲染交互等功能_flutterView是显示Flutter App的View_splashScreenView是显示启动图的View
重点来了
FlutterViewController的各种构造函数最后都会调用
- (void)sharedSetupWithProject:(nullable FlutterDartProject*)project initialRoute:(nullable NSString*)initialRoute
FlutterViewController
- (void)sharedSetupWithProject:(nullable FlutterDartProject*)project
                  initialRoute:(nullable NSString*)initialRoute {
  // Need the project to get settings for the view. Initializing it here means
  if (!project) {
    project = [[[FlutterDartProject alloc] init] autorelease];
  }
  auto engine = fml::scoped_nsobject<FlutterEngine>{[[FlutterEngine alloc]
                initWithName:@"io.flutter"
                     project:project
      allowHeadlessExecution:self.engineAllowHeadlessExecution
          restorationEnabled:[self restorationIdentifier] != nil]};

  _flutterView.reset([[FlutterView alloc] initWithDelegate:_engine opaque:self.isViewOpaque]);
  [_engine.get() createShell:nil libraryURI:nil initialRoute:initialRoute];
  [self loadDefaultSplashScreenView];
  [self performCommonViewControllerInitialization];
}
- 生成一个FlutterDartProject对象
project,这个对象主要是描述了Flutter APP的一些相关信息,最重要的一个是找到可执行文件。 - 根据这个
project的设置信息生成一个FlutterEngine对象engine。 - 生成一个FlutterView对象
_flutterView来作为渲染的View。 _engine找到Flutter APP的可执行文件的入口main.dart开始执行,然后渲染到_flutterView上。- 看是否需要加载启动图
- 一些通用的初始化内容
FlutterDartProject
FlutterDartProject中通过FLTDefaultSettingsForBundle方法可以生成一些通用设置。
flutter::Settings FLTDefaultSettingsForBundle(NSBundle* bundle) {
    // Frameworks directory.
    if (settings.application_library_path.size() == 0) {
      NSString* applicationFrameworkPath = [mainBundle pathForResource:@"Frameworks/App.framework"
                                                                ofType:@""];
      if (applicationFrameworkPath.length > 0) {
        NSString*  =
            [NSBundle bundleWithPath:applicationFrameworkPath].executablePath;
        if (executablePath.length > 0) {
          settings.application_library_path.push_back(executablePath.UTF8String);
        }executablePath
      }
    }
  }

  // Checks to see if the flutter assets directory is already present.
  if (settings.assets_path.size() == 0) {
    NSString* assetsName = [FlutterDartProject flutterAssetsName:bundle];
    NSString* assetsPath = [bundle pathForResource:assetsName ofType:@""];

    }
  }

  // Domain network configuration
  NSDictionary* appTransportSecurity =
      [mainBundle objectForInfoDictionaryKey:@"NSAppTransportSecurity"];
  settings.may_insecurely_connect_to_all_domains =
      [FlutterDartProject allowsArbitraryLoads:appTransportSecurity];
  settings.domain_network_policy =
      [FlutterDartProject domainNetworkPolicy:appTransportSecurity].UTF8String;
  }
  return settings;
}
这段代码主要做了以下一些事情:
- 如果不特殊指定的话,Flutter APP的执行文件是位于FLutter目录下的
App.framework中那个命名为App的可执行文件,也就是说所有的Flutter代码都打包成了一个可执行文件。
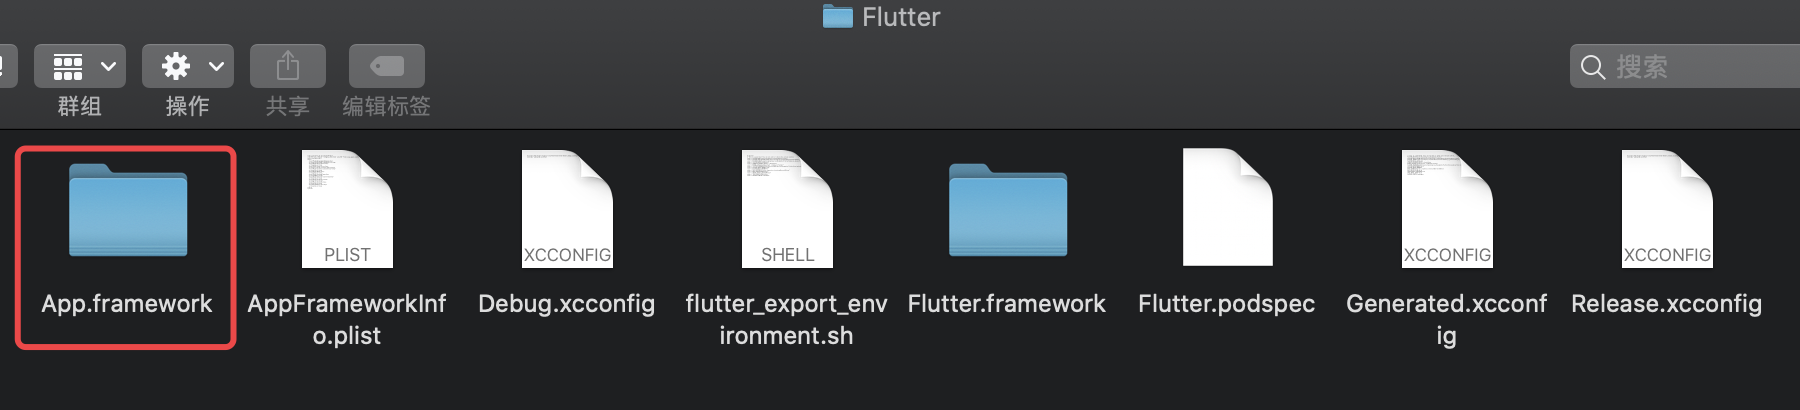
- 指定了图片的路径
- 网络设置,是否允许HTTP请求。