文章目录
SpringCloud搭建环境demo
项目gitee地址
https://gitee.com/cheunghonghui/heima-exam.git
1.新建父工程
在实际项目中如果存在多个子工程,都会先创建一个父工程,然后后续的工程都以这个工程为父,实现maven的聚合。
配置pom.xml:
<?xml version="1.0" encoding="UTF-8"?>
<project xmlns="http://maven.apache.org/POM/4.0.0"
         xmlns:xsi="http://www.w3.org/2001/XMLSchema-instance"
         xsi:schemaLocation="http://maven.apache.org/POM/4.0.0 http://maven.apache.org/xsd/maven-4.0.0.xsd">
    <modelVersion>4.0.0</modelVersion>

    <groupId>com.cheung</groupId>
    <artifactId>exam-springcloud</artifactId>
    <packaging>pom</packaging>
    <version>1.0-SNAPSHOT</version>
    <modules>
        <module>exam-article</module>
        <module>exam-gateway</module>
        <module>exam-page</module>
        <module>eureka-server</module>
    </modules>


    <!-- 配置父级 -->
    <parent>
        <groupId>org.springframework.boot</groupId>
        <artifactId>spring-boot-starter-parent</artifactId>
        <version>2.1.6.RELEASE</version>
    </parent>

    <!-- 配置全局属性 -->
    <properties>
        <mapper.version>2.1.5</mapper.version>
        <mysql.version>5.1.47</mysql.version>
        <springcloud.version>Greenwich.SR2</springcloud.version>
    </properties>

    <dependencyManagement>
        <dependencies>
            <!-- spring-cloud (导入pom文件)
            scope: import 只能在<dependencyManagement>元素里面配置
       -->
            <dependency>
                <groupId>org.springframework.cloud</groupId>
                <artifactId>spring-cloud-dependencies</artifactId>
                <version>${springcloud.version}</version>
                <type>pom</type>
                <scope>import</scope>
            </dependency>
            <!-- 通用mapper启动器 -->
            <dependency>
                <groupId>tk.mybatis</groupId>
                <artifactId>mapper-spring-boot-starter</artifactId>
                <version>${mapper.version}</version>
            </dependency>
        </dependencies>
    </dependencyManagement>

    <!-- 子工程会继承该依赖 -->
    <dependencies>

        <dependency>
            <groupId>org.projectlombok</groupId>
            <artifactId>lombok</artifactId>
        </dependency>

        <!--测试类-->
        <dependency>
            <groupId>org.springframework.boot</groupId>
            <artifactId>spring-boot-starter-test</artifactId>
            <version>2.2.4.RELEASE</version>
        </dependency>
        <dependency>
            <groupId>junit</groupId>
            <artifactId>junit</artifactId>
            <version>4.12</version>
        </dependency>
    </dependencies>

    <build>
        <plugins>
            <!-- 配置spring-boot的maven插件 -->
            <plugin>
                <groupId>org.springframework.boot</groupId>
                <artifactId>spring-boot-maven-plugin</artifactId>
            </plugin>
        </plugins>
    </build>
</project>
- sql
USE `springcloud`;
/*Table structure for table `t_article` */
DROP TABLE IF EXISTS `t_article`;
CREATE TABLE `t_article` (
`id` bigint(20) NOT NULL AUTO_INCREMENT COMMENT 'ID',
`title` varchar(100) CHARACTER SET utf8 DEFAULT NULL COMMENT '标题',
`content` text CHARACTER SET utf8 COMMENT '文章正文',
`authorid` bigint(20) DEFAULT NULL COMMENT '作者编号',
`createtime` datetime DEFAULT NULL COMMENT '发表日期',
`state` char(1) CHARACTER SET utf8 DEFAULT NULL COMMENT '审核状态',
PRIMARY KEY (`id`)
) ENGINE=InnoDB AUTO_INCREMENT=5 DEFAULT CHARSET=utf8mb4 COMMENT='文章';
/*Data for the table `t_article` */
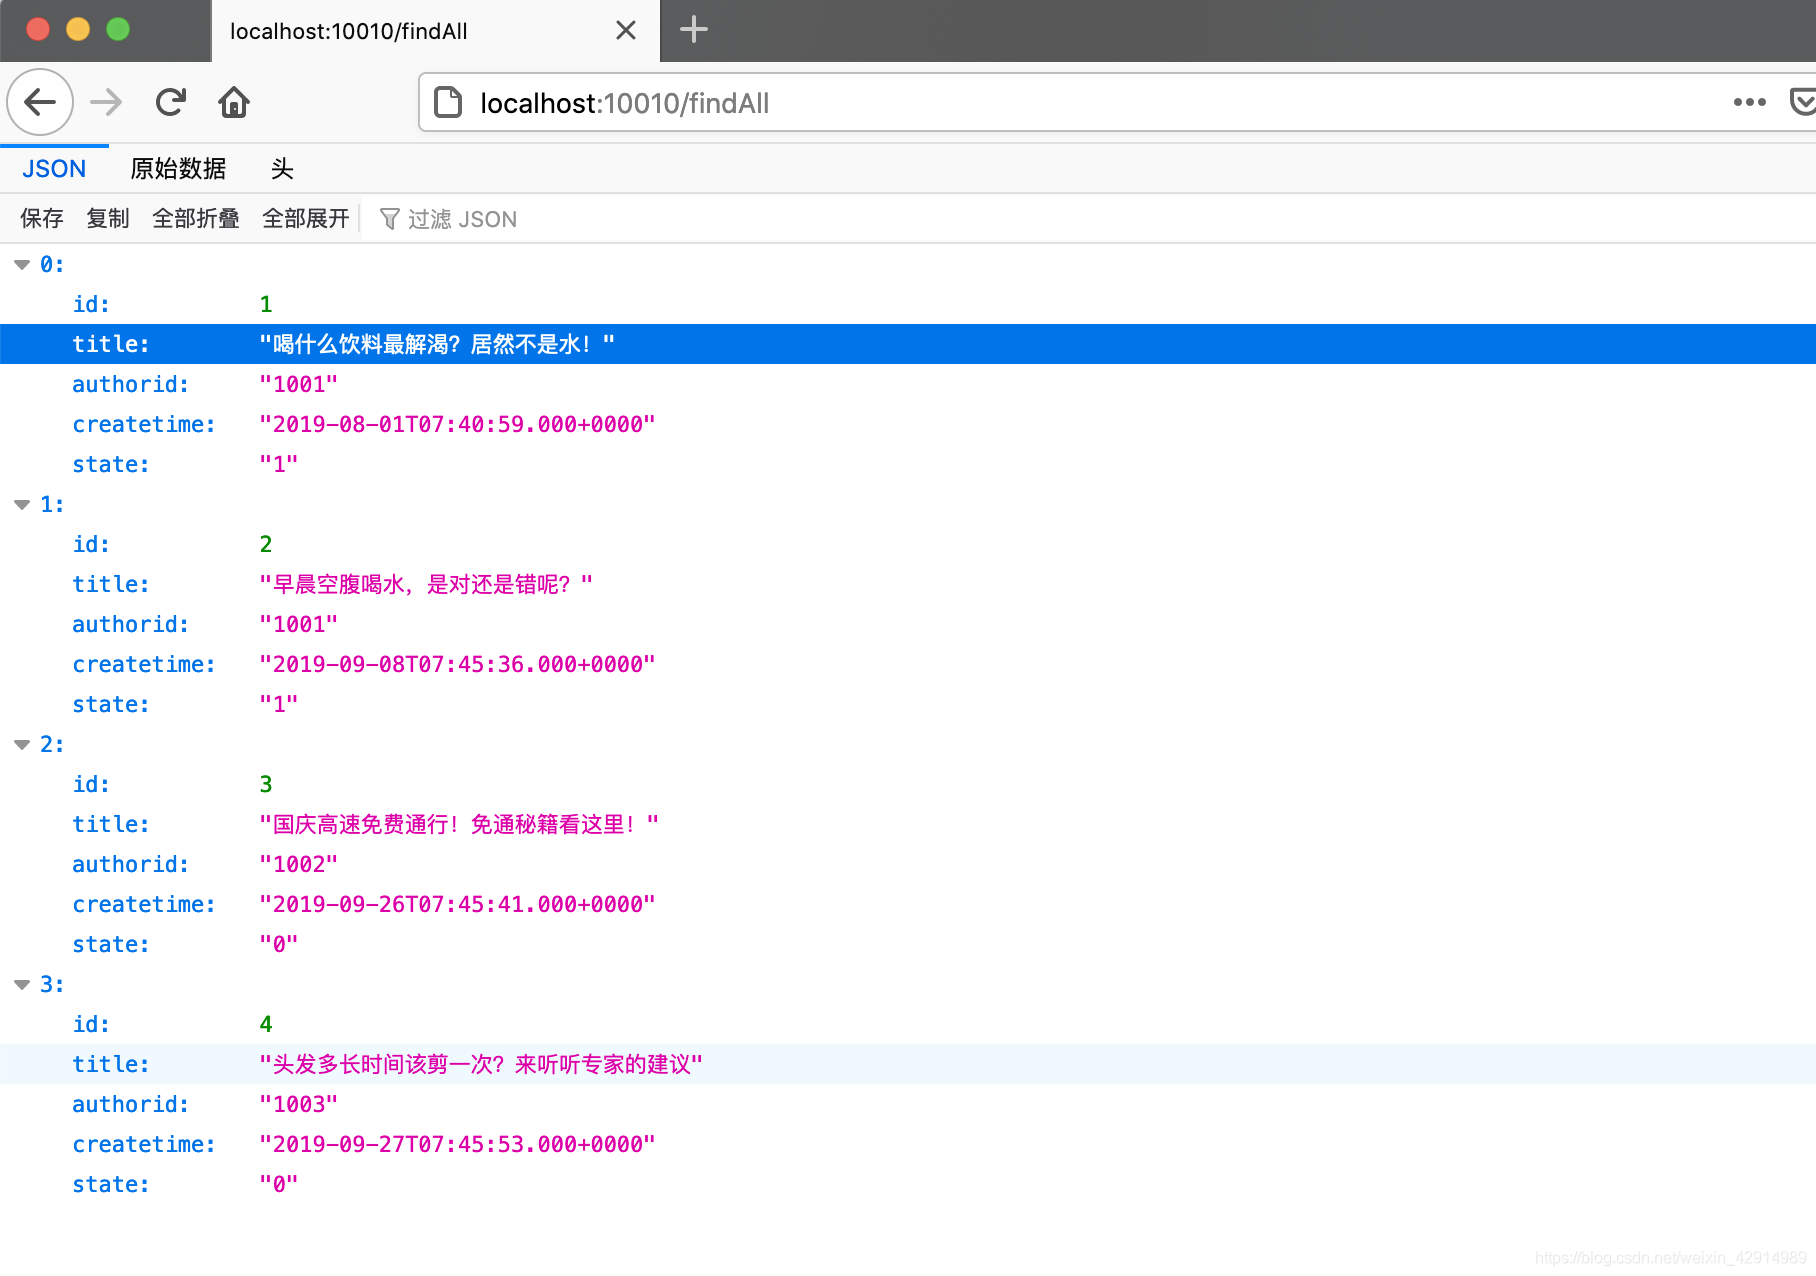
insert into `t_article`(`id`,`title`,`content`,`authorid`,`createtime`,`state`) values
(1,'喝什么饮料最解渴?居然不是水!','什么饮料最解渴?白水、茶还是汽水?都不是!苏格兰科学家的研究发现,最补水的饮料含有乳糖、蛋白质和脂肪,你猜出来是哪种饮料了吗?',1001,'2019-08-01 15:40:59','1'),
(2,'早晨空腹喝水,是对还是错呢?','大部分人都有这样一个习惯,早晨刚刚起床的时候,就喜欢空腹喝一杯温水,而且很多朋友认为这是对身体的健康,非常有益的,早晨空腹喝水,是对还是错呢?',1001,'2019-09-08 15:45:36','1'),
(3,'国庆高速免费通行!免通秘籍看这里!','据交通运输部26日例行新闻发布会,今年国庆假期,将继续免收7座及以下小型客车通行费,免费通行时间为10月1日0时至10月7日24时,在此期间,普通公路以车辆通过收费站的时间为准,高速公路以车辆驶离出口收费站的时间为准。9座小型客车暂不免车辆通行费。',1002,'2019-09-26 15:45:41','0'),
(4,'头发多长时间该剪一次?来听听专家的建议','菲茨杰拉德说,长发的人应该定期去修剪头发,因为变换发型会对发丝造成损伤。这也是为什么她建议每8周去理一次发,以保持长发健康。',1003,'2019-09-27 15:45:53','0');
2.搭建Eureka服务端:注册中心
- 配置eureka-server依赖: pom.xml
<?xml version="1.0" encoding="UTF-8"?>
<project xmlns="http://maven.apache.org/POM/4.0.0"
         xmlns:xsi="http://www.w3.org/2001/XMLSchema-instance"
         xsi:schemaLocation="http://maven.apache.org/POM/4.0.0
         http://maven.apache.org/xsd/maven-4.0.0.xsd">
    <parent>
        <artifactId>springcloud-demo</artifactId>
        <groupId>cn.itcast</groupId>
        <version>1.0-SNAPSHOT</version>
    </parent>
    <modelVersion>4.0.0</modelVersion>
    <artifactId>eureka-server</artifactId>

    <dependencies>
        <!-- 配置eureka服务端启动器(集成了web启动器) -->
        <dependency>
            <groupId>org.springframework.cloud</groupId>
            <artifactId>spring-cloud-starter-netflix-eureka-server</artifactId>
        </dependency>
    </dependencies>
</project>
- 编写启动类 : EurekaServerApplication
package cn.itcast;

import org.springframework.boot.SpringApplication;
import org.springframework.boot.autoconfigure.SpringBootApplication;
import org.springframework.cloud.netflix.eureka.server.EnableEurekaServer;

@EnableEurekaServer // 声明当前应用为eureka服务(启用eureka服务)
@SpringBootApplication
public class EurekaServerApplication {


    public static void main(String[] args){


        SpringApplication.run(EurekaServerApplication.class, args);
    }
}
- 编写配置文件: application.yml,这里要注意一点是eureka-server本身也是一个客户端(与高可用有关,后续章节会讲到),所以也需要配置服务端的地址,目前服务端就是自己,因此配置自己的地址即可。
server:
  port: 8761 # eureka服务端,默认端口
spring:
  application:
    name: eureka-server # 应用名称,会在Eureka中作为服务的id标识(serviceId)
eureka:
  client:
    service-url: # EurekaServer的地址,现在是自己的地址,如果做集群,需要写其它服务实例(节点)的地址。
      defaultZone: http://localhost:8761/eureka
    fetch-registry: false # 不拉取服务
    register-with-eureka: false # 不注册服务
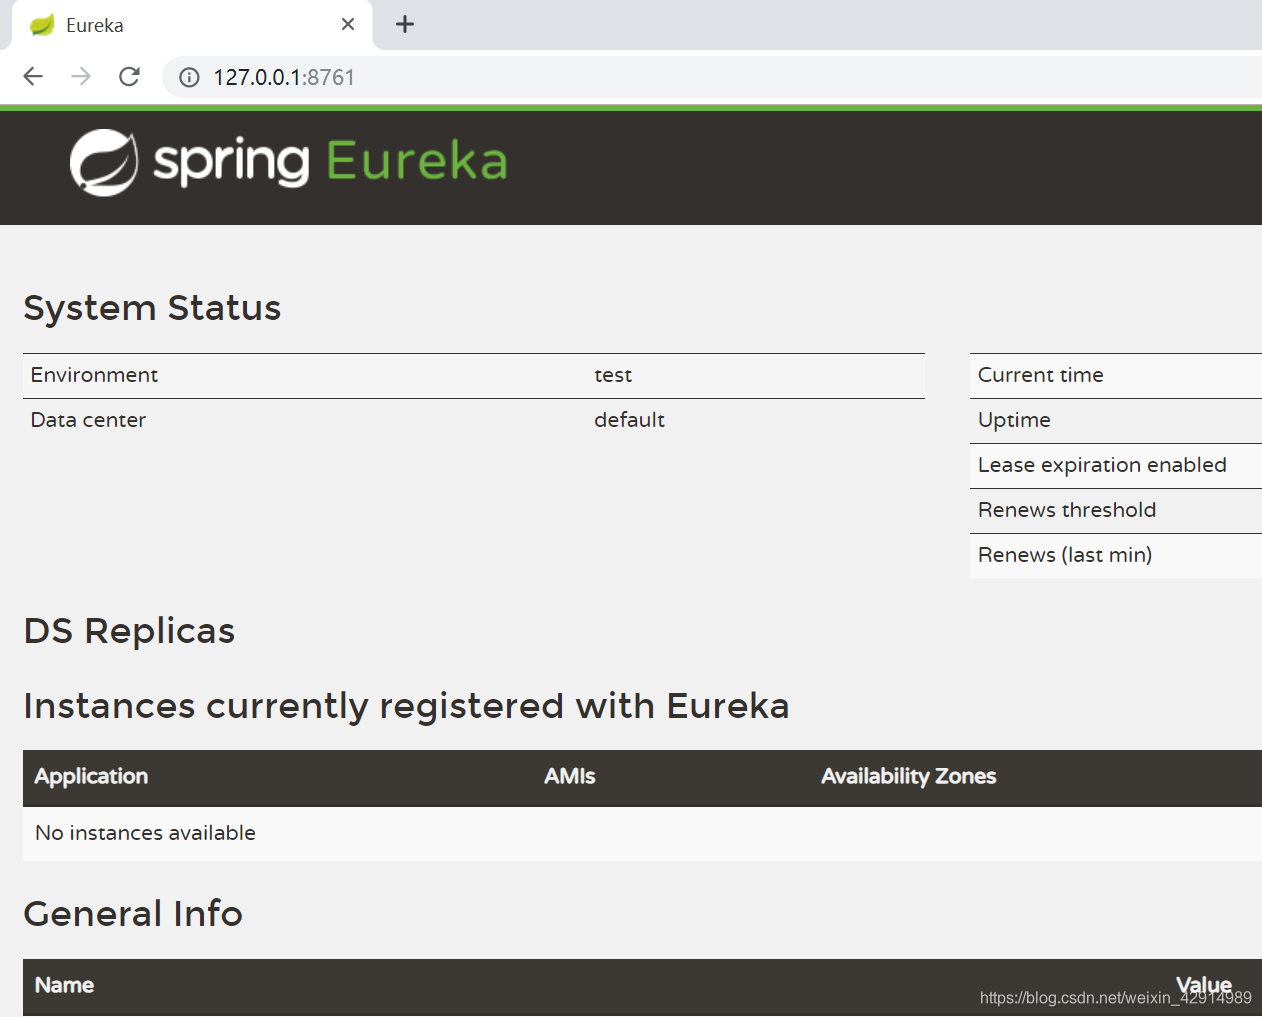
- 启动服务,并访问:http://127.0.0.1:8761
3.搭建Eureka客户端:服务注册
3.1 实现步骤
-
第一步:在exam-article模块中添加eureka客户端启动器依赖
<!-- 配置eureka客户端启动器 --> <dependency> <groupId>org.springframework.cloud</groupId> <artifactId>spring-cloud-starter-netflix-eureka-client</artifactId> </dependency> -
第二步:在启动类上开启Eureka客户端,添加 @EnableDiscoveryClient 来开启Eureka客户端
@EnableEurekaClient
@SpringBootApplication
@MapperScan("com.cheung.exam.mapper")
public class ExamApplication {


    public static void main(String[] args) {


        SpringApplication.run(ExamApplication.class,args);
    }
}
- 第三步:修改application.yml,添加eureka客户端配置(url需要按照自己数据库进行更改)
server:
  port: ${

    port:9001}
spring:
  datasource:
    driver-class-name: com.mysql.jdbc.Driver
    url: jdbc:mysql://47.113.92.207:3306/springcloud?serverTimezone=GMT&useSSL=false
    username: root
    password: root
  jackson:
    date-format: yyyy-MM-dd HH:mm:ss
    time-zone:  GMT+8
    #格林威治
  application:
    # 应用名称(服务id)
    name: exam-service
# 配置eureka服务端地址
eureka:
  client:
    service-url:
      defaultZone: http://localhost:8761/eureka
logging:
  level:
    com.cheung: debug
注意:这里我们添加了spring.application.name属性来指定应用名称,将来会作为服务的id使用。
- 第四步:重启项目,访问Eureka监控页面查看:
3.2 编写服务逻辑
-
项目结构
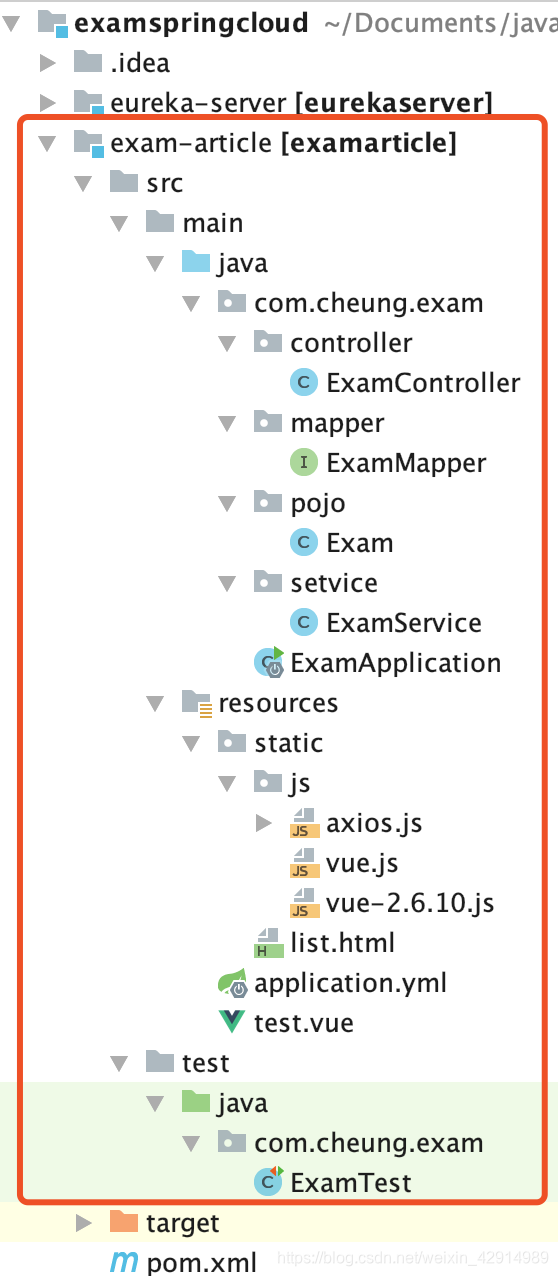
-
controller
package com.cheung.exam.controller;

import com.cheung.exam.pojo.Exam;
import com.cheung.exam.setvice.ExamService;
import org.springframework.beans.factory.annotation.Autowired;
import org.springframework.web.bind.annotation.GetMapping;
import org.springframework.web.bind.annotation.RestController;

import java.util.List;

@RestController
public class ExamController {


    @Autowired
    private ExamService examService;

    //查询所有信息
    @GetMapping("/findAll")
    public List<Exam> findAll(){


        return examService.findAll();
    }

}
- service
package com.cheung.exam.setvice;

import com.cheung.exam.mapper.ExamMapper;
import com.cheung.exam.pojo.Exam;
import org.springframework.beans.factory.annotation.Autowired;
import org.springframework.stereotype.Service;
import org.springframework.transaction.annotation.Transactional;

import java.util.List;

@Service
@Transactional
public class ExamService {


    @Autowired(required = false)
    private ExamMapper examMapper;

    public List<Exam> findAll(){


        return examMapper.selectAll();
    }

}
- mapper
package com.cheung.exam.mapper;

import com.cheung.exam.pojo.Exam;
import tk.mybatis.mapper.common.Mapper;

import java.util.List;

public interface ExamMapper extends Mapper<Exam> {


    //查询所有信息
    List<Exam> findAll();
}
- pojo
package com.cheung.exam.pojo;

import lombok.Data;
import tk.mybatis.mapper.annotation.KeySql;

import javax.persistence.Id;
import javax.persistence.Table;
import java.util.Date;

@Data
@Table(name = "t_article")
public class Exam {


    @Id //  主键
    @KeySql(useGeneratedKeys = true)    //开启自增主键返回功能
    private Long id;

    private String title;

    private String authorid;

    private Date createtime;

    private String state;
}
4.搭建Gateway网关
4.1 添加依赖
<?xml version="1.0" encoding="UTF-8"?>
<project xmlns="http://maven.apache.org/POM/4.0.0"
         xmlns:xsi="http://www.w3.org/2001/XMLSchema-instance"
         xsi:schemaLocation="http://maven.apache.org/POM/4.0.0 http://maven.apache.org/xsd/maven-4.0.0.xsd">
    <parent>
        <artifactId>exam-springcloud</artifactId>
        <groupId>com.cheung</groupId>
        <version>1.0-SNAPSHOT</version>
    </parent>
    <modelVersion>4.0.0</modelVersion>

    <artifactId>exam-gateway</artifactId>

    <dependencies>
        <!-- 配置eureka客户端启动器 -->
        <dependency>
            <groupId>org.springframework.cloud</groupId>
            <artifactId>spring-cloud-starter-netflix-eureka-client</artifactId>
        </dependency>
        <!-- 配置gateway启动器(基于netty运行,所在不需要tomcat启动器) -->
        <dependency>
            <groupId>org.springframework.cloud</groupId>
            <artifactId>spring-cloud-starter-gateway</artifactId>
        </dependency>
    </dependencies>

</project>
4.2 编写启动类
在gateway-server中创建cn.itcast.GatewayApplication启动类
package com.cheung;

import org.springframework.boot.SpringApplication;
import org.springframework.boot.autoconfigure.SpringBootApplication;
import org.springframework.cloud.client.discovery.EnableDiscoveryClient;

@SpringBootApplication
@EnableDiscoveryClient
public class GatewayApplication {


    public static void main(String[] args) {


        SpringApplication.run(GatewayApplication.class,args);
    }
}
4.3 编写配置
在gateway-server中创建application.yml文件,内容如下:
server:
  port: 10010
spring:
  application:
    name: api-gateway
  cloud:
    gateway:
      routes:
        # 路由id, 路由信息的唯一标识, 可以随意写
        - id: exam-service-route
          # 路由的目标服务地址
          uri: http://127.0.0.1:9001
          # 断言,Path: 匹配路由映射路径
          predicates:
            - Path=/**

eureka:
  client:
    service-url:
      defaultZone: http://localhost:8761/eureka
注意:必须设置拉取服务为true(默认也是为true),因为需要转发请求到具体服务,或者使用默认值
- 将符合 Path 规则的一切请求,都代理或路由到 uri 参数指定的地址
- 本例中,我们将路径中包含有 /** 开头的请求,代理到http://127.0.0.1:9001
4.4 启动测试
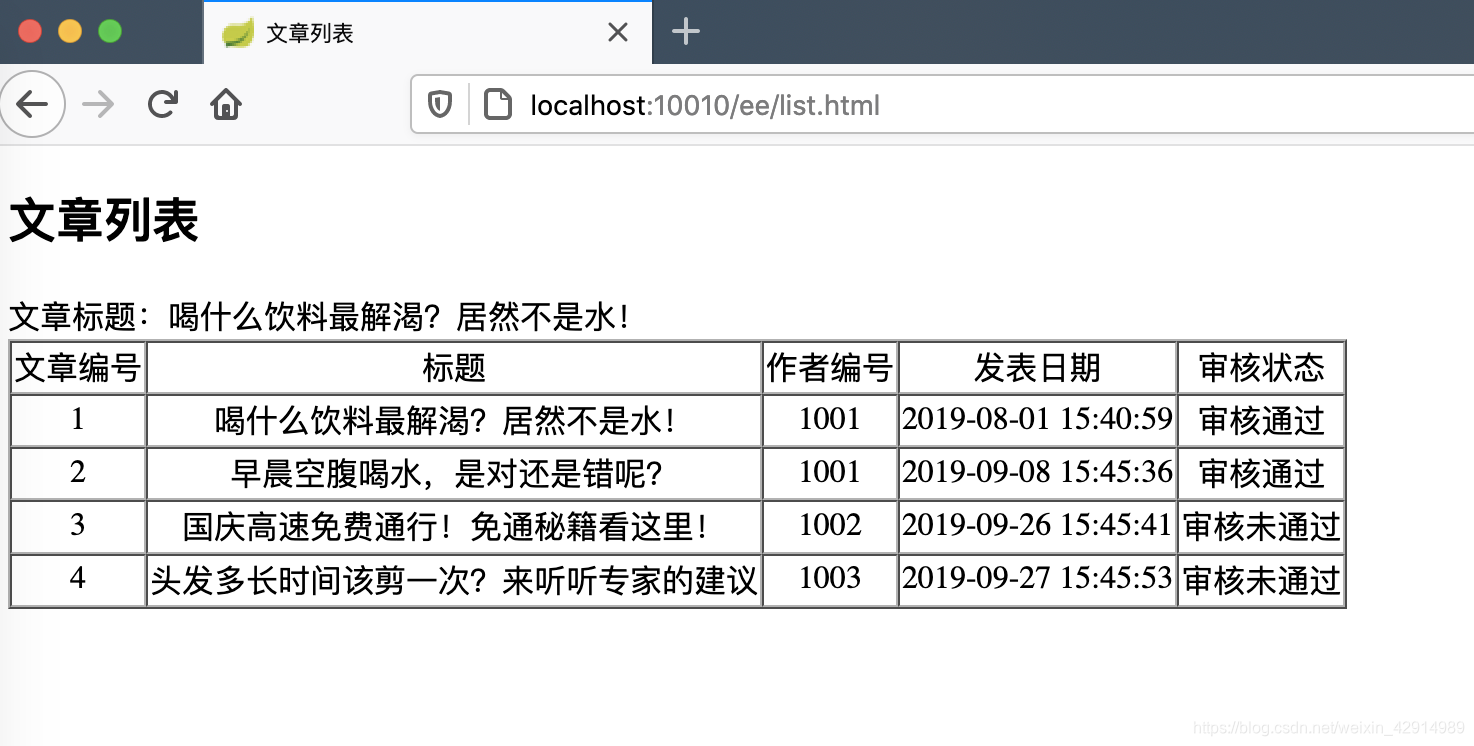
访问的路径中需要加上配置规则的映射路径,我们访问:http://localhost:10010/findAll
- 去掉路由前缀
有时候为了掩盖服务的真实API,我们可以通过配置网关过滤器StripPrefix,实现映射路径中的地址去除前缀,修改Gateway的application.yml文件:
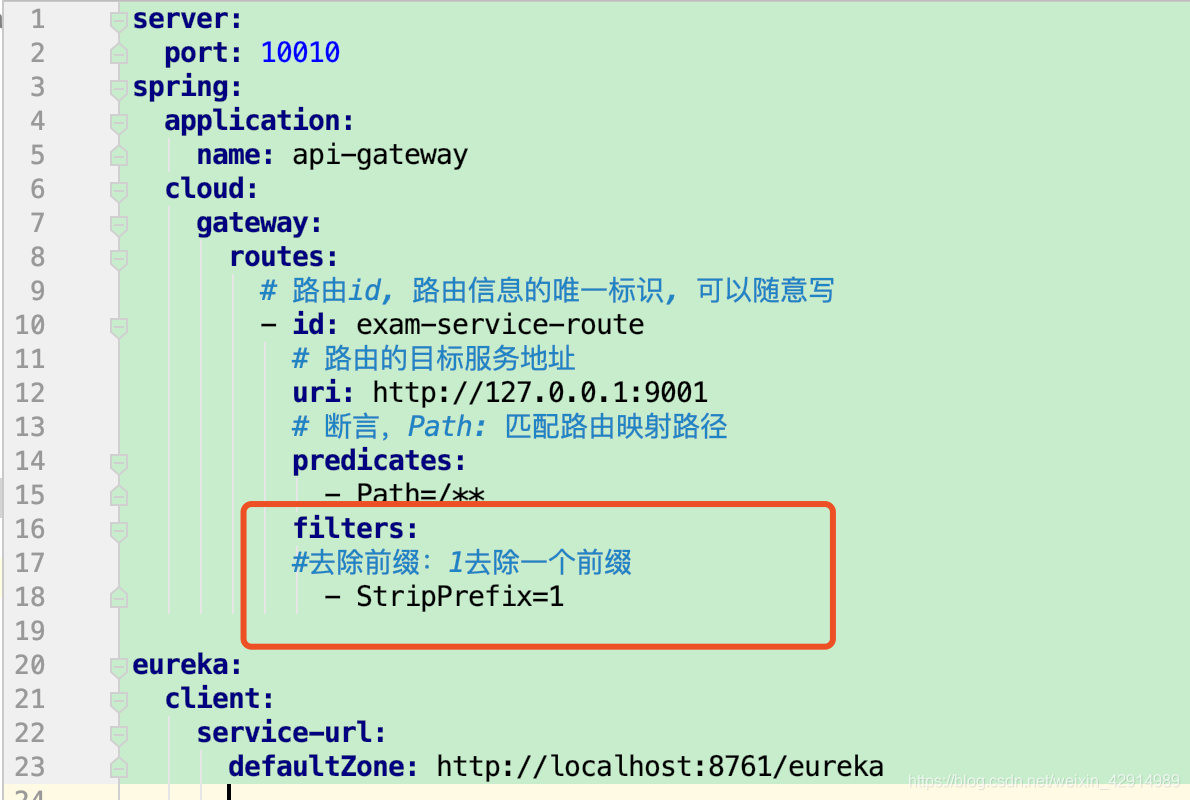
通过 StripPrefix=1 来指定了路由要去掉的前缀个数。如:路径 /ee/findAll 将会被代理到 /findAll。

5.前端Vue
记得在static目录下引进vue.js和axios.js文件
同时在list.html中应用上面文件
<!DOCTYPE html>
<html lang="en">
<head>
    <meta charset="UTF-8">
    <title>文章列表</title>
    <script src="js/vue.js"></script>
    <script src="js/axios.js"></script>
    <script type="text/javascript">
        // 文档加载完
        window.onload = function () {


            //创建Vue实例
            var vue = new Vue({


                el: '#app', //指定渲染的html元素
                data: {

    //数据对象
                    examList: [],
                    msg: ""
                },
                methods: {

    //操作方法
                    //查询用户数据
                    search() {


                        //发送异步请求
                        axios.get("/ee/findAll").then((response) => {

    //请求成功
                            this.examList = response.data;
                    }).catch((error) => {

    //请求出错
                            console.log(error);
                    })
                    },

                    //返回标题
                    setMsg(msg){


                        this.msg = msg;
                    }

                },
                created() {

    //创建vue实例完成后
                    this.search();
                }
            });
        };
    </script>

</head>
<body>
<div id="app">
    <h2>文章列表</h2>
    <table border="1" cellpadding="1" cellspacing="0" style="text-align: center">
        文章标题:{

    {

    msg}}  <!--悬浮显示-->
        <thead>
        <tr>
            <td>文章编号</td>
            <td>标题</td>
            <td>作者编号</td>
            <td>发表日期</td>
            <td>审核状态</td>
        </tr>
        </thead>
        <tbody>
        <!--<tr>-->
            <!--<td>1</td>-->
            <!--<td>喝什么饮料最解渴?居然不是水!</td>-->
            <!--<td>1001</td>-->
            <!--<td>2019-08-01T15:40:59</td>-->
            <!--<td>审核通过</td>-->
        <!--</tr>-->


        <tr v-for="exam in examList" @mouseenter = "setMsg(exam.title)"><!--鼠标悬浮-->
            <td>{

    {

    exam.id}}</td>
            <td>{

    {

    exam.title}}</td>
            <td>{

    {

    exam.authorid}}</td>
            <td>{

    {

    exam.createtime}}</td>
            <!--let state = {

    {

    exam.state}}-->
            <!--<td>{

    {

    exam.state==1?'审核通过':'审核未通过'}}</td>-->
            <!--<td><span v-if="exam.state==1">审核通过</span></td>-->
            <td>
                <span v-if="exam.state=='1'">审核通过</span>
                <span v-else-if="exam.state=='0'">审核未通过</span>
                <span v-else>未审核</span>
            </td>
        </tr>
        </tbody>
    </table>
</div>
</body>
</html>
运行效果:
Memorial Day is 515 days |