Thymeleaf
1.thymeleaf简介
Thymeleaf 是个什么?
简单说, Thymeleaf 是一个跟 Velocity、FreeMarker 类似的模板引擎,它可以完全替代 JSP 。相较与其他的模板引擎,它有如下三个极吸引人的特点:
1、Thymeleaf 在有网络和无网络的环境下皆可运行,即它可以让美工在浏览器查看页面的静态效果,也可以让程序员在服务器查看带数据的动态页面效果。这是由于它支持 html 原型,然后在 html 标签里增加额外的属性来达到模板+数据的展示方式。浏览器解释 html 时会忽略未定义的标签属性,所以 thymeleaf 的模板可以静态地运行;当有数据返回到页面时,Thymeleaf 标签会动态地替换掉静态内容,使页面动态显示。
2、Thymeleaf 开箱即用的特性。它提供标准和spring标准两种方言,可以直接套用模板实现JSTL、 OGNL表达式效果,避免每天套模板、该jstl、改标签的困扰。同时开发人员也可以扩展和创建自定义的方言。
3 、Thymeleaf 提供spring标准方言和一个与 SpringMVC 完美集成的可选模块,可以快速的实现表单绑定、属性编辑器、国际化等功能。
4.thymeleaf与jsp有点相似都是渲染模板,不同的是jsp,在没有启动服务器的时候是不能正常访问的,但是thymeleaf是在不启动Tomcat也能正常访问,jsp对页面的侵入性大,thymeleaf对页面的侵入小,在不影响到原页面的样式的情况下渲染数据。
5、接下来为大家演示一些比较常用的用法,具体的更多细节请参照官网文档
thymeleaf官网:https://www.thymeleaf.org/
maven依赖:
<!-- https://mvnrepository.com/artifact/org.thymeleaf/thymeleaf -->
<dependency>
    <groupId>org.thymeleaf</groupId>
    <artifactId>thymeleaf</artifactId>
    <version>3.0.11.RELEASE</version>
</dependency>
springBoot开发场景依赖:
<!--     thymeleaf模板   -->
        <dependency>
            <groupId>org.springframework.boot</groupId>
            <artifactId>spring-boot-starter-thymeleaf</artifactId>
        </dependency>
使用的时候再html页面前加上:
 当然只加上这个也是可以的:
<html lang="en" xmlns:th="http://www.thymeleaf.org">
<html xmlns="http://www.w3.org/1999/xhtml" xmlns:th="http://www.thymeleaf.org">
2.thymeleaf的使用
通过源码分析:
springBoot项目:我们只需要把html文件放在Resources目录下的templates目录下就可以被thymeleaf解析到。(也就是我们的类路径下面 )
 案例:
案例:
3.i18n国际化
1.指定国际化properties文件
2.在application.properties中配置国际化properties文件的路径

4.thymeleaf变量获取
html页面:
<!DOCTYPE html>
<html lang="en"  xmlns:th="http://www.thymeleaf.org">
<head th:replace="common :: head(~{::title})">
    <meta charset="UTF-8">
    <title>通过表达式获取对象的属性</title>
</head>
<body>
<h1>Object对象取值</h1>
<span>User对象:</span>
<span th:text="${

     '用户名:'+user.username+'密码:'+user.password}"></span>
<p>用户名(行内取值):[[${user.username}]]</p>
<span> 根据索引获取list集合中的属性值: </span>  <span th:text="${users[0].username}"></span>

<br>
<!--
    #ctx: the context object.
    #vars: the context variables.
    #locale: the context locale.
    #httpServletRequest: (only in Web Contexts) the HttpServletRequest object.
    #httpSession: (only in Web Contexts) the HttpSession object.

-->
<span> 根据内置对象获取属性值: </span>  <span th:text="${#httpSession.getAttribute('message')}"></span>

<br>
<!--

    #dates: utility methods for java.util.Date objects: formatting, component extraction, etc.
    #calendars: analogous to #dates, but for java.util.Calendar objects.
    #numbers: utility methods for formatting numeric objects.
    #strings: utility methods for String objects: contains, startsWith, prepending/appending, etc.
    #objects: utility methods for objects in general.
    #bools: utility methods for boolean evaluation.
    #arrays: utility methods for arrays.
    #lists: utility methods for lists.
    #sets: utility methods for sets.
    #maps: utility methods for maps.
    #aggregates: utility methods for creating aggregates on arrays or collections.
    #messages: utility methods for obtaining externalized messages inside variables expressions, in the same way as they would be obtained using #{…} syntax.
    #ids: utility methods for dealing with id attributes that might be repeated (for example, as a result of an iteration).

-->

根据内置对象格式化日期:<span th:text="${#dates.format(user.time,'yyyy-MM-dd')}" ></span> <br>
根据内置对象格式化数值:<span th:text="${#numbers.formatPercent(user.score,1,1)}" ></span> <br>
根据内置对象截取字符串(字符串,前面截取n位,后面截取n位):<span th:text="${#strings.substring(user.email,1,5)}" ></span> <br>
根据内置对象将字符串数组合并为一个字符串:<span th:text="${#strings.arrayJoin(array,'')}" ></span> <br>
根据内置对象将字符串转为一个list集合:<span th:text="${#strings.listSplit(strings,'-')}" ></span>

<hr>
<p>根据对象获取对象中的属性值</p>
<div th:object="${user}">
    <p th:text="*{username}"></p>
    <p th:text="*{password}"></p>
</div>

<p>给表单赋值,以及提交地址利用三元表达式来进行判读提交</p>
<div>
    <form  th:object="${user}" th:action="*{id}==null ? @{/admin/types} : @{/admin/types/{id}(id=*{id})}" method="post" >
        <input type="text"   th:value="*{username}">
        <input type="text"  th:value="*{password}">
    </form>
</div>
</body>
</html>
controller:代码
    @RequestMapping("/obj")
    public String object(Model model,HttpSession session){


        Users user = new Users(1, "admin", "admin123", "[email protected]", new Date(),0.23f);
        ArrayList<Users> userList = new ArrayList<>();
        for (int i =1;i<6;i++){


            userList.add( new Users(1, "admin", "admin123", "[email protected]", new Date(),0.2f));
        }
        session.setAttribute("message","message信息");
        model.addAttribute("user",user);
        model.addAttribute("users",userList);
        model.addAttribute("array",new String[]{

    "a","b","c","d"});
        model.addAttribute("strings","hello-word");
        return "object";
    }
5.url变量
html页面:
<!DOCTYPE html>
<html lang="en" xmlns:th="http://www.thymeleaf.org">

<head>
    <meta charset="UTF-8">
    <title>Title</title>
</head>
<body>

<p>
    <span>相对路径(后端接口)</span>
    <a href="" th:href="@{/index}">点击此处跳转到首页</a>
</p>

<p>
    <span>相对路径(后端接口,并且携带参数)</span>
    <a href="" th:href="@{/url/param(id=${

     '1'},name=${

     'admin'})}">点击此处跳转到首页</a>
</p>

<p>
    <span>相对路径(后端接口,并且以地址变量的方式携带参数)</span>
    <a href="" th:href="@{/url/{id}(id=${

     '3'})}">点击此处跳转到url/{id}</a>
</p>


<p>  <span>绝对路径</span>
    <a href="" th:href="@{https://www.thymeleaf.org}">点击此处跳转到thymeleaf官网</a>
</p>
</body>
</html>
后端Controller代码:
@Controller
public class Url {


    @GetMapping("/url")
    public String url(){


        return "url";
    }

    @GetMapping("/url/param")
    public String urlParam(@RequestParam(value = "id") Integer id, @RequestParam(value = "name") String name){


        System.out.println(id);
        System.out.println(name);
        return "index";
    }

    @GetMapping("/url/{id}")
    public String urlParamVariable(@PathVariable("id") String id){


        System.out.println(id);
        return "index";
    }

}
6.字面量获取和设置
前端代码:
<!DOCTYPE html>
<html lang="en" xmlns:th="http://www.thymeleaf.org">
<head th:replace="common :: head(~{::title})">
    <meta charset="UTF-8">
    <title>Title</title>
</head>
<body>

<div style="margin-left: 40%;margin-top:10% ">
    <span> 字面量(字符串): </span> <span th:text="'this is a new code'"> </span> <br>
    <span> 字面量(数值): </span> <span>现在已经是 <span th:text="2020+2"></span>年了</span>  <br>
    <span> if表达式: </span> <span th:if="${isAdmin} == true"> 为true</span>  <br>
    <span> if表达式: </span> <span th:if="${notAdmin} == false"> 为false</span> <br>
    <span> if表达式: </span> <span th:if="${isNull} == null"> 为null</span> <br>
    <button class="btn " th:class="btn-success"> 按钮1</button>
<!--  根据判断条件为元素加上class  -->
    <button class="btn " th:classappend="${isAdmin}==true?'btn-danger btn ':''"> 按钮2</button>

</div>

</body>
</html>
后端Controller代码:
@Controller
public class LiteralsController {


    @RequestMapping("/literals")
    public  String literals(Model model){


        model.addAttribute("isAdmin",true);
        model.addAttribute("notAdmin",false);
        model.addAttribute("isNull",null);
        model.addAttribute("notNull","admin");
        return "literals";
    }
}
7.迭代元素
前端页面:
<!DOCTYPE html>
<html lang="en"  xmlns:th="http://www.thymeleaf.org">
<head th:replace=" list/common :: head(~{::title})">
    <meta charset="UTF-8">
    <title>Title</title>
</head>
<body>
<div>
    <!--
    current:获取一个对象
    size:获取对象的个数
    count:从1开始递增
    even:偶数为true,奇数为false
    odd:偶数为false,奇数为true
    first:当前元素是否为第一个
    last:当前元素是否为最后一个
    index:获取元素的索引,从0开始递增

    -->
    <table class="table">
        <caption class="text-center">上下文表格布局</caption>
        <thead>
        <tr>
            <th>id</th>
            <th>username</th>
            <th>password</th>
            <th>email</th>
            <th>time</th>
        </thead>
        <tbody>
        <tr class="active" th:each="user,iter:${users}" th:classappend="${iter.odd}?'success':''"  >
            <td th:text="${iter.count}"></td>
            <td th:text="${user.username}"></td>
            <td th:text="${user.password}"></td>
            <td th:text="${user.email}"></td>
            <td th:text="${#dates.format(user.time,'yyyy年-MM月-dd日:H时')}"></td>
        </tr>
        </tbody>
    </table>

</div>
</body>
</html>
后台Controller:
    @RequestMapping("/list")
    public String list(Model model){


        Users user =null;
        ArrayList<Users> users = new ArrayList<>();
        for (int i =1;i<6;i++){


          user =  new Users(1, "admin", "admin123", "[email protected]", new Date(),0.2f);
          users.add(user);
        }
        model.addAttribute("users",users);
        return "list/userList";
    }
8.条件判断的使用
if条件判断
前端代码:
<!DOCTYPE html>
<html lang="en" xmlns:th="http://www.thymeleaf.org">
<head>
    <meta charset="UTF-8">
    <title>Title</title>
</head>
<body>

<p>
    <span>if条件判断:</span> <span th:if="${flag==true}"> 测试内容 </span> <br>
</p>
<span>unless条件判断(相当于if的结果取反):</span > <span th:unless="${flag==false}" > 测试内容</span> <br>

</body>
</html>
后端Controller代码:
@Controller
public class Condition {


    @RequestMapping("/if")
    public  String condition(Model model){


        model.addAttribute("flag",true);
        return "condition";
    }
}
switch选择判断
前端代码:
<!DOCTYPE html>
<html lang="en" xmlns:th="http://www.thymeleaf.org">
<head>
    <meta charset="UTF-8">
    <title>Title</title>
</head>
<body>
<div th:switch="${variable} ">
    <p th:case="admin">管理员</p>
    <p th:case="test">测试人员</p>
    <p th:case="user">游客</p>
    <!--  * :default  -->
    <p th:case="*">为null,默认值</p>

</div>
</body>
</html>
后台Controller:
    @RequestMapping("/switch")
    public  String switchMethod(Model model, @PathParam("name") String name){


        model.addAttribute("variable",name);
        return "switch";
    }
9.属性操作
前端代码:
<!DOCTYPE html>
<html lang="en" xmlns:th="http://www.thymeleaf.org">
<head th:replace="common :: head(~{::title})">
    <meta charset="UTF-8">
    <title>Title</title>
</head>
<body>
<!--

-->

<div >
    <!-- 根据条件来设置表单的提交地址  th:action="*{id}==null ? @{/admin/types} : @{/admin/types/{id}(id=*{id})}"  -->
    <form role="form" th:action="@{/attribute2}" th:object="${user}">
        <div class="form-group">
            <label for="username">账号</label>
            <input type="text" class="form-control" id="username" placeholder="请输入账号" th:value="*{username}">
            <label for="password">密码</label>
            <input type="text" class="form-control" id="password" placeholder="请输入密码" th:value="*{password}">
        </div>

        <button type="submit" class="btn btn-default btn-success">提交</button>
    </form>

</div>

<img src="http://browser9.qhimg.com/bdm/768_474_0/t01028e5f2ec69e423d.jpg" th:attr="alt=${

     '图片展示'}" alt="">
</body>
</html>
后端代码:
@Controller
public class Attribute {


    @RequestMapping("/attribute1")
    public String attributes(Model model){


        Users user = new Users();
        user.setPassword("admin");
        user.setUsername("root");
        model.addAttribute("user",user);
        return "attribute";
    }

    @PostMapping("/attribute2")
    public String attribute(@RequestParam("username") String username,@RequestParam("password") String password){


        System.out.println("用户名:"+username);
        System.out.println("密码:"+password);
        return "attribute";

    }
}
10.thymeleaf模板注释
1.标准的html/xhtml注释可以在模板文件中任意使用。所有<!- - - ->里面的内容都不会被thymeleaf和浏览器解析。
   <!-- <div>
             测试内容
        </div>
    -->
2.hymeleaf级别的注释
thymeleaf级别的注释,指的是thymeleaf模板引擎解析的时候会去掉的注释部分,但是在静态渲染的时候可以正常进行渲染。
    <!--/*-->
       <div> 测试内容</div>
    <!--*/-->
3.在解析时用来保留注释块里的内容,并去掉注释标签。Thymeleaf解析系统会删除< !–/ * /,/ * / –>标记, 保留里面的内容。
未解析之前:
    <span>hello!</span>
    <!--/*/
    <div th:text="${variable}">
        测试
    </div>
    /*/-->
    <span>goodbye!</span>
解析之后:
 <span>hello!</span>

    <div>test</div>

<span>goodbye!</span>
11.thymeleaf配合ajax局部更新
前端代码:
1.进入测试代码的页面
<!DOCTYPE  >
<html lang="en"  xmlns:th="http://www.thymeleaf.org">
<head th:replace="common :: head(~{::title})">
    <meta charset="UTF-8">
    <title>index</title>
</head>
<body>
<h1 >首页</h1>

<a href="" th:href="@{/in}">ajax请求</a>

</body>
</html>
2.测试页面:
<!DOCTYPE html>
<html lang="en" xmlns:th="http://www.thymeleaf.org">
<head th:replace="common :: head(~{::title})">
    <meta charset="UTF-8">
    <title>Title</title>
    <script src="../static/js/jquery-3.4.1.min.js"></script>
</head>
<body>
<div class="returnContext" th:fragment="success">
    文章分类:
    <div th:each="user : ${userList}">
       <p th:text="'id:'+${user.id}"></p>
       <p th:text="'用户名:'+${user.username}"></p>
       <p th:text="${

     '密码:'+user.password}"></p>
    </div>
    <button id="btn" class="btn btn-default">提交</button>
</div>

<script>
    $(function () {


        //第一种方式:
   $('#btn').click(function () {


            var url = '/test';
            $.ajax({


                url: url,
                type: 'POST',
                data: "name=admin",
                success: function (data) {


                    var content = $(".returnContext").html(data);
                    console.log(content);
                }
            });
        });

        //第二种方式
   /*     $('#btn').click(function () {
            $('.returnContext').load('/test');
        });*/


    })


</script>
</body>
</html>
后端代码:
@Controller
public class Ajax {


    @RequestMapping("/in")
    public String ajaxEntrance(Model model){


        return "ajax_test";
    }
    //第一种方式:
    @RequestMapping(value="/test",method=RequestMethod.POST)
    public String post(Model model,@RequestParam(value = "name") String name) {


        System.out.println(name);
        ArrayList<Users> userList = new ArrayList<>();
        for (int i =1;i<2;i++){


            Users  user =  new Users(i++, "admin", "admin123", "[email protected]", new Date(),0.2f);
            userList.add(user);
        }
        model.addAttribute("userList",userList);
        return "ajax_test::success";
    }
     //第二种方式
	 @RequestMapping(value="/test",method=RequestMethod.GET)
    public String get(Model model) {


        Users user =null;
        ArrayList<Users> userList = new ArrayList<>();
        for (int i =1;i<2;i++){


            user =  new Users(i++, "admin", "admin123", "[email protected]", new Date(),0.2f);
            userList.add(user);
        }
        model.addAttribute("userList",userList);
		return "ajax_test::success";
    }

}
12:补充内容
1.thymeleaf标签值的优先级
 2.内联样式写法
<p>Hello, [[${

    session.user.name}]]!</p>
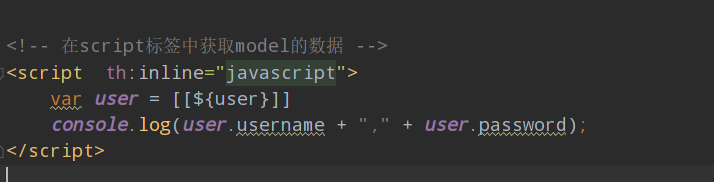
3.JavaScript内联脚本写法

实例: