准备:
①云服务器
②源码包:https://cloud.189.cn/t/FfaUjiyUfIjq (访问码:19nt)
③关闭防火墙和selinux,安全组放开端口3306 8081 8085 6379 等
④重要说明:在maven编译打包前创建数据库vhr;编译打包后、项目运行前导入V1__vhr.sql中的数据
一、上传源码包、maven、jdk包,安装maven和jdk

# 1.安装maven
tar  -zxvf  apache-maven-3.6.3-bin.tar.gz

# 安装到/usr/local下,重命名maven
mv   apache-maven-3.6.3   /usr/local/maven

# 2.安装jdk
tar  -zxvf jdk-8u11-linux-x64.tar.gz

mv  jdk1.8.0_11/   /usr/local/

# 3.配置环境变量
vim /etc/profile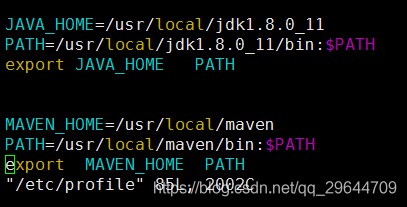
# 保存、退出后刷新环境变量
.  /etc/profile

# 查看安装是否成功,查看maven版本
mvn  -version

# 查看jdk是否安装成功,查看版本
java  -version

二、安装mariadb、rabbitmq、redis、nginx
2.1 安装mariadb
yum  install mariadb  mariadb-server  -y

systemctl  start  mariadb

mysql_secure_installation

mysql  -uroot  -p

# 下边命令在mariadb中执行
grant  all on  *.*  to root@'%'  identified by "123456";

create database  vhr;
2.2 安装rabbitmq
yum install rabbitmq-server

systemctl  start rabbitmq-server

systemctl  status  rabbitmq-server

# 添加rabbitMQ用户,设置用户名
rabbitmqctl add_user vhruser vhrpasswd

# 查看用户
rabbitmqctl list_users 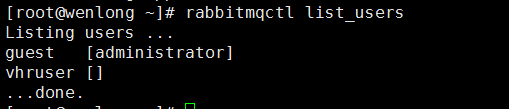
2.3 安装redis
yum install redis

# 修改redis密码
vim /etc/redis.conf

systemctl  start redis

systemctl  status  redis
2.4 安装nginx
yum install nginx

systemctl  start nginx

systemctl  status  nginx
三、项目打包部署
3.1 修改项目相关配置参数
# 修改项目的相关配置
cd  /root/app/vhr/vhrserver/vhr-web/src/main/resources/
vim  application.yml
# application.yml配置数据库、rabbitmq、redis、nginx相关信息
spring:
datasource:
type: com.alibaba.druid.pool.DruidDataSource
username: root
password: 123456
url: jdbc:mysql://localhost:3306/vhr?useUnicode=true&characterEncoding=UTF-8&serverTimezone=Asia/Shanghai
rabbitmq:
username: vhruser
password: vhrpasswd
host: 127.0.0.1
publisher-confirms: true
publisher-returns: true
redis:
host: 127.0.0.1
database: 0
port: 6379
password: vhrpasswd
cache:
cache-names: menus_cache
server:
port: 8081
compression:
enabled: true
fastdfs:
nginx:
host: http://你的nginx所在IP/
3.2 编译打包
# 切换到pom.xml下打包编译
cd  /root/app/vhr/vhrserver

# 编译、打包
mvn clean && mvn compile && mvn package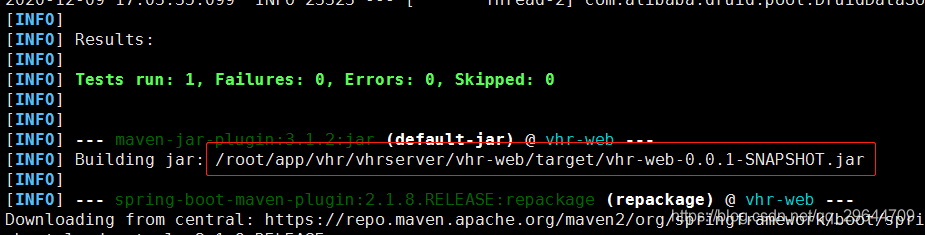

3.3 nginx配置文件夹下新建配置文件,配置前后端转发分离
vim /etc/nginx/conf.d/mynginx.conf

# 配置后一定要重启
systemctl  restart  nginx

systemctl  status  nginx
upstream vhrtest {
server 127.0.0.1:8081;
}
# nginx开放端口8085
server {
listen 8085;
server_name localhost;
client_max_body_size 1024M;
# 当访问路径 http://ip:8085/index.html,转发到http://127.0.0.1:8081
location / {
proxy_pass http://vhrtest;
# proxy_set_header Host $host:$server_port;
proxy_redirect default;
}
# 当访问是静态文件(括号中)类型,直接访问/root/app/static/
location ~ .*\.(js|css|ico|png|jpg|eot|svg|ttf|woff|html)$ {
root /root/app/static/;
expires 30d; #缓存
}
}
3.4 mysql导入站点所需数据
# 不登录数据库导入数据
mysql  -uroot -p  vhr  <  /root/app/V1__vhr.sql

# 也可以登录数据库后用如下命令导入
source  /root/app/V1__vhr.sql
3.5 运行项目
找到jar包:位置在编译打包时有提示(3.2节中的图),一般在项目路径下target目录中
cd /root/app/vhr/vhrserver/vhr-web/target/
ls -lh
# 后台启动项目,输入日志到/root/log.out下
nohup java -jar vhr-web-0.0.1-SNAPSHOT.jar > /root/log.out &
# 查看日志
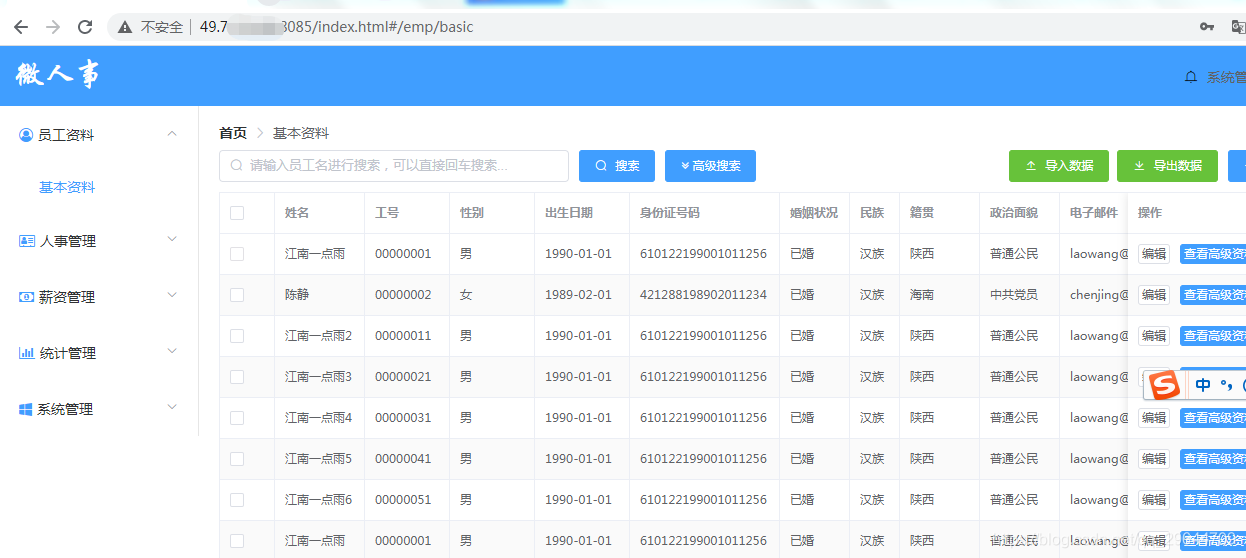
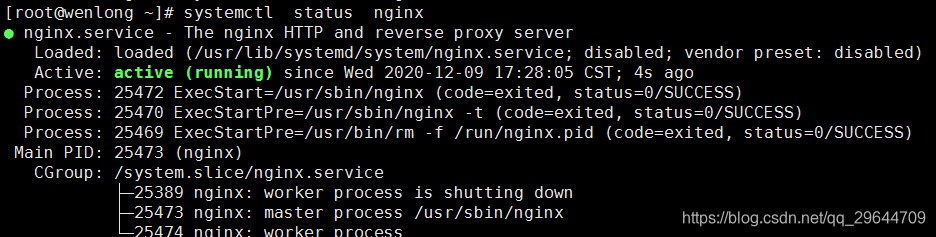
tail -f /root/log.out3.6 测试访问 http://ip:8085/index.html

403错误,显示了nginx这样子一个信息,查看nginx日志
# 查看nginx日志,出现了大量的权限被拒绝
tail -f /var/log/nginx/error.log 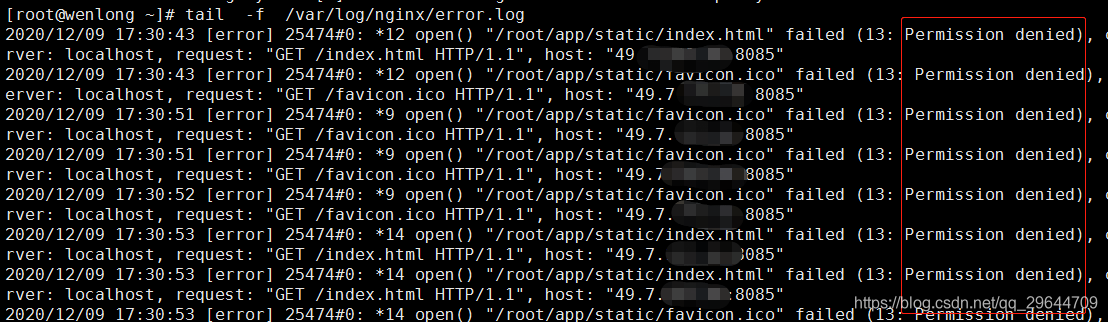
# 查看nginx进程
ps  -aux  | grep nginx
工作用户和启动用户不一致, 访问被拒绝很可能是这个原因,修改nginx工作用户并重启
# 修改nginx配置文件
vim /etc/nginx/nginx.conf

#配置修改后要重启nginx
systemctl  restart nginx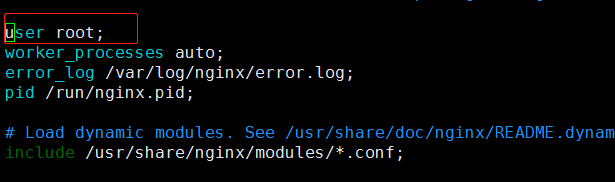
再次访问