创建对象的三种方式
- 通过new关键字创建对象
- 通过字面量创建对象
- 通过构造函数创建对象
<!DOCTYPE html>
<html lang="en">

<head>
    <meta charset="UTF-8">
    <meta name="viewport" content="width=device-width, initial-scale=1.0">
    <title>Document</title>
</head>

<body>

</body>
<script>
    // 利用new关键字创建对象
    var obj1 = new Object();
    // 利用字面量创建对象
    var obj2 = {};
    // 利用构造函数创建对象
    function People(name, age) {
        this.name = name;
        this.age = age;
        this.say = function() {
            console.log('hello word')
        }

    }

    // 利用构造函数创建实例化对象
    var People1 = new People('尧子陌', "24");
    console.log(People1); //打印这个对象
    console.log(People1.name);
    People1.say()
</script>

</html>

构造函数
构造函数是一种特殊的函数,主要用来初始化对象.
即为对象成员变量赋初始值。总之把对象中的公共属性与方法抽取出来,然后封装袋这个函数里面
注意事项
1.构造函数用于创建某一类对象,其首字母要大写。
2.构造函数要与new在一起使用才有意义。
new关键字
1.在内存中创建一个新对象
2.让this指向这个新对象
3.执行构造函数的代码,给这个新对象添加属性与方法
4.返回这个新对象(构造函数不需要retern)
静态成员和实例成员
静态成员:在构造函数本体上添加的成员被称为静态成员,只能由构造函数调用
实例成员:在构造函数内部创建的对象成员被称为实例成员,只能由实例化的对象来访问。
<!DOCTYPE html>
<html>
<head>
<meta charset="utf-8">
<title>静态成员及实例成员</title>
</head>
<body>
</body>
<script>
function People(name, age) {
// 在构造函数内部创建的成员属于实例化成员,只有实例化对象才能调用
this.name = name;
this.age = age;
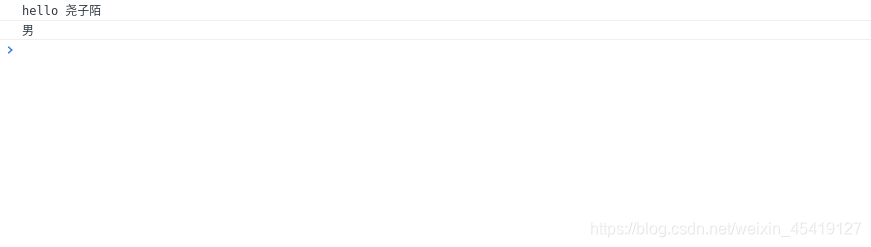
this.say = function() {
return 'hello 尧子陌'
}
}
var People1 = new People('尧子陌', "23");
// 实例化成员只能通过实例化对象调用
console.log(People1.say())
// 在构造函数本体上添加的成员属于静态成员,只能构造函数调用
People.sex = '男';
console.log(People.sex)
</script>
</html>
原型
构造函数很好用 但很浪费内存
javascript规定,每一个构造函数都有一个prototype属性,指向一个对象,我们可以把这些不变的方法定义在prototype上,这样所有的实例化对象都能共享这些方法
<!DOCTYPE html>
<html>
    <head>
        <meta charset="utf-8">
        <title>原型</title>
    </head>
    <body>

    </body>
    <script>
        function People(name, age) {
            // 在构造函数内部创建的成员属于实例化成员,只有实例化对象才能调用
            this.name = name;
            this.age = age;

        }

        People.prototype.say =function(){
            return "hello woord"
        }
        var People1 = new People('尧子陌', "23");

        console.log(People1.say())

        var People2 = new People('惊鸿一面','28');
        console.log(People2.say());

        console.log(People1.say === People2.say);
    </script>
</html>

对象的原型 proto
每个对象向都会有一个_proto_属性,指向构造函数中的prototype对象,且与之全等的关系
<!DOCTYPE html>
<html>
    <head>
        <meta charset="utf-8">
        <title>原型</title>
    </head>
    <body>

    </body>
    <script>
        function People(name, age) {
            // 在构造函数内部创建的成员属于实例化成员,只有实例化对象才能调用
            this.name = name;
            this.age = age;

        }

        People.prototype.say = function() {
            return "hello woord"
        }
        var People1 = new People('尧子陌', "23");

        console.log(People1.say())

        console.log(People1.__proto__);//指向构造函数的原型
        console.log(People1.__proto__===People.prototype) //true
    </script>
</html>

constructor构造函数
constructor:指向的是引用的构造函数,可以让原型对象重新指向构造函数。
<!DOCTYPE html>
<html>
<head>
<meta charset="utf-8">
<title>原型</title>
</head>
<body>
</body>
<script>
function People(name, age) {
// 在构造函数内部创建的成员属于实例化成员,只有实例化对象才能调用
this.name = name;
this.age = age;
}
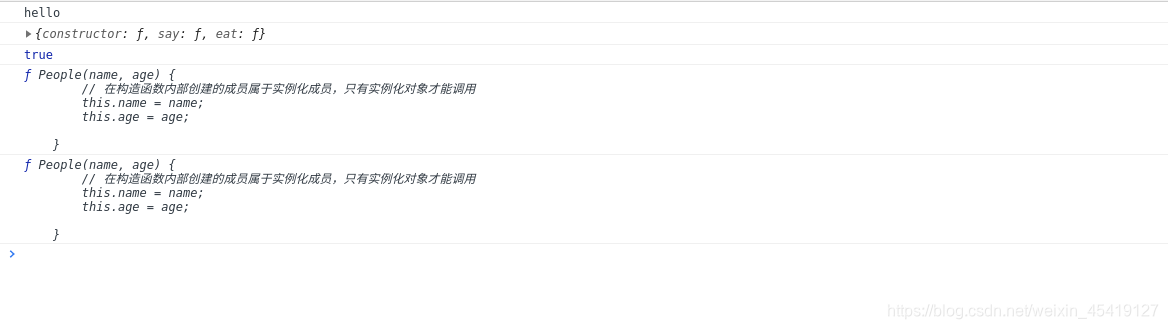
People.prototype = {
// 将原型对象采用对象赋值的情况下,constructor的指向会变,手动将constructor的指向改回来
constructor:People,
say:function(){
return "hello"
},
eat:function(){
return "banner"
}
}
var People1 = new People('尧子陌', "23");
console.log(People1.say())
console.log(People1.__proto__);//指向构造函数的原型
console.log(People1.__proto__===People.prototype) //true
console.log(People.prototype.constructor);
console.log(People1.__proto__.constructor)
</script>
</html>
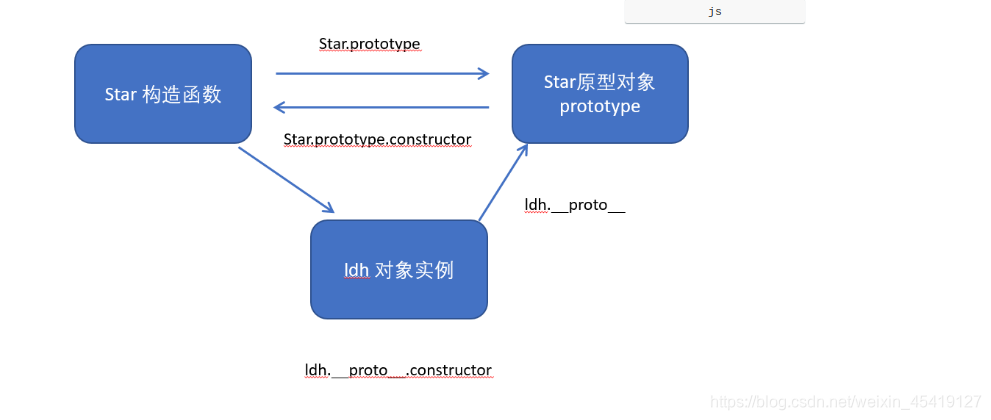
原型对象 实例对象 构造函数之间的联系
1.构造函数的prototype属性指向了构造函数原型对象
2.实例对象是由构造函数创建的,实例对象的__proto__属性指向了构造函数的原型对象
3.构造函数的原型对象的constructor属性指向了构造函数,实例对象的原型的constructor属性也指向了构造函数
原型链
任何对象都会有_proto_属性,且在js中万物皆对象,由_proto_属性连起来的链条便叫做原型链,且最终值为null
构造函数的原型的_proto_属性指向Object.prototype
<!DOCTYPE html>
<html>
    <head>
        <meta charset="utf-8">
        <title>原型</title>
    </head>
    <body>

    </body>
    <script>
        function People(name, age) {
            // 在构造函数内部创建的成员属于实例化成员,只有实例化对象才能调用
            this.name = name;
            this.age = age;

        }

        People.prototype = {
            // 将原型对象采用对象赋值的情况下,constructor的指向会变,手动将constructor的指向改回来
            constructor:People,
            say:function(){
                return "hello"
            },
            eat:function(){
                return "banner"
            }

        }

        var People1 = new People('尧子陌', "23");
        // 构造函数的原型的_proto_属性指向Object.prototype
        console.log(People.prototype.__proto__=== Object.prototype) //true
        console.log(Object.prototype.__proto__) //null

    </script>
</html>

js成员的查找机制
- 当我们访问一个对象的属性与方法的时候,首先看这个对象自身有没有属性与方法。
- 如果没有就开始通过原型对象中的_proto_属性继续查找(Object.prototype)
- 如果还没有,就以此类推继续向上查找,直至值为null的时候
简单而言,就是沿着一条线查找
原型对象中的this指向问题
- 构造函数中的this指的是实例化的对象。
- 原型中的this指的是实例化对象
<!DOCTYPE html>
<html>
    <head>
        <meta charset="utf-8">
        <title>原型对象中的this指向</title>
    </head>
    <body>
        <script>
            var that

            function Star(name, age) {
                this.name = name;
                this.age = age;
            }
            Star.prototype.sing = function() {

                console.log('hello')
                that = this;
            }
            var star1 = new Star('尧子陌', '22');
            star1.sing()
            console.log(that === star1)
        </script>
    </body>
</html>

扩展内置对象
可以通过原型对象,对原来的内置对象进行扩展自定义的方法。
注意:内置的数组和字符串等内置对象不能给原型对象覆盖;

call()方法
call()方法可以调用函数,并且可以修改this指向,还可以进行传参。
<!DOCTYPE html>
<html>
    <head>
        <meta charset="utf-8">
        <title>call()方法</title>
    </head>
    <body>
        <script>
            function fn(x,y) {
                console.log('手磨咖啡')
                console.log(this)
                console.log(x+y)
            }

            var o ={
                name:"尧子陌"
            }
            // 不仅改变this指向,而且调用函数 甚至能进行传参

            fn.call(o,1,2)
        </script>
    </body>
</html>

继承
ES6之前并没有跟我们提供extends继承,我们可以通过构造函数+原型对象模拟实现继承,被称为组合继承
借用构造函数继承父类型属性
核心原理:通过call()把父类型的this指向子类型的this,可以实现子类型继承父类型的属性
<!DOCTYPE html>
<html lang="en">
<head>
    <meta charset="UTF-8">
    <title>借用父构造函数函数继承属性</title>
</head>
<body>
<script>
    // 父类构造函数
 function Father(name,age){
        console.log(this) //此时this指向子类的实例对象
 this.name =name;
        this.age = age;
    }
    //子类构造函数
 function Son(name,age,score) {
        // 借助call()方法让父类中的this指向子类的this
 Father.call(this,name,age);
        this.score = score;
    }
    var son = new Son('尧子陌',18);
    console.log(son.name);//尧子陌
</script>
</body>
</html>

借用原型对象继承父类的方法
思路如下
-
子类的prototype原型 = new 父类
-
因为父类的实例化对象会另外开辟空间,不会影响父类的原型对象。
-
将子类的constructor重新指向子类的构造函数
<!DOCTYPE html>
<html lang="en">
<head>
    <meta charset="UTF-8">
    <title>借用原型对象继承父类的方法</title>
</head>
<body>
<script>
    // 父构造函数
 function Father(name,age) {
        this.name =name;
        this.age =age;
    }
    Father.prototype.money = function () {
        console.log('10000')
    }
    // 子构造函数
 function Son(name,age,score) {
        Father.call(this,name,age);
        this.score = score;
    }
    //将子类的constructor构造函数重新指向原来的构造函数
 Son.prototype.constructor = Son;
    //子类的原型对象等于父类的实例化对象
 Son.prototype = new Father()
    var father = new Father('惊鸿一面','24');
    father.money()
    var son = new Son('尧子陌','28');
    console.log(son.name)
    son.money()
</script>
</body>
</html>

ES6新增数组方法
迭代(遍历)方法:forEach(),map(),filter(),some(),every()
forEach()
array.forEach(function(currentValue,index,arr)
- currentValue:数组当前项的值
- index:数组当前项的索引
- arr:数组对象的本身
<!DOCTYPE html>
<html lang="en">
<head>
    <meta charset="UTF-8">
    <title>forEach()方法</title>
</head>
<body>
<script>
    // 创建一个数组
 var arr = [1, 2, 3]
    // 求和的变量
 var sum = 0;
    arr.forEach(function (value, index, array) {
        console.log(value);
        console.log(index);
        console.log(array)
        sum += value;
    })
    console.log(sum)
</script>
</body>
</html>

filter()
array.filter(funcction(curentValue,index,arr))
注意:主要用来筛选数组,返回的是新数组
- currentValue:数组当前项的值
- index:数组当前项的索引
- arr:数组对象的本身
<!DOCTYPE html>
<html lang="en">
<head>
    <meta charset="UTF-8">
    <title>filter()</title>
</head>
<body>
<script>
    var arr = [20, 50, 80, 100, 150, 500, 600];
    var newArr = arr.filter(function (value, index, array) {
        //筛选大于100的数组元素,返回一个新数组
     return value > 100;
    })
    console.log(newArr)
</script>
</body>
</html>

some()
array.some(funcction(curentValue,index,arr))
注意:主要用来筛选数组,返回的是布尔值,当查找到第一个满足条件的数组元素,则停止查找
- currentValue:数组当前项的值
- index:数组当前项的索引
- arr:数组对象的本身
<!DOCTYPE html>
<html lang="en">
<head>
    <meta charset="UTF-8">
    <title>some()方法</title>
</head>
<body>
<script>
    var arr = ['pink', 'black', 'red', 'pink', 'pink'];
    var flag = arr.some(function (value, index, array) {
        //当查找到第一个满足的数组元素后,便停止查找,返回值是一个布尔值
         return value = 'pink'
     })
    console.log(flag)
</script>
</body>
</html>
查询商品案例
核心思路
- 把数据渲染到页面中(forEach)
- 根据价格渲染数据(filter)
- 根据商品名称渲染数据
<!DOCTYPE html>
<html lang="en">

<head>
    <meta charset="UTF-8">
    <meta name="viewport" content="width=device-width, initial-scale=1.0">
    <meta http-equiv="X-UA-Compatible" content="ie=edge">
    <title>Document</title>
    <style>
        table {
            width: 400px;
            border: 1px solid #000;
            border-collapse: collapse;
            margin: 0 auto;
        }

        td,
        th {
            border: 1px solid #000;
            text-align: center;
        }

        input {
            width: 50px;
        }

        .search {
            width: 600px;
            margin: 20px auto;
        }
    </style>
</head>

<body>
    <div class="search">
        按照价格查询: <input type="text" class="start"> - <input type="text" class="end"> <button class="search-price">搜索</button> 按照商品名称查询: <input type="text" class="product"> <button class="search-pro">查询</button>
    </div>
    <table>
        <thead>
            <tr>
                <th>id</th>
                <th>产品名称</th>
                <th>价格</th>
            </tr>
        </thead>
        <tbody>


        </tbody>
    </table>
    <script>
        // 利用新增数组方法操作数据
        var data = [{
            id: 1,
            pname: '小米',
            price: 3999
        }, {
            id: 2,
            pname: 'oppo',
            price: 999
        }, {
            id: 3,
            pname: '荣耀',
            price: 1299
        }, {
            id: 4,
            pname: '华为',
            price: 1999
        }, ];
        // 1. 获取相应的元素
        var tbody = document.querySelector('tbody');
        var search_price = document.querySelector('.search-price');
        var start = document.querySelector('.start');
        var end = document.querySelector('.end');
        var product = document.querySelector('.product');
        var search_pro = document.querySelector('.search-pro');
        setDate(data);
        // 2. 把数据渲染到页面中
        function setDate(mydata) {
            // 先清空原来tbody 里面的数据
            tbody.innerHTML = '';
            mydata.forEach(function(value) {
                // console.log(value);
                var tr = document.createElement('tr');
                tr.innerHTML = '<td>' + value.id + '</td><td>' + value.pname + '</td><td>' + value.price + '</td>';
                tbody.appendChild(tr);
            });
        }

        // 3. 根据价格查询商品
        // 当我们点击了按钮,就可以根据我们的商品价格去筛选数组里面的对象
        search_price.addEventListener('click', function() {
            // alert(11);
            var newDate = data.filter(function(value) {
                return value.price >= start.value && value.price <= end.value;
            });
            console.log(newDate);
            // 把筛选完之后的对象渲染到页面中
            setDate(newDate);
        });
        // 4. 根据商品名称查找商品
        // 如果查询数组中唯一的元素, 用some方法更合适,因为它找到这个元素,就不在进行循环,效率更高]
        search_pro.addEventListener('click', function() {
            var arr = [];
            data.some(function(value) {
                if (value.pname === product.value) {
                    // console.log(value);
                    arr.push(value);
                    return true; // return 后面必须写true
                }
            });
            // 把拿到的数据渲染到页面中
            setDate(arr);
        })
    </script>
</body>

</html>

字符串方法
trim()
trim()方法可以去除字符串两侧的空白
<html lang="zh">
<head>
    <meta charset="UTF-8">
    <meta name="viewport" content="width=device-width, initial-scale=1.0">
    <meta http-equiv="X-UA-Compatible" content="ie=edge">
    <title></title>
</head>
<body>
<input type="text">
<button>点击</button>
<div></div>
<script type="text/javascript">
    var input = document.querySelector('input');
    var bth = document.querySelector('button');
    var div = document.querySelector('div')
    bth.onclick = function () {
        var str = input.value.trim();
        if (str === '') {
            alert('内容为空')
        } else {
            div.innerHTML = str;
        }
    }
    var str2 = '   andy  ';
    console.log(str2.trim().length)
</script>
</body>
</html>

对象方法
Object.keys()
Object.keys()方法返回一个所有元素为字符串的数组
Object.keys()obj
- 效果类似for…in
<!DOCTYPE html>
<html lang="en">
<head>
    <meta charset="UTF-8">
    <title>Object.keys()</title>
</head>
<body>
<script>
    var obj ={
        id:1,
        name:"尧子陌",
        sex:"男"
 }
    console.log(  Object.keys(obj))
</script>
</body>
</html>

Object.defineProperty()
定义新属性或修改为原来的属性 :Object.defineProperty(obj,prop,descriptor)
- obj:必需 目标对象
- prop:必需:定义或修改属性的名字
- descriptor:必需,目标属性所必需有的属性
Object.defineProperty()第三个descriptor说明
- value:需要修改的值
- writable:值是否可以被重写
- enumerable:目标属性是否可以被枚举
- configurable:目标属性是否可以被删除或者再次修改特性
<!DOCTYPE html>
<html lang="en">
<head>
<meta charset="UTF-8">
<title>Title</title>
</head>
<body>
<script>
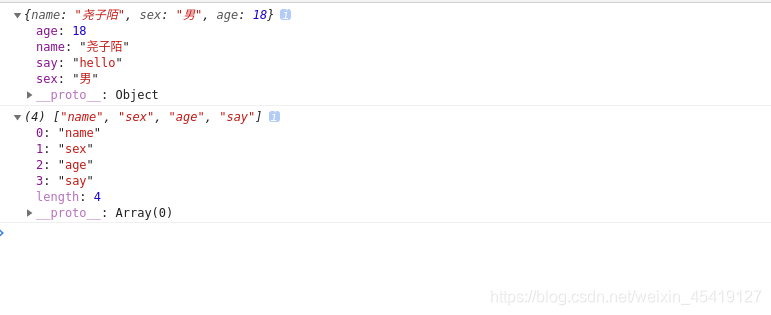
var obj = {
name: "尧子陌",
sex: "男",
age: 18
}
Object.defineProperty(obj, 'name', {
//不允许修改属性
writable: false
})
obj.name = '惊鸿'
console.log(obj);
// 定义新属性或修改属性
Object.defineProperty(obj, 'say', {
value: 'hello',
//目标属性可以被枚举
enumerable: true,
//目表属性不允许删除或修改属性
configurable: false
})
console.log(Object.keys(obj))
</script>
</body>
</html>