一、准备
默认认为会了简单的spring boot知识和vue知识
1、前端
先安装好vue cli,没有的点这里
2、后端
后端IDEA安装vue.js插件就OK了
二、创建前端VUE项目
就进入CMD,挑个好路径,输入vue ui


然后打开IDEA,导入文件就可以
三、IDEA打开VUE与操作
1、打开
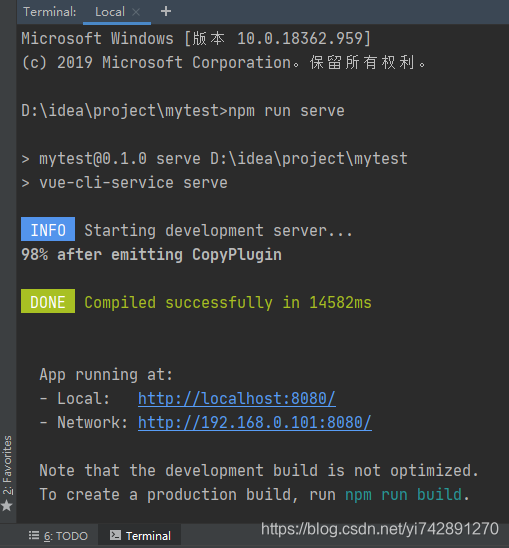
上面我们是通过vue cli 来创建一个VUE项目而已,其他的可以关闭了
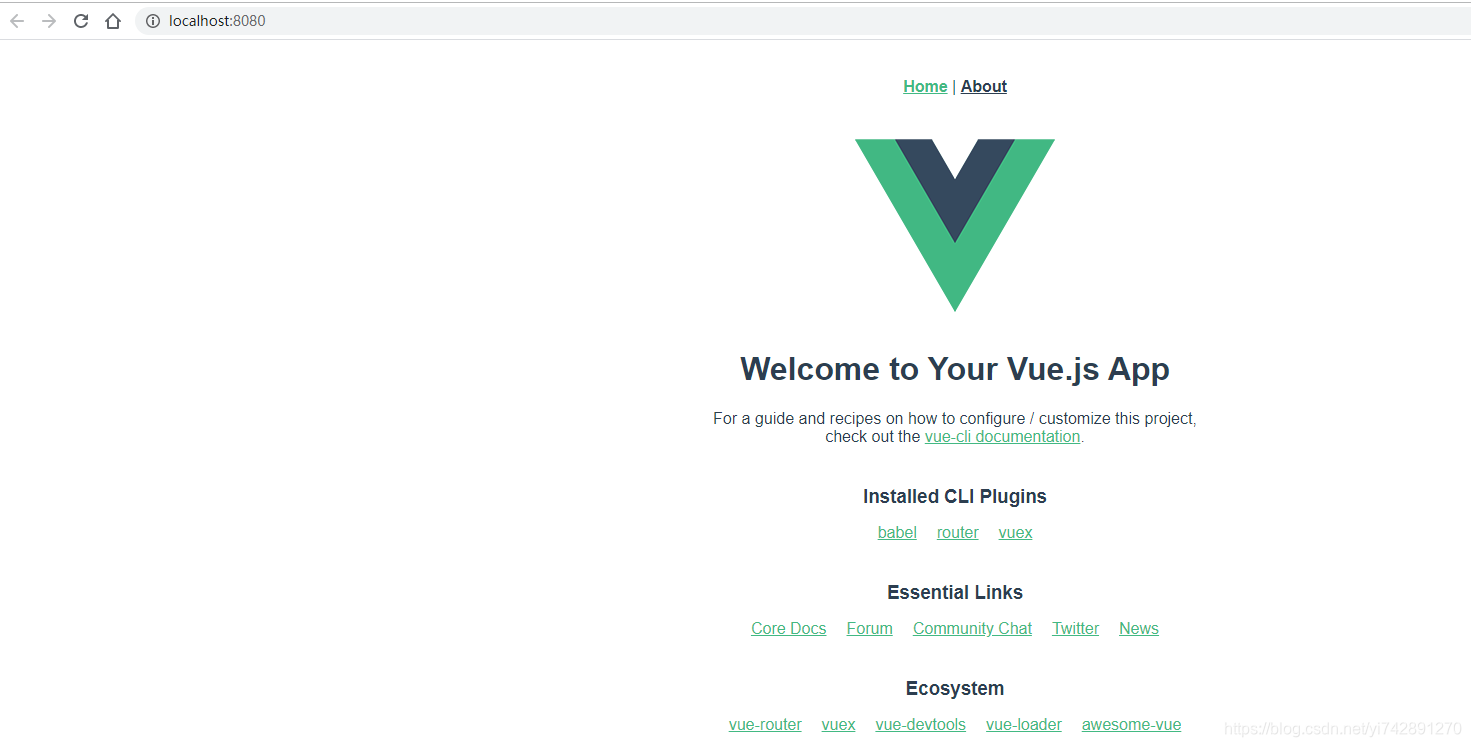
在IDEA中,Terminal控制台输入npm run serve就可运行VUE
2、VUE的结构
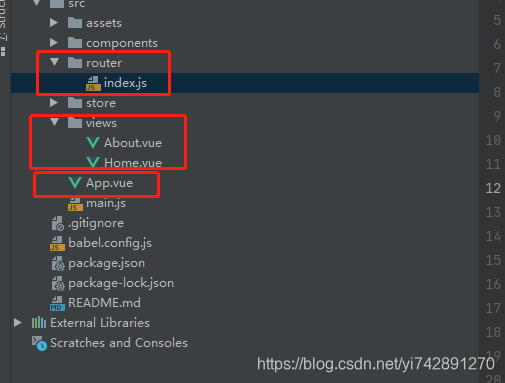
先看下App.vue的文件
<template>
  <div id="app">
    <div id="nav">
      <router-link to="/">Home</router-link> |
      <router-link to="/about">About</router-link>
    </div>
    <router-view/>
  </div>
</template>
这里的两个router-link to="xxx",里面的xxx就是一个访问路径而已,就有点类似spring MVC的映射那样,流程是:
- 先写VUE文件,写要展示的东西
- 在
router/index.js中导入刚写的VUE,然后通过path,name和component3个属性来定位他 - 在App.vue中写
router-link to="xxxx"
3、写一个VUE
这个VUE先弄假数据
Book.vue:
<template>
    <div>
        <table>
            <tr>
                <td>编号</td>
                <td>名字</td>
                <td>作者</td>
            </tr>
            <tr v-for="book in books">
                <td>{

   {book.id}}</td>
                <td>{

   {book.name}}</td>
                <td>{

   {book.author}}</td>
            </tr>
        </table>
    </div>
</template>

<script>
    export default {


        name: "Book",
        data(){


            return {


                books:[
                    {


                        id: 1,
                        name: '三体',
                        author: '刘慈欣'
                    },
                    {


                        id: 2,
                        name: 'java从零到入土',
                        author: '我'
                    }
                ]
            }
        }
    }
</script>

<style scoped>

</style>
name属性一定要写的- 然后,data的格式是
data(){return {xxxxx}}
4、在router/index.js中导入VUE
import Vue from 'vue'
import VueRouter from 'vue-router'
import Home from '../views/Home.vue'
import Book from "../views/Book";//这里导入我们刚创建的Book

Vue.use(VueRouter)

  const routes = [
  {


    path: '/',
    name: 'Home',
    component: Home
  },
  {


    path: '/about',
    name: 'About',
    // route level code-splitting
    // this generates a separate chunk (about.[hash].js) for this route
    // which is lazy-loaded when the route is visited.
    component: () => import(/* webpackChunkName: "about" */ '../views/About.vue')
  },
  //这里,导入用到Book
  {


    path: '/book',
    name: 'Book',
    component: Book
  }
]

const router = new VueRouter({


  mode: 'history',
  base: process.env.BASE_URL,
  routes
})

export default router
- 导入了名字后,
path属性就是我们访问的路径,比如path: '/book',就访问http://localhost:8080/book - 反正你记得,写了VUE之后,在这个js里面导入VUE,其中,
- import xx from ‘xx’
- path写访问路径
- name和component都写VUE的name,反正这些名字全都一样就不会有错了
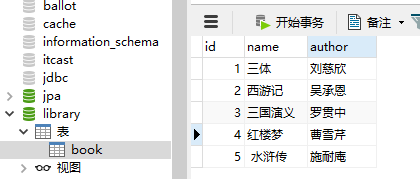
四、数据库
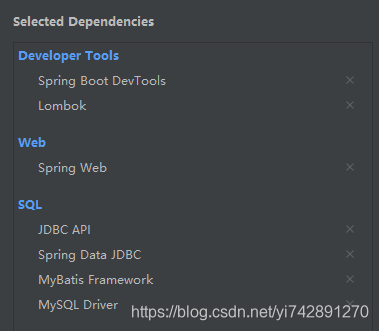
五、创建后端spring boot项目
我是使用SSM的
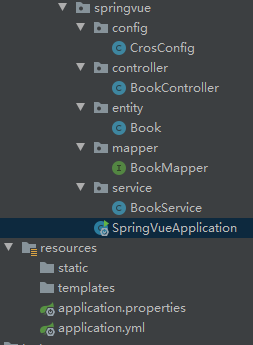
1、流程
分为实体类,mapper层、service层、controller层,配置层。这里的spring boot我们用的是8081端口,前端是8080端口,在前端使用axios跨域访问到8081的json数据,并且得到数据返回至8080端口
2、先配置数据库
spring:
  datasource:
    url: jdbc:mysql://localhost:3306/library?useUnicode=true&characterEncoding=UTF-8&useSSL=false&autoReconnect=true&failOverReadOnly=false&serverTimezone=GMT%2B8
    username: root
    password: root
    driver-class-name: com.mysql.jdbc.Driver
    initialization-mode: always
server:
  port: 8081
3、实体层
@Data
public class Book {


    private Integer id;
    private String name;
    private String author;
}
4、mapper层
@Mapper
public interface BookMapper {


    @Select("select * from book")
    public List<Book> getAllBook();
}
5、service层
@Service
public class BookService {


    @Autowired
    BookMapper bookMapper;

    public List<Book> getAllBook(){


        return bookMapper.getAllBook();
    }
}
6、controller层
@RestController
@RequestMapping("/book")
public class BookController {


    @Autowired
    BookService bookService;

    @GetMapping("/getAll")
    public List<Book> getAll(){


        return bookService.getAllBook();
    }
}
7、访问数据
http://localhost:8081/book/getAll

已经把数据库的数据取出来了,接下来就要在前端把数据展示
六、手尾
1、Book.vue
就不需要假数据了,因为有真数据了
<template>
    <div>
        <table>
            <tr>
                <td>编号</td>
                <td>名字</td>
                <td>作者</td>
            </tr>
            <tr v-for="book in books">
                <td>{

   {book.id}}</td>
                <td>{

   {book.name}}</td>
                <td>{

   {book.author}}</td>
            </tr>
        </table>
    </div>
</template>

<script>
    export default {


        name: "Book",
        data() {


            return {


                books: [
                    {


                        id: 1,
                        name: '三体',
                        author: '刘慈欣'
                    },
                    {


                        id: 2,
                        name: 'java从零到入土',
                        author: '我'
                    }
                ]
            }
        },
        created() {


            var that=this;
            axios.get('http://localhost:8081/book/getAll').then(function (resp) {


                that.books=resp.data;
            })
        }
    }
</script>

<style scoped>

</style>
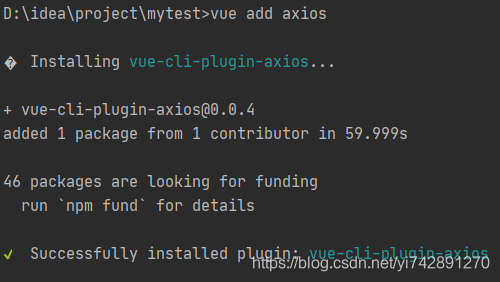
- 要用到axios,先下载,在控制台中输入
vue add axios就可下载
axios
要用到axios,先下载,在控制台中输入vue add axios就可下载,每个VUE项目都要下载一次的。。
created():在创造之前就执行的东西- 拿到跨域json数据格式
 	created() {


        var that=this;
        axios.get('地址').then(function (resp) {


            that.XXX变量=resp.data;
        })
    }
2、解决跨域问题
但是这样子直接访问有错误的,因为前端是8080,后端是8081,不同端口,出现了跨域问题。
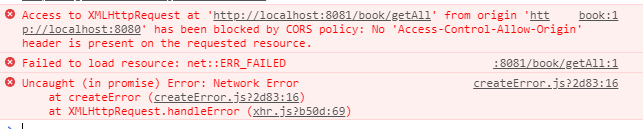
在spring 创建config类,把下面的代码复制粘贴就可以解决跨域问题了。你不需要知道为什么,复制粘贴就完事
@Configuration
public class CrosConfig implements WebMvcConfigurer {


    @Override
    public void addCorsMappings(CorsRegistry registry) {


        registry.addMapping("/**")
                .allowedOrigins("*")
                .allowedMethods("GET","HEAD","POST","DELETE","OPTIONS","PUT")
                .allowCredentials(true)
                .maxAge(3600)
                .allowedHeaders("*");
    }
}
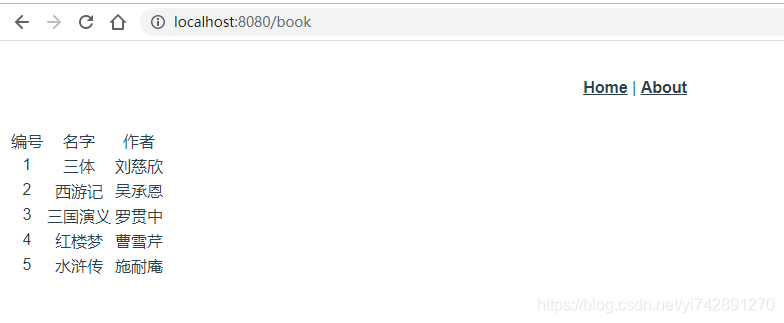
3、完成效果
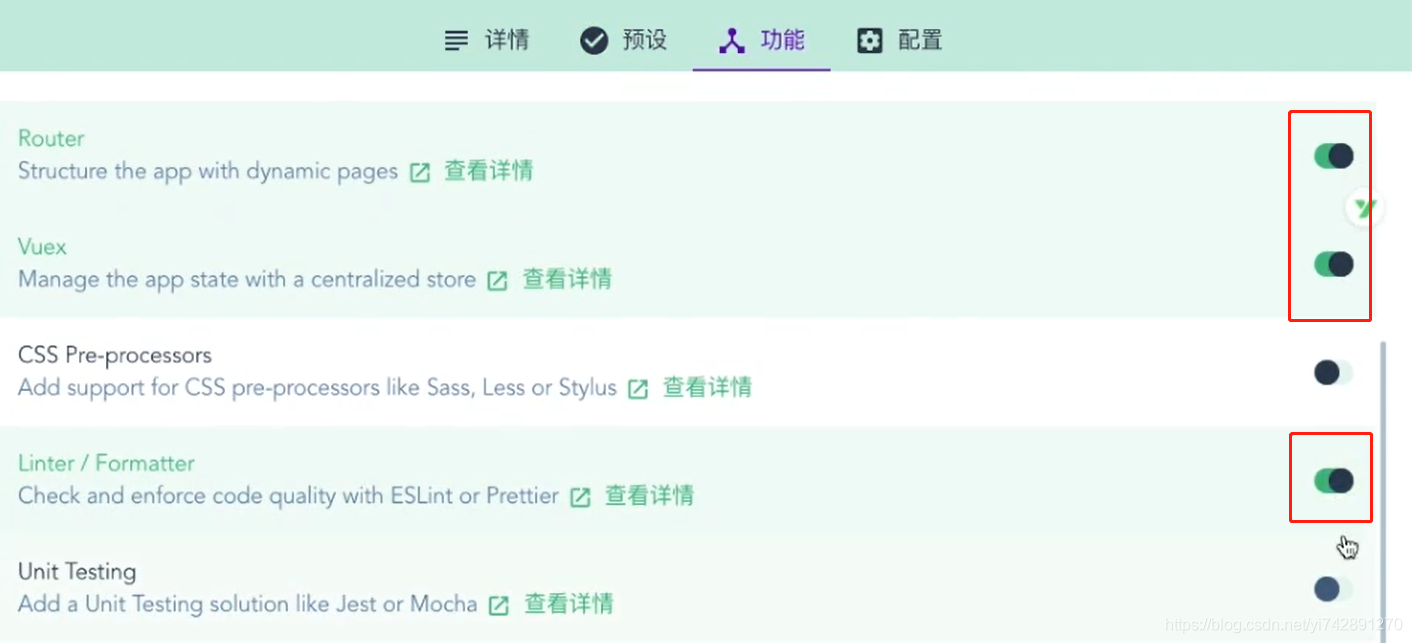
七、安装element-ui(其实应该早点装的。。。)
在如果是平时,js-src加载酒可以,但项目不是这样的
cmd:vue ui


如果Element 成功安装,就会看到有个el-button按钮
八、前端传数据给后端
前面都是,前端查询数据,然后后端查询数据库丢给前端的。
那么现在是前端要添加数据,把数据丢给后端,后端再写入数据库
打开element-ui官网,查找el-form表单,抄一个喜欢的,比如这个
1、看下基本要素
还是要看一下的,要不到时候抄了不会改
 <div>
     <el-form :model="ruleForm" status-icon :rules="rules" ref="ruleForm" label-width="100px" class="demo-ruleForm">
         <el-form-item label="书名" prop="name">
             <el-input  v-model="ruleForm.name" ></el-input>
         </el-form-item>
         <el-form-item label="作者" prop="author">
             <el-input v-model="ruleForm.author"></el-input>
         </el-form-item>
         <el-form-item>
             <el-button type="primary" @click="submitForm('ruleForm')">提交</el-button>
             <el-button @click="resetForm('ruleForm')">重置</el-button>
         </el-form-item>
     </el-form>
 </div>

<script>
    export default {


        name: "AddBook",
        data() {


            var validateName = (rule, value, callback) => {


                if (value === '') {


                    callback(new Error('请输入书名'));
                } else {


                    if (this.ruleForm.name !== '') {


                        //如果不为空
                    }
                    callback();
                }
            };
            var validateAuthor = (rule, value, callback) => {


                if (value === '') {


                    callback(new Error('请输入作者名'));
                } else {


                    if (this.ruleForm.author !== '') {


                        //如果不为空
                    }
                    callback();
                }
            };
            return {


                ruleForm: {


                    name: '',
                    author: ''
                },
                rules: {


                    name: [
                        {

      validator: validateName, trigger: 'blur' }
                    ],
                    author: [
                        {

      validator: validateAuthor, trigger: 'blur' }
                    ]
                }
            };
        },
        methods: {


            submitForm(formName) {


                var that=this;
                this.$refs[formName].validate((valid) => {


                    if (valid) {


                        //提交成功后要做的事情
                        // alert('submit!');
                        console.log(that.ruleForm)
                        axios.post('http://localhost:8081/book/',that.ruleForm).then(function (response) {


                            console.log(response);
                        })
                    } else {


                        console.log('error submit!!');
                        return false;
                    }
                });
            },
            resetForm(formName) {


                this.$refs[formName].resetFields();
            }
        }
    }
</script>
- 看到最上面的
:model="ruleForm" status-icon :rules="rules" ref="ruleForm" :model="ruleForm",看到下面的<el-form-item label="书名" prop="name"> <el-input v-model="ruleForm.name" ></el-input> </el-form-item> <el-form-item label="作者" prop="author"> <el-input v-model="ruleForm.author"></el-input> </el-form-item>
意思就是,这个form表单的数据(v-model绑定),有两个,name和author。像php的表单提交是input里面的值,那么return { ruleForm: { name: '', author: '' },el-input框的值v-model="ruleForm.name",就用到了下面的ruleForm对应值绑定起来。那么提交表单的时候,只要用到this.ruleForm就可以,而且是json格式,到后端用@RequestBody接受转换为对象就可以了。:rules="rules",第一个rules翻译,就是规则嘛,规则格式是什么?是第二个rules,那么rules的规则格式是什么?下面有写到<el-form-item label="书名" prop="name"> <el-input v-model="ruleForm.name" ></el-input> </el-form-item> <el-form-item label="作者" prop="author"> <el-input v-model="ruleForm.author"></el-input> </el-form-item>
根据prop的值不同,选择rules: { name: [ { validator: validateName, trigger: 'blur' } ], author: [ { validator: validateAuthor, trigger: 'blur' } ] }rules中不同的规则。其中,规则的属性有trigger焦点触发时间required,true或者false,是否为必填项message:接在trigger和message后面,为事件消息弹出validator:更进一步的规则,这个更进一步的规则,看到下面的
这个,看一下就知道是什么了。var validateName = (rule, value, callback) => { if (value === '') { callback(new Error('请输入书名')); } else { if (this.ruleForm.name !== '') { //如果不为空 } callback(); } };validataName不就是上面一个validator的规则嘛,这个就,深入规则咯。值为空就怎样,不空又怎样
2、后端添加数据
要做的是前端-后端-数据库的流程,先写好后端接口
@RestController
@RequestMapping("/book")
public class BookController {


    @Autowired
    BookService bookService;

    @PostMapping("/")
    public int insertBook(@RequestBody  Book book){


        return bookService.insertBook(book);
    }

 }
- mapper层和service层不展示了
@RequestBody:这个注解很重要,因为前端是通过json格式用post方式传送过来的,这个注解可以帮助前端json和后端对象的交互
3、前端的axios
   methods: {


       submitForm(formName) {


           var that=this;
           this.$refs[formName].validate((valid) => {


               if (valid) {


                   //提交成功后要做的事情
                   // alert('submit!');
                   console.log(that.ruleForm)
                   axios.post('http://localhost:8081/book/',that.ruleForm).then(function (response) {


                       console.log(response);
                   })
               } else {


                   console.log('error submit!!');
                   return false;
               }
           });
       },
       resetForm(formName) {


           this.$refs[formName].resetFields();
       }
   }
- 前端这么一个方法,是点击提交之后的事件。使用axios,发送post请求就用
axios.post(),格式为axios.post('路径',json类型的数据).then(function (response) { console.log(response); }) - 前端的数据,为
this.ruleFormruleForm: { name: '', author: '' } - 这样就把数据传过去了,然后后端添加数据为
http://localhost:8081/book/的post请求。不用路径?name=xxx&author=xxx的格式,PHP都不用了Java还用吗。想起php也是一堆input,一个submit,就可以提交了,虽然不知道原理,但是就是这么一回事。vue也是一堆input,一个submit
九、代码
后端代码:https://github.com/E-10000/spring-and-vue-demo/tree/master
前端代码:https://github.com/E-10000/spring-and-vue-demo/tree/vue