想快速入门图像处理的小伙伴们!跟着步伐我们一起闯关吧!一定会收获满满哦!
为图像处理初学者设计的 100 个问题。这里感谢@gzr2017的翻译,然后我也将随作者的脚步逐一学习实现100道算法题,大家可以一起学习哦,加油!坚持!持续更新中哦!!!
问题1-5:
- 问题一:通道交换
- 问题二:灰度化(Grayscale)
- 问题三:二值化(Thresholding)
- 问题四:大津二值化算法(Otsu’s Method)
- 问题五:HSV转换
代码实现:
- 问题一:通道交换
读取图像,然后将RGB通道替换成BGR通道。
#include<opencv2/highgui.hpp>
#include<opencv2/core.hpp>
#include<iostream>

using namespace cv;

Mat channel_swap(Mat img)
{


	int height = img.rows;
	int width = img.cols;
	//准备一个与原图像格式尺寸相同的黑色模板
	Mat out = Mat::zeros(height, width, CV_8UC3);
	for (size_t y = 0; y <height; y++)
	{


		for (size_t x = 0; x < width; x++)
		{


			out.at<Vec3b>(y, x)[0] = img.at<Vec3b>(y, x)[2];//R->B
			out.at<Vec3b>(y, x)[1] = img.at<Vec3b>(y, x)[1];//G->G
			out.at<Vec3b>(y, x)[2] = img.at<Vec3b>(y, x)[0];//B->R
		}
	}
	return out;
}

int main()
{


	//读取图片
	Mat img = imread("D:/文件/lenna.png");
	Mat out = channel_swap(img);

	imshow("img", img);
	imshow("out", out);
	waitKey(0);
	destroyAllWindows();
	return 0;
}
输入:

输出:
Note:
1、imread()读取图像通道的顺序为BGR
2、vector说明
< Vec3f > 浮点
< Vec3d > double
< Vec3b > 8U 类型的 RGB 彩色图像 (0-255)
- 问题二:灰度化(Grayscale)
将图像灰度化。
灰度是一种图像亮度的表示方法,通过下式计算:
Y = 0.2126\ R + 0.7152\ G + 0.0722\ B
#include <opencv2/core.hpp>
#include <opencv2/highgui.hpp>
#include <iostream>

using namespace cv;

Mat BGR2GRAY(Mat img)
{


	int height = img.rows;
	int width = img.cols;

	Mat out = Mat::zeros(height, width, CV_8UC1);

	for (size_t y = 0; y < height; y++)
	{


		for (size_t x = 0; x < width; x++)
		{


			out.at<uchar>(y, x) = 0.2126*(float)img.at<Vec3b>(y, x)[2]
				+ 0.7152*(float)img.at<Vec3b>(y, x)[1]
				+ 0.0722*(float)img.at<Vec3b>(y, x)[0];
		}
	}
	return out;
}


int main(int argc, const char* argv[])
{


	Mat img = imread("D:/文件/lenna.png");
	Mat out = BGR2GRAY(img);
	imshow("img", img);
	imshow("out", out);

	waitKey(0);
	destroyAllWindows();
	return 0;
}
输入:
输出:

- 问题三:二值化(Thresholding)
将图像进行二值化。
二值化是将图像使用黑和白两种颜色表示的方法。我们将阈值设置为128来进行二值化。
#include <opencv2/core.hpp>
#include <opencv2/highgui.hpp>
#include <iostream>

using namespace cv;

//BGR->GRAY
Mat BGR2GRAY(Mat img)
{


	int height = img.rows;
	int width = img.cols;

	Mat out = Mat::zeros(height, width, CV_8UC1);

	for (size_t y = 0; y < height; y++)
	{


		for (size_t x = 0; x < width; x++)
		{


			out.at<uchar>(y, x) = 0.2126*(float)img.at<Vec3b>(y, x)[2]
				+ 0.7152*(float)img.at<Vec3b>(y, x)[1]
				+ 0.0722*(float)img.at<Vec3b>(y, x)[0];
		}
	}
	return out;
}

//GRAY->BINARIZE
Mat Binarize(Mat img,int th)//th用来设置二值化阈值
{


	int height = img.rows;
	int width = img.cols;

	Mat out = Mat::zeros(height, width, CV_8UC1);

	for (size_t y = 0; y < height; y++)
	{


		for (size_t x = 0; x < width; x++)
		{


			if (img.at<uchar>(y, x) < th)
				out.at<uchar>(y, x) = 0;
			else
				out.at<uchar>(y, x) = 255;
		}
	}
	return out;
}
int main(int argc, const char* argv[])
{


	Mat img = imread("D:/文件/lenna.png");
	Mat out = Binarize(BGR2GRAY(img), 128);

	imshow("img", img);
	imshow("out", out);

	waitKey(0);
	destroyAllWindows();
	return 0;
}
输入:
输出:
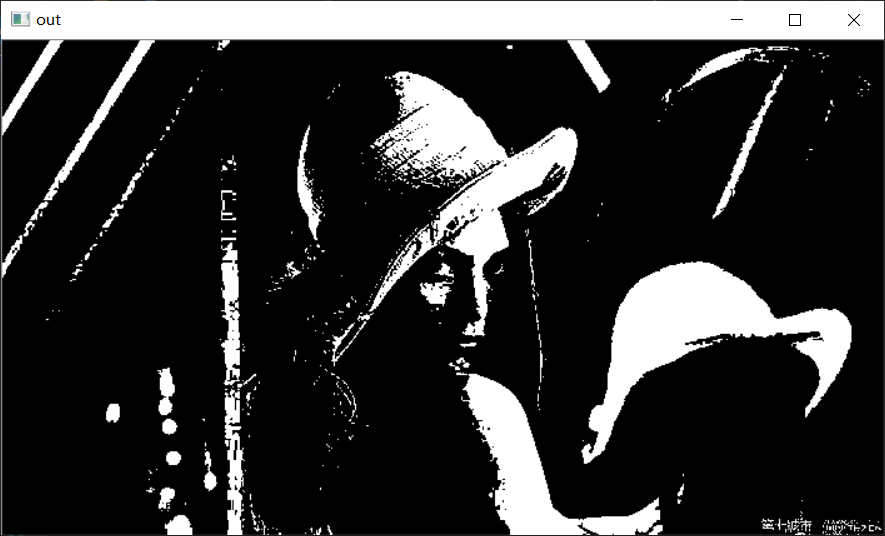
- 问题四:大津二值化算法(Otsu’s Method)
用大津算法二值化图像。
推荐这篇博客,写的比较清晰。
https://blog.csdn.net/u012198575/article/details/81128799
#include <opencv2/core.hpp>
#include <opencv2/highgui.hpp>
#include <iostream>

using namespace std;
using namespace cv;

//BGR->GRAY
Mat BGR2GRAY(Mat img)
{


	int height = img.rows;
	int width = img.cols;

	Mat out = Mat::zeros(height, width, CV_8UC1);

	for (size_t y = 0; y < height; y++)
	{


		for (size_t x = 0; x < width; x++)
		{


			out.at<uchar>(y, x) = 0.2126*(float)img.at<Vec3b>(y, x)[2]
				+ 0.7152*(float)img.at<Vec3b>(y, x)[1]
				+ 0.0722*(float)img.at<Vec3b>(y, x)[0];
		}
	}
	return out;
}

//GRAY->BINARIZE
Mat Binarize(Mat img, int th)//th用来设置二值化阈值
{


	int height = img.rows;
	int width = img.cols;

	Mat out = Mat::zeros(height, width, CV_8UC1);

	for (size_t y = 0; y < height; y++)
	{


		for (size_t x = 0; x < width; x++)
		{


			if (img.at<uchar>(y, x) < th)
				out.at<uchar>(y, x) = 0;
			else
				out.at<uchar>(y, x) = 255;
		}
	}
	return out;
}

//Otsu自动选取阈值
int Otsu(Mat & src)
{


	int th;
	const int GrayScale = 256;	//单通道图像总灰度256级
	int pixCount[GrayScale] = {

     0 };//每个灰度值所占像素个数
	int pixSum = src.cols * src.rows;//图像总像素点
	float pixPro[GrayScale] = {

     0 };//每个灰度值所占总像素比例
	float w0, w1, u0tmp, u1tmp, u0, u1, deltaTmp, deltaMax = 0;

	for (int i = 0; i < src.cols; i++)
	{


		for (int j = 0; j < src.rows; j++)
		{


			pixCount[src.at<uchar>(j, i)]++;//统计每个灰度级中像素的个数
		}
	}

	for (int i = 0; i < GrayScale; i++)
	{


		pixPro[i] = pixCount[i] * 1.0 / pixSum;//计算每个灰度级的像素数目占整幅图像的比例
	}

	for (int i = 0; i < GrayScale; i++)//遍历所有从0到255灰度级的阈值分割条件,测试哪一个的类间方差最大
	{


		w0 = w1 = u0tmp = u1tmp = u0 = u1 = deltaTmp = 0;
		for (int j = 0; j < GrayScale; j++)
		{


			if (j <= i)//背景
			{


				w0 += pixPro[j];//背景像素比
				u0tmp += j * pixPro[j];
			}
			else//前景
			{


				w1 += pixPro[j];//前景像素比
				u1tmp += j * pixPro[j];
			}
		}
		u0 = u0tmp / w0;
		u1 = u1tmp / w1;
		deltaTmp = (float)(w0 *w1* pow((u0 - u1), 2)); //类间方差公式 g = w1 * w2 * (u1 - u2) ^ 2
		if (deltaTmp > deltaMax)
		{


			deltaMax = deltaTmp;
			th = i;
		}
	}
	return th;
}

int main(int argc, const char* argv[])
{


	Mat img = imread("D:/文件/lenna.png");
	Mat gray = BGR2GRAY(img);
	Mat out = Binarize(gray, Otsu(gray));

	imshow("img", img);
	imshow("out", out);

	waitKey(0);
	destroyAllWindows();
	return 0;
}
输入:
输出:

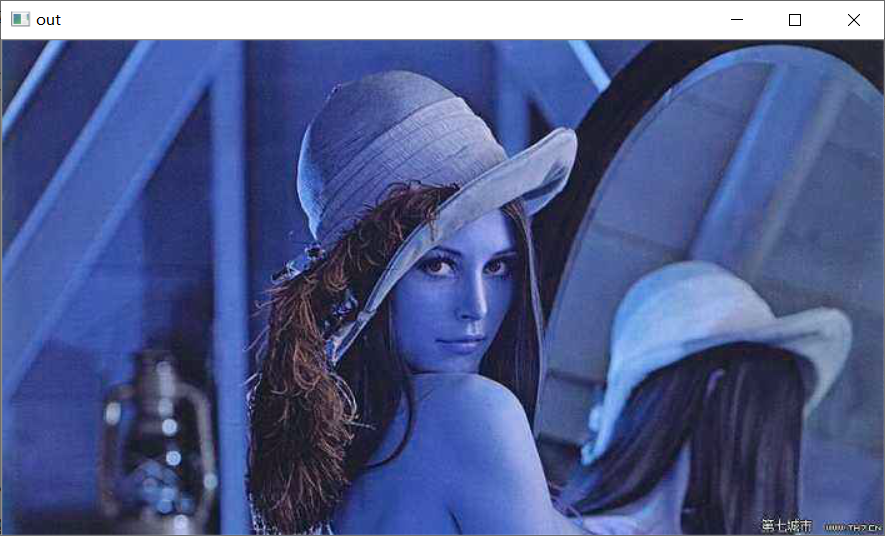
- 问题五:HSV转换
将使用HSV表示色彩的图像的色相反转。
HSV使用色相(Hue)、饱和度(Saturation)、明度(Value)来表示色彩的一种方式。 - 色相:将颜色使用 0 ∘ 0^{\circ} 0∘到 36 0 ∘ 360^{\circ} 360∘表示,就是平常所说的颜色名称,如红色、蓝色。色相与数值按下表对应:
| 红 | 黄 | 绿 | 青色 | 蓝色 | 品红 |
|---|---|---|---|---|---|
| 0 ∘ 0^{\circ} 0∘ | 6 0 ∘ 60^{\circ} 60∘ | 12 0 ∘ 120^{\circ} 120∘ | 18 0 ∘ 180^{\circ} 180∘ | 24 0 ∘ 240^{\circ} 240∘ | 30 0 ∘ 300^{\circ} 300∘ |
- 饱和度:是指色彩的纯度,饱和度越低则颜色越黯淡( 0 ≤ S < 1 0\leq S < 1 0≤S<1);
- 明度:即颜色的明暗程度。数值越高越接近白色,数值越低越接近黑色( 0 ≤ V < 1 0\leq V < 1 0≤V<1);
从 RGB \text{RGB} RGB色彩表示转换到 HSV \text{HSV} HSV色彩表示通过以下方式计算:
RGB \text{RGB} RGB的取值范围为 [ 0 , 1 ] [0, 1] [0,1],令: Max = max ( R , G , B ) \text{Max}=\max(R,G,B) Max=max(R,G,B) Min = min ( R , G , B ) \text{Min}=\min(R,G,B) Min=min(R,G,B) 色相: H = { 0 ( if Min = Max ) 60 G − R Max − Min + 60 ( if Min = B ) 60 B − G Max − Min + 180 ( if Min = R ) 60 R − B Max − Min + 300 ( if Min = G ) H=\begin{cases} 0&(\text{if}\ \text{Min}=\text{Max})\\ 60\ \frac{G-R}{\text{Max}-\text{Min}}+60&(\text{if}\ \text{Min}=B)\\ 60\ \frac{B-G}{\text{Max}-\text{Min}}+180&(\text{if}\ \text{Min}=R)\\ 60\ \frac{R-B}{\text{Max}-\text{Min}}+300&(\text{if}\ \text{Min}=G) \end{cases} H=⎩⎪⎪⎪⎨⎪⎪⎪⎧060 Max−MinG−R+6060 Max−MinB−G+18060 Max−MinR−B+300(if Min=Max)(if Min=B)(if Min=R)(if Min=G) 饱和度: S = Max − Min S=\text{Max}-\text{Min} S=Max−Min 明度: V = Max V=\text{Max} V=Max 从 HSV \text{HSV} HSV色彩表示转换到 RGB \text{RGB} RGB色彩表示通过以下方式计算: C = S C = S C=S H ′ = H 60 \ H' = \frac{H}{60} H′=60H X = C ( 1 − ∣ H ′ m o d 2 − 1 ∣ ) \ X = C\ (1 - |H' \mod 2 - 1|) X=C (1−∣H′mod2−1∣) ( R , G , B ) = ( V − C ) ( 1 , 1 , 1 ) + { ( 0 , 0 , 0 ) ( if H is undefined ) ( C , X , 0 ) ( if 0 ≤ H ′ < 1 ) ( X , C , 0 ) ( if 1 ≤ H ′ < 2 ) ( 0 , C , X ) ( if 2 ≤ H ′ < 3 ) ( 0 , X , C ) ( if 3 ≤ H ′ < 4 ) ( X , 0 , C ) ( if 4 ≤ H ′ < 5 ) ( C , 0 , X ) ( if 5 ≤ H ′ < 6 ) \ (R,G,B)=(V-C)\ (1,1,1)+\begin{cases} (0, 0, 0)& (\text{if H is undefined})\\ (C, X, 0)& (\text{if}\quad 0 \leq H' < 1)\\ (X, C, 0)& (\text{if}\quad 1 \leq H' < 2)\\ (0, C, X)& (\text{if}\quad 2 \leq H' < 3)\\ (0, X, C)& (\text{if}\quad 3 \leq H' < 4)\\ (X, 0, C)& (\text{if}\quad 4 \leq H' < 5)\\ (C, 0, X)& (\text{if}\quad 5 \leq H' < 6) \end{cases} (R,G,B)=(V−C) (1,1,1)+⎩⎪⎪⎪⎪⎪⎪⎪⎪⎪⎪⎨⎪⎪⎪⎪⎪⎪⎪⎪⎪⎪⎧(0,0,0)(C,X,0)(X,C,0)(0,C,X)(0,X,C)(X,0,C)(C,0,X)(if H is undefined)(if0≤H′<1)(if1≤H′<2)(if2≤H′<3)(if3≤H′<4)(if4≤H′<5)(if5≤H′<6) 请将色相反转(色相值加 180 180 180),然后再用 RGB \text{RGB} RGB色彩空间表示图片。
#include <opencv2/core.hpp>
#include <opencv2/highgui.hpp>
#include <iostream>
#include <math.h>

// BGR -> HSV
cv::Mat BGR2HSV(cv::Mat img)
{


	// get height and width
	int width = img.cols;
	int height = img.rows;

	float r, g, b;
	float h, s, v;
	float _max, _min;

	// prepare output
	cv::Mat hsv = cv::Mat::zeros(height, width, CV_32FC3);

	// each y, x
	for (int y = 0; y < height; y++)
	{


		for (int x = 0; x < width; x++)
		{


			// BGR -> HSV
			r = (float)img.at<cv::Vec3b>(y, x)[2] / 255;
			g = (float)img.at<cv::Vec3b>(y, x)[1] / 255;
			b = (float)img.at<cv::Vec3b>(y, x)[0] / 255;

			_max = fmax(r, fmax(g, b));
			_min = fmin(r, fmin(g, b));

			// get Hue
			if (_max == _min)
			{


				h = 0;
			}
			else if (_min == b)
			{


				h = 60 * (g - r) / (_max - _min) + 60;
			}
			else if (_min == r)
			{


				h = 60 * (b - g) / (_max - _min) + 180;
			}
			else if (_min == g)
			{


				h = 60 * (r - b) / (_max - _min) + 300;
			}

			// get Saturation
			s = _max - _min;

			// get Value
			v = _max;

			hsv.at<cv::Vec3f>(y, x)[0] = h;
			hsv.at<cv::Vec3f>(y, x)[1] = s;
			hsv.at<cv::Vec3f>(y, x)[2] = v;
		}
	}
	return hsv;
}


// HSV -> BGR
cv::Mat HSV2BGR(cv::Mat hsv)
{


	// get height and width
	int width = hsv.cols;
	int height = hsv.rows;

	float h, s, v;
	double c, _h, _x;
	double r, g, b;

	// prepare output
	cv::Mat out = cv::Mat::zeros(height, width, CV_8UC3);

	// each y, x
	for (int y = 0; y < height; y++)
	{


		for (int x = 0; x < width; x++)
		{


			h = hsv.at<cv::Vec3f>(y, x)[0];
			s = hsv.at<cv::Vec3f>(y, x)[1];
			v = hsv.at<cv::Vec3f>(y, x)[2];

			c = s;
			_h = h / 60;
			_x = c * (1 - abs(fmod(_h, 2) - 1));

			r = g = b = v - c;

			if (_h < 1)
			{


				r += c;
				g += _x;
			}
			else if (_h < 2)
			{


				r += _x;
				g += c;
			}
			else if (_h < 3)
			{


				g += c;
				b += _x;
			}
			else if (_h < 4) {


				g += _x;
				b += c;
			}
			else if (_h < 5)
			{


				r += _x;
				b += c;
			}
			else if (_h < 6)
			{


				r += c;
				b += _x;
			}

			out.at<cv::Vec3b>(y, x)[0] = (uchar)(b * 255);
			out.at<cv::Vec3b>(y, x)[1] = (uchar)(g * 255);
			out.at<cv::Vec3b>(y, x)[2] = (uchar)(r * 255);
		}
	}
	return out;
}

// inverse Hue
cv::Mat inverse_hue(cv::Mat hsv)
{


	int height = hsv.rows;
	int width = hsv.cols;

	for (int y = 0; y < height; y++) {


		for (int x = 0; x < width; x++) {


			hsv.at<cv::Vec3f>(y, x)[0] = fmod(hsv.at<cv::Vec3f>(y, x)[0] + 180, 360);
		}
	}
	return hsv;
}


int main(int argc, const char* argv[])
{


	// read image
	cv::Mat img = cv::imread("D:/文件/lenna.png", cv::IMREAD_COLOR);

	// BGR -> HSV
	cv::Mat hsv = BGR2HSV(img);
	imshow("hsv", hsv);

	// Inverse Hue
	hsv = inverse_hue(hsv);

	// Gray -> Binary
	cv::Mat out = HSV2BGR(hsv);

	cv::imshow("out", out);
	cv::waitKey(0);
	cv::destroyAllWindows();

	return 0;
}
输入:
输出:
