Spring简单整理 上
明日复明日,明日何其多,我生待明日,万事成蹉跎。
1. 简介
-
以interface21为基础
-
使现有的技术更加容易使用
-
整合了现有的技术框架
-
SSH: Struct2 + Spring + Hibernate
SSM: SpringMvc + Spring + mybatis
-
优点:
- Spring是一个开源的免费的框架
- Spring是一个轻量级的、非入侵式的框架
- 控制反转IOC,面向切面编程AOP
- 支持事物的处理,对框架整合的支持
-
组成:

-
拓展
- Spring Boot —— Build Anything
- 一个快速开发的脚手架
- 基于SpringBoot可以快速的开发单个微服务
- 约定大于配置
- Spring Cloud —— Coordinate Anything
- 基于SpringBoot 实现
- Spring Cloud Date Flow —— Connect Everything
- Spring Boot —— Build Anything
<!-- https://mvnrepository.com/artifact/org.springframework/spring-webmvc -->
<dependency>
    <groupId>org.springframework</groupId>
    <artifactId>spring-webmvc</artifactId>
    <version>5.2.0.RELEASE</version>
</dependency>

<!-- https://mvnrepository.com/artifact/org.springframework/spring-webmvc -->
<dependency>
    <groupId>org.springframework</groupId>
    <artifactId>spring-jdbc</artifactId>
    <version>5.2.0.RELEASE</version>
</dependency>
2. IOC控制反转
spring_01_ioc
- 是一种思想
- 依赖注入DI是实现IoC的一种方式
- 一种通过描述(XML或注解)并通过第三方生产或获取特定对象的方式
3. helloSpring
要实现不同的操作,只需要在xml配置文件中进行操作
1. 父工程的pom.xml
<dependencies>
    <dependency>
        <groupId>org.springframework</groupId>
        <artifactId>spring-webmvc</artifactId>
        <version>5.2.0.RELEASE</version>
    </dependency>
</dependencies>
2. 实体类Hello
package com.magician.pojo;

public class Hello {


    public String str;

    public String getStr() {


        return str;
    }

    public void setStr(String str) {


        this.str = str;
    }

    @Override
    public String toString() {


        return "Hello{" +
            "str='" + str + '\'' +
            '}';
    }
}
3. beans.xml
<?xml version="1.0" encoding="UTF-8"?>
<beans xmlns="http://www.springframework.org/schema/beans"
       xmlns:xsi="http://www.w3.org/2001/XMLSchema-instance"
       xsi:schemaLocation="http://www.springframework.org/schema/beans
                           http://www.springframework.org/schema/beans/spring-beans.xsd">

    <!--使用spring来创建对象,在Spring这些都成为Bean
            id = 变量名
            class = new 的对象
            property 相当于给对象中的属性设置一个值

			value
			ref : 引用spring的容器中创建好的对象
        -->
    <bean id="hello" class="com.magician.pojo.Hello">
        <property name="str" value="Spring" />
    </bean>
</beans>
4.测试类
import com.magician.pojo.Hello;
import org.springframework.context.ApplicationContext;
import org.springframework.context.support.ClassPathXmlApplicationContext;

public class MyTest {


    public static void main(String[] args) {


        // 获取spring的上下文对象
        ApplicationContext context = new ClassPathXmlApplicationContext("beans.xml");

        // 对象现在都在spring中管理
        Hello hello = (Hello) context.getBean("hello");
        System.out.println(hello.toString());
    }
}
* ref情况下的beans.xml 样例
<?xml version="1.0" encoding="UTF-8"?>
<beans xmlns="http://www.springframework.org/schema/beans"
       xmlns:xsi="http://www.w3.org/2001/XMLSchema-instance"
       xsi:schemaLocation="http://www.springframework.org/schema/beans
                           http://www.springframework.org/schema/beans/spring-beans.xsd">

    <bean id="mysqlImpl" class="com.magician.dao.UserDaoMysqlImpl" />
    <bean id="userImpl" class="com.magician.dao.UserDaoImpl" />

    <bean id="userService" class="com.magician.service.UserServiceImpl">
        <!--ref: 引用spring容器中创建好的对象-->
        <property name="userDao"  ref="userImpl" />
    </bean>

</beans>
4. IOC创建对象的方式
-
使用无参构造创建对象,默认实现!
-
假设我们要使用有参实现:
-
第一种 index 下标赋值
<bean id="user" class="com.magician.pojo.User"> <constructor-arg index="0" value="lover" /> </bean> -
第二种,type
<bean id="user" class="com.magician.pojo.User"> <constructor-arg type="java.lang.String" value="second" /> </bean> -
第三种 name 直接通过参数名
<bean id="user" class="com.magician.pojo.User">
    <constructor-arg name="name" value="third" />
</bean>
-
-
在配置文件加载到时候,容器 (beans.xml)中管理的对象就已经初始化了
public class MyTest {


    public static void main(String[] args) {


        ApplicationContext context = new ClassPathXmlApplicationContext("beans.xml");
        User user = (User) context.getBean("user");
        User user2 = (User) context.getBean("user");

        System.out.println(user == user2);  // true
    }
}
5. Spring配置说明
5.1 alias
<alias name="user" alias="woyebuzhidao" />
5.2 bean
<!--
        id: bean的唯一标识符
        class: bean对象所对应的权限定名
        name: 也是别名,而且name可以同时取多个别名 【bean中的name】
    -->
<bean id="userT" class="com.magician.pojo.UserT" name="user2, u2">
    <property name="name" value="西部开源"/>
</bean>
5.3 import
一般用于团队开发使用,它可以将多个配置文件导入合并为一个
<import resource="beans.xml"/>
<import resource="beans2.xml"/>
6. 依赖注入 DI
6.1 构造器注入
4.2 三种方式
6.2 Set方式注入
-
依赖:bean对象的创建依赖于容器
-
注入:bean对象中的所有属性,由容器注入
-
环境搭建
- 复杂类型
- 真是测试对象
-
<bean id="address" class="com.magician.pojo.Address" />

<bean id="student" class="com.magician.pojo.Student">
    <!--第一种,普通注入 value -->
    <property name="name" value="magician" />
    <!--第二种, bean注入 ref -->
    <property name="address" ref="address" />
    <!--第三种,数组注入: -->
    <property name="books">
        <array>
            <value>english</value>
            <value>scientist</value>
            <value>CET4</value>
            <value>technich</value>
        </array>
    </property>
    <!--第四种,list注入-->
    <property name="hobbys">
        <list>
            <value>睡觉</value>
            <value>看书</value>
        </list>
    </property>

    <!--第五种 map-->
    <property name="card">
        <map>
            <entry key="身份证" value="121412"/>
            <entry key="银行卡" value="affafk" />
        </map>
    </property>

    <!--第六种 set-->
    <property name="games">
        <set>
            <value>LOL</value>
            <value>王者荣耀</value>
        </set>
    </property>

    <!--第七种 Null and empty-->
    <property name="wife">
        <null />
    </property>

    <!--第八种 properties 特殊类型-->
    <property name="info">
        <props>
            <prop key="学号">124791284</prop>
        </props>
    </property>
</bean>
6.3 拓展方式注入
-
the p-namespace
<?xml version="1.0" encoding="UTF-8"?> <beans xmlns="http://www.springframework.org/schema/beans" xmlns:xsi="http://www.w3.org/2001/XMLSchema-instance" xmlns:p="http://www.springframework.org/schema/p" xsi:schemaLocation="http://www.springframework.org/schema/beans http://www.springframework.org/schema/beans/spring-beans.xsd"> <bean id="user" class="com.magician.pojo.User" p:age="12" p:name="yuanxiao"/> </beans> -
the c-namespace
<?xml version="1.0" encoding="UTF-8"?>
<beans xmlns="http://www.springframework.org/schema/beans"
       xmlns:xsi="http://www.w3.org/2001/XMLSchema-instance"
   		xmlns:c="http://www.springframework.org/schema/c"
       xsi:schemaLocation="http://www.springframework.org/schema/beans
                           http://www.springframework.org/schema/beans/spring-beans.xsd">
    <!--C 命名空间-->
    <bean id="user2" class="com.magician.pojo.Student" c:age="18" c:name="test" />
</beans>
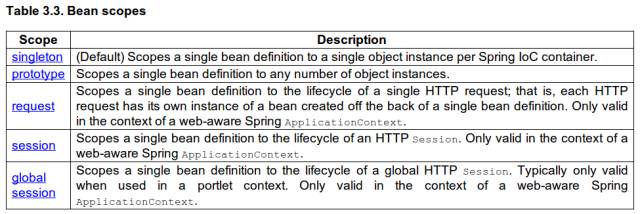
6.4 Bean scope
7. Bean的自动装配
- 自动装配式spring满足bean依赖的一种方式
- spring会在上下文中自动寻找,并自动给bean装配属性
在Spring中有三种装配的方式:
- 在xml中显示的配置
- 在java中显示配置
- 隐式的自动装配bean !important
7.1 测试
-
byName: 会自动在容器上下文查找,和自己对象set方法后面的值对应的 beanid<bean id="cat" class="com.magician.pojo.Cat" /> <bean id="dog" class="com.magician.pojo.Dog" /> <bean id="people" class="com.magician.pojo.People" autowire="byName" > <property name="name" value="kuang shen" /> </bean> -
byType:会自动查找和自己对象属性类型相同的bean<bean id="cat" class="com.magician.pojo.Cat" /> <bean id="dog1" class="com.magician.pojo.Dog" /> <bean id="people" class="com.magician.pojo.People" autowire="byType" > <property name="name" value="kuang shen" /> </bean>
7.2 使用注解实现自动装配
默认为byName方式
要使用注解须知:
<?xml version="1.0" encoding="UTF-8"?>
<beans xmlns="http://www.springframework.org/schema/beans"
       xmlns:xsi="http://www.w3.org/2001/XMLSchema-instance"
       xmlns:context="http://www.springframework.org/schema/context"
       xsi:schemaLocation="http://www.springframework.org/schema/beans
                           http://www.springframework.org/schema/beans/spring-beans.xsd
                           http://www.springframework.org/schema/context
                           http://www.springframework.org/schema/context/spring-context.xsd">

    <context:annotation-config />
</beans>
public class People {
    @Autowired
    private Cat cat;
    @Autowired
    private Dog dog;

    private String name;
}
-
@Autowired
-
@Resource

8. spring注解开发
-
bean
<!--指定要扫描的包,这个包下的注解就会生效-->
<context:component-scan base-package="com.magcian.pojo"/>
<context:annotation-config />
package com.magcian.pojo; import org.springframework.stereotype.Component; @Component public class User { public String name = "yuanxiao"; } -
属性如何注入
@Component public class User { @Value("guesss") public String name = "yuanxiao"; } -
衍生的注解
@Component有几个衍生注解,我们在web开发中,会按照mvc三层架构来分层。
- dao 【@Repository]
- service [@Service]
- controller [@Controller]
- pojo [@Component]
-
自动装置的配置
-
作用域 【@scope()】
@Component
@Scope("prototype")
public class User {


    @Value("guesss")
    public String name = "yuanxiao";
}
9. 使用java的方式配置spring
JavaConfig是Spring的一个子项目,在Spring4之后,成为了一个核心功能。
实体类:
package com.magcian.pojo;

import org.springframework.beans.factory.annotation.Value;
import org.springframework.context.annotation.Scope;
import org.springframework.stereotype.Component;

@Component
public class User {


    @Value("guesss")
    public String name;

    public String getName() {


        return name;
    }
}
配置文件
@Configurable
@ComponentScan("com.magician.pojo")
public class MyConfig {


    // 注册一个bean,就相当于我们之前写的一个bean标签
    @Bean
    public User getUser(){


        return new User();
    }
}
测试类:
public class MyTest {


    public static void main(String[] args) {


        ApplicationContext context = new AnnotationConfigApplicationContext(MyConfig.class);

        User getUser = (User)context.getBean("getUser");
        System.out.println(getUser.getName());
    }
}
10. 代理模式
SpringAOP的底层!【SpringAOP 和 SpringMVC】
10.1 静态代理
角色分析:
- 抽象角色
- 真实角色
- 代理角色
- 客户
10.2 动态代理
- 动态代理和静态代理角色一样
- 动态代理的代理类是动态生成的,不是我们直接写好的
- 动态代理分为两大类:
- 基于接口的动态代理
- 基于类的动态代理
- Java字节码 JAVAssist
- 需要了解2个类:Proxy、InvocationHandler
private Object target;
public void setTarget(Object target){


    this.target = target;
}
// 生成得到代理类
public Object getProxy(){


    return Proxy.newProxyInstance(this.getClass().getClassLoader(), rent.getClass().getInterfaces(), this);
}
// 处理代理实例,并返回结果
public Object invoke(Object proxy, Method method, Object[] args)throws Throwable{


    Object result = method.invoke(target, args);
    return result;
}
11. AOP 面向切面编程
<dependencies>
    <dependency>
        <groupId>org.aspectj</groupId>
        <artifactId>aspectjweaver</artifactId>
        <version>1.9.4</version>
    </dependency>
</dependencies>
使用Spring实现AOP:
-
使用Spring接口
applicationContext.xml
<?xml version="1.0" encoding="UTF-8"?>
<beans xmlns="http://www.springframework.org/schema/beans"
       xmlns:xsi="http://www.w3.org/2001/XMLSchema-instance" xmlns:aop="http://www.springframework.org/schema/aop"
       xsi:schemaLocation="http://www.springframework.org/schema/beans
                           http://www.springframework.org/schema/beans/spring-beans.xsd http://www.springframework.org/schema/aop https://www.springframework.org/schema/aop/spring-aop.xsd">

    <!--注册bean-->
    <bean id="userService" class="com.magician.service.UserServiceImpl" />
    <bean id="log" class="com.magician.log.Log" />
    <bean id="afterLog" class="com.magician.log.AfterLog" />

    <!--配置aop-->
    <aop:config>
        <!--切入点 execution(要执行的位置)-->
        <aop:pointcut id="pointcut" expression="execution(* com.magician.service.UserServiceImpl.*(..))"/>

        <!--执行环绕增加-->
        <aop:advisor advice-ref="log" pointcut-ref="pointcut"/>
        <aop:advisor advice-ref="afterLog" pointcut-ref="pointcut" />
    </aop:config>
</beans>
Test.java
public class MyTest {


    public static void main(String[] args) {


        // 获取spring的上下文对象
        ApplicationContext context = new ClassPathXmlApplicationContext("applicationContext.xml");

        // 对象现在都在spring中管理
        UserService hello = (UserService) context.getBean("userService");
        hello.add();
    }
}
Log.java
public class Log implements MethodBeforeAdvice { /* * method: 要执行的目标对象方法 * objects: 参数 * o: 目标参数 * */ @Override public void before(Method method, Object[] objects, Object o) throws Throwable { System.out.println(objects.getClass().getName() + "的" + method.getName() + "被执行了"); } } -
自定义类
-
注解实现AOP
@Aspect // 标注这个类是一个切面 public class AnnotationPointCut { @Before("execution(* com.magician.service.UserServiceImpl.*(..))") public void before(){ System.out.println("方法执行前========="); } @After("execution(* com.magician.service.UserServiceImpl.*(..))") public void after(){ System.out.println("方法执行后 +++=============="); } }<bean id="annotationPointCut" class="com.magician.diy.AnnotationPointCut" /> <!--开启注解支持--> <aop:aspectj-autoproxy />
12. 整合Mybatis
步骤:
-
导入相关Jar包
- junit
- mybatis
- mysql数据库
- spring相关的
- aop
pom.xml
<dependencies> <dependency> <groupId>junit</groupId> <artifactId>junit</artifactId> <version>4.12</version> </dependency> <dependency> <groupId>mysql</groupId> <artifactId>mysql-connector-java</artifactId> <version>5.1.47</version> </dependency> <dependency> <groupId>org.mybatis</groupId> <artifactId>mybatis</artifactId> <version>3.5.2</version> </dependency> <dependency> <groupId>org.springframework</groupId> <artifactId>spring-webmvc</artifactId> <version>5.2.0.RELEASE</version> </dependency> <dependency> <groupId>org.springframework</groupId> <artifactId>spring-jdbc</artifactId> <version>5.2.0.RELEASE</version> </dependency> <dependency> <groupId>org.aspectj</groupId> <artifactId>aspectjweaver</artifactId> <version>1.9.4</version> </dependency> <dependency> <groupId>org.mybatis</groupId> <artifactId>mybatis-spring</artifactId> <version>2.0.2</version> </dependency> </dependencies> -
编写配置文件
-
测试