文章目录
前言
spring security学习总结到这里,其实已经进入到尾声了,只是还剩下授权的部分需要简单总结一下。这篇博客简单总结一下spring security的helloworld,通过helloworld进行一下简单的源码分析
何为授权
可能目前很多开发人员,对授权的认知还是简单的认为隐藏菜单,其实这并不全面,根据权限显示菜单与否,只能算是从UI层面控制住了菜单的显示与否,如果某一天,数据库被黑掉了,黑客拿到了所有的访问链接路径,依旧可以顺利访问相关接口。针对这些访问的安全问题,spring security也提供了相关的方案。
不同系统也有不同的授权复杂程度。
如下图所示:
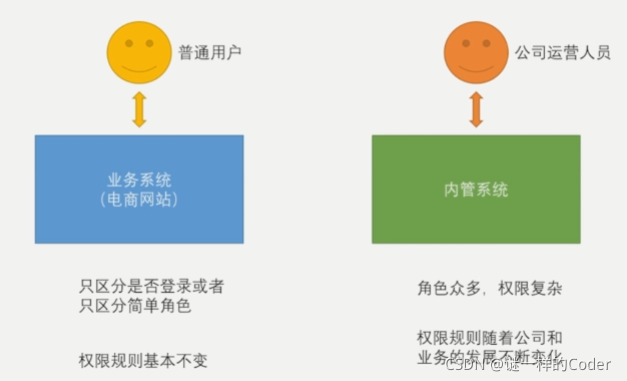
大部分企业中,开发一个业务系统的同时,还会开发一个内管系统,真正的业务系统其实权限角色并不复杂,大体上只会区分VIP和非VIP的用户,而且权限角色也较为稳定,不会频繁的变动,比如某电商网站在推出了VIP角色之后,并不会很频繁的退出VVIP。所以正常来说真正对客的业务系统权限其实是比较简单的。但是针对内部的运营人员使用的内管系统,权限角色变化就会比较频繁,比如某技术总监,在升职之后去了管理部门,其角色和权限都会产生相应的变化。所以其实权限模式也是随着业务的不同而不同的。
spring security 权限校验的helloworld
其实在之前的学习中,针对某些未登录即可访问,与某些接口登录才能访问的配置,就是spring security权限的一种配置,只是这种比较简单。下面根据一个简单的实例来说明spring security的角色权限控制
准备一个简单的业务接口(这个接口在之前的实例已经用到过很多次了)
/**
 * autor:liman
 * createtime:2021/6/29
 * comment:
 */
@RestController
@RequestMapping("/user")
@Slf4j
public class UserController {


    @GetMapping(value = "/{id:\\d+}")
    @JsonView(User.userDetailView.class)
    public User getUserById(@PathVariable(name = "id") String id) {


        User user = new User();
        user.setUsername("tom");
        return user;
    }
}
关于登录的配置

http
	.and()
    .authorizeRequests()//并且要认证请求
    .antMatchers("/authentication/require", securityProperties.getBrowser().getLoginPage(),
            securityProperties.getBrowser().getSiguUpPage(),//第三方认证跳转的注册页不需要登录认证
            "/authentication/sessiontimeout",//session失效的路径放开登录校验
            "/verifycode/*","/login/weixin")
    .permitAll()//以上的请求不需要认证即可访问
    .anyRequest()//对其余任意的请求
    .authenticated()//都需要做认证
    .and().csrf().disable()//关闭csrf
上面的登录配置中,只是针对某些url的访问做了登录与非登录可访问的区分。并没有针对角色的访问进行区分
指定角色访问的配置,依旧是通过antMatchers
http
	.and()
    .authorizeRequests()//并且要认证请求
    .antMatchers("/authentication/require", securityProperties.getBrowser().getLoginPage(),
            securityProperties.getBrowser().getSiguUpPage(),//第三方认证跳转的注册页不需要登录认证
            "/authentication/sessiontimeout",//session失效的路径放开登录校验
            "/verifycode/*","/login/weixin").permitAll()//登录页的请求不需要认证
    .antMatchers("/user/*").hasRole("ADMIN")//这里指定只有ADMIN角色的用户才能访问/user/*
    .anyRequest()//对其余任意的请求
    .authenticated()//都需要做认证
    .and().csrf().disable()//关闭csrf
注意上述代码第8行,利用antMatchers配置指定了访问/user/*接口,需要ADMIN的角色,antMatcher的url指定支持通配符。
最后剩下一个问题,就是用户的角色如何指定的。答案是在用户认证通过之后的实例化时,指定用户的角色
最简单的实例就是在我们之前自定义的UserDetailsServer中
/**
 * autor:liman
 * createtime:2021/7/8
 * comment:
 */
@Component
@Slf4j
public class MyUserDetailService implements UserDetailsService{


    @Autowired
    private PasswordEncoder passwordEncoder;


    /**
     * 根据用户名查找用户信息
     * @param username
     * @return
     * @throws UsernameNotFoundException
     */
    @Override
    public UserDetails loadUserByUsername(String username) throws UsernameNotFoundException {


        log.info("根据用户名查找用户信息:{}",username);
        return new User(username,passwordEncoder.encode("123456"),
                true,true,true,true,
               //这里指定了用户的角色(需要加“ROLE_"前缀)
                        AuthorityUtils.commaSeparatedStringToAuthorityList("ROLE_USER,ROLE_ADMIN"));
    }
}
在认证结束之后,构造返回的UserDetails对象的时候,指定用户角色的时候,需要加"ROLE_"前缀,至于为什么要加这个前缀,后面会继续介绍。
完成以上代码之后,登录后的用户,才能正常访问/user/*的接口,因为spring security赋予了访问用户相关的角色。
最后再絮叨一句,针对RESTful应用中,同一个请求可以支持不同的HTTP方法。antMatchers的配置其实也可以指定HTTP方法的,例如如下配置
antMatchers(HttpMethod.POST,"/user/*").hasRole("ADMIN")
第一个参数指定HTTP的方法为post,表示针对post的/user/*请求,需要有ADMIN的角色才能进行访问。
spring security控制权限源码简析
为了后续总结角色访问控制权限的方案,这里先在helloworld的基础上简析一下源码流程。
先回归到spring security的原理部分
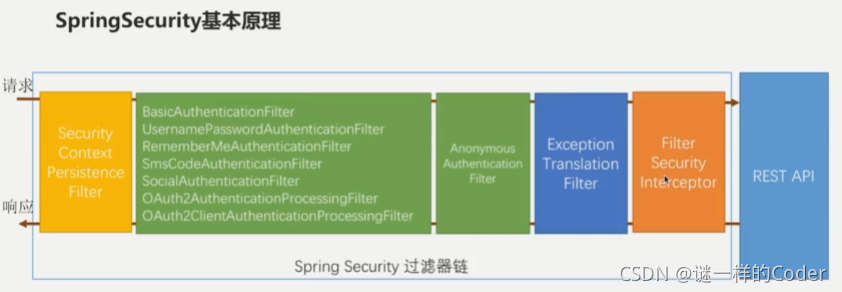
我们之前介绍过,在spring security是基于一堆过滤器链完成认证,上图中绿色的过滤器链就完成了用户认证的逻辑,完成之后将用户信息封装到Authentication中,由最后的FilterSecurityInterceptor决定当前的访问是否能正常访问REST API接口。其实在绿色的过滤器中,左边的,比较多的过滤器我们前面的博客几乎都总结过。无非就是各种认证模式的过滤器。但是在这些业务认证的过滤器完成之后,还会执行一个AnonymousAuthenticationFilterAnonymous英文单词的意思是匿名的。这个过滤器我们需要看看其中做了什么,这里我只贴出认为比较重要的核心代码,并在下述代码的注解中解释其做了什么
AnonymousAuthenticationFilter
public class AnonymousAuthenticationFilter extends GenericFilterBean implements
		InitializingBean {


	private AuthenticationDetailsSource<HttpServletRequest, ?> authenticationDetailsSource = new WebAuthenticationDetailsSource();
	private String key;
	private Object principal;
	private List<GrantedAuthority> authorities;
	//构造函数,设置key,principal(这里的principal设置为了一个字符串),权限列表
    public AnonymousAuthenticationFilter(String key) {


		this(key, "anonymousUser", AuthorityUtils.createAuthorityList("ROLE_ANONYMOUS"));
	}

    //构造函数,
	public AnonymousAuthenticationFilter(String key, Object principal,
			List<GrantedAuthority> authorities) {


		Assert.hasLength(key, "key cannot be null or empty");
		Assert.notNull(principal, "Anonymous authentication principal must be set");
		Assert.notNull(authorities, "Anonymous authorities must be set");
		this.key = key;
		this.principal = principal;
		this.authorities = authorities;
	}

	//核心的doFilter函数
	public void doFilter(ServletRequest req, ServletResponse res, FilterChain chain)
			throws IOException, ServletException {


		//判断前面的过滤器执行完成之后的Authentication是否为空(其实就是判断是否登录成功)
		if (SecurityContextHolder.getContext().getAuthentication() == null) {


            //如果没有登录成功,则创建一个Authentication对象
			SecurityContextHolder.getContext().setAuthentication(
					createAuthentication((HttpServletRequest) req));

			if (logger.isDebugEnabled()) {


				logger.debug("Populated SecurityContextHolder with anonymous token: '"
						+ SecurityContextHolder.getContext().getAuthentication() + "'");
			}
		}
        //已经认证成功了,不做任何事情,直接调用后面的过滤器
		else {


			if (logger.isDebugEnabled()) {


				logger.debug("SecurityContextHolder not populated with anonymous token, as it already contained: '"
						+ SecurityContextHolder.getContext().getAuthentication() + "'");
			}
		}

		chain.doFilter(req, res);
	}

    //创建一个Authentication,指定默认构造的principal
	protected Authentication createAuthentication(HttpServletRequest request) {


		AnonymousAuthenticationToken auth = new AnonymousAuthenticationToken(key,
				principal, authorities);
		auth.setDetails(authenticationDetailsSource.buildDetails(request));

		return auth;
	}
}
通过这个AnonymousAuthenticationFilter的源码,我们发现,其实逻辑也比较简单,无非就是判断前面的认证过滤器是否认证成功,如果认证成功了,则不作任何事情,如果没有认证成功,则内部新建一个Authentication对象,指定principal为一个匿名用户的因为字符串。
请求在通过AnonymousAuthenticationFilter之后,会进入到最后的守门员——FilterSecurityInterceptor最终鉴权的操作,就在这里面完成
后续授权源码
FilterSecurityInterceptor就是权限认证的入口,在正式解析源码之前,先看看基础的构造,以便看源码的时候不至于迷失。
基本的代码调用流程如下
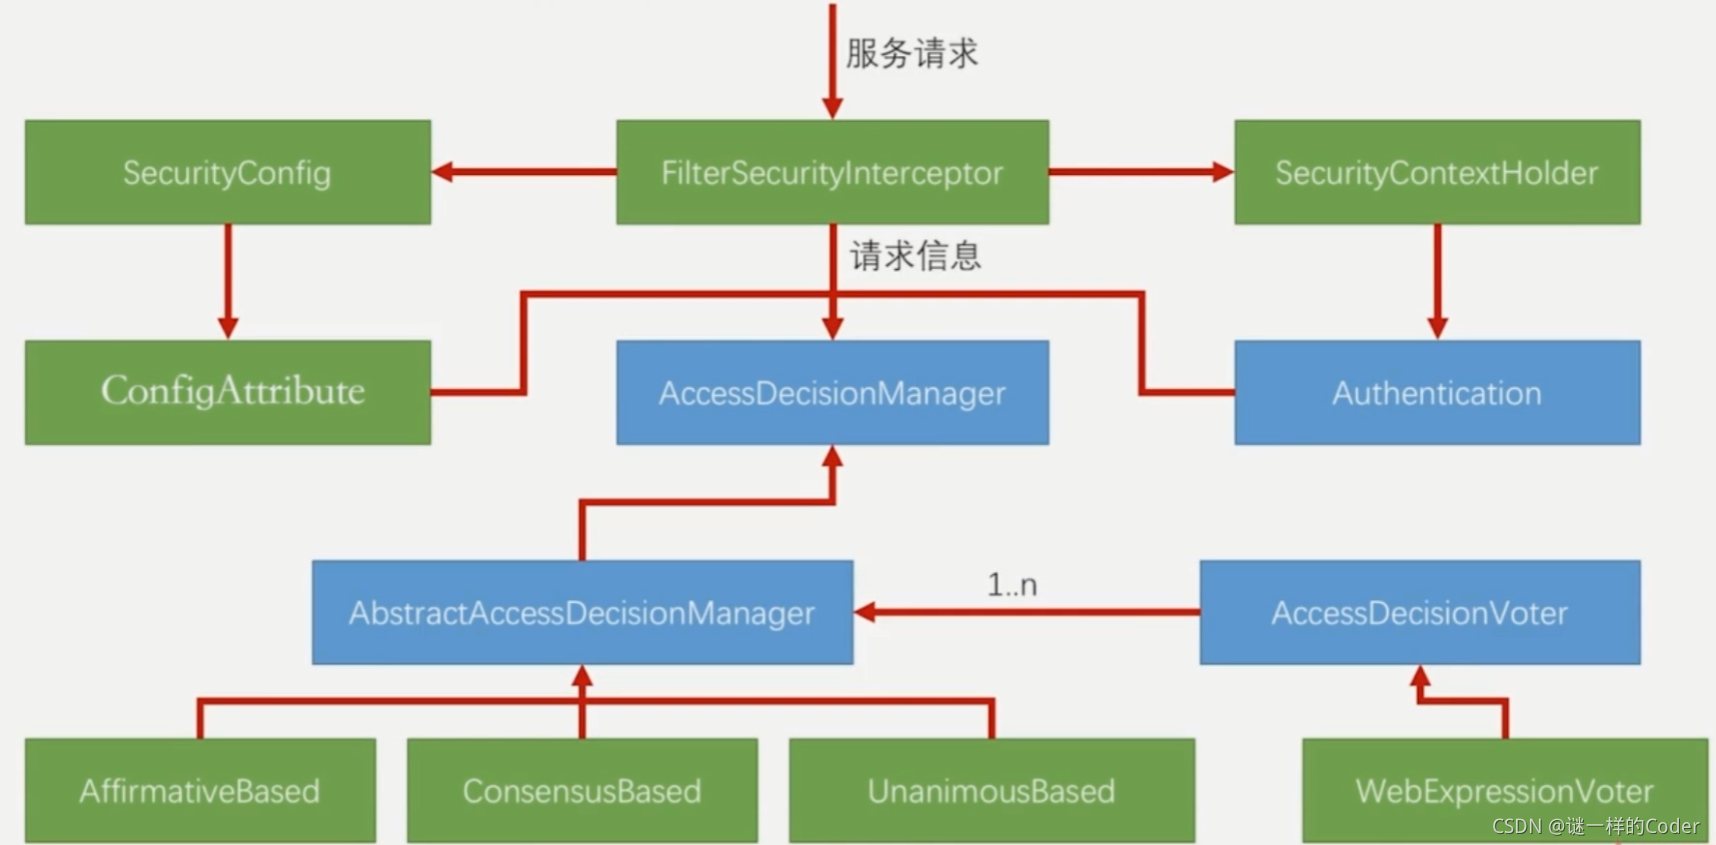
先做一个简单的说明:其中蓝色标记的都是抽象类或者接口,绿色标记的是具体的类。图虽然看上去比较复杂,但是核心的类或者接口,也就三个——FilterSecurityInterceptor,AccessDecisionManager,AccessDecisionVoter,这里先对这三个类做一个简单的介绍
FilterSecurityInterceptor
这个是权限认证的入口,最终的请求是发送到FilterSecurityInterceptor,同时前面也说过FilterSecurityInterceptor也是spring security过滤器上面的最后一环。
FilterSecurityInterceptor会从我们的配置类中读取出我们的配置项,将其封装为SecurityConfig,同时,也会通过SecurityContextHolder获取Authentication认证信息。
在获取到上述信息之后,FilterSecurityInterceptor会将当前的请求对象request,配置信息SecurityConfig,认证信息Authentication,这三者封装成一个Object,并将这个Object传递给后面的AccessDecisionManager进行处理。
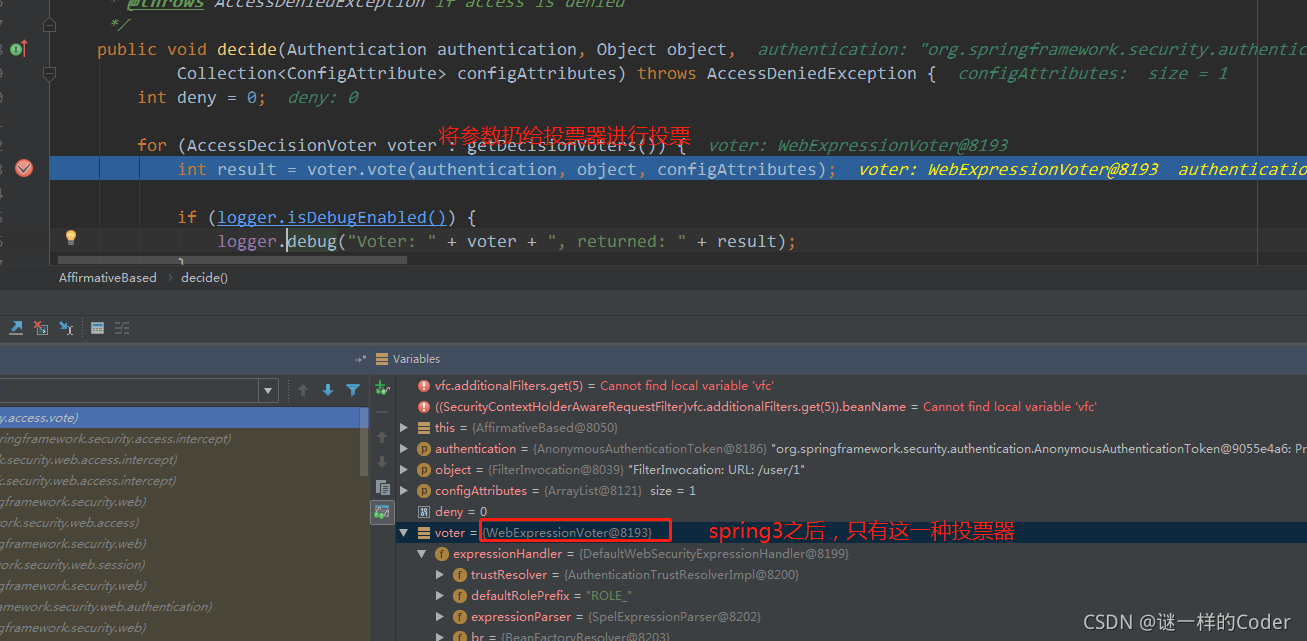
AccessDecisionVoter
可以理解为一个投票员,针对当前的请求从不同的维度进行认证,如果认为当前请求可以访问后置的业务接口,则投票为通过,否则为不通过。
在spring3之前,spring security中其实是有一组这个接口的实现的,spring3之后,引入EL表达式之后,AccessDecisionVoter实际的实现类就只有一个了——WebExpressionVoter每一个投票器根据自己的逻辑决定认证是否通过还是不通过,比如有的投票器认证的是当前请求是否具有权限,有的投票器认证的是当前密码是否正确,有的投票器认证的是当前用户角色是否匹配等等。
AccessDecisionManager
这个是一个接口,是访问决定的管理者,所谓的管理者就是管理相关的请求是否通过认证,其有一个抽象的实现——AbstractAccessDecisionManager,以及三个具体的实现AffirmativeBased,ConsensusBased,UnanimousBased。
其中AbstractAccessDecisionManager管理并维护了一堆AccessDecisionVoter,AccessDecisionVoter从名字可以看出,就是一个投票并决定当前请求是否完全通过认证和授权的接口。N多的投票器的结果最后汇总到AbstractAccessDecisionManager中,AbstractAccessDecisionManager三个具体的实现类,决定当前的请求是否认证通过。
AffirmativeBased——如果有一个投票器通过,则当前请求认证通过,这个也是spring security默认的决策管理器。
UnanimousBased——如果有一个投票器投票不通过,则当前请求认证不通过
ConsensusBased——汇总所有投票器的结果,如果大部分投票器认为可以通过,则当前决策管理器认为目前的请求可以通过认证,相反则为不通过。
开始调试查看源码
下面开始在未登录和登录情况下,debug调试相关代码,首先未登录去访问业务接口,请求会先进入到FilterSecurityInterceptor
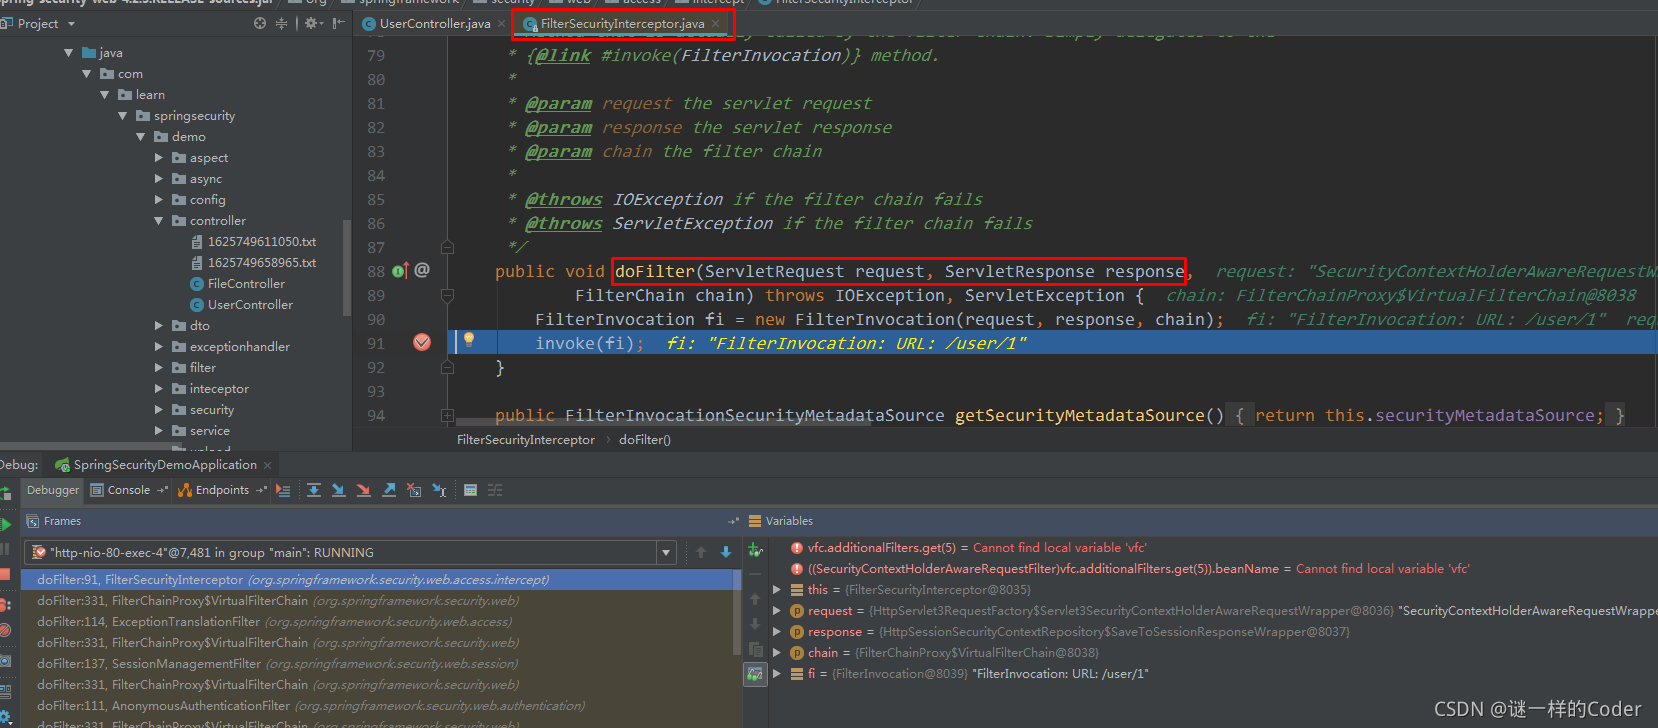
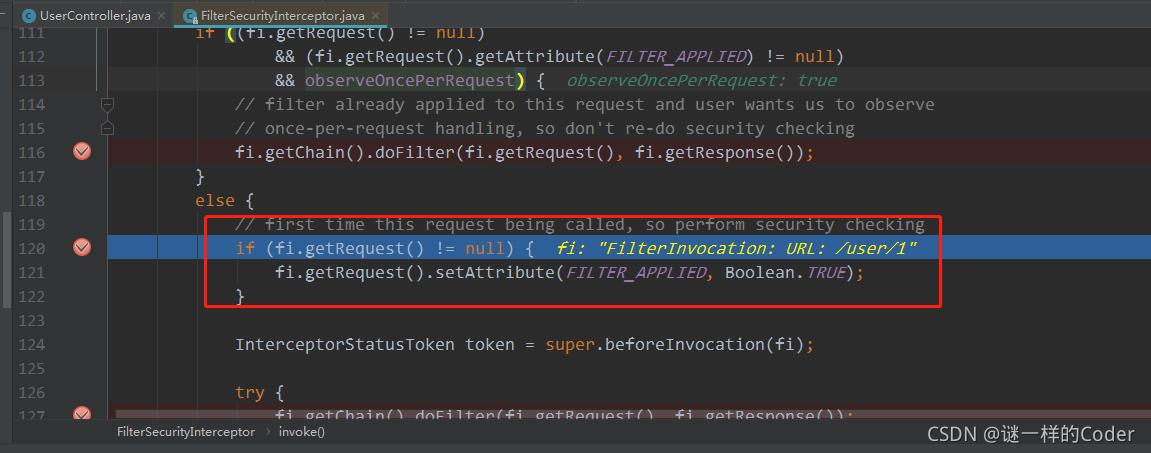
doFilter方法中,可以看到,将request,response与FilterChain三个实体构造成FilterInvocation,然后利用FilterInvocation进行后续的invoke操作,我们进入到invoke方法中,源码如下
public void invoke(FilterInvocation fi) throws IOException, ServletException {


	if ((fi.getRequest() != null)
			&& (fi.getRequest().getAttribute(FILTER_APPLIED) != null)
			&& observeOncePerRequest) {

    //如果之前经过了 FilterSecurityInterceptor 的判断,则直接通过
		// filter already applied to this request and user wants us to observe
		// once-per-request handling, so don't re-do security checking
		fi.getChain().doFilter(fi.getRequest(), fi.getResponse());
	}
	else {


		// first time this request being called, so perform security checking
		if (fi.getRequest() != null) {

    //如果之前没有经过FilterSecurityInterceptor,则在request请求头中设置FILTER_APPLIED属性为true
			fi.getRequest().setAttribute(FILTER_APPLIED, Boolean.TRUE);
		}

		InterceptorStatusToken token = super.beforeInvocation(fi);

		try {


            //这里就是通过了FilterSecurityInterceptor的判断,开始调用后面的业务接口了。
			fi.getChain().doFilter(fi.getRequest(), fi.getResponse());
		}
		finally {


			super.finallyInvocation(token);
		}

		super.afterInvocation(token, null);
	}
}
可以看到在正式调用后续的业务接口之前,会调用父类的beforeInvocation方法,这个方法其中如果抛出异常,则认证流程就会发生改变,如果没有异常,则就会在后面调用相关的业务接口。
debug的请求也会到这里
后续调用beforeInvocation方法,会进入到父类(这里是AbstractSecurityInterceptor)的beforeInvocation方法中
该方法中会首先读取安全配置类中的配置信息
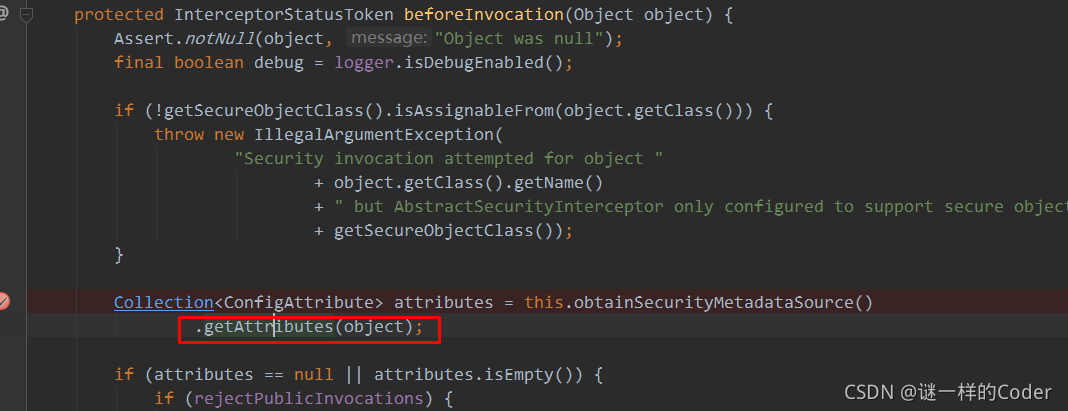
这里有一个getAttributes方法这个方法的具体实现在DefaultFilterInvocationSecurityMetadataSource中,我们进入到这个方法中,可以看到,spring security已经将我们的认证配置信息转换成了一个map
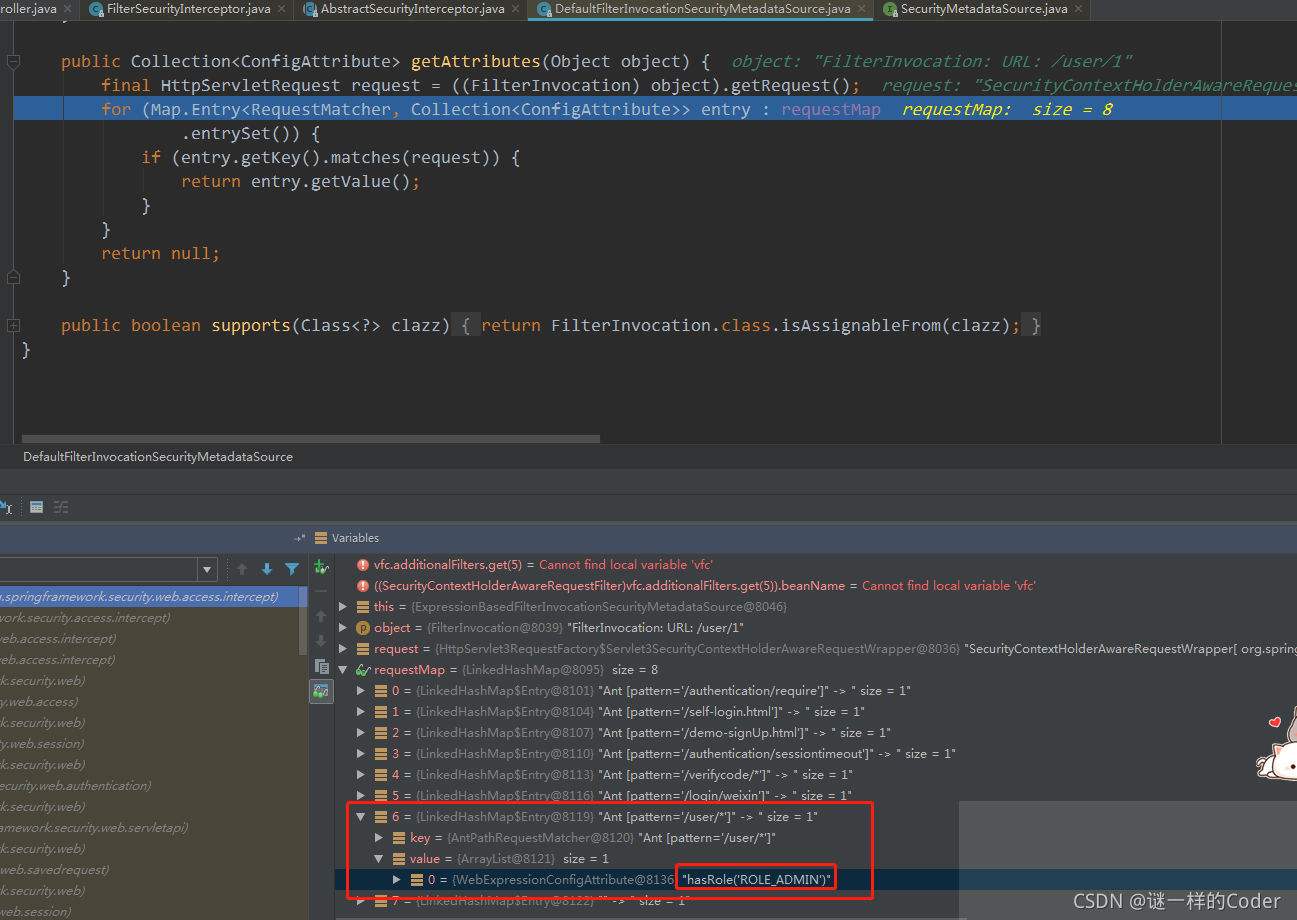
在其中我们可以看到我们对/user/*请求的配置,key值为hasRole(“ROLE_ADMIN”),这是一个权限认证表达式(后续会介绍)
回到beforeInvocation方法中,最后得到上述map中的key值其实就是最终的attributes。
经过一些判断之后,下一步就会去获取Authentication信息
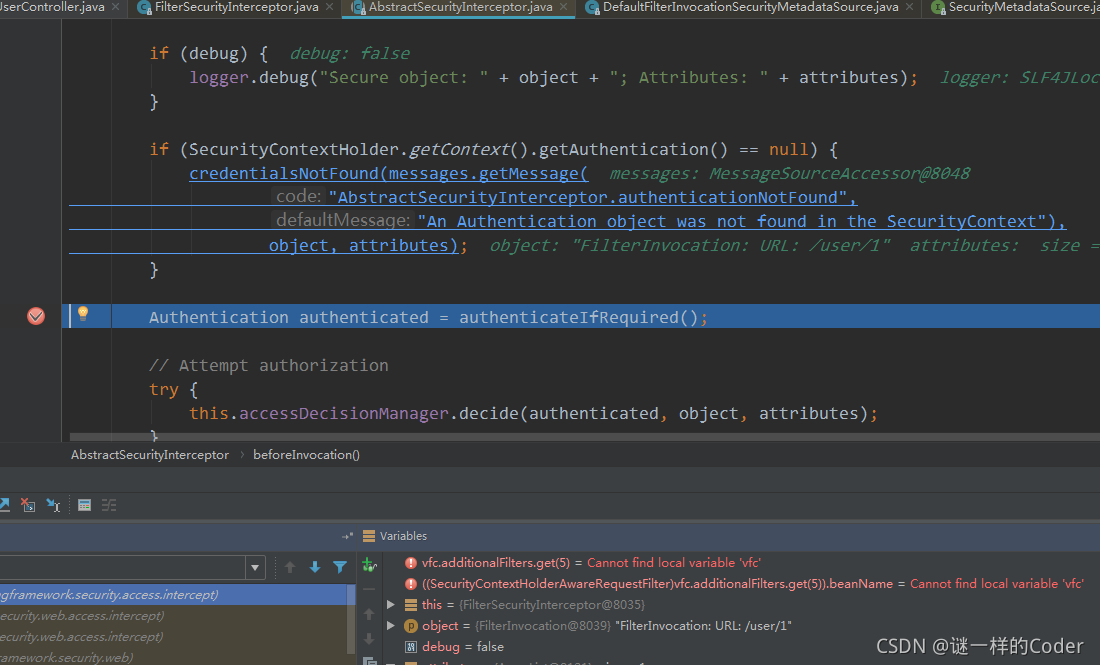
如图中高亮的哪一行代码。就是获取spring security中的Authentication信息。至此,请求信息,配置信息,认证信息在FilterSecurityInterceptor中都获取到了,需要做的就是将这些信息封装并交给投票决策管理器
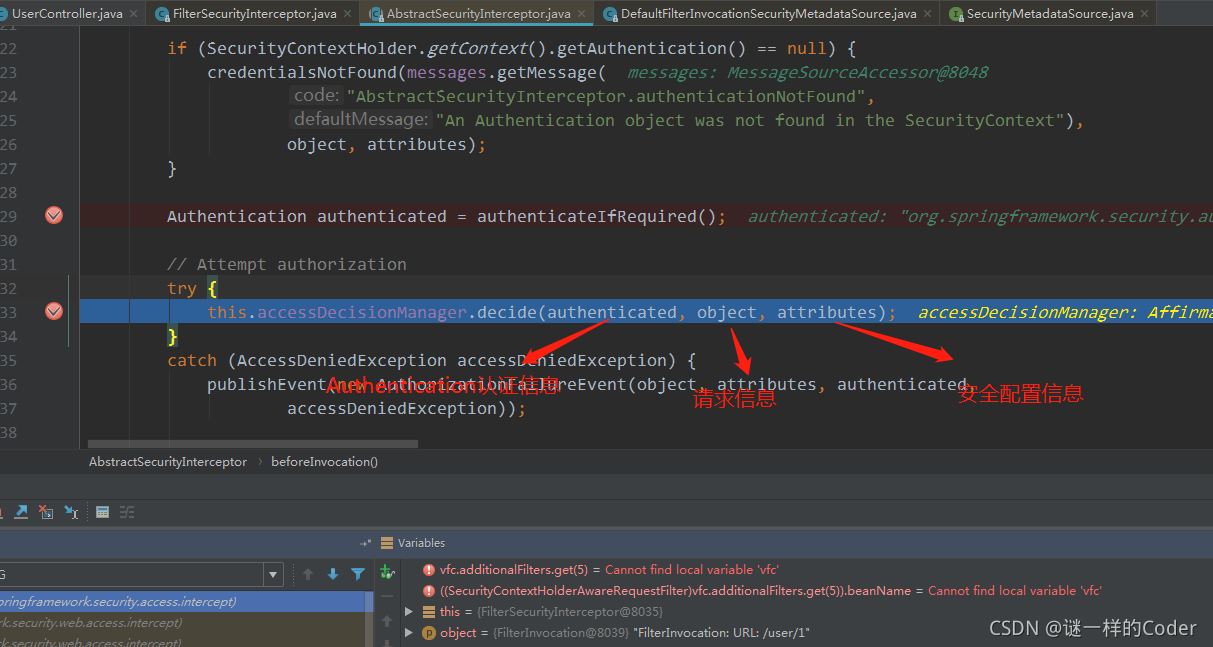
可以看到这个decide有三个具体的实现类

spring security默认的是第一个,这个投票器的决策是只要有一个相关信息认证不通过,则投票结果为不通过
由于我们是没有进行登录,就访问业务接口并开启了调试,因此到这里的认证结果为不通过

最后由于不通过,则会抛出一个访问拒绝的异常,这个异常会抛给上层——FilterSecurityInterceptor,FilterSecurityInterceptor捕获该异常之后,会继续抛出,由过滤器链上的ExceptionTranslationFilter进行处理,这部分源码就不继续debug跟踪了。
debug之后
在未认证的情况下,访问需要相关权限的业务接口,debug跟踪源码之后,我们进行一个小结,我个人认为在读取到配置信息的时候,针对/user/*的url,最终读取的attribute的表达式为hasRole(“ADMIN”)。之后具体的投票器解析权限认证表达式,决定当前请求是否通过,这个是整个权限认证的核心流程。只需要知道这一点即可。
这里解释一下hasRole方法,源码如下:
//以下方法位于:org.springframework.security.config.annotation.web.configurers.ExpressionUrlAuthorizationConfigurer.AuthorizedUrl#hasRole
//hasRole的入口方法
public ExpressionInterceptUrlRegistry hasRole(String role) {


	return access(ExpressionUrlAuthorizationConfigurer.hasRole(role));
}
//源码位于:org.springframework.security.config.annotation.web.configurers.ExpressionUrlAuthorizationConfigurer#hasRole
//上述hasRole的调用方法,我们传入的是ADMIN
private static String hasRole(String role) {


	Assert.notNull(role, "role cannot be null");
	if (role.startsWith("ROLE_")) {

    //如果我们指定的权限名为“ROLE_"开头,则会抛出提示异常。
		throw new IllegalArgumentException(
				"role should not start with 'ROLE_' since it is automatically inserted. Got '"
						+ role + "'");
	}
    //默认会加上“ROLE_"的前缀,并形成”hasRole('ROLE_ADIMIN)'“的权限表达式
	return "hasRole('ROLE_" + role + "')";
}
可以看到spring security中会默认根据我们传入的ADMIN权限,默认形成"hasRole(‘ROLE_ADIMIN)’"的权限表达式
。这也是为什么我们需要在自定义的UserDetailsServer中构造指定用户权限的时候,需要加"ROLE_"的前缀。
总结
spring security 权限认证的helloworld,以及简单的源码梳理与解析。
相关代码地址:spring security开头的项目。