前置:new Vue 做了什么
在看 provide inject 之前,最好先知道 new Vue 都做了什么(用的案例是 provide inject 那个)
- Vue 的庐山真面目就在此,实际上就是一个用 Function 实现的类,我们只能通过
new Vue去实例化它
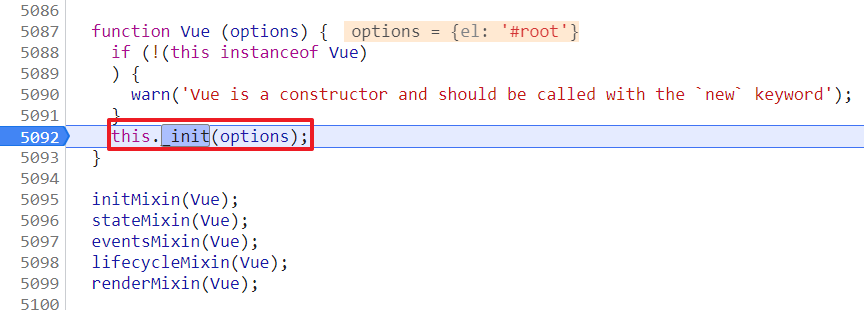
- 在
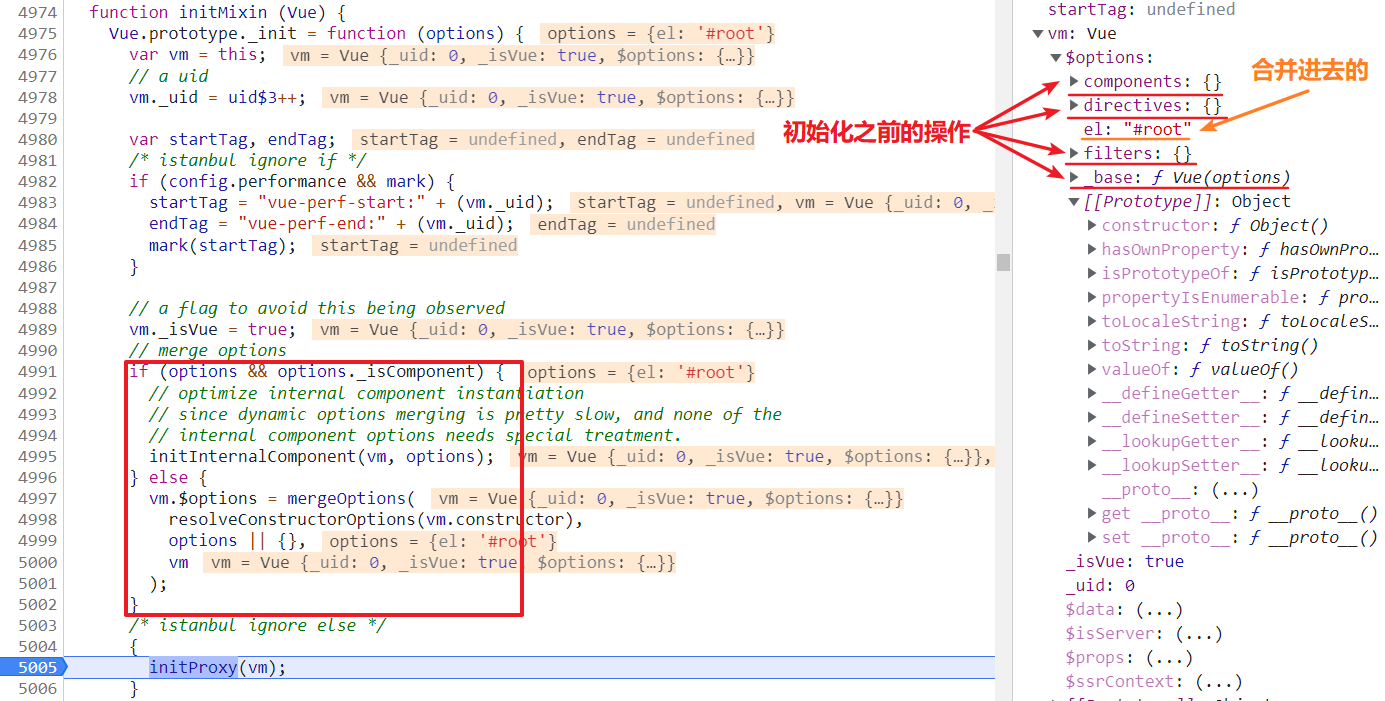
this._init(options)执行之前,除了给它的原型 prototype 扩展方法,还会给 Vue 这个对象扩展全局静态方法(set、delete、nextTick… -> 挂载到 Vue ASSET_TYPES[component|directive|filter] 和 _base(Vue 实例) -> 挂载到 Vue.options),这部分代码搜索initGlobalAPI,这里就不举例了 - Vue 初始化主要干了如下几件事情:
- 合并配置(options)
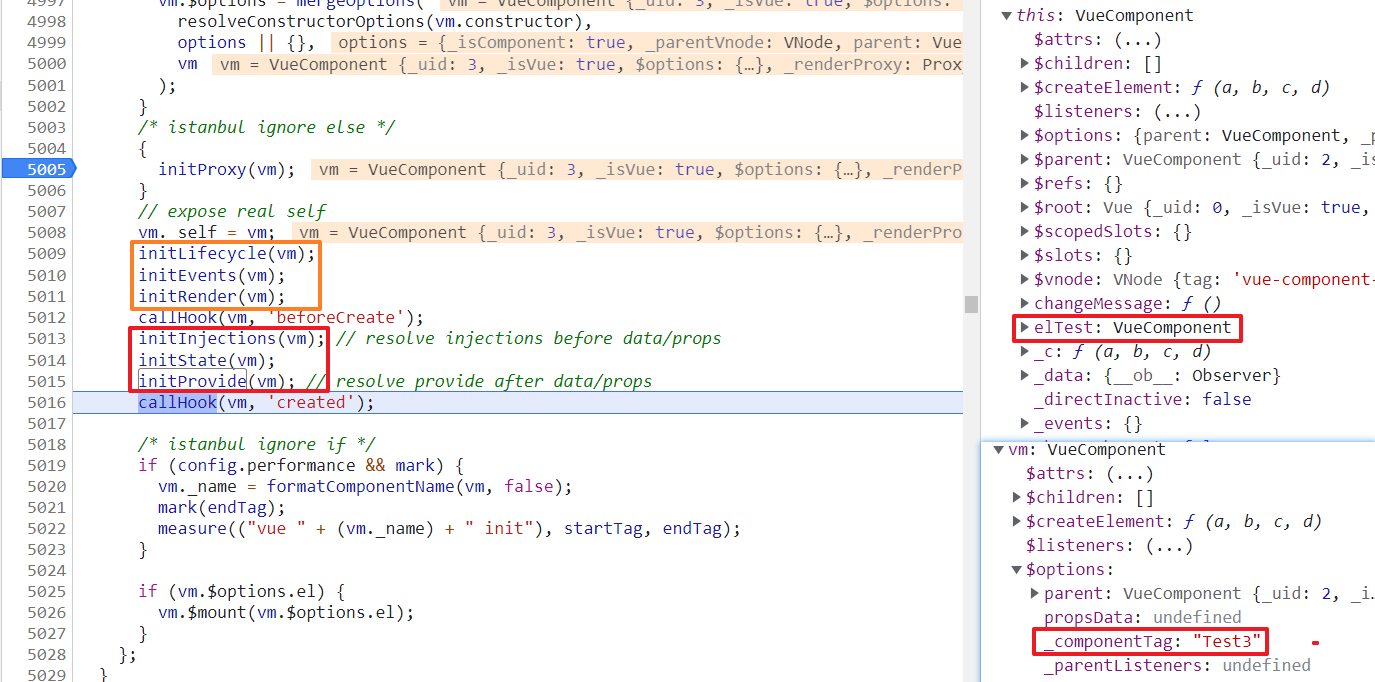
- 初始化生命周期(initLifecycle)、初始化事件中心(initEvents)、初始化渲染(initRender)在
beforeCreate之前 - 初始化 inject、初始化状态[props、methods、data、watach](initState)、初始化provide 在
beforeCreate之后在created之前 - 最后调用
vm.$mount
现在再看 provide 和 inject 就会好很多了
provide inject
provide inject 为了提高更好的跨组件解决方案
官方文档:provide / inject
provide 应该是一个对象或返回对象的函数,该对象可注入其子孙的 property
inject 应该是一个字符串数组或一个对象(key 是本地绑定名)
注意:provide 和 inject 绑定并不是可响应的。然后,如果你传入了一个可监听的对象,那么其对象的 property 还是可响应的

<body>
  <div id="root">
    <Test></Test>
  </div>
  <script>
    function registerPlugin() {


      Vue.component('Test', {


        template: '<div>{

      {message}}<Test2 /></div>',
        provide() {


          return {


            elTest: this
          }
        }, // function 的用途是为了获取运行时环境,否则 this 将指向 window
        data() {


          return {


            message: 'message from Test'
          }
        },
        methods: {


          change(component) {


            this.message = 'message from ' + component
          }
        }
      })
      Vue.component('Test2', {


        template: '<Test3 />'
      })
      Vue.component('Test3', {


        template: '<button @click="changeMessage">change</button>',
        inject: ['elTest'],
        methods: {


          changeMessage() {


            this.elTest.change(this.$options._componentTag)
          }
        }
      })
    }
    Vue.use(registerPlugin)
    new Vue({


      el: '#root'
    })
  </script>
</body>
-
通过 provide 将它的属性/方法/数据…甚至 Vue(this) 暴露出去,提供给子孙后代使用
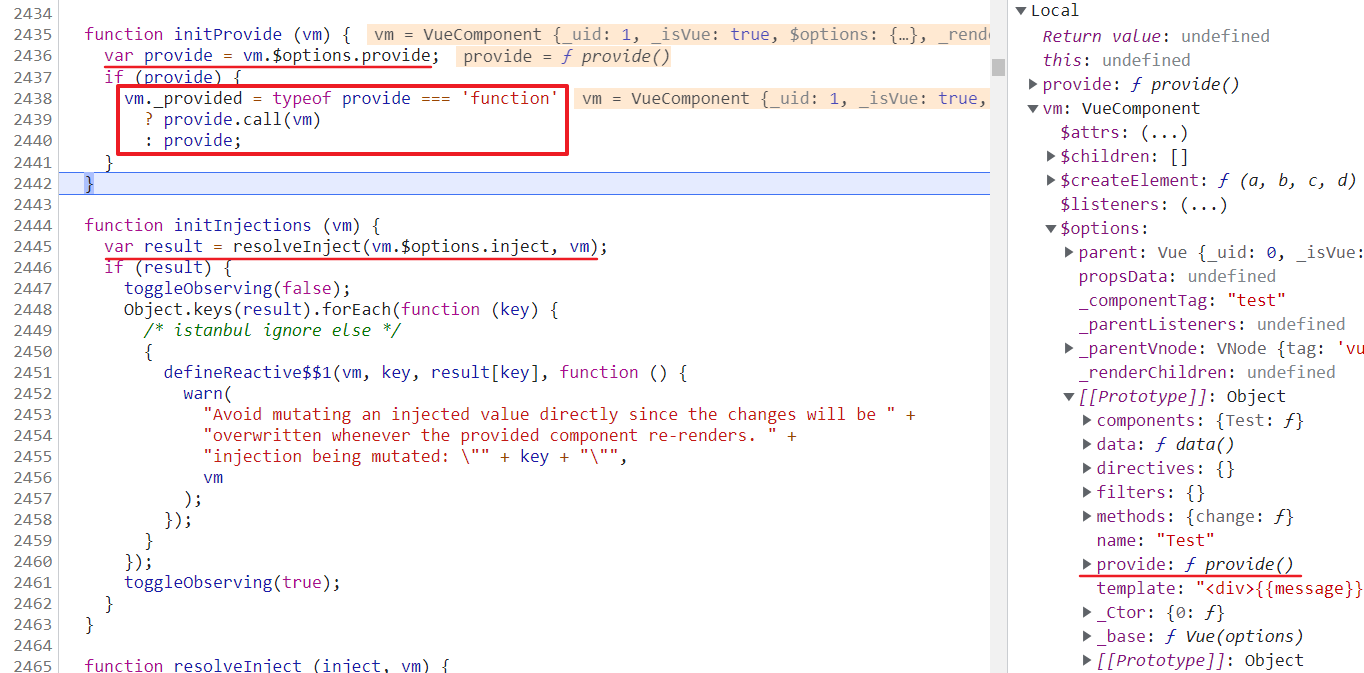
provide() { return { elTest: this } },provide 会先挂载到vm.options上,最后挂载到vm._provided上 -
inject 先挂载到
vm.options上,最后挂载到vm(VueComponent) 上,之后可以直接通过 this 获取获取组件名称:通过
this.$options._componentTag
前置:Vue 实例挂载的实现
在看 filter 之前,最好先知道 $mount 都做了什么(用的案例是 filter 那个)
- 在
Vue.prototype._init执行时,会执行vm.$mount,Vue.$mount
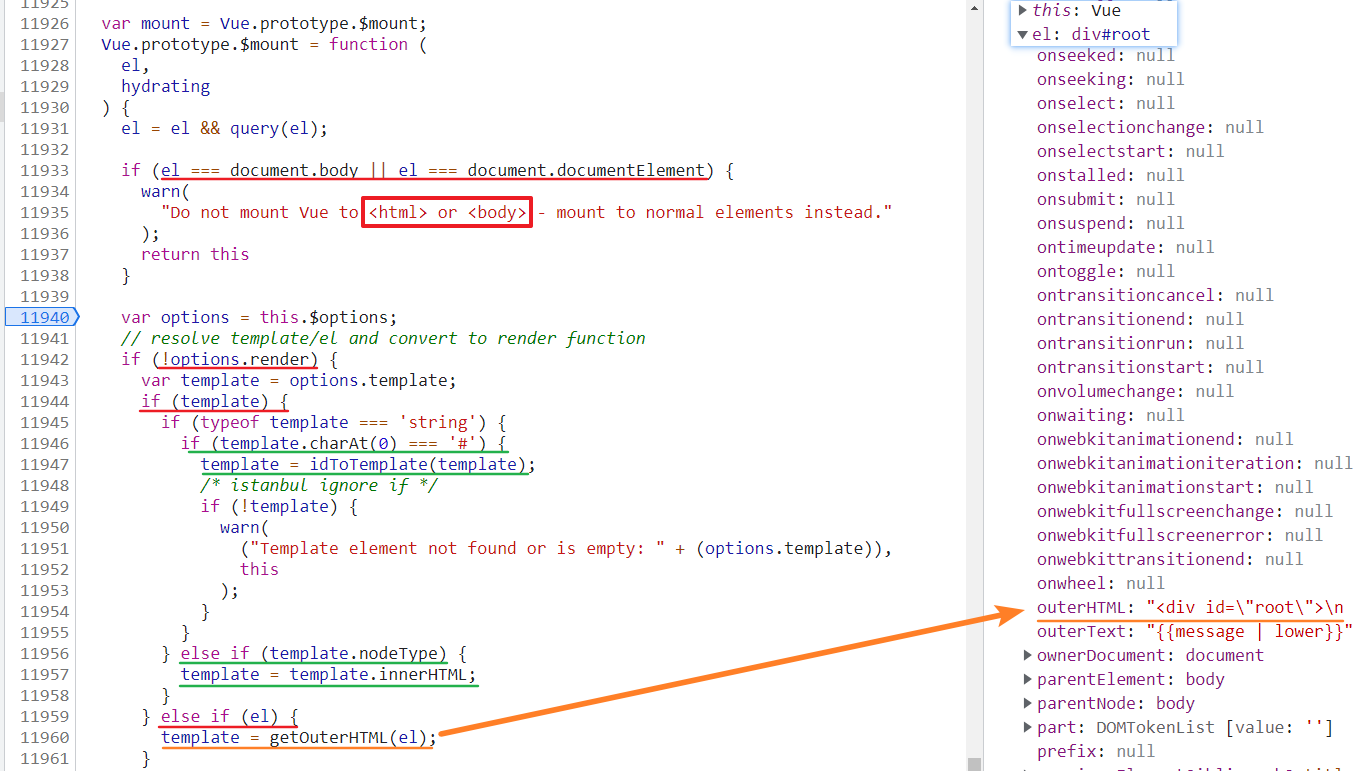
- 对
el做了限制,Vue 不能挂载到 body、html 这样的根节点上 - 如果没有定义
render方法,则会把el或template字符串转换成render方法 - 最终 Vue 只认 render 函数,有了 render 函数就会调用 mount 方法
mount.call(this, el, hydrating)(var mount = Vue.prototypr.$mount,方法挂载在原型上$mount)
$mount 方法支持传入两个参数
- 第一个参数是
el,表示挂载的元素,可以是字符串,也可以是 DOM 对象,如果是字符串浏览器环境下会调用query方法转换成 DOM 对象 - 第二个参数和服务端渲染有关,在浏览器环境下不需要传第二个参数
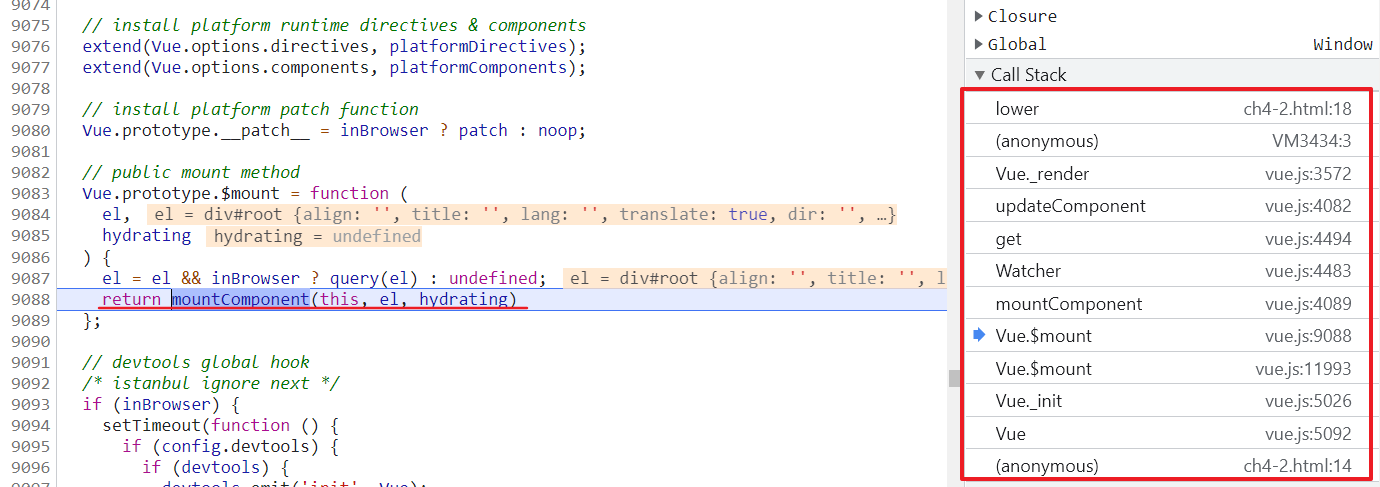
之后会执行 mountComponent 方法
- 判断 render 是否符合规范,之后会执行
beforeMounted钩子函数 mountComponent核心就是先实例化一个渲染Watcher,它的回调函数中会调用updateComponent方法,在此方法中调用vm._render方法生成虚拟 Node,最终调用vm._render更新 DOM- 最后判断
vm._isMounted为 true,表示这个实例已经挂载了,同时执行mounted钩子函数

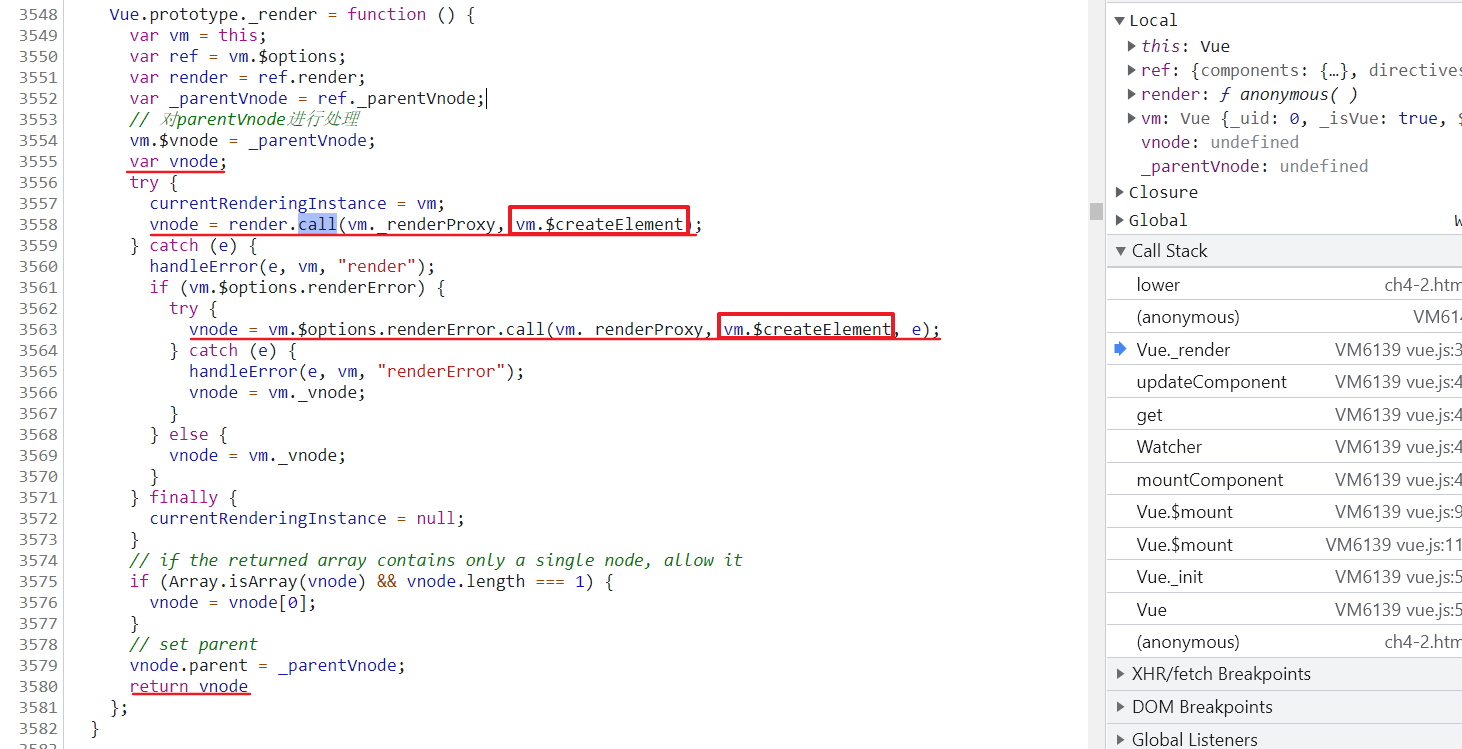
在 mountComponent 方法中会执行 vm._update(vm._render(), hydrating) ,vm._render 最终是通过执行 vm.$createElement 方法并返回 vnode (它是一个虚拟 Node)
vm.$createElement实际上就是在执行 createElement,涉及到虚拟 DOM ,代码很复杂这里就不展示了
<div id="app">
  {

   { message }}
</div>
<!-- 上面和下面是等价的 -->
<script>
render: function (createElement) {


  return createElement('div', {


     attrs: {


        id: 'app'
      },
  }, this.message)
}
</script>
现在再看 filter 就会好很多了
filter
<body>
  <div id="root">
    {

   {message | lower}}
  </div>
  <script>
    new Vue({


      el: '#root',
      filters: {


        lower(value) {


          return value.toLowerCase()
        }
      },
      data() {


        return {


          message: 'Hello Vue'
        }
      }
    })
  </script>
</body>
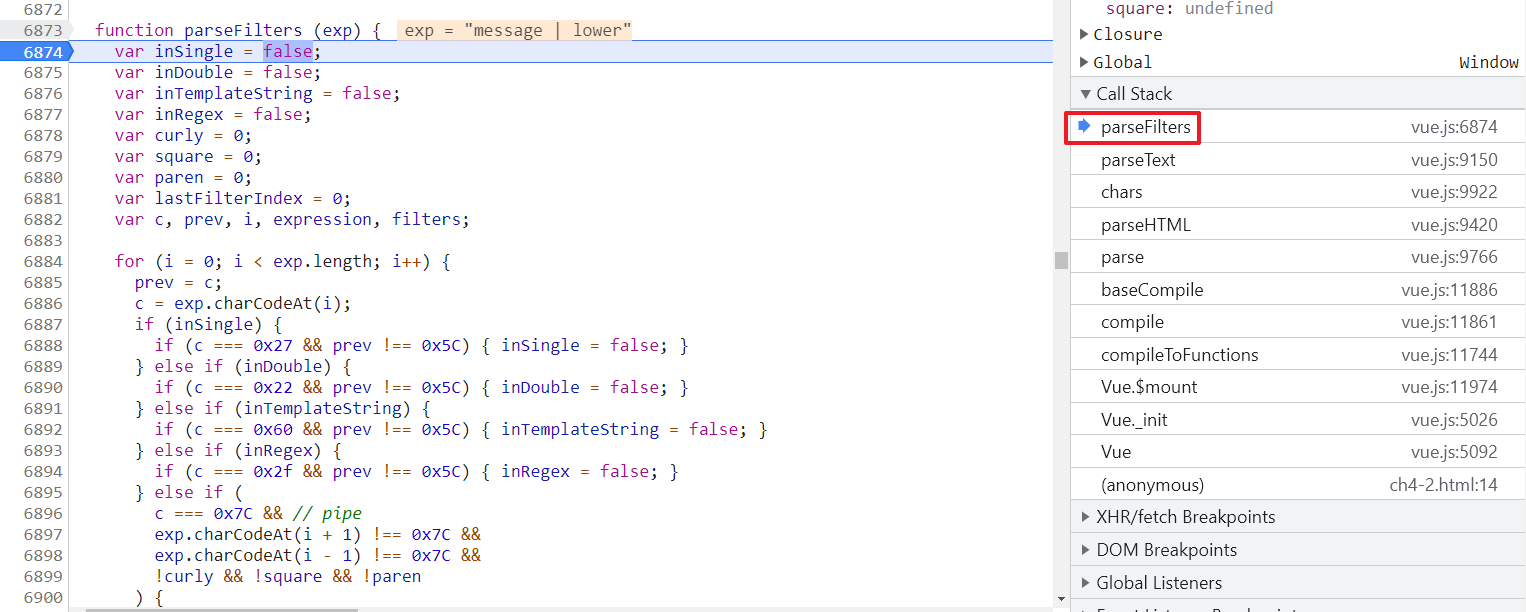
(anonymous) 最终生成的 render 函数是这样的,并在 update 里执行 render 函数
- 可以看出,过滤器是对这个状态的包裹
(function anonymous() {


  with (this) {


    return _c('div', {

     attrs: {

     id: 'root' } }, [_v('\n' + _s(_f('lower')(message)) + '\n')])
  }
})
前置:侦听属性
在看 watch 之前,最好先知道 watch 都做了什么(用的案例是 watch 那个)
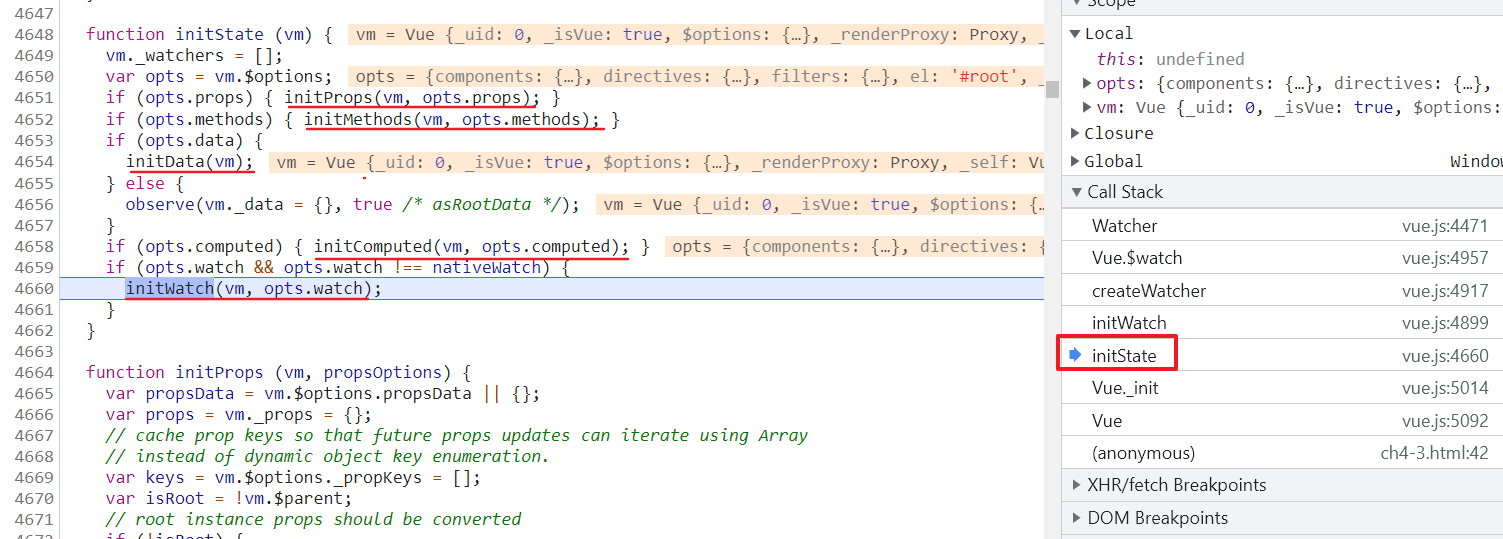
侦听属性的初始化 initWatch 是在 Vue 的实例初始化阶段 initState 函数中
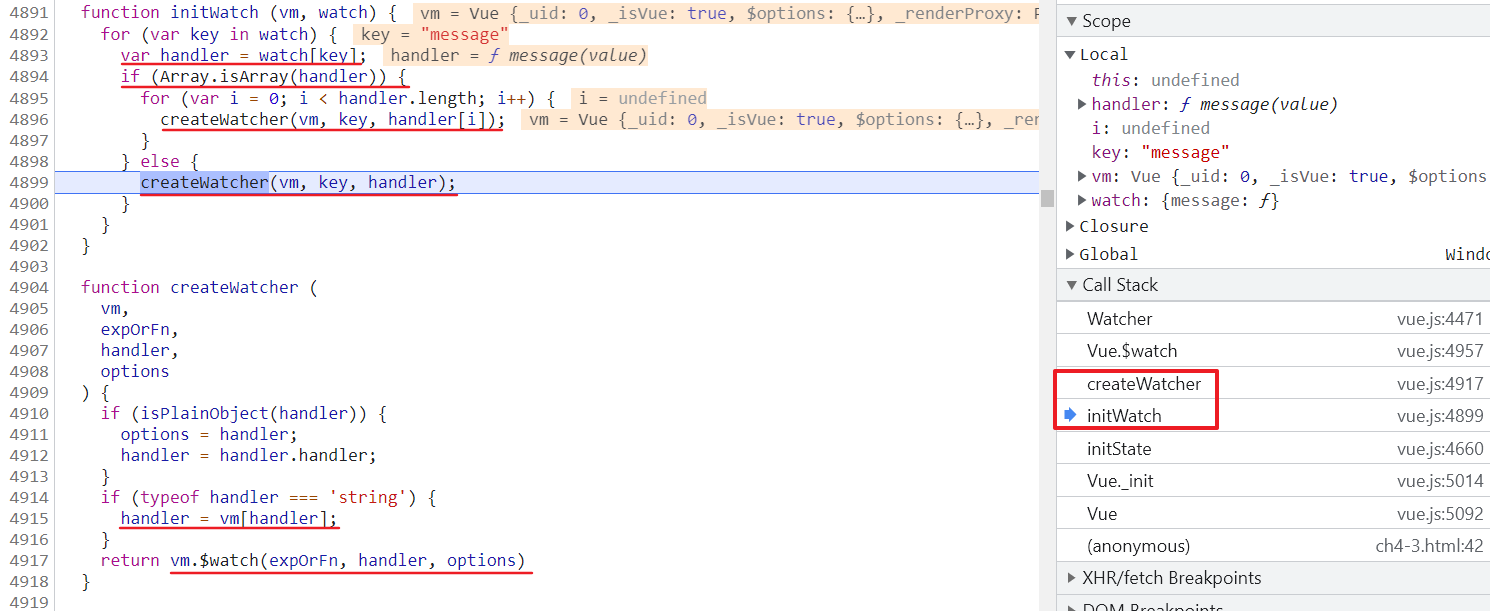
initWatch 对 watch 对象进行了遍历,拿到每一个 handler(可能是数组、函数、普通对象), 如果 handler 是一个数组,则遍历这个数组,调用 createWatcher 方法。最后执行 vm.$watch 方法
- 如果
handler是一个对象,则取对象里的 handler 这个方法 - 如果
handler是一个字符串,则取vm[handler]看是否有这个 method
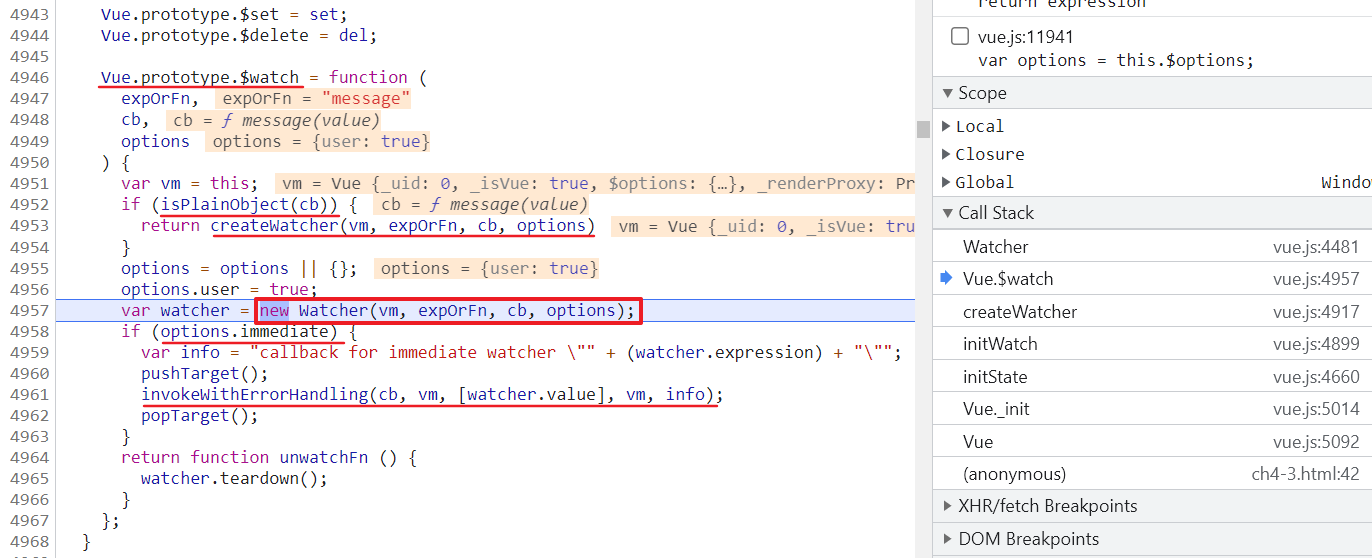
$watch 方法挂载 Vue 原型上
- 首先对
cb类型进行判断(因为在 Vue 实例上可以直接调用vm.$watch方法,可以直接传入一个对象或函数) - 如果设置了
immediate,则会直接执行回调函数cb - 最后返回了一个
unwatchFn方法,它会调用teardown方法去移除这个watcher
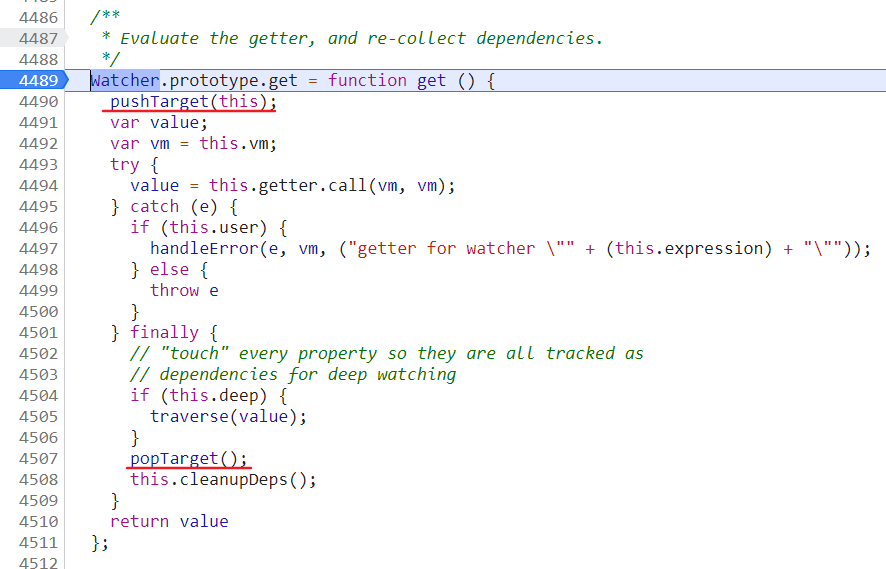
Watcher 的构造函数中对 options 做了处理,所以 watcher 对应有 4 种类型,分别是 deep watcher、user watcher、computed watcher 和 sync watcher
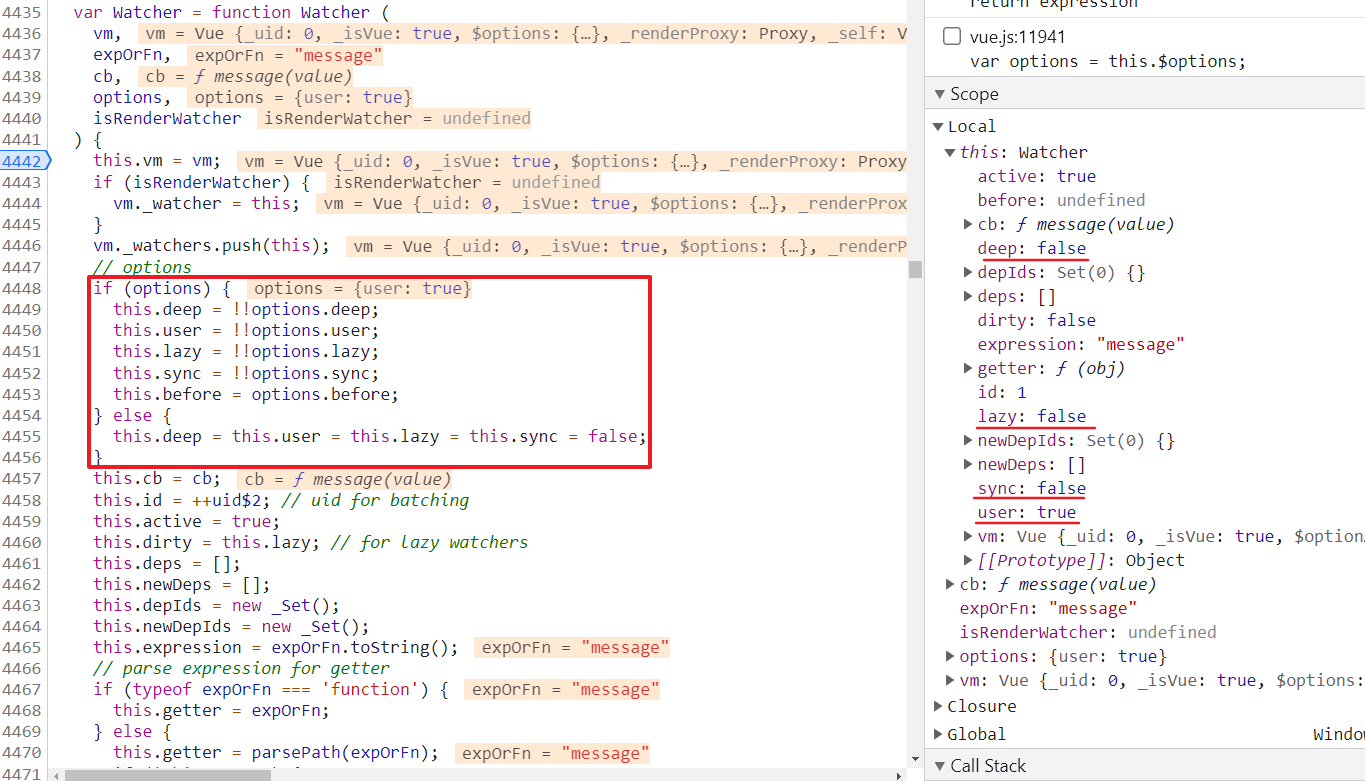
deep watcher:在watcher执行get求值的过程中if (this.deep) traverse(value),实际上就是对一个对象做深层次遍历,因为遍历过程中就是对一个子对象的访问,会触发它们的 getter 过程,这样就可以收集到依赖,也就是订阅它们变化的watcheruser watcher:通过vm.$watcher创建的 watch 是一个user watcher,其功能为:在对watcher求值以及在执行回调函数的时候会处理一下错误computed watcher:一旦对计算属性依赖的数据做修改,就会触发 setter 过程,通知所有订阅它的变化的 watcher 更新,执行watcher.update()方法sync watcher:默认的 userWatcher 都是异步的(当响应式数据发生变化后,触发watcher.update(),只是把这个 watcher 推送到一个队列中),在 nextTick 才会真正执行 watcher 回调函数,如果给 watch 配置sync: true,则会同步执行(让它的执行顺序提前)
最后就是走 get 收集依赖的过程,这个地方比较复杂,暂时先跳过。现在再看 watcher 就会好很多了
watch
Watch 用法1:常见用法(函数)
在 initWatch 里 handler 是一个函数,因为最后 $watch 中的 cb (对应 handler)希望格式就是函数,所以不会对其进行其它处理
<body>
  <div id="root">
    <h3>Watch 用法1:常见用法</h3>
    <input v-model="message">
    <span>{

   { copyMessage }}</span>
  </div>
  <script>
    new Vue({


      el: '#root',
      watch: {


        message(value) {


          this.copyMessage = value
        }
      },
      data() {


        return {


          message: 'Hello Vue',
          copyMessage: ''
        }
      }
    })
  </script>
</body>
Watch 用法2:绑定方法
在 initWatch 里 handler 是一个字符串,需要去 Vue 实例上去找这个方法 handler = vm[handler] ,之后跟用法 1 流程是一样的了
<body>
  <div id="root2">
    <h3>Watch 用法2:绑定方法</h3>
    <input v-model="message">
    <span>{

   { copyMessage }}</span>
  </div>
  <script>
    new Vue({


      el: '#root2',
      watch: {


        message: 'handleMessage'
      },
      data() {


        return {


          message: 'Hello Vue',
          copyMessage: ''
        }
      },
      methods: {


        handleMessage(value) {


          this.copyMessage = value
        }
      }
    })
  </script>
</body>
Watch 用法3:deep + handler
在 watcher 执行 get 求值的过程中 if (this.deep) traverse(value) ,实际上就是对一个对象做深层次遍历。watcher 默认不能监听对象内部属性的改变,此时需要用 deep 属性对对象进行深度监听
<body>
  <div id="root3">
    <h3>Watch 用法3:deep + handler</h3>
    <input v-model="deepMessage.a.b">
    <span>{

   { copyMessage }}</span>
  </div>
  <script>
    new Vue({


      el: '#root3',
      watch: {


        deepMessage: {


          handler: 'handleDeepMessage',
          deep: true
        }
      },
      data() {


        return {


          deepMessage: {


            a: {


              b: 'Deep Message'
            }
          },
          copyMessage: ''
        }
      },
      methods: {


        handleDeepMessage(value) {


          this.copyMessage = value.a.b
        }
      }
    })
  </script>
</body>
Watch 用法4:immediate + handler
在 $watch 里对 immediate 进行了判断,如果为 true,会在创建完 Watcher 后立即执行一次
<body>
  <div id="root">
  <div id="root4">
    <h3>Watch 用法4:immediate</h3>
    <input v-model="message">
    <span>{

   { copyMessage }}</span>
  </div>
  <script>
    new Vue({


      el: '#root4',
      watch: {


        message: {


          handler: 'handleMessage',
          immediate: true,
        }
      },
      data() {


        return {


          message: 'Hello Vue',
          copyMessage: ''
        }
      },
      methods: {


        handleMessage(value) {


          this.copyMessage = value
        }
      }
    })
  </script>
</body>
Watch 用法5:绑定多个 handler
- userWatch 几乎都是异步的它会按顺序执行
- 如果 handler 是一个数组,会遍历这个数组,调用
createWatcher方法。最后执行vm.$watch方法
<body>
  <div id="root5">
    <h3>Watch 用法5:绑定多个 handler</h3>
    <input v-model="message">
    <span>{

   { copyMessage }}</span>
  </div>
  <script>
    new Vue({


      el: '#root5',
      watch: {


        message: [{


          handler: 'handleMessage',
        },
        'handleMessage2',
        function(value) {


          this.copyMessage = this.copyMessage + '...'
        }]
      },
      data() {


        return {


          message: 'Hello Vue',
          copyMessage: ''
        }
      },
      methods: {


        handleMessage(value) {


          this.copyMessage = value
        },
        handleMessage2(value) {


          this.copyMessage = this.copyMessage + '*'
        }
      }
    })
  </script>
</body>
Watch 用法6:监听对象属性
这种直接监听某个属性,而不使用 deep: true 会减少性能开销
<body>
  <div id="root6">
    <h3>Watch 用法6:监听对象属性</h3>
    <input v-model="deepMessage.a.b">
    <span>{

   {copyMessage}}</span>
  </div>

  <script>
    new Vue({


      el: '#root6',
      watch: {


        'deepMessage.a.b': 'handleMessage'
      },
      data() {


        return {


          deepMessage: {

       a: {

       b: 'Hello Vue' } },
          copyMessage: ''
        }
      },
      methods: {


        handleMessage(value) {


          this.copyMessage = value
        }
      }
    })
  </script>
</body>
class style
<body>
  <h2 class="title">
    <a href="../index.html" style="text-decoration: none; color: #2c3e50">>back</a>
  </h2>
  <div id="root">
    <div :class="['active', 'normal']">数组绑定多个class</div>
    <div :class="[{active: isActive}, 'normal']">数组包含对象绑定class</div>
    <div :class="[showWarning(), 'normal']">数组包含方法绑定class</div>
    <div :style="[warning, bold]">数组绑定多个style</div>
    <div :style="[warning, mix()]">数组包含方法绑定style</div>
    <div :style="{ display: ['-webkit-box', '-ms-flexbox', 'flex'] }">style多重值</div>
  </div>

  <script>
    new Vue({


      el: '#root',
      data() {


        return {


          isActive: true,
          warning: {


            color: 'orange'
          },
          bold: {


            fontWeight: 'bold'
          }
        }
      },
      methods: {


        showWarning() {


          return 'warning'
        },
        mix() {


          return {


            ...this.bold,
            fontSize: 20
          }
        }
      }
    })
  </script>
</body>
数组结合对象/表达式
/* 最后展示效果 */
class="active normal" class="normal"
/* 实现方式 */
:class="[{

    active: isActive} 'normal']"
:class="(isActive ? 'active': '') + ' normal'"
Vue2.3+ 新特性
<!-- 从后往前,哪个兼容用哪个 -->
<div :style="{ display: ['-webkit-box', '-ms-flexbox', 'flex'] }"></div>
Vue.observe
用法:让一个对象可响应。Vue 内部会用它来处理 data 函数返回的对象。返回的对象可以直接用于渲染函数和计算属性内,并且会在发生变更时触发相应的更新。也可以作为最小化跨组件状态存储器,用于简单的场景(简单场景下可以代替 vuex)
<body>
  <h2 class="title">
    <a href="../index.html" style="text-decoration: none; color: #2c3e50">>back</a>
  </h2>
  <div id="root">
    {

   {message}}
    <button @click="change">Change</button>
  </div>
  <script>
    const state = Vue.observable({

       message: 'Vue 2.6' })
    const mutation = {


      setMessage(value) {


        state.message = value
      }
    }
    new Vue({


      el: '#root',
      computed: {


        message() {


          return state.message
        }
      },
      methods: {


        change() {


          mutation.setMessage('Vue 3.0')
        }
      }
    })
  </script>
</body>
在 Vue 初始化过程中,在 this._init(options) 执行之前,除了给它的原型 prototype 扩展方法,还会给 Vue 这个对象扩展全局静态方法 initGlobalAPI ,Vue.observable 初始化就在其中
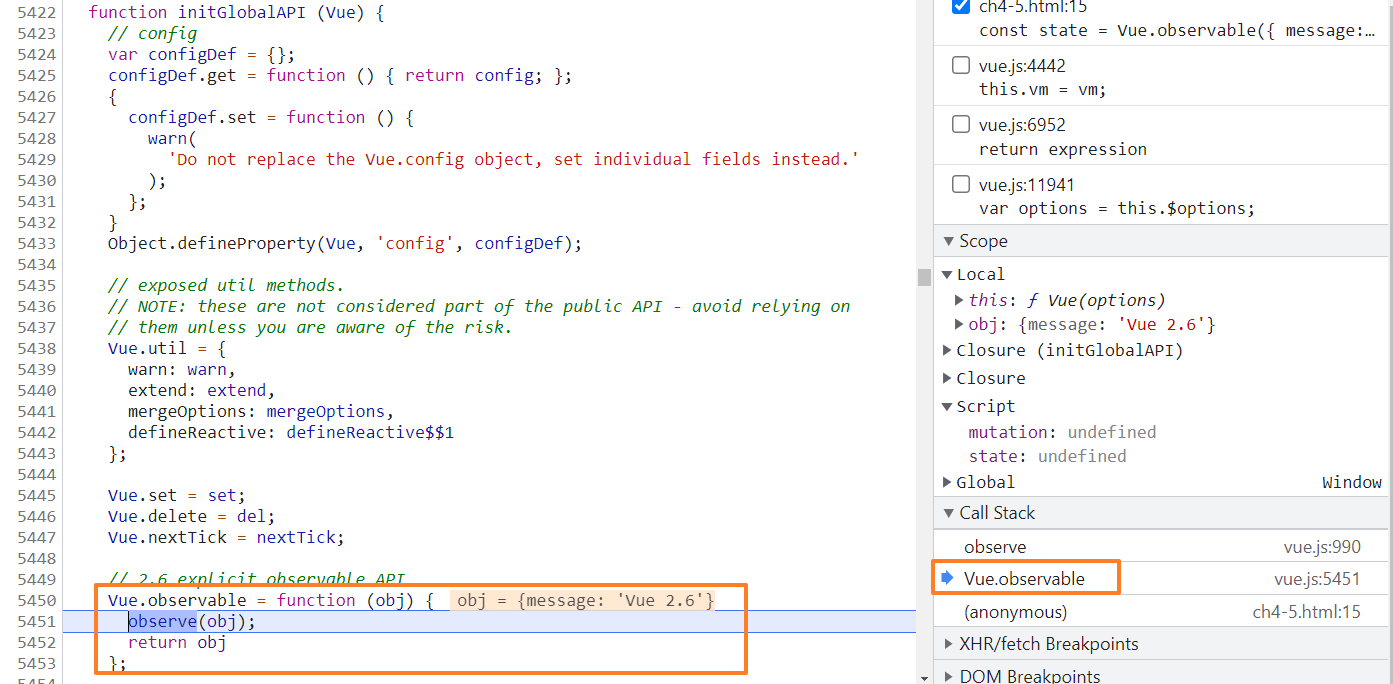
observe 传进来的参数最起码需要满足是一个对象。 observe 方法的作用:给非 VNode 的对象类型添加一个 Observer,如果已经添加过则直接返回,否则在满足一定条件下去实例化一个 Observer 对象实例
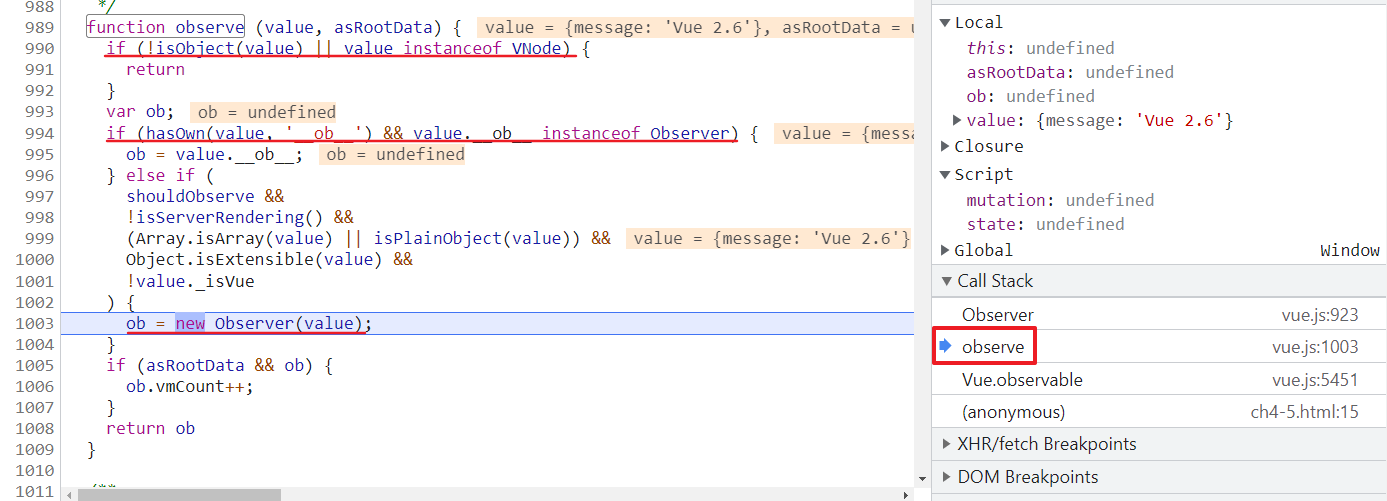
new Observer(value) ,最后会执行 walk 方法,该方法是遍历对象 key 调用 defineReactive 方法,使其变成一个响应式对象

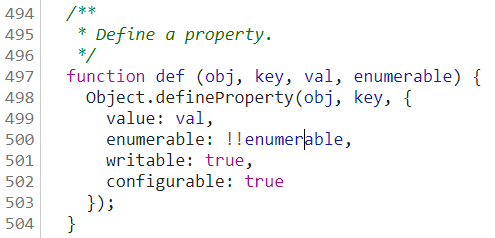
方法 def 就是对 Object.defineProperty 方法进行了封装
目的是给 value 添加 __ob__ 这个属性,并且这个属性值指向当前这个 Observer 实例
- 这样第一次定义以后,
function observe下一次会对同样对象直接返回__ob__ - 其次就是在 walk 方法中,防止其遍历
__ob__,因为第四个参数 enumerable 没有传,转换为布尔为 false,所以__ob__是不可枚举的。如果要这么写:value.__ob__ = this,则会对__ob__进行遍历
defineReactive 函数最开始初始化 Dep 对象实例,接着拿着 obj 的属性描述符,对子对象递归调用 observe 方法,这样我们访问或修改 obj 中的一个嵌套较深的属性,也能触发 getter 和 setter
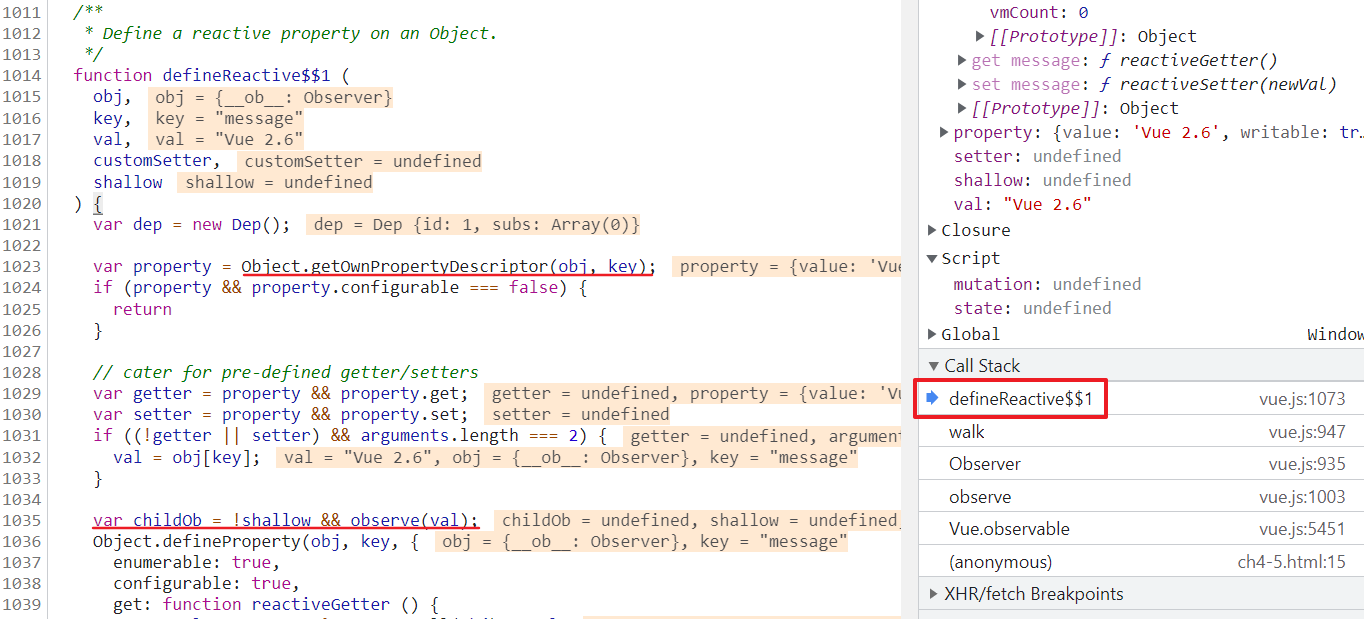
- get 做的事情是依赖收集,把值获取到直接返回
- set 做的事情是派发更新(响应式更新
dep.notify())

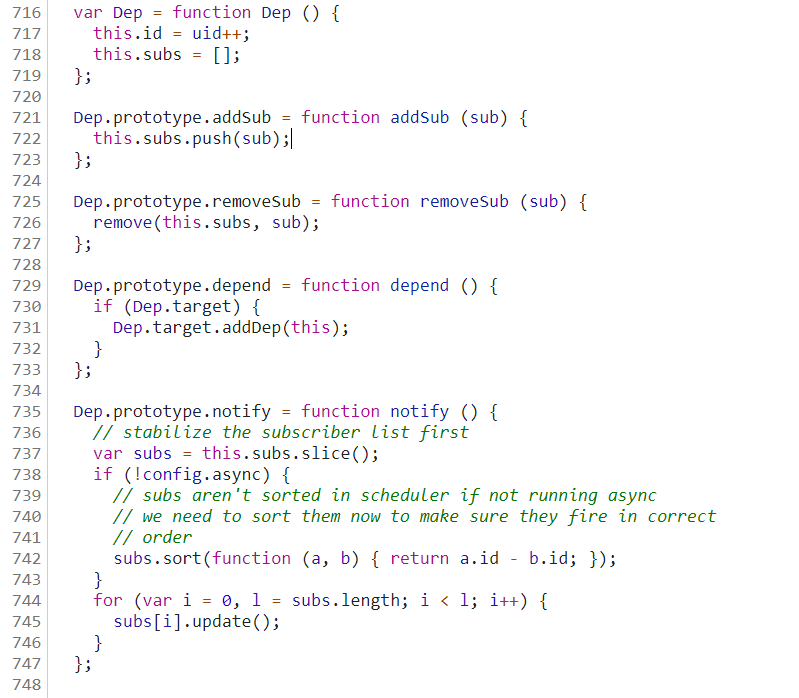
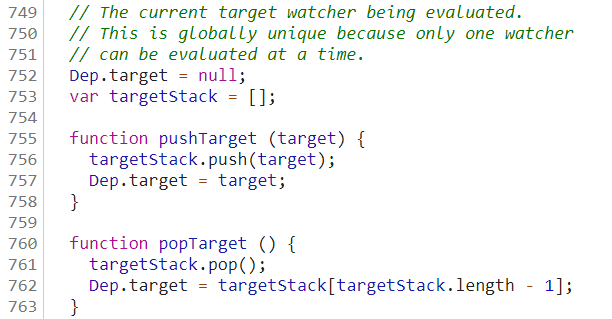
if (Dep.target) dep.depend() ,收集当前正在计算的 Watcher,把这个 Watcher 作为订阅者。Dep 实际上就是对 Watcher 的一种管理
最终 obj,会有 __ob__ 这样一个 Observe 实例,变成一个响应式对象(访问时触发 getter 逻辑、修改时触发 setter 逻辑)
slot
案例 1:
-
带 name 属性
name="header"为具名插槽,该slot绑定了两个变量user -> obj、section -> header -
不带
name属性为匿名插槽(默认插槽 default),该slot绑定了两个变量user -> obj、section -> bodyv-slot以前是用slot-scoped这种写法
<body>
  <div id="root">
    <div>案例1:slot的基本用法</div>
    <Test>
      <template v-slot:header="{user}">
        <div>自定义header({

   {user.a}})</div>
      </template>
      <template v-slot="{user}">
        <div>自定义body({

   {user.b}})</div>
      </template>
    </Test>
  </div>
  <script>
    Vue.component('Test', {


      template:
        '<div>' +
          '<slot name="header" :user="obj" :section="\'header\'">' +
            '<div>默认header</div>' +
          '</slot>' +
          '<slot :user="obj" :section="\'body\'">默认body</slot>' +
        '</div>',
      data() {


        return {


          obj: {

       a: 1, b: 2 }
        }
      }
    })
    new Vue({

       el: '#root' })
  </script>
</body>

<!-- 渲染结果 -->
<div id="root">
  <div>案例1:slot的基本用法</div>
  <div>
    <div>自定义header(1)</div>
    <div>自定义body(2)</div>
  </div>
</div>
案例2:
v-slot:[section]="{section}"是动态插槽,section -> 'header'- 点击按钮调用
change方法,切换section的值
<body>
  <div id="root2">
    <div>案例2:Vue2.6新特性 - 动态slot</div>
    <Test>
      <template v-slot:[section]="{section}">
        <div>this is {

   {section}}</div>
      </template>
    </Test>
    <button @click="change">switch header and body</button>
  </div>
  <script>
    Vue.component('Test', {


      template:
        '<div>' +
          '<slot name="header" :user="obj" :section="\'header\'">' +
            '<div>默认header</div>' +
          '</slot>' +
          '<slot :user="obj" :section="\'body\'">默认body</slot>' +
        '</div>',
      data() {


        return {


          obj: {

       a: 1, b: 2 }
        }
      }
    })
    new Vue({


      el: '#root2',
      data() {


        return {


          section: 'header'
        }
      },
      methods: {


        change() {


          this.section === 'header' ?
            this.section = 'default' :
            this.section = 'header'
        }
      }
    })
  </script>
</body>

<!-- 渲染结果 -->
<div id="root2">
  <div>案例2:Vue2.6新特性 - 动态slot</div>
  <div>
    <div>this is header</div>
      默认body
    </div>
  <button>switch header and body</button>
</div>
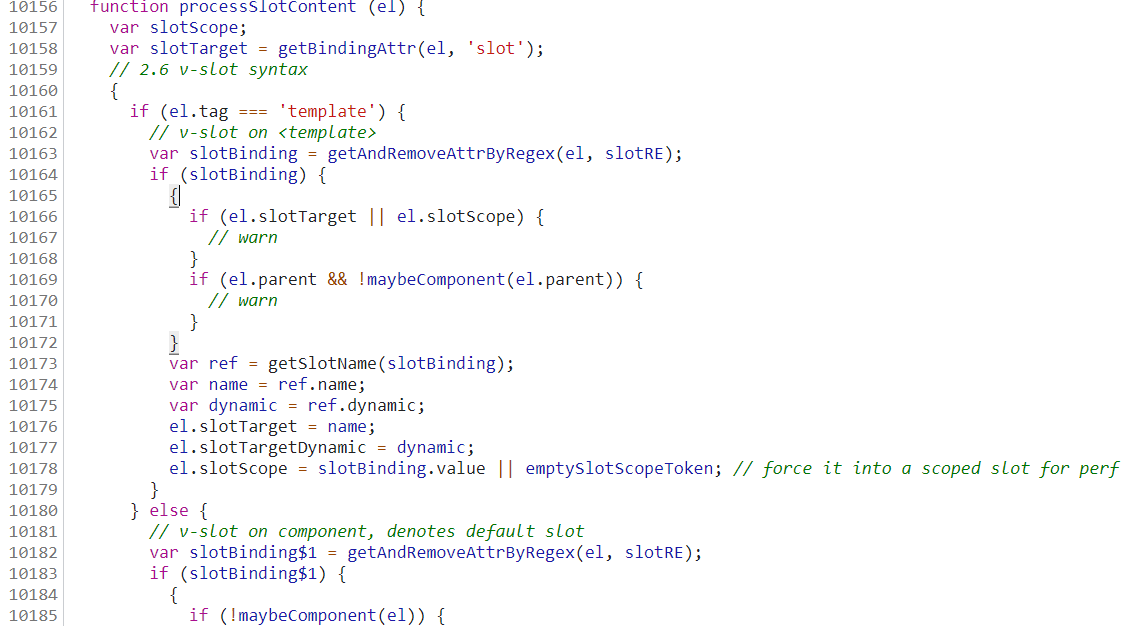
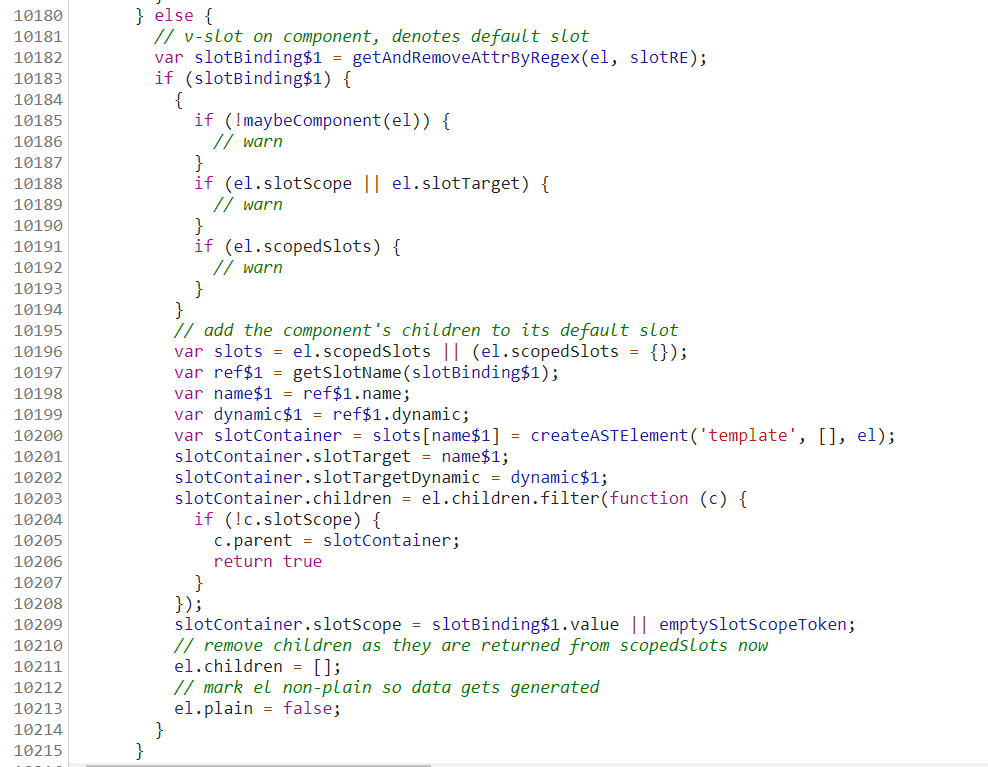
源码简读
在 parse 阶段会执行 processSlotContent 处理 slot ,当解析到标签上有 slot 属性的时候,会给对应的 AST 元素节点添加 slotTarget 属性(有 slot 就用对应的属性 -> 具名插槽,没有则用 defalult 属性 -> 默认插槽)
slot-scope 是 Vue2.5+ 新增的语法,slot-scope -> 作用域插槽,需要在 template 上使用,可以接受传递给插槽的 prop
- 用法:
<template slot="xxx"> <div slot-scope="xxx">

Vue 2.6+ 新增 v-slot ,v-slot 只能用在 component(组件也是用 template 包的) 和 template 上,v-slot 可以简写为 #