注:可参考百度推送IOS用户手册,控制台管理请参考百度推送IOS集成指南
版权所有,转载请注明出处,谢谢!
打开百度提供的SDK包,找到LibBPush文件夹,打开。删掉opensource文件夹里面的JSONKit.h和JSONKit.m(因为kony编译的IOS工程已经包含了这个类)
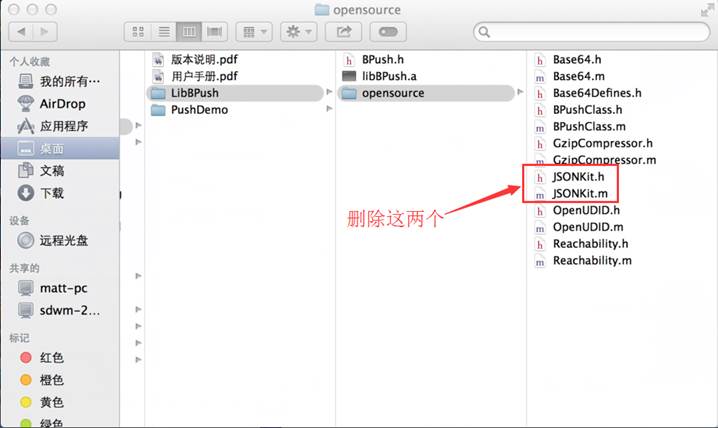
2. 删除了JSONKit这个类文件,对应的要删除其他文件(BpushClass.m)中引用了这个类的语句(#import “JSONKit.h”)
3. 修改一下几个地方的代码:
在OpenUDID.m
注释下面的代码
//static NSString * const kOpenUDIDDescription = @"OpenUDID_with_iOS6_Support";
    修改以下代码
CC_MD5( cStr, strlen(cStr), result );
修改为   CC_MD5( cStr, (CC_LONG)strlen(cStr), result );
@"%02x%02x%02x%02x%02x%02x%02x%02x%02x%02x%02x%02x%02x%02x%02x%02x%08x"
修改为   @"%02x%02x%02x%02x%02x%02x%02x%02x%02x%02x%02x%02x%02x%02x%02x%02x%08lx"
(NSUInteger)(arc4random() % NSUIntegerMax)];
    修改为   (unsigned long)(arc4random() % NSUIntegerMax)];
4. 创建并配置 BPushConfig.plist 文件(可以直接导出百度提供Demo下的plist文件,在工程下拷贝出来即可)
在工程中创建一个新的 Property List 文件,并命名为 BPushConfig.plist,添加以下键值:
“API_KEY” = “pDUCHGTbD346jt2klpHRjHp7”
“DEBUG” = NO
“BPUSH_CHANNEL” = “91”API_KEY:必选。百度开发者中心为每个 app 自动分配的 api key,在开发者中心 app 基本信息中可以查看。
PRODUCTION_MODE:必选。应用发布模式。开发证书签名时,值设为”NO”;发布证书签名时,值设为”YES”。请在调试和发布应用时,修改正确设置这个值,以免出现推送通知无法到达。
DEBUG:可选。Push SDK 调试模式开关,值为 YES 时,将打开 SDK 日志。
BPUSH_CHANNEL:可选。渠道号,云推送将会进行统计,在控制台可以看到统计结果。
5.下面集成最关键的代码:
在Xcode下新建一个类,这儿以iosbdpush类为例。
在iosbdpush.h中添加以下代码:
注意:iosbdpush类继承自NSObject → @interfa iosbdpush : NSObject
@property (strong, nonatomic) NSString *appId;
@property (strong, nonatomic) NSString *channelId;
@property (strong, nonatomic) NSString *userId;

+(id)shareInstance;
-(void)initBPush;
-(NSString *) getUserId_kony;
-(NSString *) getChannelId_kony;
-(void)setDeviceToken:(NSString *)deviceToken;
-(void)setPushAPIKey:(NSString *)apikey;
在iosbdpush.m中添加以下代码:
#import "BPush.h"
#import "OpenUDID.h"

@implementation iosbdpush
@synthesize appId, channelId, userId;

+(id)shareInstance
{
    return [[iosbdpush alloc] init];
}

-(void)initBPush
{
    NSLog(@"=======initBPush======");
    [BPush setupChannel:nil]; // 必须
    iosbdpush *obj = [[iosbdpush alloc] init];
    [BPush setDelegate:obj]; // 必须。参数对象必须实现onMethod: response:方法,本示例中为self

    //[BPush bindChannel];
    // [BPush setAccessToken:@"3.ad0c16fa2c6aa378f450f54adb08039.2592000.1367133742.282335-602025"];  // 可选。api key绑定时不需要,也可在其它时机调用
    NSString* phoneVersion = [[UIDevice currentDevice] systemVersion];
    NSLog(@"=========== phoneVersion:%@",phoneVersion);

    if ([[[UIDevice currentDevice] systemVersion] floatValue] >= 8.0) {
        UIUserNotificationType myTypes = UIRemoteNotificationTypeBadge | UIRemoteNotificationTypeAlert | UIRemoteNotificationTypeSound;
        UIUserNotificationSettings *settings = [UIUserNotificationSettings settingsForTypes:myTypes categories:nil];
        [[UIApplication sharedApplication] registerUserNotificationSettings:settings];

        UIApplication *application = [UIApplication sharedApplication];
        [application registerForRemoteNotifications];
    }else
    {
        UIRemoteNotificationType myTypes = UIRemoteNotificationTypeBadge|UIRemoteNotificationTypeAlert|UIRemoteNotificationTypeSound;
        [[UIApplication sharedApplication] registerForRemoteNotificationTypes:myTypes];
    }
}

-(NSString *) getUserId_kony
{
    return [BPush getUserId];
}
-(NSString *) getChannelId_kony
{
    return [BPush getChannelId];
}

-(void)setDeviceToken:(NSString *)deviceToken
{
    NSString *hexToken = [NSString stringWithFormat:@"<%@>",deviceToken];

    NSData* deviceTokenData = [self dataFromHexString:hexToken];
    NSLog(@"deviceTokenData NSData:%@",deviceTokenData);
    [BPush registerDeviceToken:deviceTokenData]; // 必须

    [BPush bindChannel]; // 必须。可以在其它时机调用,只有在该方法返回(通过onMethod:response:回调)绑定成功时,app才能接收到Push消息。一个app绑定成功至少一次即可(如果access token变更请重新绑定)。
}

// 必须,如果正确调用了setDelegate,在bindChannel之后,结果在这个回调中返回。
// 若绑定失败,请进行重新绑定,确保至少绑定成功一次
- (void) onMethod:(NSString*)method response:(NSDictionary*)data
{
    NSLog(@"On method:%@", method);
    NSLog(@"data:%@", [data description]);
    NSDictionary* res = [[[NSDictionary alloc] initWithDictionary:data] autorelease];
    if ([BPushRequestMethod_Bind isEqualToString:method])
    {
        NSString *appid = [res valueForKey:BPushRequestAppIdKey];
        NSString *userid = [res valueForKey:BPushRequestUserIdKey];
        NSString *channelid = [res valueForKey:BPushRequestChannelIdKey];

        NSLog(@"appid--userid--channelid==%@  %@  %@",appid, userid, channelid);
    }
}
//转换device token
-(NSData *) dataFromHexString:(NSString *) hexstr
{
    NSMutableData *data = [[NSMutableData alloc] init];
    NSString *inputStr = [hexstr uppercaseString];

    NSString *hexChars = @"0123456789ABCDEF";

    Byte b1,b2;
    b1 = 255;
    b2 = 255;
    for (int i=0; i<hexstr.length; i++) {
        NSString *subStr = [inputStr substringWithRange:NSMakeRange(i, 1)];
        NSRange loc = [hexChars rangeOfString:subStr];

        if (loc.location == NSNotFound) continue;

        if (255 == b1) {
            b1 = (Byte)loc.location;
        }else {
            b2 = (Byte)loc.location;

            //Appending the Byte to NSData
            Byte *bytes = malloc(sizeof(Byte) *1);
            bytes[0] = ((b1<<4) & 0xf0) | (b2 & 0x0f);
            [data appendBytes:bytes length:1];

            b1 = b2 = 255;
        }
    }

    return data;
}6.整合推送包文件。
把上面新建的BPushConfig.plist、iosbdpush.h、iosbdpush.m这三个文件拷贝到整理好的LibBPush文件夹下面

然后在Windows下面打包为 .zip(打包后的名称为:LibPush.zip)
注意:一定要在window下打包,mac下打包有问题,且格式必须为zip,mac下打包后在window下解压,你会发现多出一个名为__MACOSX的文件夹来,如:

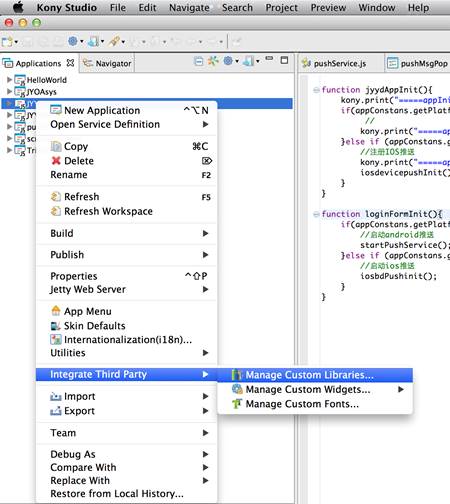
7. 现在开始往kony上集成
在kony→工程右键→Integrate Third Party→Manage Custom Libraries
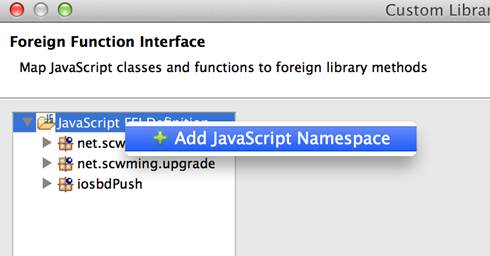
添加一个命名空间,以iosbdPush为例
添加一个类

添加类的详细
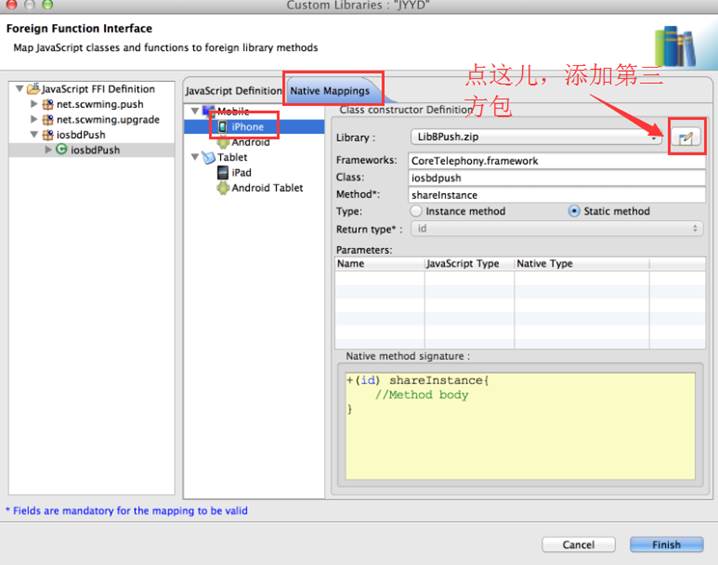
上图中的Frameworks:苹果引用的第三方框架,百度推送需要用到Foundation.framework、CoreTelephony.framework、SystemConfiguration.framework、libz.dylib这四个框架,但我们的工程已经包含了其中三个,所以只需添加CoreTelephony.framework这一个,如果要添加多个框架,可用英文逗号“,”隔开
Class:就是前面我们自己创建的类,示例创建的类名是iosbdpush
Method:静态方法,参考iosbdpush.m中的 +(id)shareInstance
下面添加方法:
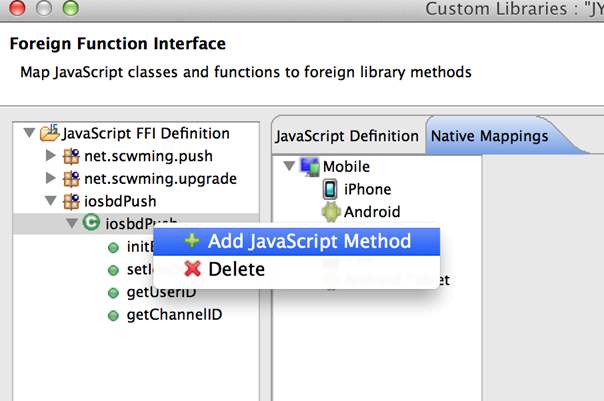
这儿只是说明添加带参数和布带参数的方法时需要注意的细节,请看下图:


8. 下面开始在kony里面调用刚刚集成的第三方包
在kony工程里面新建一个js文件,添加如下代码:
//初始化百度推送
function iosbdPushinit(){
    if(appConstans.getPlatform()=="iphone"){
        var iosbdPushObject = new iosbdPush.iosbdPush();
        //Invokes method 'initBdPush' on the object
        iosbdPushObject.initBdPush();
    }
}
//获取设备的UserID和ChannelID
function iosGetUserID(){
    if(appConstans.getPlatform()=="iphone"){
        //Creates an object of class 'iosbdPush'
        var iosbdPushObject = new iosbdPush.iosbdPush();
        //Invokes method 'getUserID' on the object
        appConstans.bdPushUserID = iosbdPushObject.getUserID();
        appConstans.bdPushChannelID = iosbdPushObject.getChannelID();
        kony.print("bdPushUserID :: "+appConstans.bdPushUserID);
        kony.print("bdPushChannelID :: "+appConstans.bdPushChannelID);
    }
}

function oniospushsuccess(identifier){
    if(appConstans.getPlatform()=="iphone"){
        kony.print("oniospushsuccess Registered SUCCESSFULLY :"+identifier);
        var iosbdPushObject = new iosbdPush.iosbdPush();
        //Invokes method 'setIosDeviceToken' on the object
        iosbdPushObject.setIosDeviceToken(identifier);
    }
}

function oniospushfailure(errortable){
    kony.print("+++++oniospushfailure Registration Failed :"+JSON.stringify(errortable));

}

function onlineiospushCallback(msg){
    if(appConstans.getPlatform()=="iphone"){
        kony.print("onlineiospushCallback online:"+JSON.stringify(msg));
        //var Jmsg = JSON.stringify(msg);

        kony.print("msg.title"+msg.title);
        kony.print("msg.msgId"+msg.msgId);
        kony.print("msg.description"+msg.description);

        appConstans.pushMsgID = msg.msgId;
        if(loginStatus){
            pushMsgPop.lblTitle.text = msg.title;
            pushMsgPop.lblDescribe.text = msg.description;

            pushMsgPop.show();
        }else{
            frmLogin.show();
        }
    }
}

function offlineiospushCallback(msg){
    kony.print("offlineiospushCallback offline:"+JSON.stringify(msg));
}

function oniospushderegsuccess(){
    kony.print("oniospushderegsuccess Deregistered Successfully :");
    alert("oniospushderegsuccess=="+msg);
}

function oniospushderegfailure(errortable){
    kony.print("oniospushderegfailure Deregistration Failed");
    alert("oniospushderegfailure=="+msg);
}
//注册设备
function iosdevicepushInit(){
    kony.print("iospushInit begin");
    var Object = { onsuccessfulregistration:oniospushsuccess ,//注册成功
                   onfailureregistration:oniospushfailure , //注册失败
                   onlinenotification:onlineiospushCallback ,//应用这在运行
                   offlinenotification:offlineiospushCallback ,//应用未运行或后台挂起状态
                   onsuccessfulderegistration:oniospushderegsuccess ,
                   onfailurederegistration:oniospushderegfailure
        };
    if(appConstans.getPlatform()=="iphone"){
        kony.push.setCallbacks(Object);
        var config=[0,1,2];
        kony.push.register(config);
    }
    kony.print("iospushInit end");
}

集成到此就OK了,不明白的地方可以百度,也可以加我QQ或者留言交流!如有错误欢迎大家指正。。

本帖只做技术交流~~~!