Android-View-Layout布局过程分析
文章目录
一、概述
读这篇文章前,建议先看下Android-View的绘制流程分析
我们知道android的View类的布局渲染包括三个部分,测量视图,布局视图,绘制视图
分别对应的measure、layout、draw
今天我们来分析下layout这个过程
二、流程
第一次进入页面,或者用户调用requestLayout,或者有动画当都会触发layout
我们就直接从ViewRootImpl的performTraversals开始
1、ViewRootImpl#performTraversals
//具体流程可以看文章开头的链接,那里有view的绘制流程
private void performTraversals
{


xxxx
....
省略一堆代码

final boolean didLayout = layoutRequested && (!mStopped || mReportNextDraw);
2065          boolean triggerGlobalLayoutListener = didLayout
2066                  || mAttachInfo.mRecomputeGlobalAttributes;
2067          if (didLayout) {


					//这个是核心代码,进入去看
2068              performLayout(lp, mWidth, mHeight);
2069
2070              // By this point all views have been sized and positioned
2071              // We can compute the transparent area
2072
2073              if ((host.mPrivateFlags & View.PFLAG_REQUEST_TRANSPARENT_REGIONS) != 0) {


2074                  // start out transparent
2075                  // TODO: AVOID THAT CALL BY CACHING THE RESULT?
2076                  host.getLocationInWindow(mTmpLocation);
2077                  mTransparentRegion.set(mTmpLocation[0], mTmpLocation[1],
2078                          mTmpLocation[0] + host.mRight - host.mLeft,
2079                          mTmpLocation[1] + host.mBottom - host.mTop);


xxxx
....
省略一堆代码
xxxx
....

}
2、ViewRootImpl#performLayout
private void performLayout(WindowManager.LayoutParams lp, int desiredWindowWidth,
2333              int desiredWindowHeight) {


2334          mLayoutRequested = false;
2335          mScrollMayChange = true;
2336          mInLayout = true;
2337
2338          final View host = mView;
2339          if (DEBUG_ORIENTATION || DEBUG_LAYOUT) {


2340              Log.v(mTag, "Laying out " + host + " to (" +
2341                      host.getMeasuredWidth() + ", " + host.getMeasuredHeight() + ")");
2342          }
2343
2344          Trace.traceBegin(Trace.TRACE_TAG_VIEW, "layout");
2345          try {


   				 // 这个host是当前的根视图,是DecotrView
    			 //这里传入了当前显示屏的全部显示尺寸了,从左上角0,0开始
    			 //因为host 之前经理了measure 所以getMeasuredWidth值是可以获得了
    			 //这个layout是View中的方法,我们进入去看下
2346              host.layout(0, 0, host.getMeasuredWidth(), host.getMeasuredHeight());
2347
2348              mInLayout = false;
2349              int numViewsRequestingLayout = mLayoutRequesters.size();
2350              if (numViewsRequestingLayout > 0) {


			xxxx
                .....
                代码省略
2404      }
3、View#layout(int l, int t, int r, int b)
这个方法中的四个参数,分别代表本视图在父视图中的左、上、右、下形成的位置
我们来看下
public void layout(int l, int t, int r, int b) {


    if ((mPrivateFlags3 & PFLAG3_MEASURE_NEEDED_BEFORE_LAYOUT) != 0) {


        onMeasure(mOldWidthMeasureSpec, mOldHeightMeasureSpec);
        mPrivateFlags3 &= ~PFLAG3_MEASURE_NEEDED_BEFORE_LAYOUT;
    }

    int oldL = mLeft;
    int oldT = mTop;
    int oldB = mBottom;
    int oldR = mRight;

    boolean changed = isLayoutModeOptical(mParent) ?
            setOpticalFrame(l, t, r, b) : setFrame(l, t, r, b);
	//PFLAG_LAYOUT_REQUIRED 这个标志位是measure完成后设置的,这个代表必须要measure完后才可以layout
    if (changed || (mPrivateFlags & PFLAG_LAYOUT_REQUIRED) == PFLAG_LAYOUT_REQUIRED) {


        //核心代码,这个调用onLayout,我们进入去看下
        onLayout(changed, l, t, r, b);

        if (shouldDrawRoundScrollbar()) {


            if(mRoundScrollbarRenderer == null) {


                mRoundScrollbarRenderer = new RoundScrollbarRenderer(this);
            }
        } else {


            mRoundScrollbarRenderer = null;
        }

        mPrivateFlags &= ~PFLAG_LAYOUT_REQUIRED;

        ListenerInfo li = mListenerInfo;
        if (li != null && li.mOnLayoutChangeListeners != null) {


            ArrayList<OnLayoutChangeListener> listenersCopy =
                    (ArrayList<OnLayoutChangeListener>)li.mOnLayoutChangeListeners.clone();
            int numListeners = listenersCopy.size();
            for (int i = 0; i < numListeners; ++i) {


                listenersCopy.get(i).onLayoutChange(this, l, t, r, b, oldL, oldT, oldR, oldB);
            }
        }
    }

    final boolean wasLayoutValid = isLayoutValid();

    mPrivateFlags &= ~PFLAG_FORCE_LAYOUT;
    mPrivateFlags3 |= PFLAG3_IS_LAID_OUT;

    if (!wasLayoutValid && isFocused()) {


        mPrivateFlags &= ~PFLAG_WANTS_FOCUS;
        if (canTakeFocus()) {


            // We have a robust focus, so parents should no longer be wanting focus.
            clearParentsWantFocus();
        } else if (getViewRootImpl() == null || !getViewRootImpl().isInLayout()) {


            // This is a weird case. Most-likely the user, rather than ViewRootImpl, called
            // layout. In this case, there's no guarantee that parent layouts will be evaluated
            // and thus the safest action is to clear focus here.
            clearFocusInternal(null, /* propagate */ true, /* refocus */ false);
            clearParentsWantFocus();
        } else if (!hasParentWantsFocus()) {


            // original requestFocus was likely on this view directly, so just clear focus
            clearFocusInternal(null, /* propagate */ true, /* refocus */ false);
        }
        // otherwise, we let parents handle re-assigning focus during their layout passes.
    } else if ((mPrivateFlags & PFLAG_WANTS_FOCUS) != 0) {


        mPrivateFlags &= ~PFLAG_WANTS_FOCUS;
        View focused = findFocus();
        if (focused != null) {


            // Try to restore focus as close as possible to our starting focus.
            if (!restoreDefaultFocus() && !hasParentWantsFocus()) {


                // Give up and clear focus once we've reached the top-most parent which wants
                // focus.
                focused.clearFocusInternal(null, /* propagate */ true, /* refocus */ false);
            }
        }
    }

    if ((mPrivateFlags3 & PFLAG3_NOTIFY_AUTOFILL_ENTER_ON_LAYOUT) != 0) {


        mPrivateFlags3 &= ~PFLAG3_NOTIFY_AUTOFILL_ENTER_ON_LAYOUT;
        notifyEnterOrExitForAutoFillIfNeeded(true);
    }

    notifyAppearedOrDisappearedForContentCaptureIfNeeded(true);
}
4、View#onLayout ViewGroup#onLayout
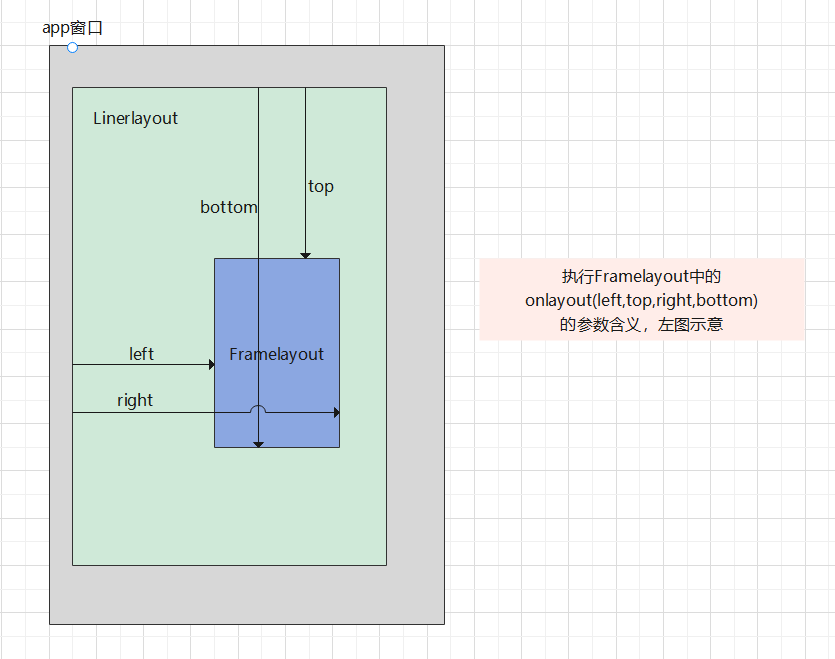
上图是onLayout的解释
由于onLayout的作用是布局子视图在自身中的位置的作用,由于View没有子视图,所以像TextView没有重写这个方法
只有ViewGroup的子类才重写了这个方法
View:
protected void onLayout(boolean changed, int left, int top, int right, int bottom) {


}
ViewGroup:
是abstract方法,需要子类实现
@Override
protected abstract void onLayout(boolean changed,
        int l, int t, int r, int b);
由于Framelayout是帧布局,所以布局方式很简单,我们就先看下Framelayout的onLayout的实现
5、FrameLayout#onLayout
@Override
protected void onLayout(boolean changed, int left, int top, int right, int bottom) {


    layoutChildren(left, top, right, bottom, false /* no force left gravity */);
}
void layoutChildren(int left, int top, int right, int bottom, boolean forceLeftGravity) {


    //子视图数量
    final int count = getChildCount();
	//framelayout自己设置的Leftpadding
    final int parentLeft = getPaddingLeftWithForeground();
    final int parentRight = right - left - getPaddingRightWithForeground();
	//framelayout自己设置的Toppadding
    final int parentTop = getPaddingTopWithForeground();
    final int parentBottom = bottom - top - getPaddingBottomWithForeground();

    for (int i = 0; i < count; i++) {


        final View child = getChildAt(i);
        //隐藏而且不占位置的Gone 不布局
        if (child.getVisibility() != GONE) {


            final LayoutParams lp = (LayoutParams) child.getLayoutParams();
			//下面这些就比较简单了,由于Framelayout只有子视图设置了gravty才能影响自身在父视图中的位置
            //所以我们只需要处理子视图的gravty属性即可
            final int width = child.getMeasuredWidth();
            final int height = child.getMeasuredHeight();

            int childLeft;
            int childTop;

            int gravity = lp.gravity;
            if (gravity == -1) {


                //默认gravity 就是left|top
                gravity = DEFAULT_CHILD_GRAVITY;
            }
			//这个是获取RTL的配置,就是从右边往左边读配置
            final int layoutDirection = getLayoutDirection();
            //获得水平gravity
            final int absoluteGravity = Gravity.getAbsoluteGravity(gravity, layoutDirection);
            //获得垂直gravity
            final int verticalGravity = gravity & Gravity.VERTICAL_GRAVITY_MASK;
			//下面这个就是计算水平方向,对应不同情况的计算,自己画一下就可以体会了
            switch (absoluteGravity & Gravity.HORIZONTAL_GRAVITY_MASK) {


                case Gravity.CENTER_HORIZONTAL:
                    childLeft = parentLeft + (parentRight - parentLeft - width) / 2 +
                    lp.leftMargin - lp.rightMargin;
                    break;
                case Gravity.RIGHT:
                    if (!forceLeftGravity) {


                        childLeft = parentRight - width - lp.rightMargin;
                        break;
                    }
                case Gravity.LEFT:
                default:
                    childLeft = parentLeft + lp.leftMargin;
            }
			//下面这个就是计算垂直方向,对应不同情况的计算,自己画一下就可以体会了
            switch (verticalGravity) {


                case Gravity.TOP:
                    childTop = parentTop + lp.topMargin;
                    break;
                case Gravity.CENTER_VERTICAL:
                    childTop = parentTop + (parentBottom - parentTop - height) / 2 +
                    lp.topMargin - lp.bottomMargin;
                    break;
                case Gravity.BOTTOM:
                    childTop = parentBottom - height - lp.bottomMargin;
                    break;
                default:
                    childTop = parentTop + lp.topMargin;
            }
			//调用子视图的layout方法,
            //子视图如果是ViewGroup的子类,就会走入之前的循环,继续层层往子视图布局,知道没有
            //如果child是View那么 view的实现是空实现,忽略
            child.layout(childLeft, childTop, childLeft + width, childTop + height);
        }
    }
}
Framelayout的布局代码很简单,LinearLayout还有RelativeLayout 比较复杂,但是他们的流程和思路都是一样的,大家可自行查阅源码和理解。