系列文章目录
spring boot专题(一)——spring boot快速上手
spring boot专题(二)——spring boot整合第三方插件
spring boot专题(三)——自定义starter
spring boot专题(四)——spring boot源码深入分析
spring boot专题(二)——spring boot整合第三方插件
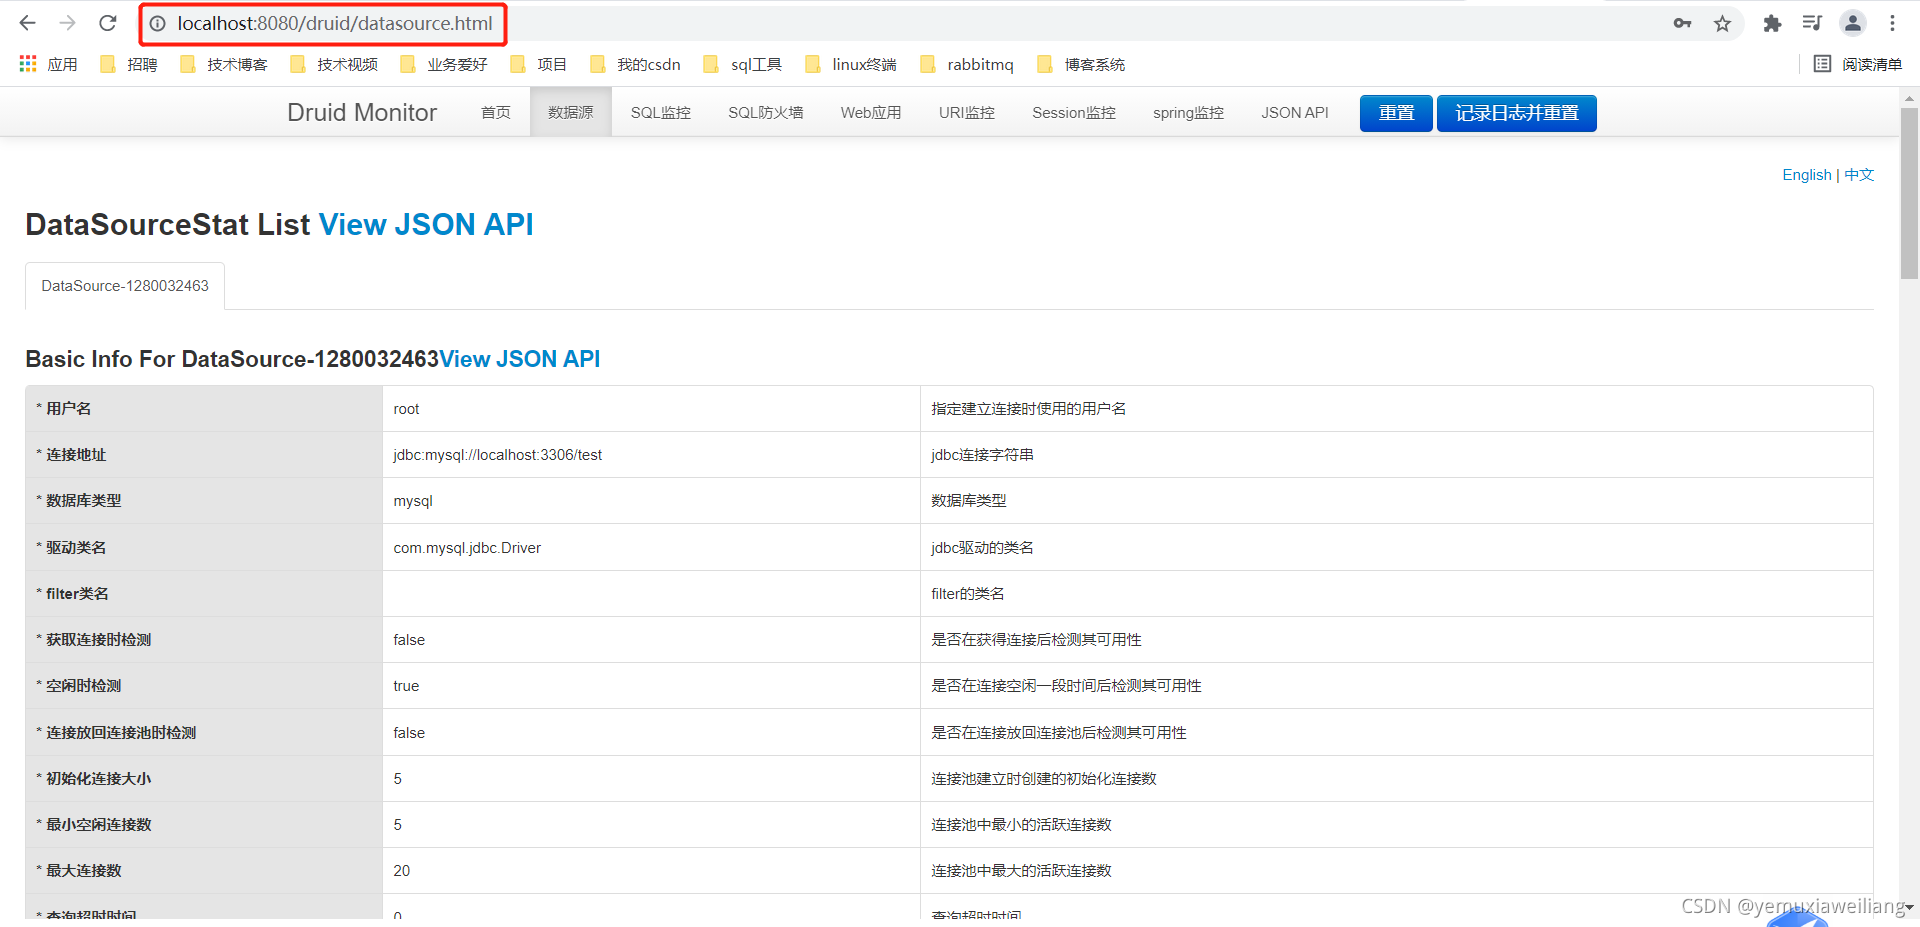
springboot整合druid +监控
案例
1.创建子模块springboot_jdbc,并引入依赖
<?xml version="1.0" encoding="UTF-8"?>
<project xmlns="http://maven.apache.org/POM/4.0.0"
         xmlns:xsi="http://www.w3.org/2001/XMLSchema-instance"
         xsi:schemaLocation="http://maven.apache.org/POM/4.0.0 http://maven.apache.org/xsd/maven-4.0.0.xsd">
    <parent>
        <artifactId>springboottest</artifactId>
        <groupId>org.example</groupId>
        <version>1.0-SNAPSHOT</version>
    </parent>
    <modelVersion>4.0.0</modelVersion>

    <artifactId>springboot_jdbc</artifactId>

    <dependencies>
        <dependency>
            <groupId>org.springframework.boot</groupId>
            <artifactId>spring-boot-starter-web</artifactId>
        </dependency>
        <dependency>
            <groupId>org.springframework.boot</groupId>
            <artifactId>spring-boot-starter-jdbc</artifactId>
        </dependency>
        <dependency>
            <groupId>mysql</groupId>
            <artifactId>mysql-connector-java</artifactId>
            <scope>runtime</scope>
        </dependency>
        <dependency>
            <groupId>com.alibaba</groupId>
            <artifactId>druid</artifactId>
            <version>1.1.10</version>
        </dependency>
        <!--自定义属性绑定配置-->
        <dependency>
            <groupId>org.springframework.boot</groupId>
            <artifactId>spring-boot-configuration-processor</artifactId>
            <optional>true</optional>
        </dependency>
    </dependencies>
</project>
2.application.yaml配置druid的数据源属性
spring:
  datasource:
    druid:
      username: root
      password: 1234
      jdbcUrl: jdbc:mysql://localhost:3306/test
      driverClassName: com.mysql.jdbc.Driver
      initialSize: 5
      minIdle: 5
      maxActive: 20
      maxWait: 60000
      timeBetweenEvictionRunsMillis: 60000
      minEvictableIdleTimeMillis: 300000
      validationQuery: SELECT 1 FROM DUAL
      testWhileIdle: true
      testOnBorrow: false
      testOnReturn: false
      poolPreparedStatements: true
      # 配置监控统计拦截的filters,去掉后监控界面sql无法统计,'wall'用于防火墙
      filters: stat,wall,log4j
      maxPoolPreparedStatementPerConnectionSize: 20
      useGlobalDataSourceStat: true
      connectionProperties: druid.stat.mergeSql=true;druid.stat.slowSqlMillis=500
3.对数据库属性进行一一映射
package com.yemuxia.properties;

import org.springframework.boot.context.properties.ConfigurationProperties;

@ConfigurationProperties(prefix = "spring.datasource.druid") //扫描配置类的属性前缀
public class DruidDataSourceProperties {


    private String username;
    private String password;
    private String jdbcUrl;
    private String driverClassName;
    private Integer initialSize;
    private Integer maxActive;
    private Integer minIdle;
    private long maxWait;
    private boolean poolPreparedStatements;


    public String getUsername() {


        return username;
    }

    public void setUsername(String username) {


        this.username = username;
    }

    public String getPassword() {


        return password;
    }

    public void setPassword(String password) {


        this.password = password;
    }

    public String getJdbcUrl() {


        return jdbcUrl;
    }

    public void setJdbcUrl(String jdbcUrl) {


        this.jdbcUrl = jdbcUrl;
    }

    public String getDriverClassName() {


        return driverClassName;
    }

    public void setDriverClassName(String driverClassName) {


        this.driverClassName = driverClassName;
    }

    public Integer getInitialSize() {


        return initialSize;
    }

    public void setInitialSize(Integer initialSize) {


        this.initialSize = initialSize;
    }

    public Integer getMaxActive() {


        return maxActive;
    }

    public void setMaxActive(Integer maxActive) {


        this.maxActive = maxActive;
    }

    public Integer getMinIdle() {


        return minIdle;
    }

    public void setMinIdle(Integer minIdle) {


        this.minIdle = minIdle;
    }

    public long getMaxWait() {


        return maxWait;
    }

    public void setMaxWait(long maxWait) {


        this.maxWait = maxWait;
    }

    public boolean isPoolPreparedStatements() {


        return poolPreparedStatements;
    }

    public void setPoolPreparedStatements(boolean poolPreparedStatements) {


        this.poolPreparedStatements = poolPreparedStatements;
    }
}
4.创建一个druid的配置类
package com.yemuxia.config;

import com.alibaba.druid.pool.DruidDataSource;
import com.alibaba.druid.support.http.StatViewServlet;
import com.alibaba.druid.support.http.WebStatFilter;
import com.yemuxia.properties.DruidDataSourceProperties;
import org.springframework.beans.factory.annotation.Autowired;
import org.springframework.boot.context.properties.EnableConfigurationProperties;
import org.springframework.boot.web.servlet.FilterRegistrationBean;
import org.springframework.boot.web.servlet.ServletRegistrationBean;
import org.springframework.context.annotation.Bean;
import org.springframework.context.annotation.Configuration;

import javax.sql.DataSource;
import java.util.Arrays;
import java.util.HashMap;
import java.util.Map;

@Configuration
@EnableConfigurationProperties(value = DruidDataSourceProperties.class)
public class DruidDataSourceConfig {


    @Autowired
    private DruidDataSourceProperties druidDataSourceProperties;

    @Bean
    public DataSource dataSource() {


        System.out.println(druidDataSourceProperties);
        DruidDataSource druidDataSource = new DruidDataSource();
        druidDataSource.setUsername(druidDataSourceProperties.getUsername());
        druidDataSource.setPassword(druidDataSourceProperties.getPassword());
        druidDataSource.setUrl(druidDataSourceProperties.getJdbcUrl());
        druidDataSource.setDriverClassName(druidDataSourceProperties.getDriverClassName());
        druidDataSource.setInitialSize(druidDataSourceProperties.getInitialSize());
        druidDataSource.setMinIdle(druidDataSourceProperties.getMinIdle());
        druidDataSource.setMaxActive(druidDataSourceProperties.getMaxActive());
        druidDataSource.setMaxWait(druidDataSourceProperties.getMaxWait());
        druidDataSourceProperties.setPoolPreparedStatements(druidDataSourceProperties.isPoolPreparedStatements());
        return druidDataSource;
    }

    /**
     * * 配置druid管理后台的servlet
     * * @return
     * */
    @Bean
    public ServletRegistrationBean statViewSerlvet() {


        ServletRegistrationBean bean = new ServletRegistrationBean(new StatViewServlet(),"/druid/*");
        Map<String,Object> initParameters = new HashMap<>();
        initParameters.put("loginUsername","admin");
        initParameters.put("loginPassword","123456");
        bean.setInitParameters(initParameters);
        return bean;
    }
    @Bean
    public FilterRegistrationBean filterRegistrationBean() {


        FilterRegistrationBean filterRegistrationBean = new FilterRegistrationBean(new WebStatFilter());
        filterRegistrationBean.setUrlPatterns(Arrays.asList("/*"));
        Map<String,Object> initParams = new HashMap<>();
        initParams.put("exclusions","*.js,*.css,/druid/*");
        filterRegistrationBean.setInitParameters(initParams);
        return filterRegistrationBean;

    }
}
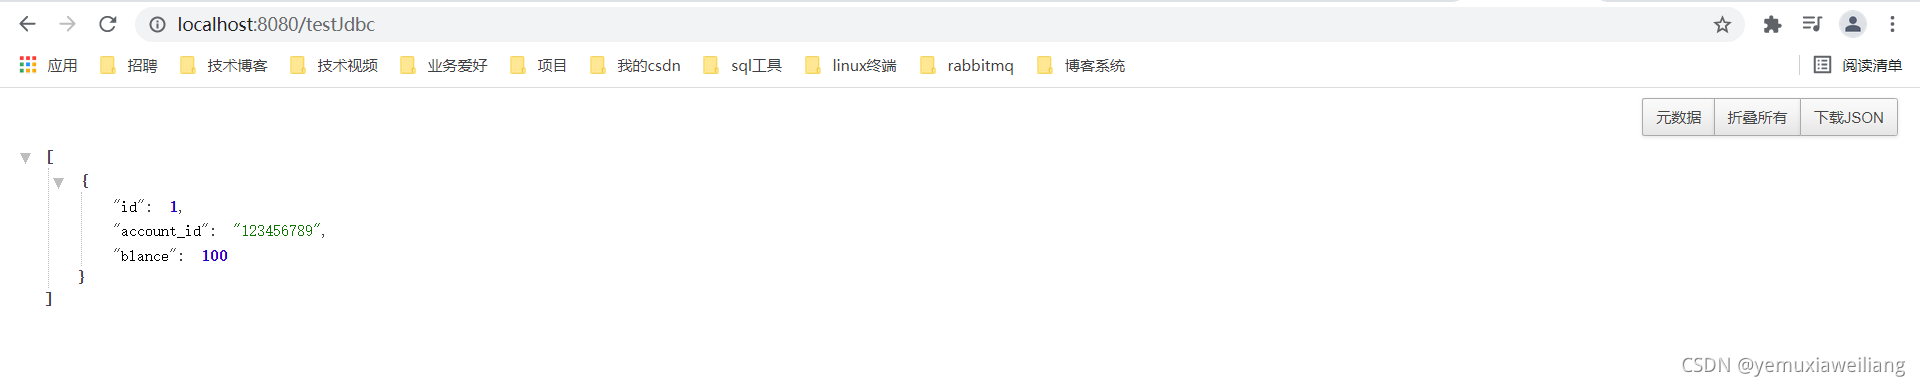
5.创建controller和启动类
package com.yemuxia.controller;

import org.springframework.beans.factory.annotation.Autowired;
import org.springframework.jdbc.core.JdbcTemplate;
import org.springframework.web.bind.annotation.RequestMapping;
import org.springframework.web.bind.annotation.RestController;

import java.util.List;
import java.util.Map;

@RestController
public class TestController {


    @Autowired
    private JdbcTemplate jdbcTemplate;

    @RequestMapping("/testJdbc")
    public List<Map<String,Object>> testHello(){


        List<Map<String,Object>> employeeList = jdbcTemplate.queryForList("select * from account_info");
        return employeeList;
    }
}
package com.yemuxia;

import org.springframework.boot.SpringApplication;
import org.springframework.boot.autoconfigure.SpringBootApplication;

@SpringBootApplication
public class AppMain {


    public static void main(String[] args) {


        SpringApplication.run(AppMain.class,args);
    }
}
6.启动项目
springboot整合 mybaits
案例
1.创建springboot_mybatis项目并引入依赖
<?xml version="1.0" encoding="UTF-8"?>
<project xmlns="http://maven.apache.org/POM/4.0.0"
         xmlns:xsi="http://www.w3.org/2001/XMLSchema-instance"
         xsi:schemaLocation="http://maven.apache.org/POM/4.0.0 http://maven.apache.org/xsd/maven-4.0.0.xsd">
    <parent>
        <artifactId>springboottest</artifactId>
        <groupId>org.example</groupId>
        <version>1.0-SNAPSHOT</version>
    </parent>
    <modelVersion>4.0.0</modelVersion>

    <artifactId>springboot_mybatis</artifactId>
    <dependencies>
        <dependency>
            <groupId>org.springframework.boot</groupId>
            <artifactId>spring-boot-starter-web</artifactId>
        </dependency>
        <dependency>
            <groupId>org.springframework.boot</groupId>
            <artifactId>spring-boot-starter-jdbc</artifactId>
        </dependency>
        <dependency>
            <groupId>org.mybatis.spring.boot</groupId>
            <artifactId>mybatis-spring-boot-starter</artifactId>
            <version>2.0.0</version>
        </dependency>
        <dependency>
            <groupId>mysql</groupId>
            <artifactId>mysql-connector-java</artifactId>
            <scope>runtime</scope>
        </dependency>
    </dependencies>
</project>
2.配置数据源以及mybatis配置
spring:
  datasource:
    username: root
    password: 1234
    url: jdbc:mysql://localhost:3306/test?useUnicode=true&characterEncoding=utf-8&useSSL=true&serverTimezone=UTC
    driver-class-name: com.mysql.jdbc.Driver

#配置mybatis
mybatis:
  #指定配置文件的位置
  mapper-locations: classpath:/mybatis/mapper/*.xml
  configuration:
    #开启驼峰命名
    map-underscore-to-camel-case: true
3.创建Controller,service,dao,entity,mapper配置文件
package com.yemuxia.controller;


import com.yemuxia.service.UserService;
import org.springframework.beans.factory.annotation.Autowired;

import org.springframework.web.bind.annotation.PathVariable;
import org.springframework.web.bind.annotation.RequestMapping;
import org.springframework.web.bind.annotation.RestController;


@RestController
@RequestMapping("/testBoot")
public class UserController {


    @Autowired
    private UserService userService;

    @RequestMapping("getUser/{id}")
    public String GetUser(@PathVariable int id){


        return userService.Sel(id).toString();
    }
}
package com.yemuxia.service;


import com.yemuxia.dao.UserMapper;
import com.yemuxia.entity.User;
import org.springframework.beans.factory.annotation.Autowired;
import org.springframework.stereotype.Service;


@Service
public class UserService {


    @Autowired
    UserMapper userMapper;
    public User Sel(int id){


        return userMapper.Sel(id);
    }
}
package com.yemuxia.dao;


import com.yemuxia.entity.User;
import org.springframework.stereotype.Repository;


@Repository
public interface UserMapper {


    User Sel(int id);
}
package com.yemuxia.entity;


public class User {


    private Integer id;
    private String userName;
    private String passWord;
    private String realName;

    public Integer getId() {


        return id;
    }

    public void setId(Integer id) {


        this.id = id;
    }

    public String getUserName() {


        return userName;
    }

    public void setUserName(String userName) {


        this.userName = userName;
    }

    public String getPassWord() {


        return passWord;
    }

    public void setPassWord(String passWord) {


        this.passWord = passWord;
    }

    public String getRealName() {


        return realName;
    }

    public void setRealName(String realName) {


        this.realName = realName;
    }

    @Override
    public String toString() {


        return "User{" +
                "id=" + id +
                ", userName='" + userName + '\'' +
                ", passWord='" + passWord + '\'' +
                ", realName='" + realName + '\'' +
                '}';
    }
}
<?xml version="1.0" encoding="UTF-8"?>
<!DOCTYPE mapper PUBLIC "-//mybatis.org//DTD Mapper 3.0//EN" "http://mybatis.org/dtd/mybatis-3-mapper.dtd">
<mapper namespace="com.yemuxia.dao.UserMapper">

    <resultMap id="BaseResultMap" type="com.yemuxia.entity.User">
        <result column="id" jdbcType="INTEGER" property="id" />
        <result column="userName" jdbcType="VARCHAR" property="userName" />
        <result column="passWord" jdbcType="VARCHAR" property="passWord" />
        <result column="realName" jdbcType="VARCHAR" property="realName" />
    </resultMap>

    <select id="Sel" resultType="com.yemuxia.entity.User">
        select * from user where id = #{id}
    </select>

</mapper>
4.创建启动类
package com.yemuxia;

import org.mybatis.spring.annotation.MapperScan;
import org.springframework.boot.SpringApplication;
import org.springframework.boot.autoconfigure.SpringBootApplication;

@MapperScan("com.yemuxia.dao")
@SpringBootApplication
public class AppMain {


    public static void main(String[] args) {


        SpringApplication.run(AppMain.class,args);
    }
}
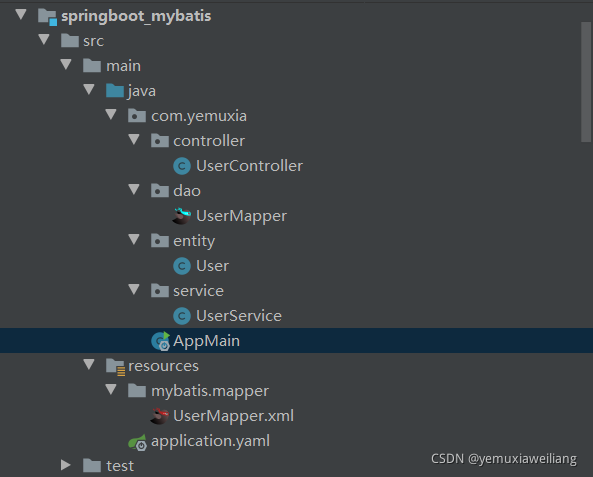
5.项目结构如图,并启动运行

spring boot整合rabbitmq
生产端案例
1.创建springboot-rabbitmq项目,并引入依赖
<?xml version="1.0" encoding="UTF-8"?>
<project xmlns="http://maven.apache.org/POM/4.0.0"
         xmlns:xsi="http://www.w3.org/2001/XMLSchema-instance"
         xsi:schemaLocation="http://maven.apache.org/POM/4.0.0 http://maven.apache.org/xsd/maven-4.0.0.xsd">
    <parent>
        <artifactId>springboottest</artifactId>
        <groupId>org.example</groupId>
        <version>1.0-SNAPSHOT</version>
    </parent>
    <modelVersion>4.0.0</modelVersion>

    <artifactId>springboot_rabbitmq</artifactId>
    <dependencies>
        <dependency>
            <groupId>org.springframework.boot</groupId>
            <artifactId>spring-boot-starter-web</artifactId>
        </dependency>
        <dependency>
            <groupId>org.springframework.boot</groupId>
            <artifactId>spring-boot-starter-amqp</artifactId>
        </dependency>
    </dependencies>
</project>
2.创建配置类
package com.yemuxia.config;


import org.springframework.amqp.core.Binding;
import org.springframework.amqp.core.BindingBuilder;
import org.springframework.amqp.core.DirectExchange;
import org.springframework.amqp.core.Queue;
import org.springframework.context.annotation.Bean;
import org.springframework.context.annotation.Configuration;

@Configuration
public class RabbitConfig {


    //队列 起名:testDirectQueue
    @Bean
    public Queue testDirectQueue() {


        // durable:是否持久化,默认是false,持久化队列:会被存储在磁盘上,当消息代理重启时仍然存在,暂存队列:当前连接有效
        // exclusive:默认也是false,只能被当前创建的连接使用,而且当连接关闭后队列即被删除。此参考优先级高于durable
        // autoDelete:是否自动删除,当没有生产者或者消费者使用此队列,该队列会自动删除。
        //   return new Queue("TestDirectQueue",true,true,false);

        //一般设置一下队列的持久化就好,其余两个就是默认false
        return new Queue("testDirectQueue",true);
    }

    //Direct交换机 起名:testDirectExchange
    @Bean
    DirectExchange testDirectExchange() {


        //  return new DirectExchange("TestDirectExchange",true,true);
        return new DirectExchange("testDirectExchange",true,false);
    }

    //绑定  将队列和交换机绑定, 并设置用于匹配键:TestDirectRouting
    @Bean
    Binding bindingDirect() {


        return BindingBuilder.bind(testDirectQueue()).to(testDirectExchange()).with("testDirectRouting");
    }


    @Bean
    DirectExchange lonelyDirectExchange() {


        return new DirectExchange("lonelyDirectExchange");
    }


}
3.添加mq配置信息
server:
  port: 8082

spring:
  application:
    name: rabbitmq-provider
  rabbitmq:
    host: localhost
    port: 5672
#    virtual-host: test-rabbitmq
    username: guest
    password: guest
    connection-timeout: 5000
    template:
      mandatory: true
4.创建Controller,启动类
package com.yemuxia.controller;
import org.springframework.amqp.rabbit.core.RabbitTemplate;
import org.springframework.beans.factory.annotation.Autowired;
import org.springframework.web.bind.annotation.GetMapping;
import org.springframework.web.bind.annotation.RestController;
import java.time.LocalDateTime;
import java.time.format.DateTimeFormatter;
import java.util.HashMap;
import java.util.Map;
import java.util.UUID;
@RestController
public class SendMessageController {
@Autowired
RabbitTemplate rabbitTemplate;
@GetMapping("/sendDirectMessage")
public String sendDirectMessage() {
String messageId = String.valueOf(UUID.randomUUID());
String messageData = "test message, hello!";
String createTime = LocalDateTime.now().format(DateTimeFormatter.ofPattern("yyyy-MM-dd HH:mm:ss"));
Map<String,Object> map=new HashMap<>();
map.put("messageId",messageId);
map.put("messageData",messageData);
map.put("createTime",createTime);
//将消息携带绑定键值:TestDirectRouting 发送到交换机TestDirectExchange
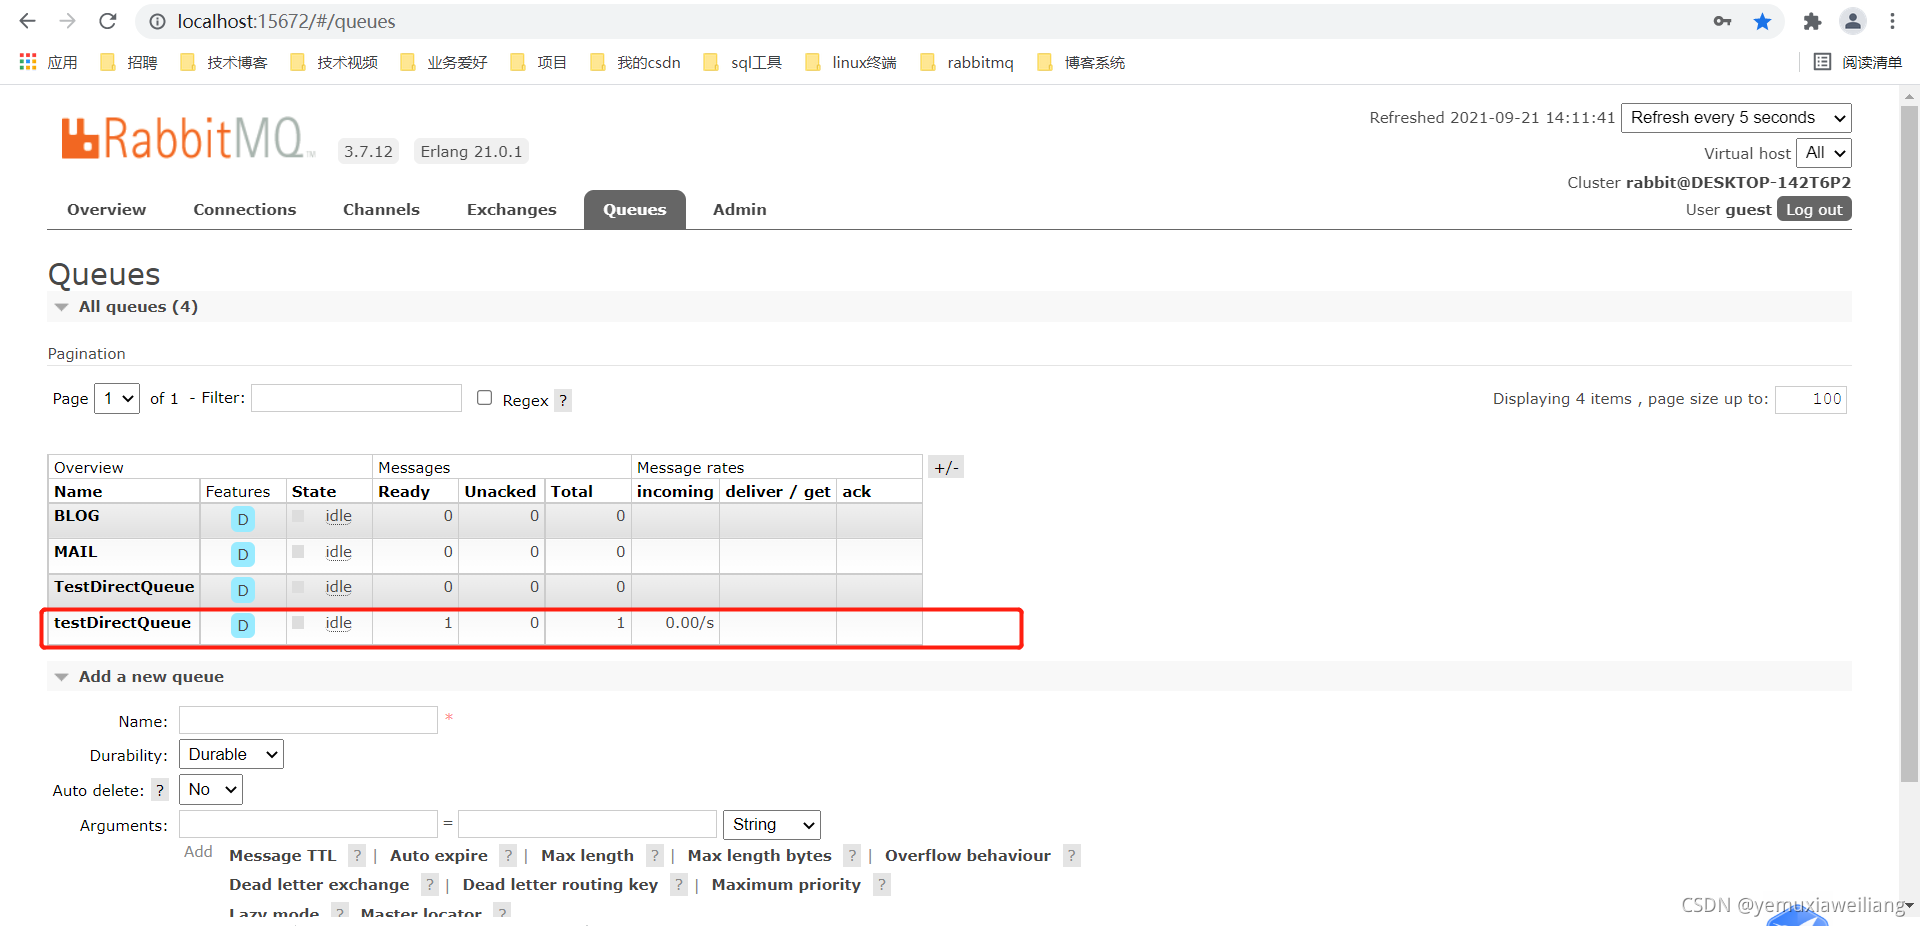
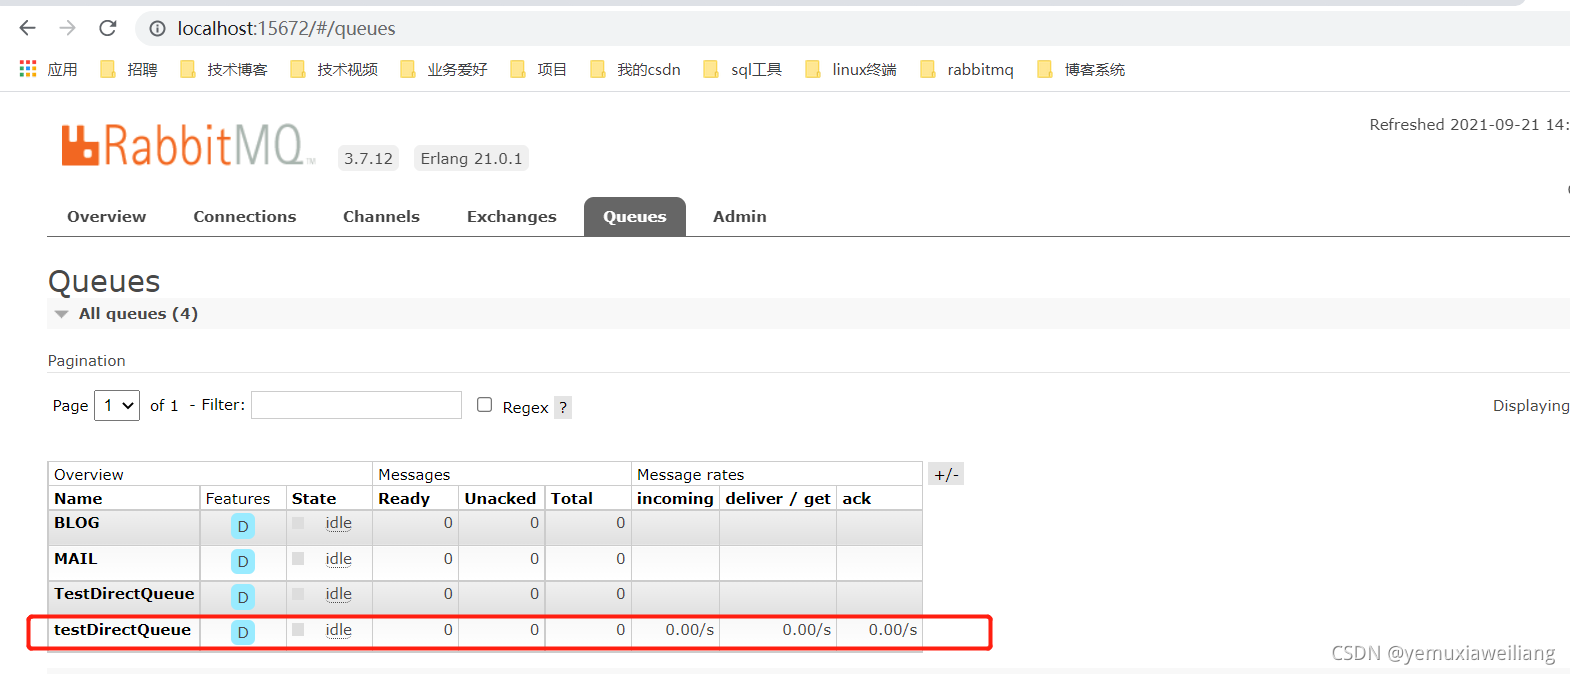
rabbitTemplate.convertAndSend("testDirectExchange", "testDirectRouting", map);
return "ok";
}
}
package com.yemuxia;

import org.springframework.boot.SpringApplication;
import org.springframework.boot.autoconfigure.SpringBootApplication;

@SpringBootApplication
public class AppMain {


    public static void main(String[] args) {


        SpringApplication.run(AppMain.class,args);
    }
}
5.启动项目
消费端案例
1.创建springboot-rabbitmq-consumer项目,并引入依赖
2.创建监听器,监听队列
package com.yemuxia.listener;
import org.springframework.amqp.rabbit.annotation.RabbitHandler;
import org.springframework.amqp.rabbit.annotation.RabbitListener;
import org.springframework.stereotype.Component;
import java.util.Map;
@Component
@RabbitListener(queues = "testDirectQueue")//监听的队列名称 TestDirectQueue
public class RabbitReceiver {
@RabbitHandler
public void process(Map testMessage) {
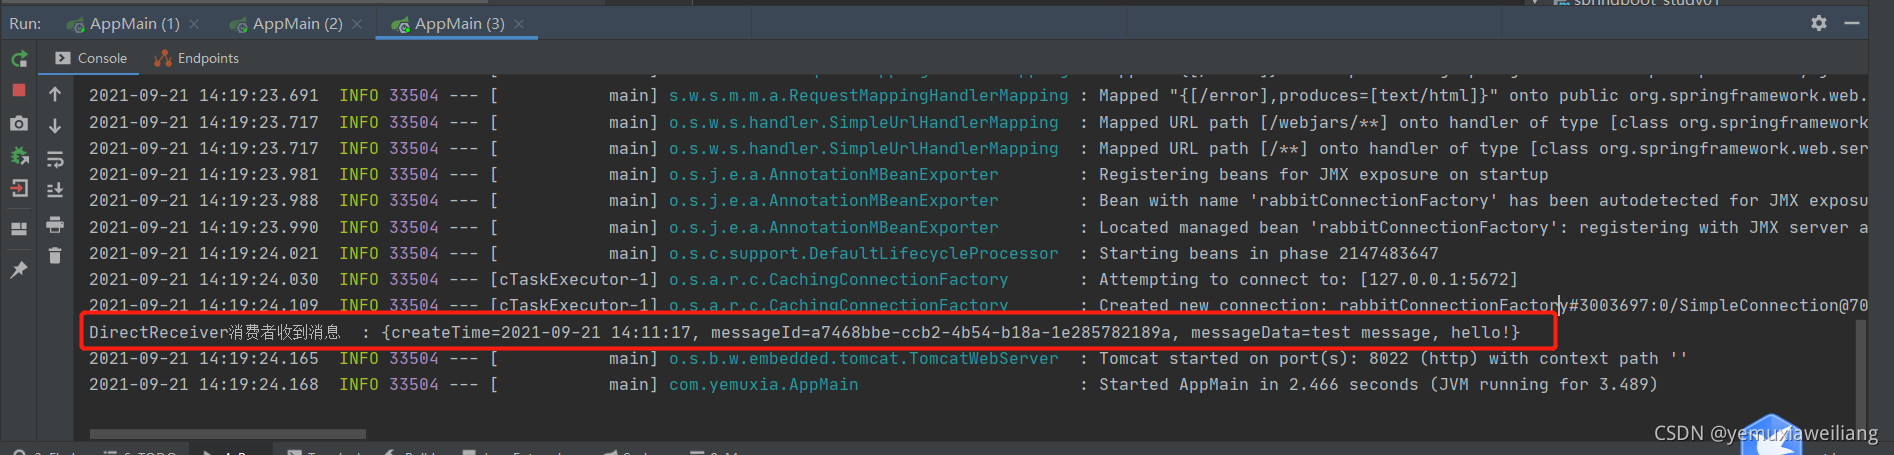
System.out.println("DirectReceiver消费者收到消息 : " + testMessage.toString());
}
}
3.添加mq配置
server:
  port: 8022
spring:
  #给项目来个名字
  application:
    name: rabbitmq-consumer
  #配置rabbitMq 服务器
  rabbitmq:
    host: 127.0.0.1
    port: 5672
    username: guest
    password: guest
    #虚拟host 可以不设置,使用server默认host
    # virtual-host: JCcccHost
4.添加启动类,并运行
package com.yemuxia;

import org.springframework.boot.SpringApplication;
import org.springframework.boot.autoconfigure.SpringBootApplication;

@SpringBootApplication
public class AppMain {


    public static void main(String[] args) {


        SpringApplication.run(AppMain.class,args);
    }
}
spring boot整合swaggerui
案例
1.在springboot_mybatis项目的基础上进行改造,依赖如下
<?xml version="1.0" encoding="UTF-8"?>
<project xmlns="http://maven.apache.org/POM/4.0.0"
         xmlns:xsi="http://www.w3.org/2001/XMLSchema-instance"
         xsi:schemaLocation="http://maven.apache.org/POM/4.0.0 http://maven.apache.org/xsd/maven-4.0.0.xsd">
    <parent>
        <artifactId>springboottest</artifactId>
        <groupId>org.example</groupId>
        <version>1.0-SNAPSHOT</version>
    </parent>
    <modelVersion>4.0.0</modelVersion>

    <artifactId>springboot_swaggerui</artifactId>
    <dependencies>
        <dependency>
            <groupId>org.springframework.boot</groupId>
            <artifactId>spring-boot-starter-web</artifactId>
        </dependency>
        <dependency>
            <groupId>io.springfox</groupId>
            <artifactId>springfox-swagger2</artifactId>
            <version>2.7.0</version>
        </dependency>
        <dependency>
            <groupId>io.springfox</groupId>
            <artifactId>springfox-swagger-ui</artifactId>
            <version>2.7.0</version>
        </dependency>
        <dependency>
            <groupId>org.springframework.boot</groupId>
            <artifactId>spring-boot-starter-jdbc</artifactId>
        </dependency>
        <dependency>
            <groupId>org.mybatis.spring.boot</groupId>
            <artifactId>mybatis-spring-boot-starter</artifactId>
            <version>2.0.0</version>
        </dependency>
        <dependency>
            <groupId>mysql</groupId>
            <artifactId>mysql-connector-java</artifactId>
            <scope>runtime</scope>
        </dependency>
    </dependencies>

</project>
2.增加swagger配置类
package com.yemuxia.config;

import org.springframework.context.annotation.Bean;
import org.springframework.context.annotation.Configuration;
import springfox.documentation.builders.ApiInfoBuilder;
import springfox.documentation.builders.PathSelectors;
import springfox.documentation.builders.RequestHandlerSelectors;
import springfox.documentation.service.ApiInfo;
import springfox.documentation.spi.DocumentationType;
import springfox.documentation.spring.web.plugins.Docket;

@Configuration
public class Swagger2Config {


    @Bean
    public Docket createRestApi() {


        return new Docket(DocumentationType.SWAGGER_2).
                apiInfo(apiInfo()).
                select().
                apis(RequestHandlerSelectors.basePackage("com.yemuxia.controller"))    //你需要生成文档所在的包
                .paths(PathSelectors.any()).build();
    }

    private ApiInfo apiInfo() {


        return new ApiInfoBuilder()
                .title("springboot利用swagger构建api文档")//文档标题
                .description("简单优雅的restfun风格,http://blog.csdn.net/saytime") //描述
                .termsOfServiceUrl("http://blog.csdn.net/saytime").version("1.0").build();
    }

}
3.改造UserController类
package com.yemuxia.controller;
import com.yemuxia.service.UserService;
import io.swagger.annotations.Api;
import io.swagger.annotations.ApiImplicitParam;
import io.swagger.annotations.ApiOperation;
import org.springframework.beans.factory.annotation.Autowired;
import org.springframework.web.bind.annotation.GetMapping;
import org.springframework.web.bind.annotation.PathVariable;
import org.springframework.web.bind.annotation.RequestMapping;
import org.springframework.web.bind.annotation.RestController;
@RestController
@RequestMapping("/testBoot")
@Api(value = "用户服务",tags = {
"用户的基本操作"})
public class UserController {
@Autowired
private UserService userService;
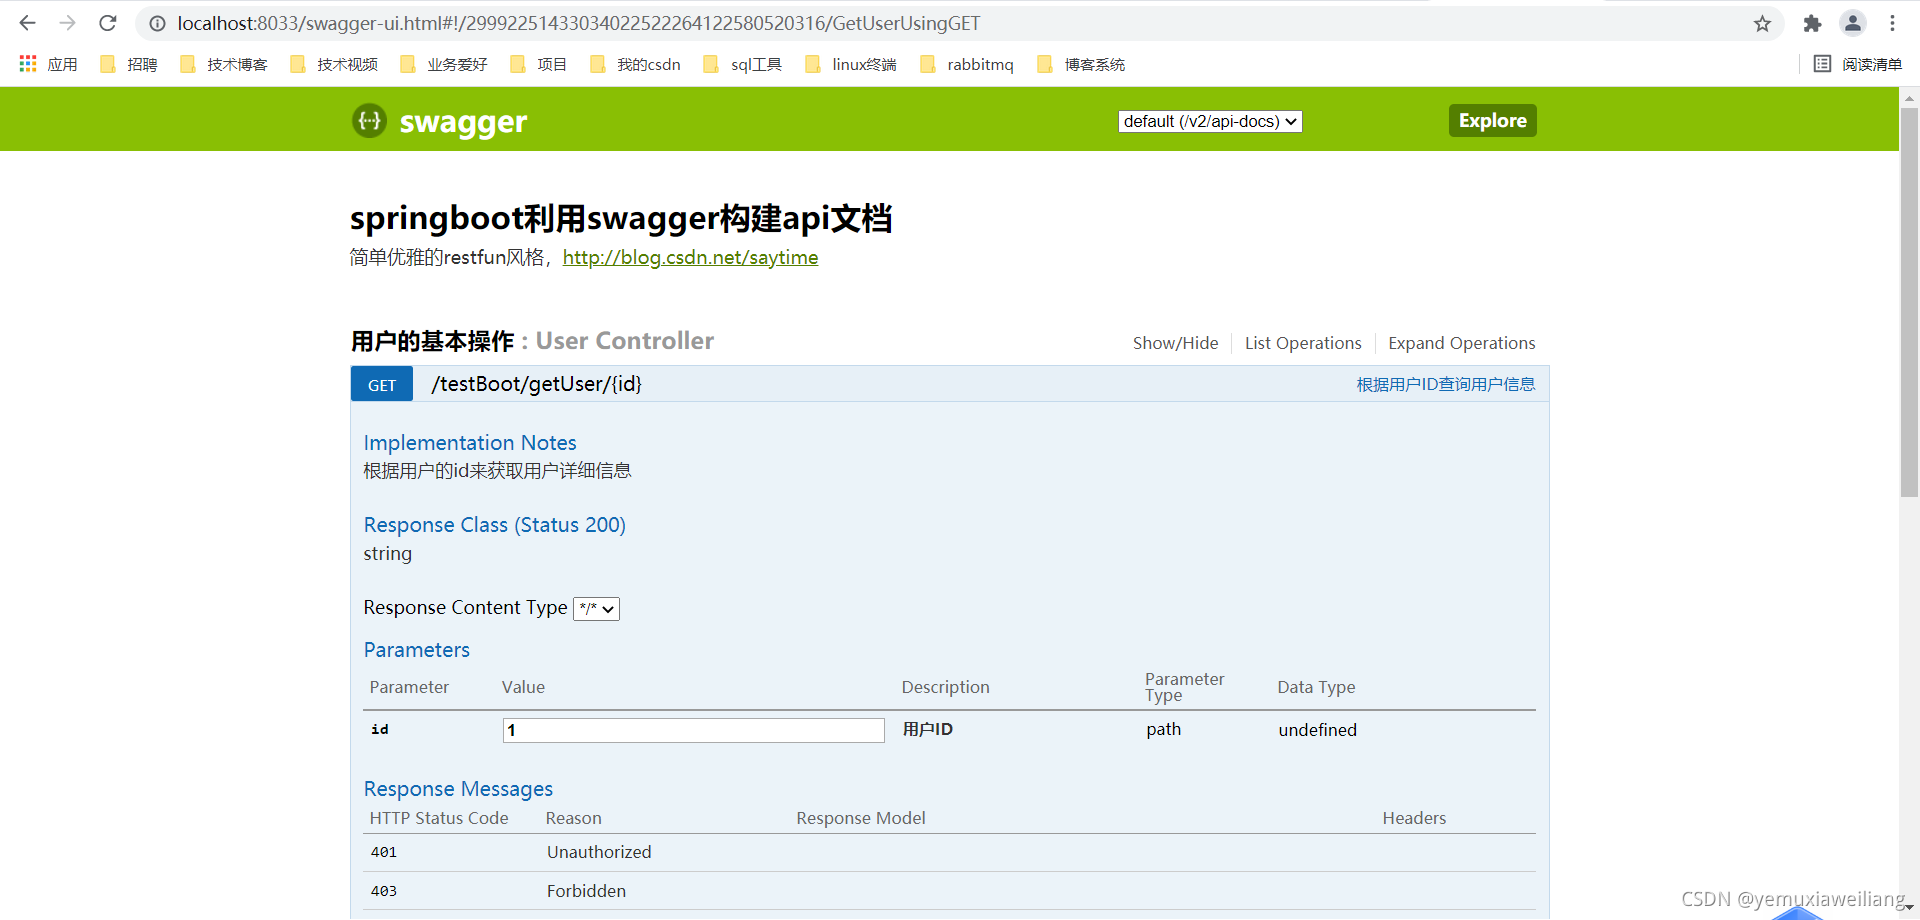
@ApiOperation(value ="根据用户ID查询用户信息",notes="根据用户的id来获取用户详细信息")
@ApiImplicitParam(name="id",value = "用户ID",required = true,dataType ="Integer",paramType = "path")
@GetMapping("getUser/{id}")
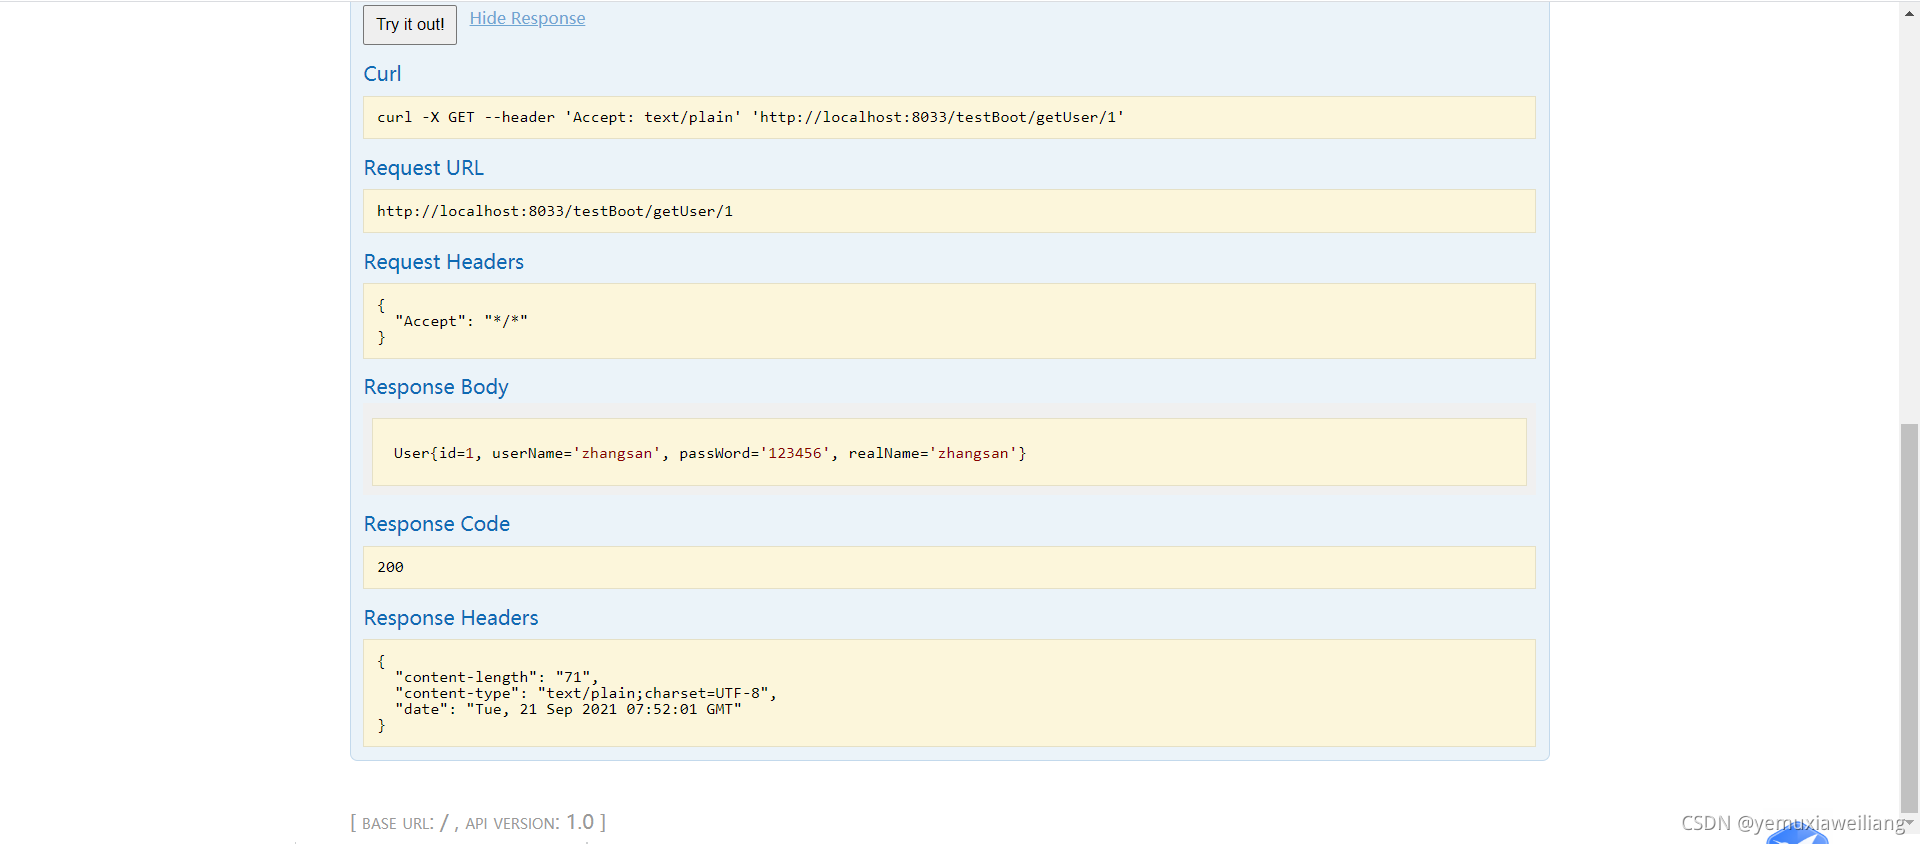
public String GetUser(@PathVariable int id){
return userService.Sel(id).toString();
}
}
4.在启动类上增加启动swagger注解
package com.yemuxia;

import org.mybatis.spring.annotation.MapperScan;
import org.springframework.boot.SpringApplication;
import org.springframework.boot.autoconfigure.SpringBootApplication;
import springfox.documentation.swagger2.annotations.EnableSwagger2;

@SpringBootApplication
@MapperScan("com.yemuxia.dao")
@EnableSwagger2
public class AppMain {


    public static void main(String[] args) {


        SpringApplication.run(AppMain.class,args);
    }
}
5.启动项目
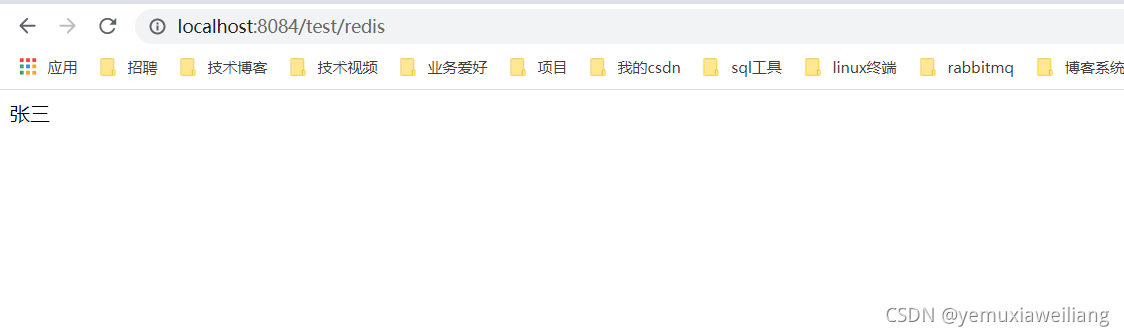
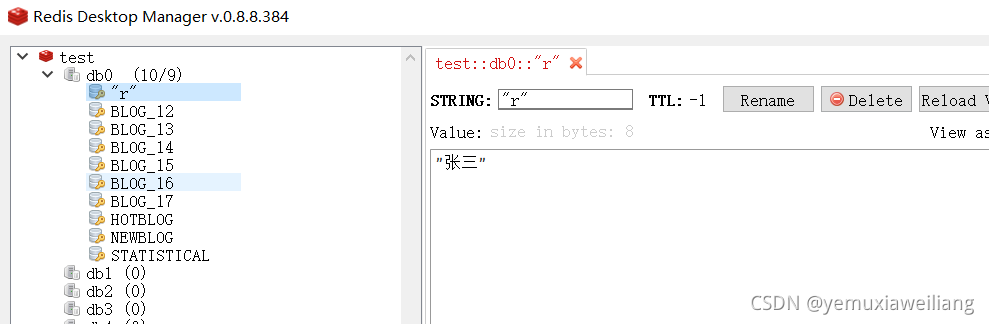
spring boot整合redis
案例
1.创建项目并引入依赖
<?xml version="1.0" encoding="UTF-8"?>
<project xmlns="http://maven.apache.org/POM/4.0.0"
         xmlns:xsi="http://www.w3.org/2001/XMLSchema-instance"
         xsi:schemaLocation="http://maven.apache.org/POM/4.0.0 http://maven.apache.org/xsd/maven-4.0.0.xsd">
    <parent>
        <artifactId>springboottest</artifactId>
        <groupId>org.example</groupId>
        <version>1.0-SNAPSHOT</version>
    </parent>
    <modelVersion>4.0.0</modelVersion>

    <artifactId>springboot_redis</artifactId>
    <dependencies>
        <dependency>
            <groupId>org.springframework.boot</groupId>
            <artifactId>spring-boot-starter-web</artifactId>
        </dependency>
        <dependency>
            <groupId>org.springframework.boot</groupId>
            <artifactId>spring-boot-starter-data-redis</artifactId>
        </dependency>
    </dependencies>

</project>
2.引入redis配置
spring:
  redis:
    host: localhost
    port: 6379
    password:
    jedis:
      pool:
        max-active: 20
        max-idle: 10
        min-idle: 5
server:
  port: 8084
3.创建redis配置类
package com.yemuxia.config;

import org.springframework.context.annotation.Bean;
import org.springframework.context.annotation.Configuration;

import org.springframework.data.redis.connection.RedisConnectionFactory;
import org.springframework.data.redis.core.RedisTemplate;
import org.springframework.data.redis.serializer.Jackson2JsonRedisSerializer;

@Configuration
public class RedisConfig {


    @Bean
    public RedisTemplate<Object, Object> redisTemplate(RedisConnectionFactory factory) {


        RedisTemplate<Object, Object> template = new RedisTemplate<>();
        //设置自己的序列化工具
        template.setDefaultSerializer(new Jackson2JsonRedisSerializer<>(Object.class));
        template.setConnectionFactory(factory);
        return template;
    }
}
4.创建Controller以及启动类
package com.yemuxia.controller;


import org.springframework.beans.factory.annotation.Autowired;
import org.springframework.data.redis.core.RedisTemplate;
import org.springframework.web.bind.annotation.GetMapping;
import org.springframework.web.bind.annotation.RequestMapping;
import org.springframework.web.bind.annotation.RestController;

@RestController
@RequestMapping("/test")
public class TestController {


    @Autowired
    private RedisTemplate redisTemplate;

    @GetMapping("redis")
    public Object getRedis(){


        redisTemplate.opsForValue().set("r","张三");
        return redisTemplate.opsForValue().get("r");
    }

}
package com.yemuxia;

import org.springframework.boot.SpringApplication;
import org.springframework.boot.autoconfigure.SpringBootApplication;

@SpringBootApplication
public class AppMain {


    public static void main(String[] args) {


        SpringApplication.run(AppMain.class,args);
    }
}
5.运行项目