文章目录
@TableName注解
-
@TableName 注解用来将指定的数据库表和 JavaBean 进行映射
-
@TableName 注解的属性
- value字符串类型,不是必填,用来指定数据表名称
将 user 数据表和 UserBean 实体进行映射 @TableName("user") public class UserBean { // ... }- 将 user 数据表和 UserBean 实体进行映射,如果使用mysql 数据库则指定数据库名,使用的是 oracle,则为 schema,例如:schema=“scott”,其中:scott 就是 oracle 中的 schema
@TableName(value = "user", schema = "mybatis_test") public class AnnotationUserBean { // 忽略其他代码 }- keepGlobalPrefix是否保持使用全局的 tablePrefix 的值,如果设置了全局 tablePrefix 且自行设置了 value 的值
- resultMap对应 Mapper XML 文件中
<resultMap>标签的 id 属性的值 - autoResultMap(默认为 false)控制是否自动构建 resultMap 并使用它,如果手动设置 resultMap 则不会进行自动构建并注入 resultMap
在 AnnotationUser3Mapper.java 所在的目录创建一个 AnnotationUser3Mapper.xml 文件
<?xml version="1.0" encoding="UTF-8"?>
<!DOCTYPE mapper PUBLIC "-//mybatis.org//DTD Mapper 3.0//EN"
    "http://mybatis.org/dtd/mybatis-3-mapper.dtd">
<mapper namespace="com.hxstrive.mybatis_plus.mapper.AnnotationUser3Mapper">
   <resultMap id="annotationUser3BeanMap" type="com.hxstrive.mybatis_plus.model.AnnotationUser3Bean">
      <id column="user_id" jdbcType="INTEGER" property="userId" />
      <result column="name" jdbcType="VARCHAR" property="name" />
      <result column="sex" jdbcType="VARCHAR" property="sex" />
      <result column="age" jdbcType="INTEGER" property="age" />
   </resultMap>
</mapper>
在 @TableName 注解中使用 resultMap 配置映射名称。例如,“resultMap = "annotationUser3BeanMap"
@TableName(value = "user", resultMap = "annotationUser3BeanMap")
public class AnnotationUser3Bean {


   @TableId(value = "user_id", type = IdType.AUTO)
   private String userId;
   // 忽略其他代码
}
关于 autoResultMap 的说明
- MyBatis Plus 会自动构建一个 ResultMap 并注入到 mybatis 里(一般用不上)
- MyBatis Plus 底层是 mybatis,MyBatis Plus 只是注入了常用 crud 到 mybatis 里,注入之前可以说是动态的,根据entity的字段以及注解的变化而变化,MyBatis Plus 注入了之后是静态的了,等于在xml中写sql,
- 对于指定typeHandler,mybatis 只支持写在2个地方:
- 定义在 resultMap 里,只作用于 select 查询的返回结果封装
- 定义在 insert 和 update sql 的 #{property} 里的 property 后面(例:#{property,typehandler=xxx.xxx.xxx}),只作用于设置值而除了这两种直接指定 typeHandler,
@TableId注解
- @TableId 注解的用法,该注解用于将某个成员变量指定为数据表主键
@TableName("user")
public class UserBean {


   @TableId(value = "user_id", type = IdType.AUTO)
   private Integer userId;
}
- 将 UserBean 中的 userId 字段标识为主键,并且对应数据表中的 user_id 字段
- @TableId 注解的属性
-
value指定数据表主键字段名称,不是必填的,默认为空字符串。
-
type指定数据表主键类型,如:ID自增、UUID等。该属性的值是一个 IdType 枚举类型,默认为 IdType.NONE。
-
IdType 枚举可取值如下:
- IdType 枚举值:AUTO数据库ID自增,如果创建数据库表时使用了 AUTO_INCREMENT 修饰主键
CREATE TABLE `user` ( `user_id` int(10) unsigned NOT NULL AUTO_INCREMENT COMMENT '用户ID', `name` varchar(100) DEFAULT NULL COMMENT '用户名', -- ... 忽略 ... PRIMARY KEY (`user_id`) );-
使用 @TableId 时可以指定为 IdType.AUTO
-
IdType 枚举值:NONE表示无状态,该类型为 type 属性的默认主键类型(全局属性为 IdType.INPUT)
-
当设置 @TableId 类型为NONE 时,且不手动设置主键值,MyBatis Plus 将默认给出一个 Long 类型的字符串。
// JavaBean 定义 @TableId(value = "user_id", type = IdType.NONE) private Long userId; // 调用方法 AnnotationUserBean userBean = new AnnotationUserBean( "测试-" + System.currentTimeMillis(), "男", (int)(Math.random() * 50) + 10); userMapper.insert(userBean); -
执行 insert 方法,输出日志
Preparing: INSERT INTO mybatis_test.user ( user_id, name, sex, age ) VALUES ( ?, ?, ?, ? ) Parameters: 1315521648090255362(Long), 测试-1602479776677(String), 男(String), 47(Integer) -
1315521648090255362 就是 MyBatis Plus 自动设置的值
-
insert 前自行 set 主键值
// JavaBean 定义 @TableId(value = "user_id", type = IdType.INPUT) private Long userId; // 调用方法 AnnotationUserBean userBean = new AnnotationUserBean( "测试-" + System.currentTimeMillis(), "男", (int)(Math.random() * 50) + 10); userMapper.insert(userBean); -
执行 insert 方法,输出日志,当没有设置 user_id 主键值时,MyBatis Plus 并没有设置 Long 类型的值
Preparing: INSERT INTO mybatis_test.user ( user_id, name, sex, age ) VALUES ( ?, ?, ?, ? ) Parameters: null, 测试-1602479950289(String), 男(String), 22(Integer) -
IdType 枚举值:ASSIGN_ID,分配ID(主键类型为 Number(Long和Integer) 或 String),使用接口 IdentifierGenerator 的方法 nextId
// JavaBean 定义 @TableId(value = "user_id", type = IdType.ASSIGN_ID) private Long userId; // 调用方法 AnnotationUserBean userBean = new AnnotationUserBean( "测试-" + System.currentTimeMillis(), "男", (int)(Math.random() * 50) + 10); userMapper.insert(userBean); -
执行 insert 方法,输出日志如下, user_id “1315523711071158273” 是通过调用 DefaultIdentifierGenerator 的 nextId 方法获取。
Preparing: INSERT INTO mybatis_test.user ( user_id, name, sex, age ) VALUES ( ?, ?, ?, ? )
Parameters: 1315523711071158273(Long), 测试-1602480268514(String), 男(String), 57(Integer)
-
@TableField注解
-
@TableField 字段注解,该注解用于标识非主键的字段。将数据库列与 JavaBean 中的属性进行映射,
-
将 user 数据表中的 name、sex 和 age 列字段与 AnnotationUser4Bean 实体中的 name、sex 和 age 属性进行映射。
@TableName(value = "user") public class AnnotationUser4Bean { @TableId(value = "user_id", type = IdType.AUTO) private String userId; @TableField("name") private String name; @TableField("sex") private String sex; @TableField("age") private Integer age; } -
@TableField 注解每个属性的含义和用法
- value指定映射的数据库字段名
@TableField("sex") private String sex; @TableField(value="sex") private String sex; - exist属性,是否为数据库表字段,默认为true
- el属性:映射为原生 #{ … } 逻辑,相当于写在 xml 里的 #{ … } 部分。
- condition属性:字段 where 实体查询比较条件,有值设置则按设置的值为准,没有则为默认全局的 %s=#{%s}
- update属性:字段 update set 部分注入,例如:update="%s+1":表示更新时会 set version=version+1(该属性优先级高于 el 属性)
- fill属性:字段自动填充策略,默认为 FieldFill.DEFAULT
- select属性:是否进行 select 查询,默认为 true
- keepGlobalFormat属性;是否保持使用全局的 format 进行处理,默认为 false。
- numericScale属性:指定小数点后保留的位数。
- value指定映射的数据库字段名
什么是乐观锁
- 乐观锁(Optimistic Locking)是相对悲观锁而言的,乐观锁假设数据一般情况下不会造成冲突,所以在数据进行提交更新的时候,才会正式对数据的冲突进行检测。如果发现冲突了,则返回给用户错误的信息,让用户决定如何去做
- 乐观锁适用于读操作多的场景,这样可以提高程序的吞吐量。
乐观锁实例
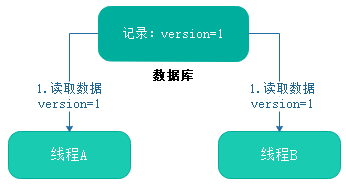
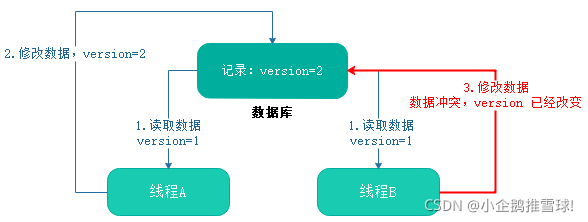
- 存在两个线程 A 和 B,分别从数据库读取数据。执行后,线程 A 和 线程 B 的 version 均等于 1
- 线程 A 处理完业务,提交数据。此时,数据库中该记录的 version 为 2

- 线程 B 也处理完业务了,提交数据。此时,数据库中的 version 已经等于 2,而线程的 version 还是 1。程序给出错误信息,不允许线程 B 操作数据
- 乐观锁机制采取了更加宽松的加锁机制。
- 乐观锁是相对悲观锁而言,也是为了避免数据库幻读、业务处理时间过长等原因引起数据处理错误的一种机制,但乐观锁不会刻意使用数据库本身的锁机制,而是依据数据本身来保证数据的正确性。
- 乐观锁的实现:
- CAS 实现:Java 中 java.util.concurrent.atomic 包下面的原子变量使用了乐观锁的一种 CAS 实现方式。
- 版本号控制:一般是在数据表中加上一个数据版本号 version 字段,表示数据被修改的次数。当数据被修改时,version 值会+1。
- 当线程A要更新数据值时,在读取数据的同时也会读取 version 值,在提交更新时,若刚才读取到的 version 值与当前数据库中的 version 值相等时才更新,否则重试更新操作,直到更新成功。
@Version注解
- 在 MyBatis Plus 中,使用 @Version 实现乐观锁,该注解用于字段上面
- 定义 user 表的 JavaBean
@TableName(value = "user")
public class AnnotationUser5Bean {


   @TableId(value = "user_id", type = IdType.AUTO)
   private String userId;

   @TableField("name")
   private String name;

   @TableField("sex")
   private String sex;

   @TableField("age")
   private Integer age;

   @Version
   private int version;
   // 忽略 getter 和 setter 方法
}
-
添加 MyBatis Plus 的乐观锁插件,该插件会自动帮我们将 version 加一操作
@Configuration public class MybatisPlusConfig { @Bean public MybatisPlusInterceptor paginationInterceptor() { MybatisPlusInterceptor interceptor = new MybatisPlusInterceptor(); // 乐观锁插件 interceptor.addInnerInterceptor(new OptimisticLockerInnerInterceptor()); return interceptor; } } -
创建两个线程 A 和 B 分别去修改用户ID为 1 的用户年龄,然后观察年龄和version字段的值。
package com.hxstrive.mybatis_plus.simple_mapper.annotation;

import com.hxstrive.mybatis_plus.mapper.AnnotationUser5Mapper;
import com.hxstrive.mybatis_plus.model.AnnotationUser5Bean;
import org.junit.jupiter.api.Test;
import org.junit.runner.RunWith;
import org.springframework.beans.factory.annotation.Autowired;
import org.springframework.boot.test.context.SpringBootTest;
import org.springframework.test.context.junit4.SpringRunner;
import java.util.concurrent.CountDownLatch;

@RunWith(SpringRunner.class)
@SpringBootTest
class AnnotationDemo5 {


    @Autowired
    private AnnotationUser5Mapper userMapper;

    @Test
    void contextLoads() throws Exception {


        // 重置数据
        AnnotationUser5Bean user5Bean = new AnnotationUser5Bean();
        user5Bean.setUserId(1);
        user5Bean.setAge(0);
        user5Bean.setVersion(0);
        userMapper.updateById(user5Bean);

        // 修改数据
        for (int i = 0; i < 10; i++) {


            System.out.println("第 " + (i + 1) + " 次修改数据");
            final CountDownLatch countDownLatch = new CountDownLatch(2);
            modifyUser(countDownLatch, "My-Thread-A", 1);
            modifyUser(countDownLatch, "My-Thread-B", 1);
            countDownLatch.await();
            Thread.sleep(100L);
        }
    }

    private void modifyUser(final CountDownLatch countDownLatch, String threadName, int userId) {


        Thread t = new Thread(new Runnable() {


            @Override
            public void run() {


                try {


                    String threadName = Thread.currentThread().getName();
                    try {


                        AnnotationUser5Bean userBean = userMapper.selectById(userId);
                        if (null == userBean) {


                            return;
                        }
                        AnnotationUser5Bean newBean = new AnnotationUser5Bean();
                        newBean.setName(userBean.getName());
                        newBean.setSex(userBean.getSex());
                        newBean.setAge(userBean.getAge() + 1);
                        newBean.setUserId(userBean.getUserId());
                        newBean.setVersion(userBean.getVersion());
                        int result = userMapper.updateById(newBean);
                        System.out.println("result=" + result + " ==> " + userBean);
                    } catch (Exception e) {


                        System.err.println(threadName + " " + e.getMessage());
                    }
                } finally {


                    countDownLatch.countDown();
                }
            }
        });
        t.setName(threadName);
        t.start();
    }

}
- 支持的数据类型只有:int,Integer,long,Long,Date,Timestamp,LocalDateTime
- 整数类型下 newVersion = oldVersion + 1
- newVersion 会回写到 entity 中
- 仅支持 updateById(id) 与 update(entity, wrapper) 方法
- 在 update(entity, wrapper) 方法下, wrapper 不能复用!
@EnumValue注解
- @EnumValue 注解用来将数据库定义的枚举类型和Java的枚举进行映射
- 注意、@EnumValue 注解需要添加到枚举类的某个字段上面,而不是添加到 JavaBean 实体的某个字段上面
- 假如在数据库 user 表中有一个 week 字段,表示周信息。在项目中存在一个 WeekEnum 枚举类,可以在该枚举类中使用 @EnumValue 注解
public enum WeekEnum {


    SUNDAY("Sunday", "星期日"),
    SATURDAY("Saturday", "星期六"),
    FRIDAY("Friday", "星期五"),
    THURSDAY("Thursday", "星期四"),
    WEDNESDAY("Wednesday", "星期三"),
    TUESDAY("Tuesday", "星期二"),
    MONDAY("Monday", "星期一");

    @EnumValue
    private String value;
    private String name;
    // ...
}
- 将 @EnumValue 注解标注在 value 字段,表示该字段的值和数据库表中定义的枚举值一一对应。在 JavaBean 中就可以直接引用该枚举了
public class User {


    private int id;
    private String name;
    private String sex;
    private WeekEnum week;
}
@EnumValue注解 示例代码
- 数据库 user 表中添加一个枚举类型的 week 字段
-- 添加一个枚举类型的列,week
ALTER TABLE `user`
ADD COLUMN `week`  enum('Sunday','Saturday','Friday','Thursday','Wednesday','Tuesday','Monday') NULL DEFAULT '';
- 给 WeekEnum 枚举类,该类中的 value 字段使用 @EnumValue 字段进行修饰
package com.hxstrive.mybatis_plus.enums;

import com.baomidou.mybatisplus.annotation.EnumValue;

public enum WeekEnum {


    SUNDAY("Sunday", "星期日"),
    SATURDAY("Saturday", "星期六"),
    FRIDAY("Friday", "星期五"),
    THURSDAY("Thursday", "星期四"),
    WEDNESDAY("Wednesday", "星期三"),
    TUESDAY("Tuesday", "星期二"),
    MONDAY("Monday", "星期一");

    @EnumValue
    private String value;
    private String name;

    private WeekEnum(String value, String name) {


        this.value = value;
        this.name = name;
    }

    public String getValue() {


        return this.value;
    }

    public String getName() {


        return this.name;
    }
}
- 定义一个 User 类,其中 week 成员变量的类型为 WeekEnum
package com.hxstrive.mybatis_plus.model;

import com.baomidou.mybatisplus.annotation.*;
import com.hxstrive.mybatis_plus.enums.WeekEnum;

@TableName(value = "user")
public class AnnotationUser6Bean {


   @TableId(value = "user_id", type = IdType.AUTO)
   private int userId;

   @TableField("name")
   private String name;

   @TableField("sex")
   private String sex;

   @TableField("age")
   private Integer age;

   @TableField("week")
   private WeekEnum week;

   // 忽略 getter 和 setter

   @Override
   public String toString() {


      String weekStr = "IS NULL";
      if(this.week != null) {


         weekStr = "[" + this.week.getValue() + "] " + this.week.getName();
      }
      return "UserBean{" +
            "userId=" + userId +
            ", name='" + name + '\'' +
            ", sex='" + sex + '\'' +
            ", age=" + age +
            ", week=" + weekStr +
            '}';
   }

}
- 配置 MyBatis Plus 自动扫描我们定义的枚举类型,配置如下
# mybatis plus
mybatis-plus:
  # 支持统配符 * 或者 ; 分割
  typeEnumsPackage: com.hxstrive.mybatis_plus.enums
- 忘记了上面的配置,运行程序会抛出“No enum constant com.hxstrive.mybatis_plus.enums.WeekEnum.Friday”错误信息。
- 测试代码:
@Test
    void contextLoads() throws Exception {


        QueryWrapper<AnnotationUser6Bean> wrapper = new QueryWrapper<>();
        wrapper.lt("user_id", 10);
        for(AnnotationUser6Bean item : userMapper.selectList(wrapper)) {


            System.out.println(item);
        }
    }
@TableLogic注解
-
@TableLogic 注解用于实现数据库数据逻辑删除。注意,该注解只对自动注入的 sql 起效
-
插入(insert)时不做限制
-
查找(select):@TableLogic 注解将会在 select 语句的 where 条件添加条件,过滤掉已删除数据,且使用 wrapper.entity 生成的 where 条件会忽略该字段。例如:
SELECT user_id,name,sex,age,deleted FROM user WHERE user_id=1 AND deleted='0' -
更新(update):@TableLogic 注解将会在 update 语句的 where 条件后追加条件,防止更新到已删除数据,且使用 wrapper.entity 生成的 where条件会忽略该字段。例如:
UPDATE user SET deleted='1' WHERE user_id=1 AND deleted='0'
- 删除(delete):@TableLogic 注解会将 delete 语句转变为 update 语句,例如
update user set deleted=1 where id = 1 and deleted=0
- @TableLogic 字段类型支持说明
- 支持所有数据类型(推荐使用 Integer、Boolean、LocalDateTime)
- 如果数据库字段使用 datetime,逻辑未删除值和已删除值支持配置为字符串 null,另一个值支持配置为函数来获取值如now()
- 逻辑删除是为了方便数据恢复和保护数据本身价值等等的一种方案,但实际就是删除。如果需要频繁查出来看就不应使用逻辑删除,而是以一个状态去表示
@TableLogic 属性
- value属性:用来指定逻辑未删除值,默认为空字符串
- delval属性:用来指定逻辑删除值,默认为空字符串。
- 可以不在 @TableLogic 注解中指定 value 和 delval 属性的值。使用全局逻辑删除配置信息,配置如下:
# application.yml
mybatis-plus:
  global-config:
    db-config:
      # 全局逻辑删除的实体字段名 (since 3.3.0, 配置后可以忽略 @TableLogic 中的配置)
      logic-delete-field: flag
      # 逻辑已删除值(默认为 1)
      logic-delete-value: 1
      # 逻辑未删除值(默认为 0)
      logic-not-delete-value: 0
@TableLogic 属性样例
-
在 user 数据表中添加一个 deleted 字段。如果该字段值为1,表示记录被删除。如果该字段值为0,表示记录未被删除
-
向 user 数据表添加 deleted 字段
-- 添加一个 deleted 字段,实现逻辑删除
ALTER TABLE `user`
ADD COLUMN `deleted`  varchar(1) NULL DEFAULT 0 COMMENT '是否删除(1-删除;0-未删除)';
- 创建 user 表的实体类 AnnotationUser7Bean
package com.hxstrive.mybatis_plus.model;

import com.baomidou.mybatisplus.annotation.*;

@TableName(value = "user")
public class AnnotationUser7Bean {


   @TableId(value = "user_id", type = IdType.AUTO)
   private int userId;

   @TableField("name")
   private String name;

   @TableField("sex")
   private String sex;

   @TableField("age")
   private Integer age;

   @TableLogic(value = "0", delval = "1")
   private String deleted;

   // 忽略 getter 和 setter 方法

   @Override
   public String toString() {


      return "UserBean{" +
            "userId=" + userId +
            ", name='" + name + '\'' +
            ", sex='" + sex + '\'' +
            ", age=" + age +
            ", deleted=" + deleted +
            '}';
   }
}
- 使用 @TableLogic 注解将 deleted 成员变量指定为逻辑删除字段
@TableLogic(value = "0", delval = "1")
private String deleted;
- 先查询用户ID为1的用户是否存在。如果存在,则删除该用户信息。然后,查询用户ID小于10的用户信息,
@RunWith(SpringRunner.class)
@SpringBootTest
class AnnotationDemo7 {


    @Autowired
    private AnnotationUser7Mapper userMapper;

    @Test
    void contextLoads() throws Exception {


        // 删除用户ID为1的用户信息
        AnnotationUser7Bean oldUserBean = userMapper.selectById(1);
        if(null != oldUserBean) {


            userMapper.deleteById(oldUserBean.getUserId());
        }

        // 查询用户信息
        QueryWrapper<AnnotationUser7Bean> wrapper = new QueryWrapper<>();
        wrapper.lt("user_id", 10);
        for(AnnotationUser7Bean item : userMapper.selectList(wrapper)) {


            System.out.println(item);
        }
    }

}