学学SpringBoot那点事儿
SpringBoot
背景
J2EE笨重的开发,繁多的配置,低下的开发效率,复杂的部署流程,第三方集成难度大
解决
SpringBoot->J2EE一站式解决方案
SpringCloud->分布式整体解决方案
SpringBoot自动配置好Spring的相关文件,对于用户来说仅仅需要少量的配置;简化Spring项目开发
优缺点
优点
- 快速创建独立运行的Spring项目以及主流框架集成
- 使用嵌入式的Servlet容器,应用无需打成WAR包;直接打成jar包,使用java命令即可运行
- Starters自动依赖于版本控制
- 大量的自动配置,简化开发
- 无需配置XML,无代码生成,开箱即用
- 准生产环境的运行时应用监控
- 与云计算天然集成
缺点
- 入门容易精通难,基于Spring系列的封装,需精通Spring的各个API
微服务
微服务是一种架构风格
一个应用应该是一组小型服务,可以通过HTTP的方式进行互通
微服务的对立面就是单体应用
每一个功能元素最终都是一个可独立替换和独立升级的软件单元,单元与单元之间通过HTTP的方式进行轻量级通信
HelloWorld
SpringBoot的HelloWorld
@SpringBootApplication
package main;

import org.springframework.boot.SpringApplication;
import org.springframework.boot.autoconfigure.SpringBootApplication;

/*
*   @SpringBootApplication标签用以标识当前为Springboot程序
* */
@SpringBootApplication
public class HelloWorld{


    public static void main(String[] args) {


        SpringApplication.run(HelloWorld.class,args);
    }
}
@Controller
package controller;

import org.springframework.stereotype.Controller;
import org.springframework.web.bind.annotation.RequestMapping;
import org.springframework.web.bind.annotation.ResponseBody;
/*
*   @Controller标识当前为控制器类
* */
@Controller
public class ControllerTest {


    @ResponseBody
    @RequestMapping("/hello")
    public String hello(){


        return "hello world";
    }
    @ResponseBody
    @RequestMapping("/test")
    public String test(){


        return "test";
    }
}
HelloWorld探究
我们去查看一下pom文件
扫描二维码关注公众号,回复: 13492587 查看本文章
pom文件
父项目
<parent>
		<groupId>org.springframework.boot</groupId>
		<artifactId>spring-boot-dependencies</artifactId>
		<version>1.5.9.RELEASE</version>
		<relativePath>../../spring-boot-dependencies</relativePath>
</parent>
父项目为dependencies
点到父项目内部去看一下
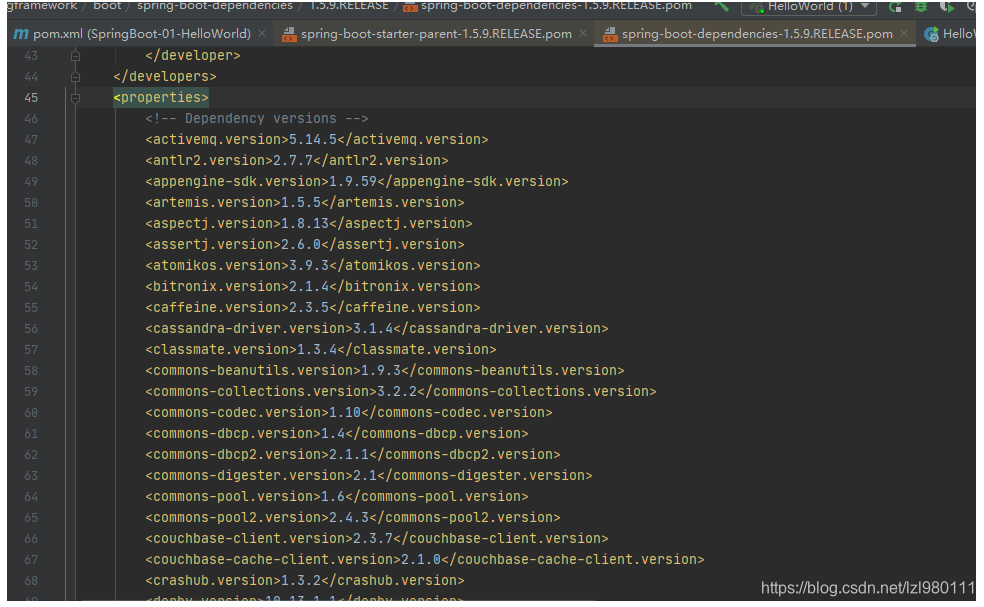
在这里定义了各个依赖的版本信息
SpringBoot的版本仲裁中心
启动器
<dependencies>
    <dependency>
        <groupId>org.springframework.boot</groupId>
        <artifactId>spring-boot-starter-web</artifactId>
    </dependency>
</dependencies>
spring-boot-starter-web:
spring-boot 场景启动器;帮我们导入了web模块正常运行所以来的组件
SpringBoot将所有的功能长江抽取出来,做成一个个的Starters(启动器),只需要在项目里面引入这些Starter相关场景的所有依赖导入进来
主程序类
@SpringBootApplication: SpringBoot应用标注在某个类上,说明这个类是SpringBoot的主配置类,SpringBoot就应该运行在这个类的main方法来启动SpringBoot应用
我们点进去看一下,发现SpringBootApplication其实是如下几个注解的组合
@Target({

    ElementType.TYPE})
@Retention(RetentionPolicy.RUNTIME)
@Documented
@Inherited
@SpringBootConfiguration
@EnableAutoConfiguration
@ComponentScan(
    excludeFilters = {

    @Filter(
    type = FilterType.CUSTOM,
    classes = {

    TypeExcludeFilter.class}
), @Filter(
    type = FilterType.CUSTOM,
    classes = {

    AutoConfigurationExcludeFilter.class}
)}
)
@SpringBootConfiguration:Spring Boot的配置类
标注在某个类上,表示这是一个SpringBoot的配置类;
@Configuration:配置类上来标注这个注解
配置类---------配置文件;配置类也是容器的一个组件;@Component
@EnableAutoConfiguration:开启自动配置功能
以前我们需要自己去配置的东西,SpringBoot帮我们自动配置
@AutoConfigurationPackage:自动配置包
@Import:(AutoConfigurationPackages.Registrar.class):
Spring的底层注解@Import,给容器中导入一个组件导入的组件由AutoconfigurationPackages.Registrar.class
将主配置类(@SpringBootApplication标注的类)的所在包及下面所有子包里面的所有组件扫描到Spring容器中
@EnableAutoConfigurationImportSelector:导入那些组件的选择器;将所有需要导入的组件以全类名的方式返回;这些组件就回被添加到容器中
有了自动配置类,我们无需再手动配置
YAML
标记语言
springboot 使用一个全局的配置文件,配置文件名是固定的:
- application.properties
- application.yml
配置文件的作用:修改SpringBoot自动配置的默认值;SpringBoot在底层自动配置完成
以前的配置文件大多以xml文件
yml文件以数据为中心,比json\xml更适合做配置文件
yaml语法:
server:
	port:8081
properties语法:
server.port:8081
xml语法:
<server>
	<port>8081</port>
</server>
YAML语法
基本语法
k:(空格)v:表示一对键值对(空格必须要有)
以空格的缩进来表示层级关系:只要是左对齐的一列数据都是同一层级的
例子:
server:
	port: 8081
	path: /hello
属性和值是大小写敏感的
值的写法
普通值(字面量):数字、字符、布尔
key: value    直接写;

字符串默认不用加上单引号或者双引号;

""	双引号会转义;
''	单引号不会转义;
对象值:对象、Map、键值对
key: value    直接写;
例:
friends:
	lastName: zhangsan
    age: 20
行内写法:
friends:{

    lastName: zhangsan,age: 18}
数组:List、Set
用-代表数组中的一个值
例:
animals:
 - cat
 - dog
 - tiger
行内写法:
animals:{

    cat,dog,pig}
yaml配置文件值获取
@ConfigurationProperties
@ConfigurationProperties 告诉SpringBoot将本类中的所有属性和配置文件中的相关配置进行绑定
实例:
yml文件如下:
server:
  port: 2021

person:
  lastname: zhangsan
  age: 18
  boss: false
  birth: 2019/12/12
  maps: {

    k1: v1,k2: v2}
  lists:
    - lisi
    - wangwu
  dog:
    name: 小狗
    age: 5
建立bean: person和dog,数据结构同上
package bean;

import org.springframework.boot.context.properties.ConfigurationProperties;
import org.springframework.stereotype.Component;

import java.util.Date;
import java.util.List;
import java.util.Map;
/*
*           将配置文件中配置的每一个属性映射到此组件中
*           @ConfigurationProperties 告诉SpringBoot将本类中的所有属性和配置文件中的相关配置进行绑定
* 只有这个组件是容器中的组件,容器才能提供@ConfigurationProperties功能
* */
@Component
@ConfigurationProperties(prefix = "person")
public class Person {


    private String lastname;
    private Integer age;
    private Boolean boos;
    private Date birth;
    private Map<String,Object> maps;
    private List<Object> lists;
    private Dog dog;

    @Override
    public String toString() {


        return "Person{" +
                "lastname='" + lastname + '\'' +
                ", age=" + age +
                ", boos=" + boos +
                ", birth=" + birth +
                ", maps=" + maps +
                ", lists=" + lists +
                ", dog=" + dog +
                '}';
    }

    public String getLastname() {


        return lastname;
    }

    public void setLastname(String lastname) {


        this.lastname = lastname;
    }

    public Integer getAge() {


        return age;
    }

    public void setAge(Integer age) {


        this.age = age;
    }

    public Boolean getBoos() {


        return boos;
    }

    public void setBoos(Boolean boos) {


        this.boos = boos;
    }

    public Date getBirth() {


        return birth;
    }

    public void setBirth(Date birth) {


        this.birth = birth;
    }

    public Map<String, Object> getMaps() {


        return maps;
    }

    public void setMaps(Map<String, Object> maps) {


        this.maps = maps;
    }

    public List<Object> getLists() {


        return lists;
    }

    public void setLists(List<Object> lists) {


        this.lists = lists;
    }

    public Dog getDog() {


        return dog;
    }

    public void setDog(Dog dog) {


        this.dog = dog;
    }
}
进入SpringBoot的单元测试模块中测试一下
package com.example.springboot01config;

import com.example.springboot01config.bean.Person;
import org.junit.jupiter.api.Test;
import org.junit.runner.RunWith;
import org.springframework.beans.factory.annotation.Autowired;
import org.springframework.boot.test.context.SpringBootTest;
import org.springframework.test.context.junit4.SpringRunner;
/*
*           SpringBoot单元测试
*           可以在测试期间很方便的使用   类似编码一样进行自动注入等 容器的功能
* */
@RunWith(SpringRunner.class)
@SpringBootTest
class SpringBoot01ConfigApplicationTests {


    @Autowired
    Person person;
    @Test
    void contextLoads() {


        System.out.println(person);
    }

}
确实可以将Person打印出来
Person{lastname=‘zhangsan’, age=18, birth=Thu Dec 12 00:00:00 CST 2019, maps={k1=v1, k2=v2}, lists=[lisi, wangwu], dog=Dog{name=‘小狗’, age=5}}
@Value
使用@Value同样可以获取配置文件中的值
它的使用同Spring中bean配置一样
<bean class="Person">
	<property name="lastname" value="字面量/${key}从环境变量、配置文件中获取值/#{SpEl}"></property>
</bean>
使用如下(截取了部分代码)
public class Person {


/*
*           <bean class="Person">
                <property name="lastName" value="字面量/${key}从环境变量、配置文件中获取值/#{SpEl}"></property>
            <bean/>
            同下面的@value("")
            *
* */
    @Value("${person.lastname}")
    private String lastname;
    @Value("${person.age}")
    private Integer age;
    private Date birth;
    private Map<String,Object> maps;
    private List<Object> lists;
    private Dog dog;
@Value需一个一个属性单独赋值
| @ConfigurationProperties | @Value | |
|---|---|---|
| 功能 | 批量注入配置文件中的属性 | 一个个属性单独指定 |
| 松散绑定 | 支持 | 不支持 |
| SpEL | 不支持 | 支持 |
| JSR303数据校验 | 支持 | 不支持 |
| 复杂类型封装 | 支持 | 不支持 |
如果说,我们只是在某个文件中获取一下配置文件中的某个值,此时可以使用@Value
如果说,我们专门编写了一个javaBean来和配置文件进行映射,此时我们使用@ConfigurationProperties
加载指定配置文件
@PropertySource
/*
 *           将配置文件中配置的每一个属性映射到此组件中
 *           @ConfigurationProperties 告诉SpringBoot将本类中的所有属性和配置文件中的相关配置进行绑定
 *           只有这个组件是容器中的组件,容器才能提供@ConfigurationProperties功能
 * */
/*
* @PropertySource加载指定的配置文件
* */
@PropertySource(value = {

    "classpath:person.properties"})
@Component
@ConfigurationProperties(prefix = "person")
@Validated
public class Person {


/*
*           <bean class="Person">
                <property name="lastName" value="字面量/${key}从环境变量、配置文件中获取值/#{SpEl}"></property>
            <bean/>
            同下面的@value("")
            *
* */
//    @Value("${person.lastname}")
//    @Email
    private String lastname;
//    @Value("${person.age}")
    private Integer age;
    private Date birth;
    private Map<String,Object> maps;
    private List<Object> lists;
    private Dog dog;
导入Spring配置文件,使其生效
@ImportResource
测试一下:
首先我们先写一个Spring配置文件beans.xml
<?xml version="1.0" encoding="UTF-8"?>
<beans xmlns="http://www.springframework.org/schema/beans"
       xmlns:xsi="http://www.w3.org/2001/XMLSchema-instance"
       xsi:schemaLocation="http://www.springframework.org/schema/beans http://www.springframework.org/schema/beans/spring-beans.xsd">
    <bean id="helloService" class="com.example.springboot01config.service.HelloService">

    </bean>
</beans>
然后我们在单元测试中进行测试
自动注入ioc -> 调用ioc的containsBean()方法看声明的helloService是否注入
结果为False
package com.example.springboot01config;

import com.example.springboot01config.bean.Person;
import org.junit.jupiter.api.Test;
import org.junit.runner.RunWith;
import org.springframework.beans.factory.annotation.Autowired;
import org.springframework.boot.test.context.SpringBootTest;
import org.springframework.context.ApplicationContext;
import org.springframework.test.context.junit4.SpringRunner;
/*
*           SpringBoot单元测试
*           可以在测试期间很方便的使用   类似编码一样进行自动注入等 容器的功能
* */
@RunWith(SpringRunner.class)
@SpringBootTest
class SpringBoot01ConfigApplicationTests {


    @Autowired
    Person person;

    @Autowired
    ApplicationContext ioc;

    @Test
    void testHelloService(){


        System.out.println(ioc.containsBean("helloService"));

    }
    @Test
    void contextLoads() {


        System.out.println(person);
    }
}
说明helloService没有注入
下面我们使用@ImportResource再次测试
package com.example.springboot01config;

import org.springframework.boot.SpringApplication;
import org.springframework.boot.autoconfigure.SpringBootApplication;
import org.springframework.context.annotation.ImportResource;

@ImportResource(locations = {

    "classpath:beans.xml"})
@SpringBootApplication
public class SpringBoot01ConfigApplication {


    public static void main(String[] args) {


        SpringApplication.run(SpringBoot01ConfigApplication.class, args);
    }

}
结果 true 说明 配置文件生效
@ImportResource(locations = {

    "classpath:beans.xml"})
使Spring配置文件生效
但是,SpringBoot不推荐使用Spring配置文件的方式添加组件
现在推荐使用注解的方式
具体方式如下:
- 添加配置类
- @Configuration注解标识当前类是一个配置类
- @Bean替代了之前的bean标签,效果是一样的
package com.example.springboot01config.config;

import com.example.springboot01config.service.HelloService;
import org.springframework.context.annotation.Bean;
import org.springframework.context.annotation.Configuration;
/*
*   @Configuration指明当前类是一个配置类,就是用来替代之前Spring配置文件的
*   在配置文件中是使用<bean><bean/>标签添加组件
*
* */
@Configuration
public class MyAppConfig {


//    使用@Bean替代了<bean><bean/>
    @Bean
    public HelloService helloService(){


        System.out.println("配置类@Bean容器中添加组件");
        return new HelloService();
    }
}
配置文件占位符
随机数
person.name=zhangsan${random.uuid}
person.age=${random.int}
person.age2=${random.long}
person.age3=${random.int(10)}
person.age4=${random.int(10,100)}
占位符
获取之配置的值、没有可以使用:指定默认值
person.name=zhangsan
person.dog.name=${person.name:lisi}_dog
默认lisi,有则使用配置值
Profile
多Profile文件
我们在主配置文件编写的时候,文件名可以是application-(profile).properties/yml
默认使用application.properties配置文件
在application.properties中配置
spring.profiles.active=dev
切换配置文件的使用
yml支持多文档块方式
激活指定profile
自动配置
配置文件到底能些什么?怎么写?自动配置以原理
自动配置原理
-
SpringBoot启动时候加载主配置类,开启了自动配置功能**@EnableAutoConfiguration**
-
@EnableAutoConfiguration作用
-
利用AutoConfigurationImportSelector给容器中导入组件,导入了那些组件?
可以查看 selectImports() 方法中的内容
    public String[] selectImports(AnnotationMetadata annotationMetadata) {


        if (!this.isEnabled(annotationMetadata)) {


            return NO_IMPORTS;
        } else {


            AutoConfigurationImportSelector.AutoConfigurationEntry autoConfigurationEntry = this.getAutoConfigurationEntry(annotationMetadata);
            return StringUtils.toStringArray(autoConfigurationEntry.getConfigurations());
        }
    }
主要是获取候选的配置
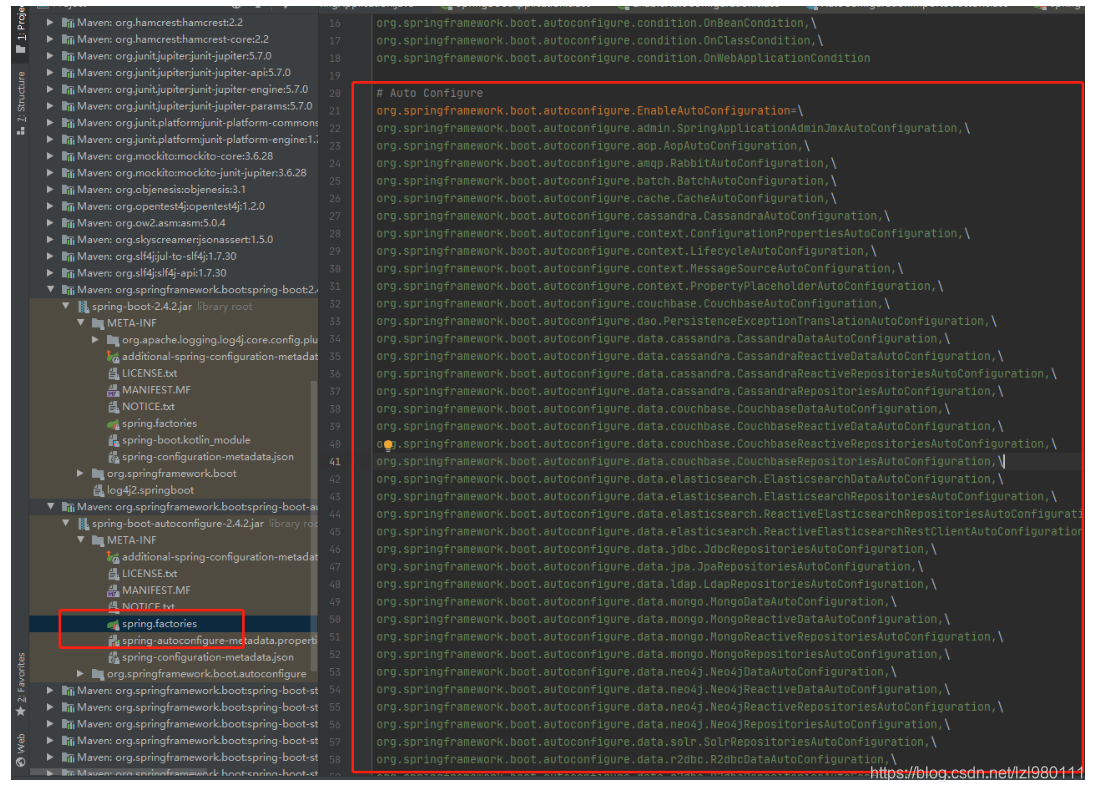
SpringFactoriesLoader.loadFactoryNames()
扫描所有jar包类路径下 META-INF/spring.factories
把扫描到的这些文件的内容包装成properties对象
从properties中获取到EnableAutoConfiguration.class类对应的值,然后把它们添加到容器中
概括为一句话:
将类路径下 META/spring.factories 里面配置的所有 EnableAutoConfiguration 的值加入到了容器中
-
每一个这样的xxxAutoConfiguration类都是容器中的每一个组件,都加入到容器中,用他们来做自动配置
-
每一个自动配置类进行自动配置功能
以 HttpEncodingAutoConfiguration 为例进行解析
- 首先我们看到类顶部的一堆注解
//@Configuration表明当前为配置类
@Configuration(
    proxyBeanMethods = false
)
//启用指定类(此处为ServerProperties)的ConfigurationProperties功能;
//将配置文件中的值与当前配置类的值匹配起来
@EnableConfigurationProperties({

      ServerProperties.class})
//Spring底层的@Conditional:根据不同的条件,如果满足指定条件,整个配置类里面的配置才会生效,当前是判断应用是否为Web应用,如果是则生效,否则失效
@ConditionalOnWebApplication(
    type = Type.SERVLET
)
//判断当前项目是否有这个类     CharacterEncodingFilter是SpringMVC中解决乱码的
@ConditionalOnClass({

      CharacterEncodingFilter.class})
//判断配置文件是否存在某个配置
@ConditionalOnProperty(
    prefix = "server.servlet.encoding",
    value = {

      "enabled"},
    matchIfMissing = true
)
点入ServerProperties.class看一下
所有在配置文件中能配置的属性都在 xxxProperties类中封装着;配置文件能配置什么,就可以参照某一个功能对应的这个属性类
一句话解释自动配置类:根据当前不同的条件判断,决定这个配置类是否生效
- 若当前自动配置类生效,则给容器中添加当前组件 @Bean
日志
日志框架
记录系统运行时信息
几个高大上的功能
- 异步模式
- 自动归档
- 等等等等
市面上的日志框架:
- JUL
- JCL
- Jboss-logging
- logback
- log4j
- log4j2
- SLF4J
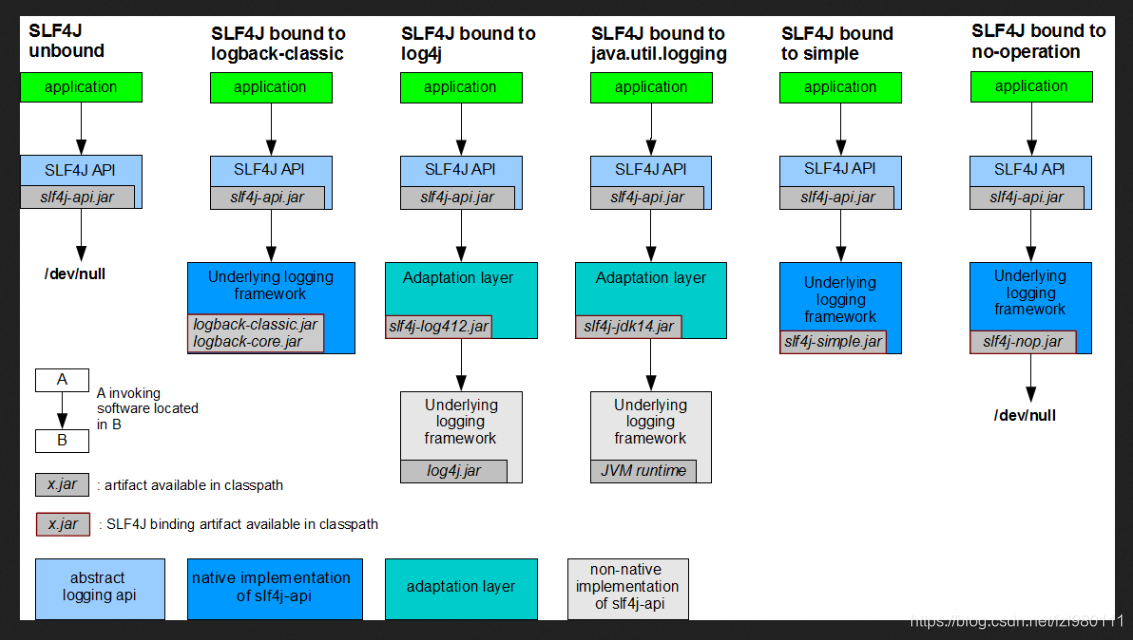
日志门面(日志抽象层):JCL SLF4J Jboss-logging
日志实现:Log4j JUL Log4j2 Logback
日志的实现需选一个日志门面一个日志实现:综合考虑选用SLF4J和Logback
SpringBoot:底层Spring框架,Spring默认使用JCL;SpringBoot选用 SLF4J和Logback
SLF4J的使用
以后开发的时候,日志记录方法的调用,不应该直接调用日志的实现类,而是应当调用日志抽象层的方法
import org.slf4j.Logger;
import org.slf4j.LoggerFactory;

public class HelloWorld {


  public static void main(String[] args) {


    Logger logger = LoggerFactory.getLogger(HelloWorld.class);
    logger.info("Hello World");
  }
}
首先导入slf4j的jar和logback的实现jar 适配slf4j和logback的jar
每一个日志的实现框架都有自己的配置文件,使用了slf4j后,配置文件还是做成日志实现框架的配置文件
遗留问题
假如不同组件之间的日志实现框架是不同的,我们使用同一的日志抽象层 SLF4J
统一日志记录:
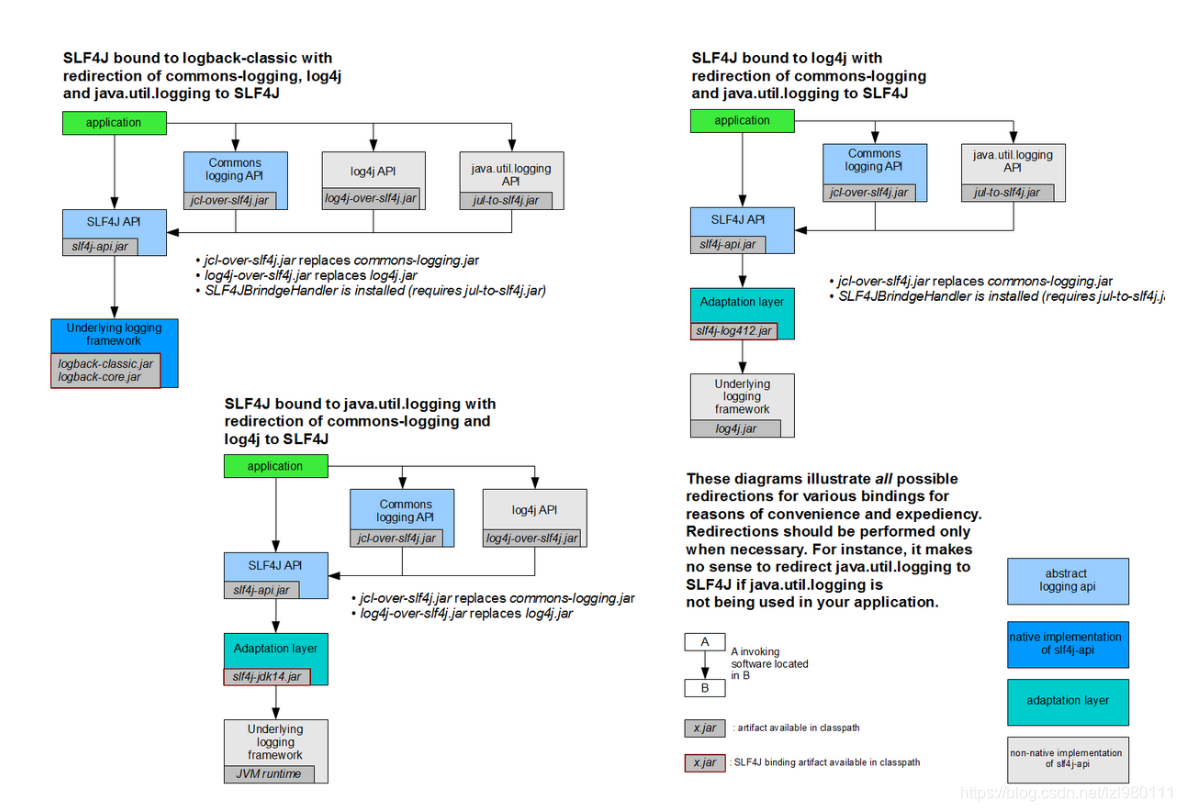
如何让系统中的日志都统一到SLF4J
- 将系统中其他日志框架先排除出去
- 使用中间包替换原有日志框架
- 再来导入SLF4J其他的实现
SpringBoot日志实现
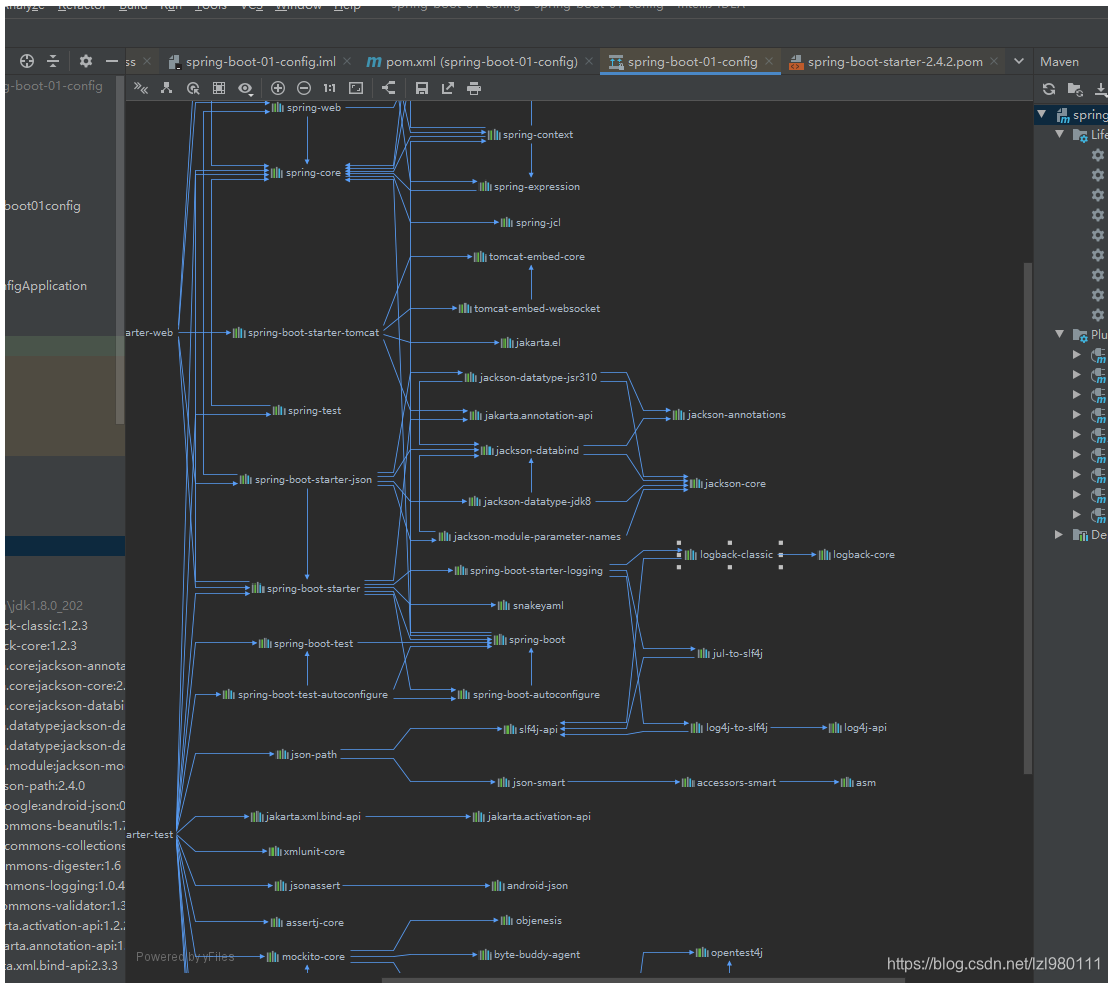
Idea可以通过思维导图的方式查看依赖关系
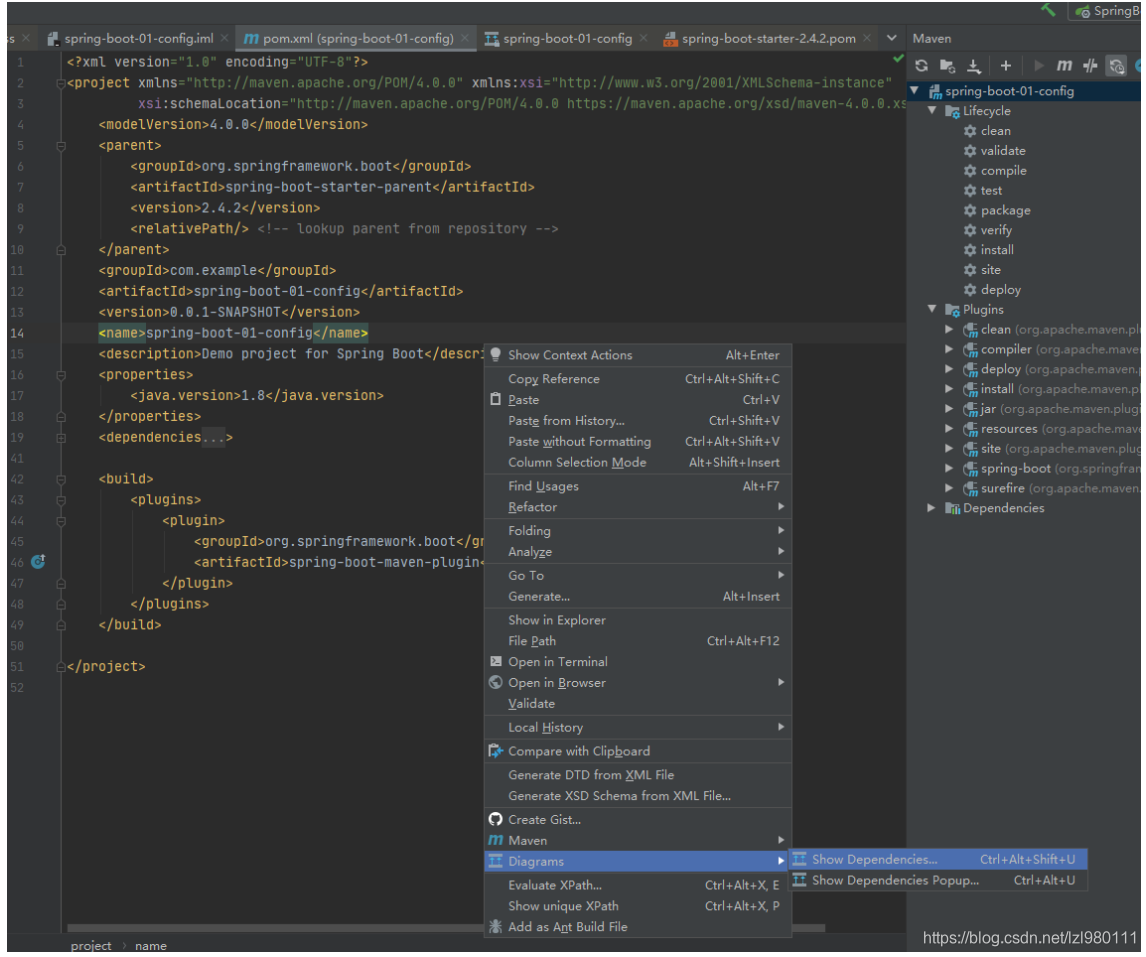
视图效果如下:
    <dependency>
      <groupId>org.springframework.boot</groupId>
      <artifactId>spring-boot-starter</artifactId>
      <version>2.4.3</version>
      <scope>compile</scope>
    </dependency>
SpringBoot使用它来做日志功能
    <dependency>
      <groupId>org.springframework.boot</groupId>
      <artifactId>spring-boot-starter-logging</artifactId>
      <version>2.4.2</version>
      <scope>compile</scope>
    </dependency>
封装所有日志
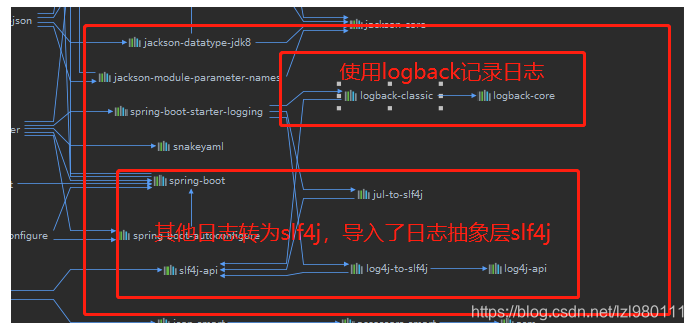
总结:
SpringBoot底层也是使用SLF4J + LogBack的方式进行日志记录
同时还将其他的日志替换成了slf4j
日志使用
package com.example.springboot;

import org.junit.jupiter.api.Test;
import org.junit.runner.RunWith;
import org.slf4j.Logger;
import org.slf4j.LoggerFactory;
import org.springframework.boot.test.context.SpringBootTest;
import org.springframework.test.context.junit4.SpringRunner;


@RunWith(SpringRunner.class)
@SpringBootTest
class SpringBoot03LoggingApplicationTests {


    Logger logger= LoggerFactory.getLogger(getClass());
    @Test
    void contextLoads() {


/*          这是日志级别日志
*          由低到高  trace<debug<info<warn<error
*           可以调整输出的日志级别,日志就只会在这个级别以后的高级别生效
* */
        logger.trace("这是trace日志....");
        logger.debug("这是debug日志...");
        logger.info("这是info日志...");
        logger.warn("这是warn日志...");
        logger.error("这是error日志...");
    }

}
日志配置:
#指明  com.example.springboot  包下的日志级别
logging.level.com.example.springboot=trace
logging.file.path=/spring/log
logging.file.name=springboot.log
#在控制台输出的日志格式
logging.pattern.console=%d{yyyy-MM-dd}{%thread} %-5level %logger{50} -%msg%n
#指定在文件输出的日志格式
logging.pattern.file=%d{yyyy-MM-dd}{%thread} %-5level %logger{50} -%msg%n
Web开发
使用SpringBoot
- 创建SpringBoot应用,选中我们所需要的模块
- SpringBoot已经默认将这些场景配置完成;只需要在配置文件中指定少量配置,就可以正常运行
- 编写业务逻辑代码
SpringBoot深入
自动配置原理?
- SpringBoot帮我们配置了什么?能不能修改?能修改哪些配置?能不能扩展
***AutoConfigration : 帮我们给容器中自动配置组件
***Properties : 配置类来封装配置文件中的内容
01 - SpringBoot对静态资源的映射规则
/webjar
我们看到 WebMvcAutoConfigration 里面
protected void addResourceHandlers(ResourceHandlerRegistry registry) {


            super.addResourceHandlers(registry);
            if (!this.resourceProperties.isAddMappings()) {


                logger.debug("Default resource handling disabled");
            } else {


                ServletContext servletContext = this.getServletContext();
                //所有	/webjars/**	都去	classpath:/META-INF/resources/webjars/ 找资源
                // webjars:以jar包的方式引入静态资源;
                this.addResourceHandler(registry, "/webjars/**", "classpath:/META-INF/resources/webjars/");
                this.addResourceHandler(registry, this.mvcProperties.getStaticPathPattern(), (registration) -> {


                    registration.addResourceLocations(this.resourceProperties.getStaticLocations());
                    if (servletContext != null) {


                        registration.addResourceLocations(new Resource[]{

    new ServletContextResource(servletContext, "/")});
                    }

                });
            }
        }

        private void addResourceHandler(ResourceHandlerRegistry registry, String pattern, String... locations) {


            this.addResourceHandler(registry, pattern, (registration) -> {


                registration.addResourceLocations(locations);
            });
        }

        private void addResourceHandler(ResourceHandlerRegistry registry, String pattern, Consumer<ResourceHandlerRegistration> customizer) {


            if (!registry.hasMappingForPattern(pattern)) {


                ResourceHandlerRegistration registration = registry.addResourceHandler(new String[]{

    pattern});
                customizer.accept(registration);
                registration.setCachePeriod(this.getSeconds(this.resourceProperties.getCache().getPeriod()));
                registration.setCacheControl(this.resourceProperties.getCache().getCachecontrol().toHttpCacheControl());
                this.customizeResourceHandlerRegistration(registration);
            }
        }
webjars:以jar包的方式引入静态资源(例如:JQuery、Bootstrap等框架)
参考此网站:https://www.webjars.org/
![[外链图片转存失败,源站可能有防盗链机制,建议将图片保存下来直接上传(img-rwxBaOUc-1614176885609)(C:\Users\lzl\AppData\Roaming\Typora\typora-user-images\image-20210223210701461.png)]](https://img-blog.csdnimg.cn/20210224222926778.png?x-oss-process=image/watermark,type_ZmFuZ3poZW5naGVpdGk,shadow_10,text_aHR0cHM6Ly9ibG9nLmNzZG4ubmV0L2x6bDk4MDExMQ==,size_16,color_FFFFFF,t_70)
可以看到前端框架可以以Maven依赖的方式给到我们
我们添加jquery依赖查看一下:
<dependency>
    <groupId>org.webjars</groupId>
    <artifactId>jquery</artifactId>
    <version>3.5.1</version>
</dependency>
可以看到引入成功:
![[外链图片转存失败,源站可能有防盗链机制,建议将图片保存下来直接上传(img-j6H5CjCC-1614176885613)(C:\Users\lzl\AppData\Roaming\Typora\typora-user-images\image-20210223211205599.png)]](https://img-blog.csdnimg.cn/20210224222953257.png?x-oss-process=image/watermark,type_ZmFuZ3poZW5naGVpdGk,shadow_10,text_aHR0cHM6Ly9ibG9nLmNzZG4ubmV0L2x6bDk4MDExMQ==,size_16,color_FFFFFF,t_70)
访问下试试:
http://localhost:8080/webjars/jquery/3.5.1/jquery.js
确实是可以访问到
![[外链图片转存失败,源站可能有防盗链机制,建议将图片保存下来直接上传(img-Up7VsxcZ-1614176885617)(C:\Users\lzl\AppData\Roaming\Typora\typora-user-images\image-20210223211430237.png)]](https://img-blog.csdnimg.cn/20210224223005746.png?x-oss-process=image/watermark,type_ZmFuZ3poZW5naGVpdGk,shadow_10,text_aHR0cHM6Ly9ibG9nLmNzZG4ubmV0L2x6bDk4MDExMQ==,size_16,color_FFFFFF,t_70)
/**
/**访问当前项目的任何资源,静态资源的文件夹
"classpath:/META-INF/resources/",
"classpath:/resources/",
"classpath:/static/",
"classpath:/public/",
"/"
![[外链图片转存失败,源站可能有防盗链机制,建议将图片保存下来直接上传(img-Nq0Dt1Mx-1614176885620)(C:\Users\lzl\AppData\Roaming\Typora\typora-user-images\image-20210223212456131.png)]](https://img-blog.csdnimg.cn/20210224223017132.png?x-oss-process=image/watermark,type_ZmFuZ3poZW5naGVpdGk,shadow_10,text_aHR0cHM6Ly9ibG9nLmNzZG4ubmV0L2x6bDk4MDExMQ==,size_16,color_FFFFFF,t_70)
欢迎页
静态资源文件夹下所有的index.html页面被 “/**" 映射
localhost:8080/ 找index页面
icon
所有的 **/favicon.ico 都是在静态文件下找
定义静态资源路径
spring.web.resources.static-locations=classpath:/hello/,classpath:/test/,
02 - 请求参数处理
请求映射
- @xxxMapping
- Rest风格支持(使用HTTP请求方式动词来表示对资源的操作)
- 以前:/GetUser 获取用户 /DeleteUser 删除用户 /EditUser修改用户 /AddUser 添加用户
- 现在:/User Get-获取用户 DELETE-删除用户 PUT-修改用户 POST-添加用户
- 核心:Filter;HiddenHttpMethodFilter
- 用法:表单 method = post,隐藏域 method = put
- 在SpringBoot中手动开启
Rest原理
- 表单提交会带上_method=PUT
- 请求过来被HiddenHttpMethodFilter拦截
- 请求是否正常,且是POST请求
- 获取到_method值
- 兼容:PUT PATCH DELETE
- 原生request(post),包装模式requestWrapper重写了getMethod(),返回的是我们传入的值(传入的_method的值)
- 过滤器链放行的时候使用wrapper重写的,以后的方法调用getMethod是调用的requestWrapper的值
- 请求是否正常,且是POST请求
Rest使用客户端工具
- 如PostMan直接发送 Put、Delete请求,无需进入Filter
其中SpringBoot对@RequestMapping也有封装
@RequestMapping(value = "/user",method = RequestMethod.GET)
@GetMapping("/user")
在SpringBoot(底层的SpringMVC)中,所有的请求,最终 **都会来到 DispatcherServlet ** , DispatcherServlet 是处理所有请求的开始
IDEA Ctrl+F12 查看当前类的结构

所有对SpringMVC功能分析,都从DispatcherServlet.class中的doDispatch()方法中开始