Python函数方法的使用
1.next()函数
next()返回迭代器的下一个项目
next()函数要和生成迭代器iter()函数一起使用
next(iterable[, default]), iterable--可迭代对象
it = iter([1, 2, 3, 4, 5])
while True:
    try:
        x = next(it)
        #x = next(it, 'a')
        print(x)
    except StopIteration:
        break
2.yield的用法
带有yield的函数在Python中称之为generator(生成器)
def foo():
    print("starting...")
    while True:
        res = yield 4
        print("res:",res)
g = foo()
print(next(g))
print("*"*20)
print(next(g))
#!/usr/bin/python
# -*- coding: UTF-8 -*-
def fab(max):
n, a, b = 0, 0, 1
while n < max:
yield b # 使用 yield
# print b
a, b = b, a + b
n = n + 1
for n in fab(5):
print n3.python中:于数组中的使用
b = a[i:j]   # 表示复制a[i]到a[j-1],以生成新的list对象

a = [0,1,2,3,4,5,6,7,8,9]
b = a[1:3]   # [1,2]

# 当i缺省时,默认为0,即 a[:3]相当于 a[0:3]
# 当j缺省时,默认为len(alist), 即a[1:]相当于a[1:10]
# 当i,j都缺省时,a[:]就相当于完整复制一份a

b = a[i:j:s]    # 表示:i,j与上面的一样,但s表示步进,缺省为1.
# 所以a[i:j:1]相当于a[i:j]

# 当s<0时,i缺省时,默认为-1. j缺省时,默认为-len(a)-1
# 所以a[::-1]相当于 a[-1:-len(a)-1:-1],也就是从最后一个元素到第一个元素复制一遍,即倒序。
4.get()
当我们获取字典里的值的时候,一个是通过键值对,即dict['key'],另一个就是dict.get()方法。
dict.get(key, default=None)
key -- 字典中要查找的键。
default -- 如果指定键的值不存在时,返回该默认值。
5.item()方法

python中item和for…in…是类似的,即实现遍历,所不同的是item是遍历字典用的。
6.zip()函数
- 当zip()函数中只有一个参数时,zip(iterable)从迭代器中依次取一个元组,组成一个元组。
- 当zip()函数有两个参数时,zip(a,b)函数分别从a和b中取一个元素组成元组,再次将组成的元组组合成一个新的迭代器。a与b的维数相同时,正常组合对应位置的元素。当a与b行或列数不同时,取两者中的最小的行列数。
7.python中的isinstance用法
Isinstance的用法是用来判断一个量是否是相应的类型, 接受的参数是对象加一种类型
a = 1
print(isinstance(a, int))
print(isinstance(a, float))
True
False
8.Python中的enumerate()函数
enumerate()是Python中的内置函数,用于可迭代/可遍历的的数据对象组合为一个索引序列,同时列出数据和数据下标,一般用在for循环中。
enumerate(sequence,[start=0])
- sequence:一个序列、迭代器或其他支持迭代对象。
- start:下标起始位置。
- enumerate()通常使用在for循环中。
lst = ['China', 'America', 'England', 'Scotland']
for index, name in enumerate(lst):
    print(index, name)
print("*" * 20)
for index, name in enumerate(lst, 1):
    print(index, name)
#输出:
0 China
1 America
2 England
3 Scotland
********************
1 China
2 America
3 England
4 Scotland9.python中filter()高阶函数
# filter()函数是python内置的另一个有用的高阶函数

# filter()函数接收一个函数f和一个list,
# 这个函数f的作用是对每个元素进行判断,返回True或False
# filter()根据判断结果自动过滤掉不符合条件的元素
# 返回由符合条件元素组成的新list

a = [1, 2, 3, 4, 5, 6]

b = filter(lambda x: x % 2 == 1, a)

print(b)                                                    # <filter object at 0x00000238F3279128>

for item in b:
    print(item)                                             # 1 3 5

print([item for item in filter(lambda x: x % 2 == 1, a)])   # [1, 3, 5]

# 使用列表解析来实现

print([item for item in a if item % 2 == 1])                # [1, 3, 5]
10.python中的squeeze()函数
squeeze()函数将向量的维度去掉, 只会将维度为1的向量去掉
unsqueeze()函数增加向量的维度。
11.python中的random库中的random函数
import random
random.uniform(x, y)
#输出一个double的值,它在[x, y]的范围内
12.python中的contiguous()函数
会改变元数据的操作是:
- narrow()
- view()
- expand()
- transpose()
在使用transpose()进行转置操作时,pytorch并不会创建新的、转置后的tensor,而是修改了tensor中的一些属性(也就是元数据),使得此时的offset和stride是与转置tensor相对应的。转置的tensor和原tensor的内存是共享的!
如果想要断开这两个变量之间的依赖(x本身是contiguous的),就要使用contiguous()针对x进行变化,感觉上就是我们认为的深拷贝。
当调用contiguous()时,会强制拷贝一份tensor,让它的布局和从头创建的一模一样,但是两个tensor完全没有联系。
Python中的迭代器--列表生成器、可迭代对象、生成器、迭代器、及其转换
pytorch中的方法
1.pytorch中index_select()函数
index_select(dim, index)
- dim:表示从第几维挑选数据,类型为int值;
- index:表示从第一个参数维度中的哪个位置挑选数据,类型为torch.Tensor类的实例;
a = torch.linspace(1, 6, steps = 12).view(3, 4)
print(a)
b = torch.index_select(a, 0, torch.tensor([0, 2]))
print(b)
#输出
tensor([[1.0000, 1.4545, 1.9091, 2.3636],
        [2.8182, 3.2727, 3.7273, 4.1818],
        [4.6364, 5.0909, 5.5455, 6.0000]])
tensor([[1.0000, 1.4545, 1.9091, 2.3636],
        [4.6364, 5.0909, 5.5455, 6.0000]])
先定义了一个tensor,这里用到了linspace和view方法。
第一个参数是索引的对象,第二个参数0表示按行索引,1表示按列进行索引,第三个参数是一个tensor,就是索引的序号,比如b里面tensor[0, 2]表示第0行和第2行,c里面tensor[1, 3]表示第1列和第3列。
2.torchvision.datasets.MNIST(root, train=True, transform=None, target_transform=None, download=False) 方法
- 根(字符串)–存在MNIST/processed/training.pt和MNIST/processed/test.pt的数据集的根目录。
- train(bool,可选)–如果为True,则从training.pt创建数据集,否则从test.pt创建数据集。
- 下载(bool,可选)–如果为true,则从internet下载数据集并将其放在根目录中。如果数据集已下载,则不会再次下载。
- transform(可调用,可选)–接受PIL图像并返回已转换版本的函数/转换。E、 g,变换。随机裁剪
- target_transform(可调用,可选)–接受目标并对其进行转换的函数/转换。
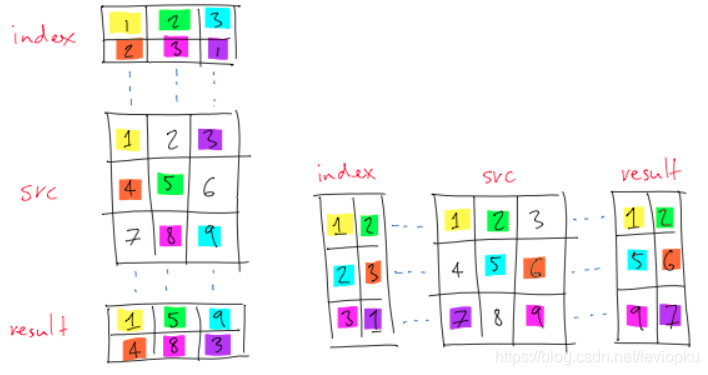
3.pytorch中的torch.gather()函数
dim = 0 表示列, dim = 1 表示行
import torch
a = torch.arange(15).view(3, 5)

b = torch.zeros_like(a)
b[1][2] = 1
b[0][0] = 1

c = a.gather(0, b)
d = a.gather(1, b)
print(a)
print(b)
print(c)
print(d)
#输出:
tensor([[ 0, 1, 2, 3, 4],
[ 5, 6, 7, 8, 9],
[10, 11, 12, 13, 14]])
tensor([[1, 0, 0, 0, 0],
[0, 0, 1, 0, 0],
[0, 0, 0, 0, 0]])
tensor([[5, 1, 2, 3, 4],
[0, 1, 7, 3, 4],
[0, 1, 2, 3, 4]])
tensor([[ 1, 0, 0, 0, 0],
[ 5, 5, 6, 5, 5],
[10, 10, 10, 10, 10]])使用一个矩阵在另一个矩阵中根据索引输出
4.pytorch中的torch.cat()函数
torch.cat()是将两个张量(tensor)拼接在一起, cat是concatenate的意思,即拼接、联系在一起
C = torch.cat( (A,B),0 ) #按维数0拼接(竖着拼)
C = torch.cat( (A,B),1 ) #按维数1拼接(横着拼)
5.pytorch中的torch.stack()函数
在pytorch中,常见的拼接函数主要是两个,分别是:
- stack()
- cat()
torch.stack()函数:
官方解释:沿着一个新维度对输入张量序列进行连接。 序列中所有的张量都应该为相同形状。
浅显说法:把多个2维的张量凑成一个3维的张量;多个3维的凑成一个4维的张量…以此类推,也就是在增加新的维度进行堆叠。
outputs = torch.stack(inputs, dim=?) → Tensor
-
inputs : 待连接的张量序列。
注:python的序列数据只有list和tuple。 -
dim : 新的维度, 必须在
0到len(outputs)之间。
注:len(outputs)是生成数据的维度大小,也就是outputs的维度值。
import torch
T1 = torch.tensor([[1, 2, 3],
                  [4, 5, 6],
                  [7, 8, 9]])
T2 = torch.tensor([[10, 20, 30],
                  [40, 50, 60],
                  [70, 80, 90]])

print(torch.stack((T1, T2), dim = 0).shape)
print(torch.stack((T1, T2), dim = 1))
print(torch.stack((T1, T2), dim = 1).shape)
print(torch.stack((T1, T2), dim = 2).shape)
输出:
torch.Size([2, 3, 3])
tensor([[[ 1,  2,  3],
         [10, 20, 30]],

        [[ 4,  5,  6],
         [40, 50, 60]],

        [[ 7,  8,  9],
         [70, 80, 90]]])
torch.Size([3, 2, 3])
torch.Size([3, 3, 2])
6.pytorch中的torch.nn.Conv2d()函数

nn.Conv2d:对由多个输入平面组成的输入信号进行二维卷积

dilation----扩张卷积(也叫空洞卷积)
扩张卷积核为 3 * 3, 扩张率为 2

import torch

#输入数据分别表示(n组数据(batch_size),  通道数, 高度, 宽度)
x = torch.randn(3, 2, 5, 5)
print(x.shape)

conv = torch.nn.Conv2d(2, 3, (3, 3))
relu = torch.nn.ReLU()

res = conv(x)
ans = relu(res)

print(res[0])
print(ans[0])

print(conv.bias)
print(conv.weight)
torch.Size([3, 2, 5, 5])
tensor([[[-0.2260, -0.7876, -1.0511],
[ 0.2240, 1.4242, 1.0653],
[ 0.6577, 1.1077, -0.4448]],
[[ 0.3154, 0.4872, 0.6060],
[-0.6774, -0.1788, -0.8415],
[ 0.2866, -0.9932, -0.3276]],
[[-0.6127, -0.6834, -1.0107],
[-0.1073, -0.8496, -0.6866],
[ 0.3393, 0.3676, -0.0211]]], grad_fn=<SelectBackward>)
tensor([[[0.0000, 0.0000, 0.0000],
[0.2240, 1.4242, 1.0653],
[0.6577, 1.1077, 0.0000]],
[[0.3154, 0.4872, 0.6060],
[0.0000, 0.0000, 0.0000],
[0.2866, 0.0000, 0.0000]],
[[0.0000, 0.0000, 0.0000],
[0.0000, 0.0000, 0.0000],
[0.3393, 0.3676, 0.0000]]], grad_fn=<SelectBackward>)
Parameter containing:
tensor([-0.1862, -0.0660, -0.1639], requires_grad=True)
Parameter containing:
tensor([[[[ 0.1374, 0.1379, -0.1797],
[-0.2350, -0.1940, 0.1645],
[-0.1340, -0.1199, 0.0746]],
[[-0.0200, -0.2045, -0.1896],
[-0.0683, -0.2113, -0.1355],
[-0.0314, 0.0633, 0.2220]]],
[[[-0.1696, -0.0531, -0.0571],
[ 0.0515, 0.1654, -0.1080],
[-0.1069, -0.0662, 0.2116]],
[[ 0.0875, -0.0227, -0.0064],
[ 0.1379, 0.1303, 0.0478],
[ 0.0119, -0.0525, -0.0494]]],
[[[ 0.0411, 0.1903, -0.0086],
[-0.1221, -0.1670, -0.1532],
[-0.1311, 0.1120, -0.1124]],
[[ 0.0468, -0.1267, -0.1429],
[ 0.1660, 0.2354, 0.0639],
[-0.1340, 0.1832, 0.0663]]]], requires_grad=True)该代码说明激活函数在卷积神经网络中的使用, 以及输出通道数多于输入通道是如何实现的。
7.pytorch中的add_module()函数
add_module()函数是Module类的成员函数,输入参数为Module.add_module(name: str, module: Module)。功能为,为Module添加一个子module,对应名字为name。
-
如果是替换,只要保证前后的forward输入输出维度一致,就可以不用改写A.forward()。如果是增减,则需要考虑重写A.forward()。
-
如果使用了cuda,并且多卡,需要将model放回cpu后进行结构修改。
8.Pytorch中的scatter()函数
scatter() 和 scatter_() 的作用是一样的,只不过 scatter() 不会直接修改原来的 Tensor,而 scatter_() 会
scatter(dim, index, src) 的参数有 3 个
- dim:沿着哪个维度进行索引
- index:用来 scatter 的元素索引
- src:用来 scatter 的源元素,可以是一个标量或一个张量
import torch
label = torch.zeros(2, 4)
label.scatter(dim = 1, index = torch.LongTensor([[2], [3]]), value = 1)
输出:按照相应的维度进行值的改变
tensor([[0., 0., 1., 0.],
        [0., 0., 0., 1.]])