这里写目录标题
spring操作数据库
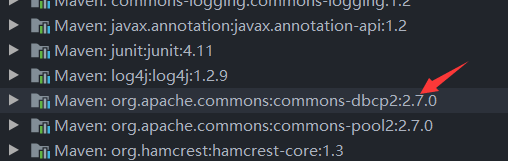
首先要导入包:
编写dbconf.properities文件
略
在ApplicationContext中,
配置数据源
    <!--配置数据源-->
    <bean id="dataSource" class="org.apache.commons.dbcp2.BasicDataSource"
    destroy-method="close">
        <property name="username" value="${jdbc_user}"/>
        <property name="driverClassName" value="${jdbc_driver}"/>
        <property name="url" value="${jdbc_url}"/>
        <property name="password" value="${jdbc_password}"/>
    </bean>
配置数据库管理组件并注入,配置jdbcTemple模板
    <!--配置数据库管理组件并注入数据库-->
    <bean id="jdbcTransactionManager"
          class="org.springframework.jdbc.datasource.DataSourceTransactionManager">
        <property name="dataSource" ref="dataSource"/>
    </bean>

    <!--配置jdbcTemple模板-->
    <bean id="jdbcTemple" class="org.springframework.jdbc.core.JdbcTemplate">
        <property name="dataSource" ref="dataSource"/>
        <property name="queryTimeout" value="10"/>
        <property name="fetchSize" value="20"/>
    </bean>
配置事务属性通知
事务属性描述了如何处理事务操作,通常使用<tx:advice>命名空间进行配置并关联事务管理对象
<!--配置数据库事务属性通知-->
    <tx:advice id="txAdvice" transaction-manager="jdbcTransactionManager">
        <tx:attributes>
            <tx:method name="save*" propagation="REQUIRED" isolation="DEFAULT"
                       no-rollback-for="java.lang.Exception"/>
            <tx:method name="add*" propagation="REQUIRED" isolation="DEFAULT"
                       no-rollback-for="java.lang.Exception"/>
            <tx:method name="update*" propagation="REQUIRED" isolation="DEFAULT"
                       no-rollback-for="java.lang.Exception"/>
            <tx:method name="modify*" propagation="REQUIRED" isolation="DEFAULT"
                       no-rollback-for="java.lang.Exception"/>
            <tx:method name="delete*" propagation="REQUIRED" isolation="DEFAULT"
                       no-rollback-for="java.lang.Exception"/>
            <tx:method name="remove*" propagation="REQUIRED" isolation="DEFAULT"
                       no-rollback-for="java.lang.Exception"/>

            <tx:method name="find*" propagation="NOT_SUPPORTED" read-only="true"/>
            <tx:method name="select*" propagation="NOT_SUPPORTED" read-only="true"/>
            <tx:method name="remove*" propagation="NOT_SUPPORTED" read-only="true"/>

        </tx:attributes>
    </tx:advice>
配置事务拦截切入点拦截通知
    <aop:config>
        <aop:pointcut id="txMethodsPointcut"
                      expression="execution(* com.model.user.server.*.*(..))"/>
        <aop:advisor advice-ref="txAdvice" pointcut-ref="txMethodsPointcut"/>
    </aop:config>
出现了bug,导致txAdvice读不出来,后面的展示等到解决bug了再说
MVC模式

在web.xml中配置
<!--配置spring核心前沿控制器-->
    <servlet>
        <servlet-name>springMVC</servlet-name>
        <servlet-class>org.springframework.web.servlet.DispatcherServlet</servlet-class>
        <init-param>
            <param-name>contextConfigLocation</param-name>
            <param-value>classpath*:com/model/conf/spring/springMVC-servlet.xml</param-value>
        </init-param>
    </servlet>

    <servlet-mapping>
        <servlet-name>springMVC</servlet-name>
        <url-pattern>*.action</url-pattern>
    </servlet-mapping>
相关类实现
package com.model.user.controller;

import com.model.user.dao.ISystemDao;
import org.springframework.beans.factory.annotation.Autowired;
import org.springframework.stereotype.Controller;
import org.springframework.web.bind.annotation.RequestMapping;

@Controller
public class DepartmentController {


    @Autowired
    private ISystemDao system;
    @RequestMapping(value = "loadDeplist")
    public String loadDeplist(){


        system.systemAction();
        return "qq";
    }
}
这里为什么要返回一个“qq”呢?因为后面要转入一个叫qq.jsp的网页中
springMVC-servlet配置如下:(视图解析器配置)
<?xml version="1.0" encoding="UTF-8"?>
<beans xmlns="http://www.springframework.org/schema/beans"
       xmlns:xsi="http://www.w3.org/2001/XMLSchema-instance"
       xmlns:context="http://www.springframework.org/schema/context"
       xmlns:tx="http://www.springframework.org/schema/cache"
       xsi:schemaLocation="http://www.springframework.org/schema/beans
       http://www.springframework.org/schema/beans/spring-beans.xsd
       http://www.springframework.org/schema/context
       http://www.springframework.org/schema/context/spring-context.xsd
       http://www.springframework.org/schema/cache
       http://www.springframework.org/schema/cache/spring-cache.xsd">

    <context:annotation-config />
    <context:component-scan base-package="com.model.*.controller">
    </context:component-scan>
    <bean id="uar" class="org.springframework.web.servlet.view.UrlBasedViewResolver">
        <property name="viewClass" value="org.springframework.web.servlet.view.JstlView"/>
        <property name="prefix" value="/view/"/>
        <property name="suffix" value=".jsp"/>
        <property name="order" value="1"/>
        <property name="cache" value="false"/>


    </bean>
</beans>
qq.jsp
文件目录如下:

<body>
    spring的配置真的太难太复杂了!!!
</body>
结果:


如果没有视图解析器配置,则无法跳转到指定页面,会报404
关于视图解析器,look下面


其它视图解析器
InternalResourceViewResolver
<!--配置一个内部资源视图解析器-->
    <bean class="org.springframework.web.servlet.view.InternalResourceViewResolver">
        <property name="prefix" value="/"/>
        <property name="suffix" value=""/>
        <property name="order" value="1"/>
        <property name="cache" value="false"/>
    </bean>
另写一个类去验证:
package com.model.user.controller;

import com.model.user.dao.IUserDao;
import org.springframework.beans.factory.annotation.Autowired;
import org.springframework.stereotype.Controller;
import org.springframework.web.bind.annotation.RequestMapping;
import org.springframework.web.servlet.ModelAndView;

@Controller
@RequestMapping("/sleep")
public class SleepController {


    @Autowired
    private IUserDao userDao;
    @RequestMapping("deepSleep")
    public ModelAndView deepSleep(){


        ModelAndView model = new ModelAndView();
        model.setViewName("/view/qq.jsp");
        userDao.addUser();
        return model;
    }
}
结果:


FreeMarkerViewResolver
是解析FreeMarker模板视图的解析器,它继承自UrlBasedViewResolver类,但是无需只当viewClass,通常应该为此解析器指定一个FreeMarker的配置信息以告诉解析器如何找到模板文件。
仅当在javaweb应用中使用FreeMarker
模板组件作为视图实现是才会用到此视图解析器
这个导入模板有点问题,等到解决了再继续做笔记
传参问题
可以在函数上方的@RequestMapping设定params参数(注意要加逗号),用于判断,当传入属性name为King时,执行下面的函数
@RequestMapping(value = "deepSleep",params = "name=KING")
在函数传入参数中可以写入@RequestParam来描述传入参数问题
@RequestMapping(value = "deepSleep",params = "name=KING")
public ModelAndView deepSleep(@RequestParam(
value="name",
required = false,
defaultValue = "haha") String username) {
ModelAndView model = new ModelAndView();
model.setViewName("/view/qq.jsp");
userDao.addUser();
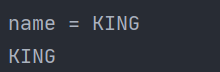
System.out.println("name = KING");
System.out.println(username);
return model;
}
@RequestMapping(value = "deepSleep",params = "name!=KING")
public ModelAndView deeepsleep(@RequestParam(
value="name",
required = false,
defaultValue = "haha") String username) {
ModelAndView model = new ModelAndView();
model.setViewName("/view/qq.jsp");
userDao.addUser();
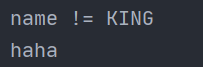
System.out.println("name != KING");
System.out.println(username);
return model;
}
上面为了做演示,写了两个名字不同的函数(虽然@RequestMapping的value都是deepSleep)
index.jsp
  <body>
    <a href="/myweb/sleep/deepSleep.action?name=KING&age=11">click:name=KING</a>
    <br>
    <a href="/myweb/sleep/deepSleep.action">click:name=null</a>
  </body>
第一个click让name=KING
第二个click让name不为KING
结果:

点击第一个click
控制台:
点击第二个click
控制台:输出了@RequestParam的默认值
重定向问题
package com.model.user.controller;

import com.model.user.domin.Person;
import org.springframework.stereotype.Controller;
import org.springframework.ui.Model;
import org.springframework.web.bind.annotation.ModelAttribute;
import org.springframework.web.bind.annotation.RequestAttribute;
import org.springframework.web.bind.annotation.RequestMapping;
import org.springframework.web.servlet.ModelAndView;
import org.springframework.web.servlet.mvc.annotation.ModelAndViewResolver;

import javax.servlet.http.HttpServletRequest;

@Controller
public class TestModelAttributeController {


    @RequestMapping(value = "args")
    public ModelAndView test(@ModelAttribute(value = "user") String user, Model model){


        System.out.println(user);
        ModelAndView mav = new ModelAndView("forward:worker.jsp");
//        ModelAndView mav = new ModelAndView("redirect:worker.jsp");
        mav.addObject("user","liang");
//        model.addAttribute("user","user");
        return mav;

    }

    private void addObj(Model model){


        model.addAttribute("user","liang");
    }
}
重定向/请求转发到worker.jsp
worker.jsp
<body>
    this is worker.jsp<br>
    ${requestScope.user}
</body>
结果:
