1、Spring Cloud Eureka是什么?
Spring Cloud Eureka 是 Spring Cloud Netflix 微服务套件的一部分,基于 Netflix Eureka 做了二次封装,主要负责实现微服务架构中的服务治理功能。
Spring Cloud Eureka 是一个基于 REST 的服务,并且提供了基于 Java 的客户端组件,能够非常方便地将服务注册到 Spring Cloud Eureka 中进行统一管理。
2、Spring Cloud Eureka应用原理?
若用我们生活中的例子来说明的话:
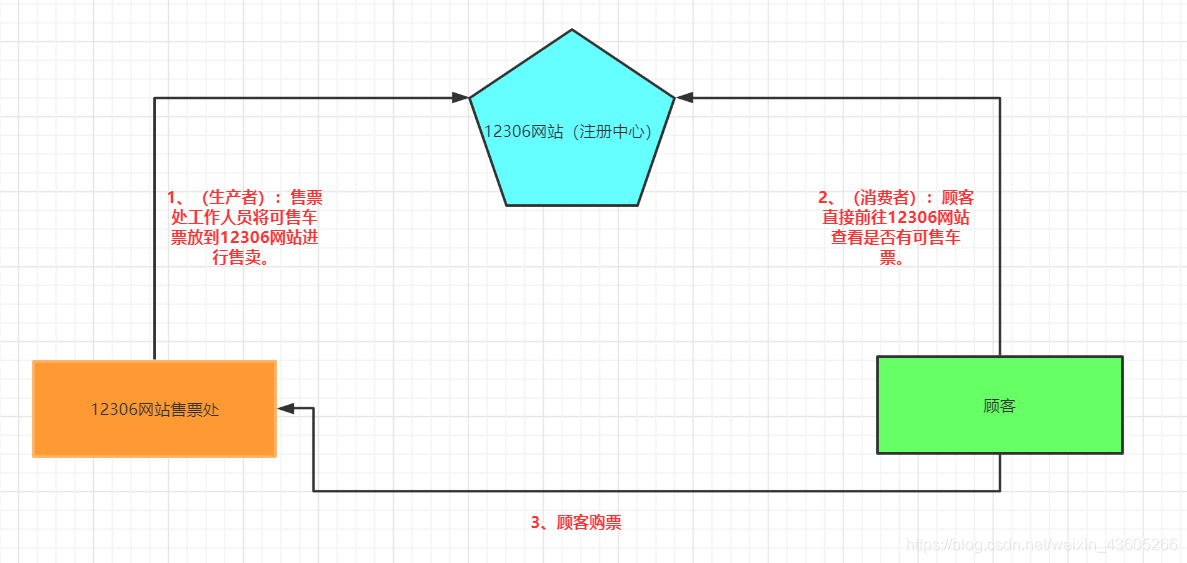
首先,12306 网站就好比一个注册中心,顾客(服务消费)就好比调用的客户端,当他们需要坐火车时,就会登录 12306 网站上查询余票,有票就可以购买,然后获取火车的车次、时间等,最后出发。
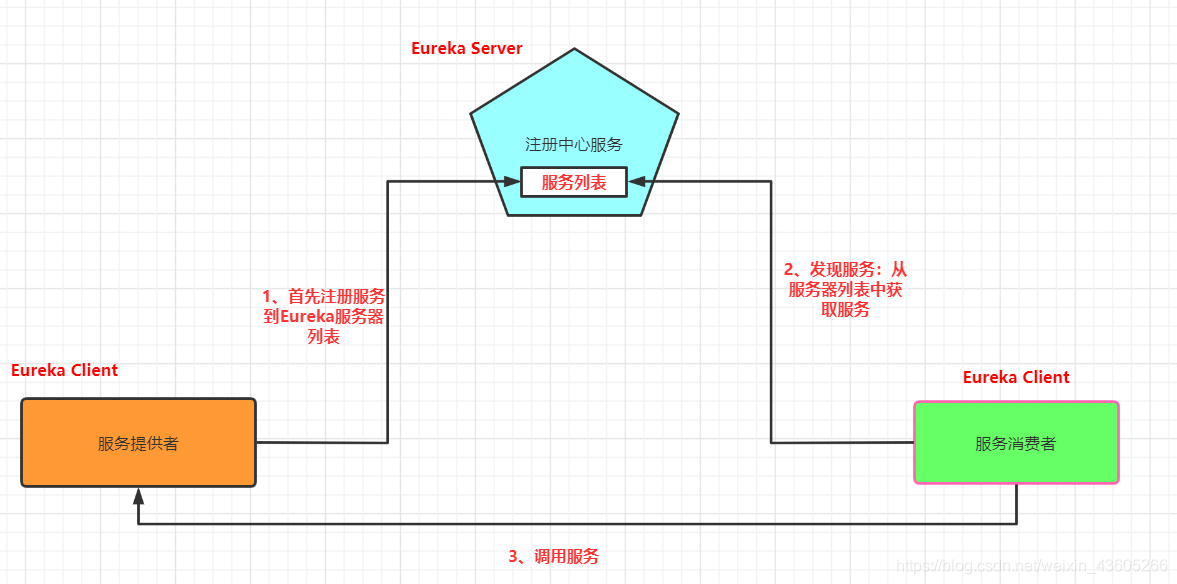
程序也是一样,当你需要调用某一个服务的时候,你会先去 Eureka 中去拉取服务列表,查看你调用的服务在不在其中,在的话就拿到服务地址、端口等信息,然后调用。
注册中心带来的好处就是,不需要知道有多少提供方,你只需要关注注册中心即可,就像顾客不必关心有多少火车在开行,只需要去 12306 网站上看有没有票就可以了。
3、关于SpringCloud中Eureka 版本 和SpringBoot版本的问题。
注意:这里使用的版本要一致,左边是Eureka的版本,要对应右边的springboot版本!!!

4、代码实现
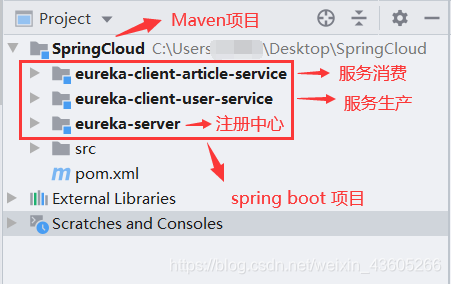
项目结构:maven父项目 + 3个 spring boot 子模块项目
(1)使用Eureka编写注册中心服务:
第一步:创建Springboot空项目(不导入任何默认依赖),取名为eureka-server。
第二步:导入依赖。
<!-- springboot 版本2.0.6.RELEASE -->
  <parent>
        <groupId>org.springframework.boot</groupId>
        <artifactId>spring-boot-starter-parent</artifactId>
        <version>2.0.6.RELEASE</version>
        <relativePath/> <!-- lookup parent from repository -->
    </parent>
 <!-- eureka注册中心服务 -->
        <dependency>
            <groupId>org.springframework.cloud</groupId>
            <artifactId>spring-cloud-starter-netflix-eureka-server</artifactId>
        </dependency>

 <!-- Spring Cloud Eureka 版本 -->
    <dependencyManagement>
        <dependencies>
            <dependency>
                <groupId>org.springframework.cloud</groupId>
                <artifactId>spring-cloud-dependencies</artifactId>
                <version>Finchley.SR2</version>
                <type>pom</type>
                <scope>import</scope>
            </dependency>
        </dependencies>
    </dependencyManagement>
第三步:配置application.properties。
spring.application.name=eureka-server
server.port=8761
# 由于该应用为注册中心, 所以设置为false, 代表不向注册中心注册自己,(生产者配置为true)
eureka.client.register-with-eureka=false
# 由于注册中心的职责就是维护服务实例, 它并不需要去检索服务, 所以也设置为 false(消费者配置为true)
eureka.client.fetch-registry=false
第四步:启动类添加 @EnableEurekaServer注释。
@SpringBootApplication
@EnableEurekaServer
public class EurekaServerApplication {


    public static void main(String[] args) {


        SpringApplication.run(EurekaServerApplication.class, args);
    }
}
第五步:启动注册服务。
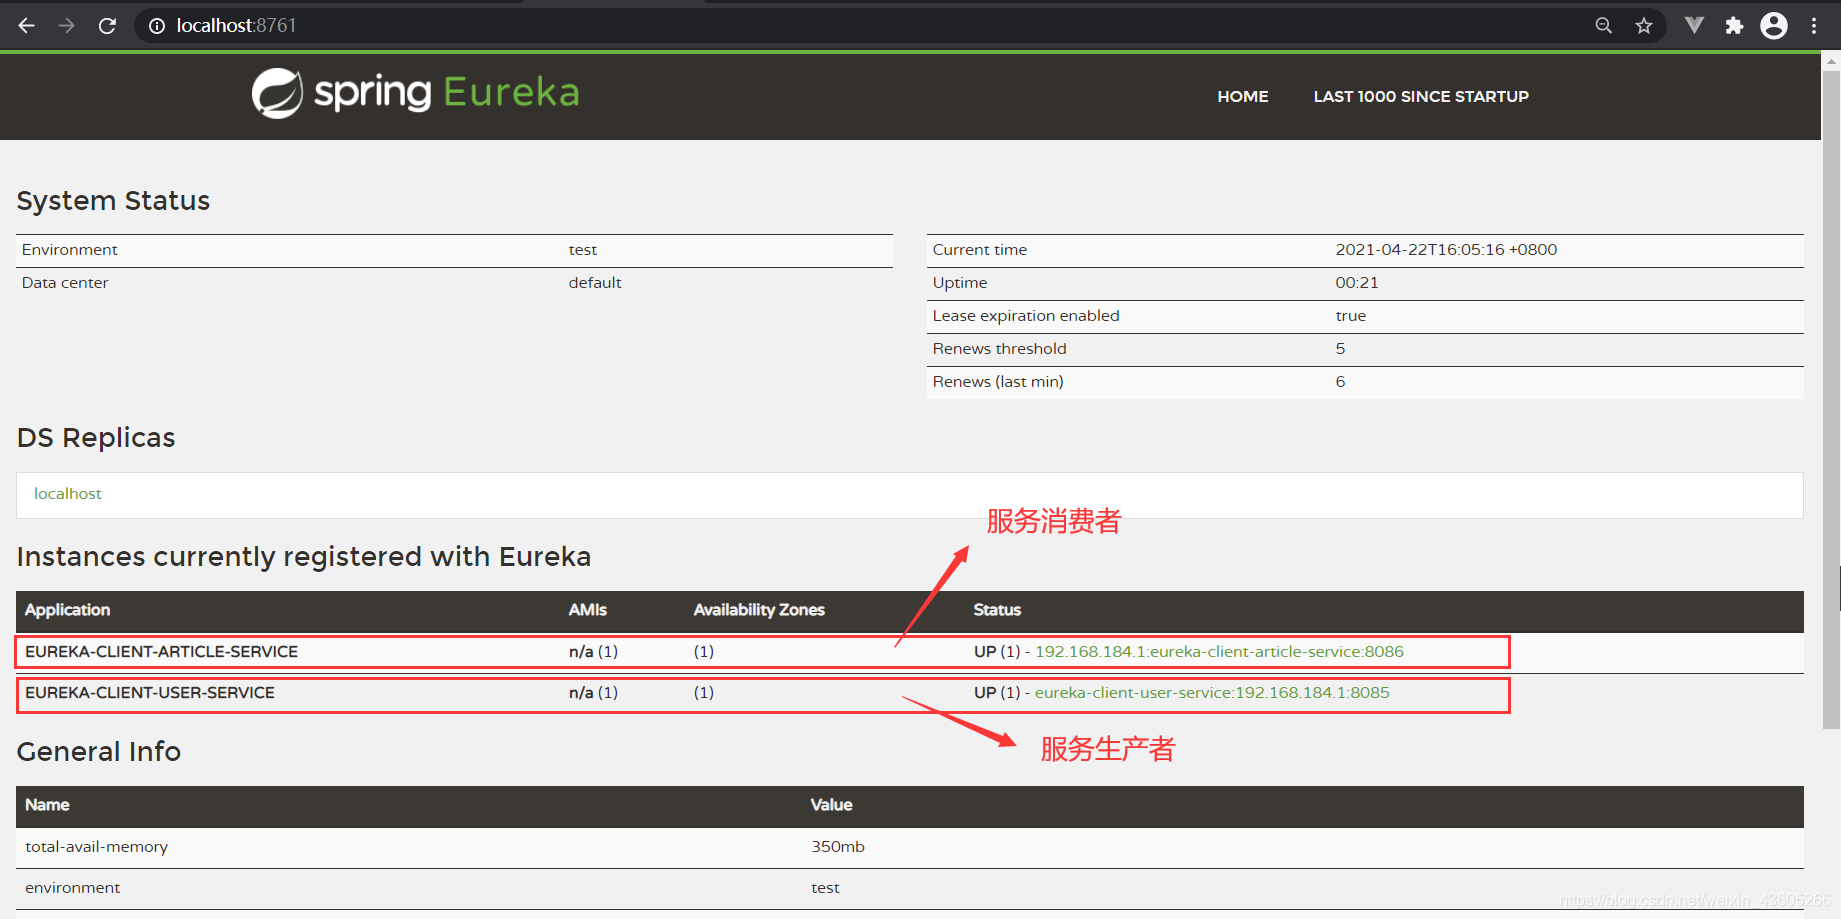
使用浏览器访问:http://localhost:8761 这里的端口号是第三步配置文件里配置的。
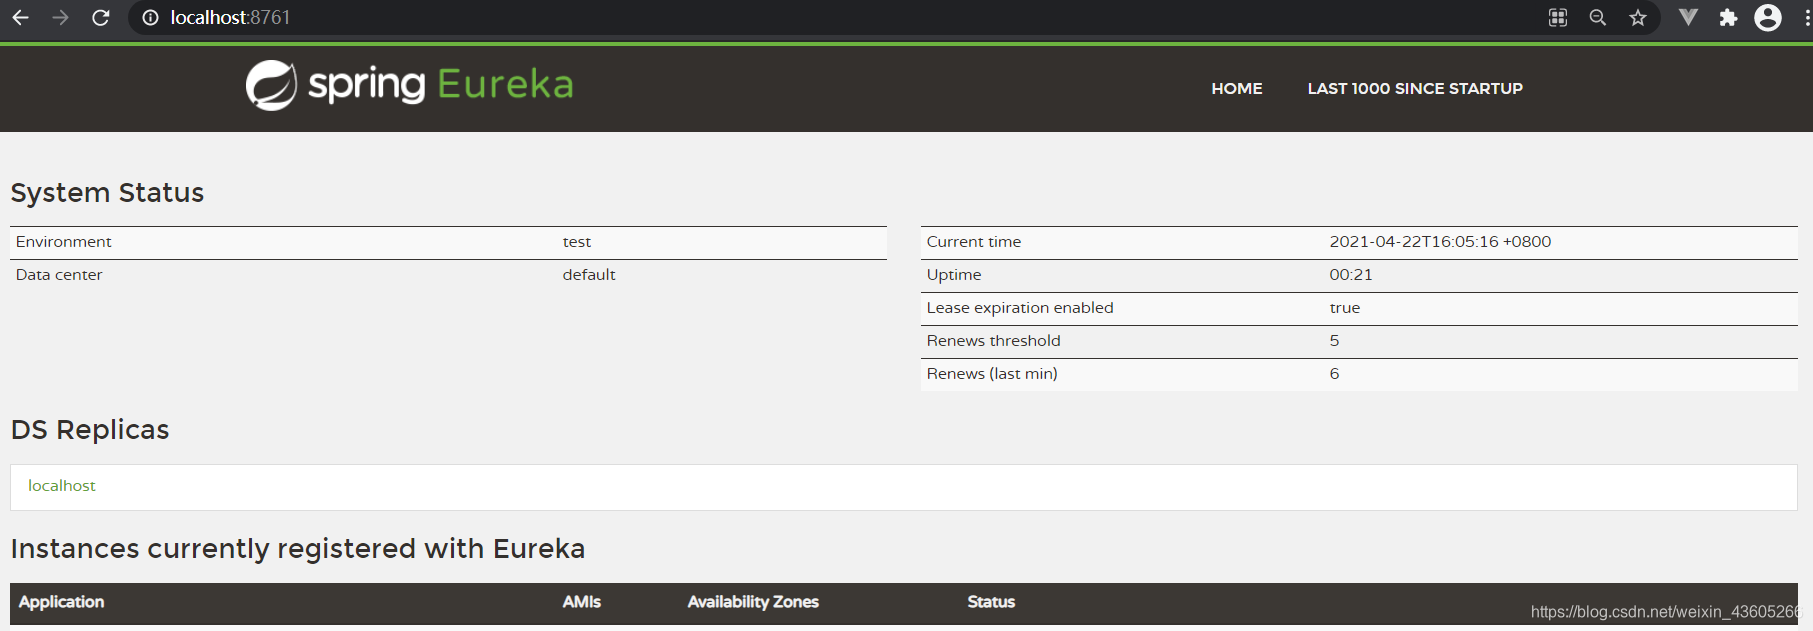
出现上图所示,说明注册中心配置成功!
(2)使用Eureka编写生产者服务:
第一步:创建Springboot空项目,取名为eureka-client-user-service。
第二步:导入依赖。
<!-- springboot 版本2.0.6.RELEASE -->
 <parent>
        <groupId>org.springframework.boot</groupId>
        <artifactId>spring-boot-starter-parent</artifactId>
        <version>2.0.6.RELEASE</version>
        <relativePath/> <!-- lookup parent from repository -->
    </parent>
    <!-- springboot web依赖 -->
     <dependency>
            <groupId>org.springframework.boot</groupId>
            <artifactId>spring-boot-starter-web</artifactId>
        </dependency>
         <!-- eureka客户端 -->
        <dependency>
            <groupId>org.springframework.cloud</groupId>
            <artifactId>spring-cloud-starter-netflix-eureka-client</artifactId>
        </dependency>
<!-- Spring Cloud Eureka 版本 -->
    <dependencyManagement>
        <dependencies>
            <dependency>
                <groupId>org.springframework.cloud</groupId>
                <artifactId>spring-cloud-dependencies</artifactId>
                <version>Finchley.SR2</version>
                <type>pom</type>
                <scope>import</scope>
            </dependency>
        </dependencies>
    </dependencyManagement>
第三步:配置application.properties。
spring.application.name= eureka-client-user-service
server.port=8085
#eureka.client.serviceUrl.defaultZone 的地址就是我们之前启动的 Eureka 服务的地址,
# 在启动的时候需要将自身的信息注册到 Eureka 中去。
eureka.client.serviceUrl.defaultZone=http://localhost:8761/eureka/
# 采用IP注册
eureka.instance.preferIpAddress=true
# 定义实例ID格式
eureka.instance.instance-id=${

    spring.application.name}:${

    spring.cloud.client.ip-address}:${

    server.port}
第四步:启动类添加 @EnableEurekaServer注释。
package com.hdit.eurekaclientuserservice;

import org.springframework.boot.SpringApplication;
import org.springframework.boot.autoconfigure.SpringBootApplication;
import org.springframework.cloud.client.discovery.EnableDiscoveryClient;

@SpringBootApplication
@EnableDiscoveryClient
public class EurekaClientUserServiceApplication {


    public static void main(String[] args) {


        SpringApplication.run(EurekaClientUserServiceApplication.class, args);
    }
}
第五步:编写Controller测试。
package com.hdit.eurekaclientuserservice.controller;

import org.springframework.web.bind.annotation.GetMapping;
import org.springframework.web.bind.annotation.RestController;

@RestController
public class UserController {


    @GetMapping("/user/hello")
    public String hello() {


        return "hello,我是生产服务!!!!";
    }
}
第六步:启动测试类,使用浏览器访问生产者服务,测试http://localhost:8085/user/hello!
结果如下:

此时访问Eureka 自带的 Web 的管理页面,方便我们查询注册到上面的实例信息,可以看到多了一个客户端。
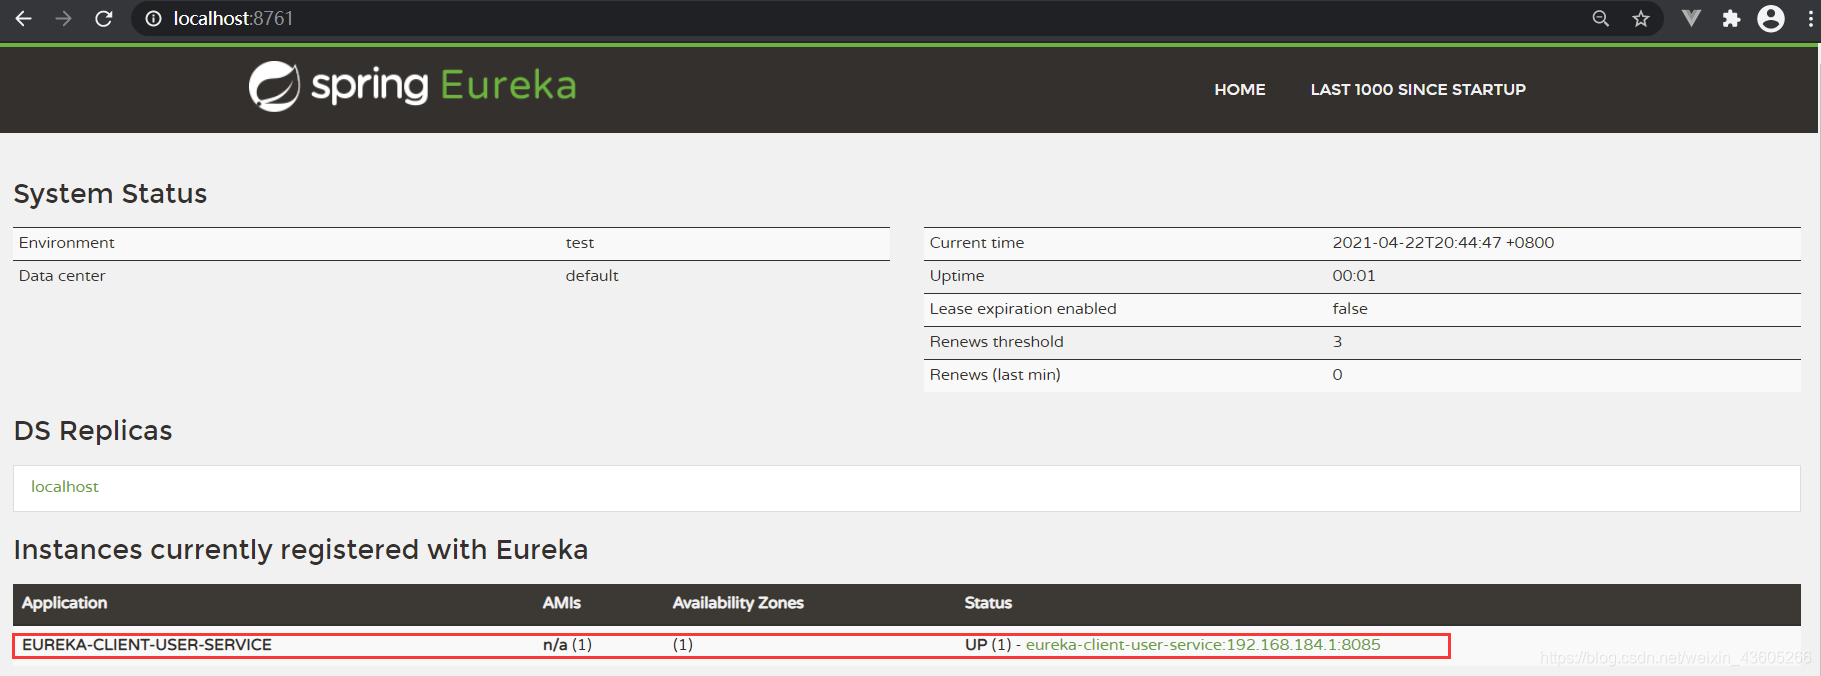
生产者服务编写至此成功!
(3)使用Eureka编写消费者服务:
第一步:创建Springboot空项目,取名为eureka-client-article-service。
第二步:导入依赖。
<!-- springboot 版本2.0.6.RELEASE -->
 <parent>
        <groupId>org.springframework.boot</groupId>
        <artifactId>spring-boot-starter-parent</artifactId>
        <version>2.0.6.RELEASE</version>
        <relativePath/> <!-- lookup parent from repository -->
    </parent>
    <!-- springboot web依赖 -->
     <dependency>
            <groupId>org.springframework.boot</groupId>
            <artifactId>spring-boot-starter-web</artifactId>
        </dependency>
         <!-- eureka客户端 -->
        <dependency>
            <groupId>org.springframework.cloud</groupId>
            <artifactId>spring-cloud-starter-netflix-eureka-client</artifactId>
        </dependency>
<!-- Spring Cloud Eureka 版本 -->
    <dependencyManagement>
        <dependencies>
            <dependency>
                <groupId>org.springframework.cloud</groupId>
                <artifactId>spring-cloud-dependencies</artifactId>
                <version>Finchley.SR2</version>
                <type>pom</type>
                <scope>import</scope>
            </dependency>
        </dependencies>
    </dependencyManagement>
第三步:配置application.properties。
spring.application.name=eureka-client-article-service
server.port=8086
第四步:创建配置类,用来实例化一个restTemplate。
package com.hdit.eurekaclientarticleservice.config;

import org.springframework.cloud.client.loadbalancer.LoadBalanced;
import org.springframework.context.annotation.Bean;
import org.springframework.context.annotation.Configuration;
import org.springframework.web.client.RestTemplate;

@Configuration
public class BeanConfiguration {


    @Bean
    @LoadBalanced
    public RestTemplate getRestTemplate(){


        return  new RestTemplate();
    }
}
第五步:编写Controller测试。
package com.hdit.eurekaclientarticleservice.controller;

import com.netflix.discovery.converters.Auto;
import org.springframework.beans.factory.annotation.Autowired;
import org.springframework.web.bind.annotation.GetMapping;
import org.springframework.web.bind.annotation.RestController;
import org.springframework.web.client.RestTemplate;


@RestController
public class ArticleController {


    //注入配置的restTemplate
    @Autowired
    private RestTemplate restTemplate;

    //服务消费者
    @GetMapping("/article/callHello")
    public String callHello() {


        // 1)直接调用接口
        return restTemplate.getForObject("http://localhost:8085/user/hello", String.class);
    }

    //服务消费者
    @GetMapping("/article/callHello2")
    public String callHello2() {


        // 2)通过 Eureka 来消费接口,restTemplate配置类前面需要添加 @LoadBalanced
        return restTemplate.getForObject("http://eureka-client-user-service/user/hello", String.class);
    }
}
第六步:启动测试类,使用浏览器访问消费者服务,测试http://localhost:8086/article/callHello2!
结果如下:

消费者服务编写至此成功!
再次查看Eureka服务注册中心,会发现多了两个客户端,一个服务消费者,一个服务生产者!