一、关于对象检测
对象检测是一个很有意思的领域。让机器识别图像中物体的确切位置有各种各样的关键用途。从人脸检测系统到帮助自动驾驶汽车安全导航,不胜枚举。
1、YOLO
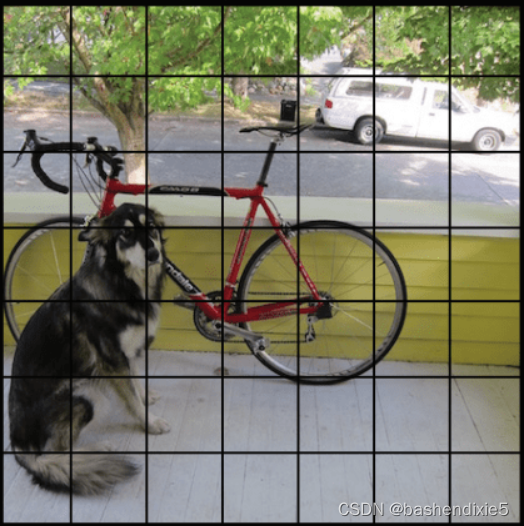
YOLO 或“ You Only Look Once ”(2015 年)引入了一种巧妙的方法来解决简单CNN检测器的缺点。我们将每个图像分割成一个S × S网格,得到每个单元格对应的对象位置。当然,有些单元格不会有任何对象,而有些单元格会出现在多个单元格中,见下图。
了解完整图像的对象的中点、高度和宽度非常重要。然后每个单元格将输出一个概率值(对象在单元格中的概率)、检测到的对象类别以及该单元格唯一的边界框值。即使每个单元格只能检测到一个对象,多个单元格的存在也会使约束无效。结果如下图。
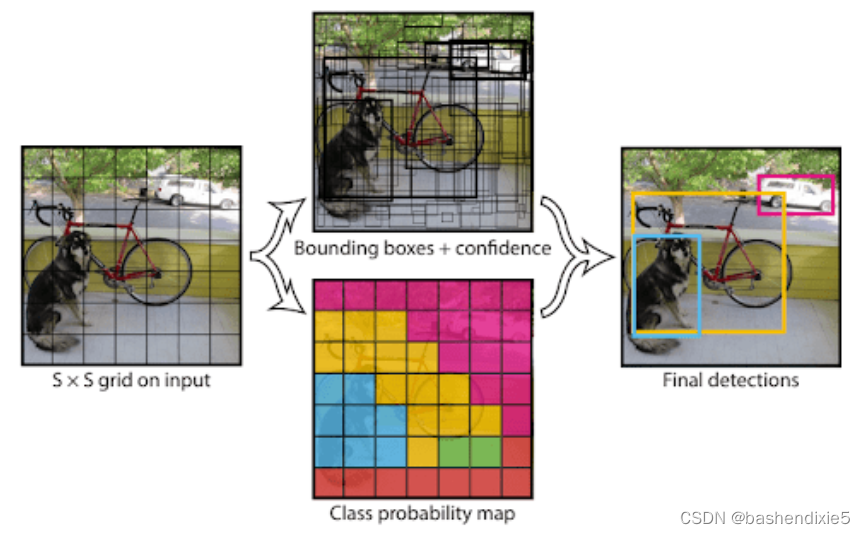
结果不错,但 YOLOv1 有一个重大缺陷;图像中物体的紧密性经常使模型错过一些物体。自成立以来,已经发布了几个后续版本,例如 YOLOv2、YOLOv3 和 YOLOv4,每个版本都比其前身更好、更快。这将我们带到了今天的焦点之一,YOLOv5。
YOLOv5的创建者 Glenn Jocher 决定不写论文,而是通过GitHub开源该模型。最初,这引起了很多关注,因为人们认为结果不可重复。然而,这个想法很快就被打破了,今天,YOLOv5 是 Torch Hub 展示中官方最先进的模型之一。
要了解YOLOv5带来了哪些改进,我们先看看YOLOv2。YOLOv2 引入了锚盒的概念。一系列预定的边界框,锚框具有特定的尺寸。这些框的选择取决于训练数据集中的对象大小,以捕获要检测的各种对象类的比例和纵横比。网络预测与锚框相对应的概率,而不是边界框本身。
但在实践中,YOLO模型最常在COCO数据集上进行训练。这导致了一个问题,因为自定义数据集可能没有相同的锚框定义。YOLOv5 通过引入自动学习锚框来解决这个问题。它还利用马赛克增强,混合随机图像,使模型擅长以较小的比例识别对象。
2、SSD
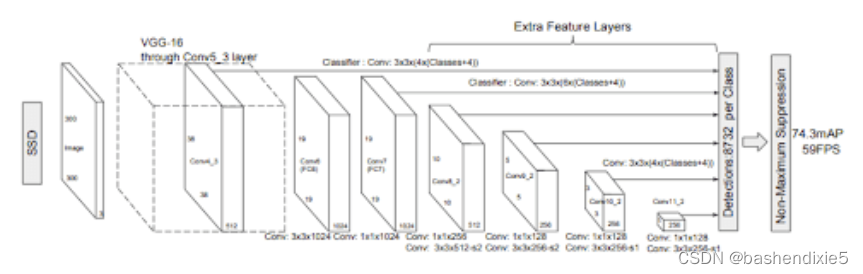
用于对象检测的 SSD 或Single Shot MultiBox Detector模型。SSD300 最初使用 VGG 主干进行熟练的特征检测,并利用Szegedy在 MultiBox 上的工作,这是一种快速与类别无关的边界框坐标推荐方法,启发了 SSD 的边界框回归算法。下图显示了 SSD 架构。
受inception-net的启发,Szegedy 创建的 Multibox 架构采用了多尺度卷积架构。Multibox 使用一系列正常的卷积和1× 1过滤器(改变通道大小但保持高度和宽度不变)以结合多尺度边界框和置信度预测模型。
SSD 以利用多尺度特征图而不是单一特征图进行检测而闻名。这允许在预测中进行更精细的检测和更精细的预测。使用这些特征图,生成了用于对象预测的锚框。
我们将使用 Torch Hub 内嵌的 SSD,它使用 ResNet 而不是 VGG 网络作为其骨干网。此外,还对模型进行了一些其他更改,例如根据现代卷积对象检测器论文的速度/准确度权衡去除一些层。
二、猫狗大战数据集
使用来自 Kaggle的简单二元分类Dogs & Cats数据集。这个 217.78 MB 的数据集包含 10,000 张猫和狗的图像,以 80-20 的训练与测试比率进行拆分。训练集包含 4000 张猫和 4000 张狗的图像,而测试集分别包含 1000 张猫和 1000 张狗的图像。
使用较小的数据集有两个原因:
(1)微调我们的分类器将花费更少的时间
(2)展示预训练模型适应数据较少的新数据集的速度
三、参考代码
1、创建配置文件
创建名为config.py的文件。
import torch
import os
# 定义根目录,后跟测试数据集路径
BASE_PATH = "dataset"
TEST_PATH = os.path.join(BASE_PATH, "test_set")
# 指定图像大小和批量大小
IMAGE_SIZE = 300
PRED_BATCH_SIZE = 4
# 指定 ssd 检测的阈值置信度值
THRESHOLD = 0.50
# 确定设备类型
DEVICE = torch.device("cuda") if torch.cuda.is_available() else "cpu"
# 定义保存输出的路径
OUTPUT_PATH = "output"
SSD_OUTPUT = os.path.join(OUTPUT_PATH, "ssd_output")
YOLO_OUTPUT = os.path.join(OUTPUT_PATH, "yolo_output")
2、创建数据处理函数
# import the necessary packages
from torch.utils.data import DataLoader

def get_dataloader(dataset, batchSize, shuffle=True):
	# 创建一个数据加载器并返回
	dataLoader= DataLoader(dataset, batch_size=batchSize,
		shuffle=shuffle)
	return dataLoader

def normalize(image, mean=128, std=128):
    # 标准化 SSD 输入并返回
    image = (image * 256 - mean) / std
return image3、在 YOLOv5 模型上进行推理
创建yolov5_inference.py文件。
下面是参考代码,如果出现Could not run 'torchvision::nms' with arguments from the 'CUDA' backend.类似这样的错误,就是版本不匹配,可以到官网重新下一套,重新安装。
# import necessary packages
from data_utils import get_dataloader
import config as config
from torchvision.transforms import Compose, ToTensor, Resize
from sklearn.model_selection import train_test_split
from torchvision.datasets import ImageFolder
from torch.utils.data import Subset
import matplotlib.pyplot as plt
import numpy as np
import random
import torch
import cv2
import os

# initialize test transform pipeline
testTransform = Compose([
	Resize((config.IMAGE_SIZE, config.IMAGE_SIZE)), ToTensor()])
# create the test dataset
testDataset = ImageFolder(config.TEST_PATH, testTransform)
# initialize the test data loader
testLoader = get_dataloader(testDataset, config.PRED_BATCH_SIZE)

# initialize the yolov5 using torch hub
yoloModel = torch.hub.load("ultralytics/yolov5", "yolov5s")
# initialize iterable variable
sweeper = iter(testLoader)
# initialize image
imageInput = []
# grab a batch of test data
print("[INFO] getting the test data...")
batch = next(sweeper)
(images, _) = (batch[0], batch[1])
# send the images to the device
images = images.to(config.DEVICE)

# loop over all the batch
for index in range(0, config.PRED_BATCH_SIZE):
	# grab each image
	# rearrange dimensions to channel last and
	# append them to image list
	image = images[index]
	image = image.permute((1, 2, 0))
	imageInput.append(image.cpu().detach().numpy()*255.0)
# pass the image list through the model
print("[INFO] getting detections from the test data...")
results = yoloModel(imageInput, size=300)

# get random index value
randomIndex = random.randint(0,len(imageInput)-1)
# grab index result from results variable
imageIndex= results.pandas().xyxy[randomIndex]
# convert the bounding box values to integer
startX = int(imageIndex["xmin"][0])
startY = int(imageIndex["ymin"][0])
endX = int(imageIndex["xmax"][0])
endY = int(imageIndex["ymax"][0])
# draw the predicted bounding box and class label on the image
y = startY - 10 if startY - 10 > 10 else startY + 10
cv2.putText(imageInput[randomIndex], imageIndex["name"][0],
	(startX, y+10), cv2.FONT_HERSHEY_SIMPLEX,0.65, (0, 255, 0), 2)
cv2.rectangle(imageInput[randomIndex],
	(startX, startY), (endX, endY),(0, 255, 0), 2)
# check to see if the output directory already exists, if not
# make the output directory
if not os.path.exists(config.YOLO_OUTPUT):
    os.makedirs(config.YOLO_OUTPUT)
# show the output image and save it to path
plt.imshow(imageInput[randomIndex]/255.0)
# save plots to output directory
print("[INFO] saving the inference...")
outputFileName = os.path.join(config.YOLO_OUTPUT, "output.png")
plt.savefig(outputFileName)4、在 SSD 模型上进行推理
下面的网盘内是nvidia_ssdpyt_amp_200703.pt的预训练模型,nvidia很不友好,非常的慢,翻墙也不是很快,所以利用了一下kaggle的服务器,写了个小脚本下载了下来。
链接:https://pan.baidu.com/s/1dc_byoAzKSAkzlYL7PRMJQ
提取码:u14r
另外,需要category_names.txt的文件,torch hub的处理方法是下载了完整的coco的标注的压缩包,一百多兆,也很慢,可以使用下面的列表,保存到category_names.txt文件内。
person
bicycle
car
motorcycle
airplane
bus
train
truck
boat
traffic light
fire hydrant
stop sign
parking meter
bench
bird
cat
dog
horse
sheep
cow
elephant
bear
zebra
giraffe
backpack
umbrella
handbag
tie
suitcase
frisbee
skis
snowboard
sports ball
kite
baseball bat
baseball glove
skateboard
surfboard
tennis racket
bottle
wine glass
cup
fork
knife
spoon
bowl
banana
apple
sandwich
orange
broccoli
carrot
hot dog
pizza
donut
cake
chair
couch
potted plant
bed
dining table
toilet
tv
laptop
mouse
remote
keyboard
cell phone
microwave
oven
toaster
sink
refrigerator
book
clock
vase
scissors
teddy bear
hair drier
toothbrush
参考代码:
# import the necessary packages
from data_utils import get_dataloader
from data_utils import normalize
import config as config
from torchvision.datasets import ImageFolder
from torch.utils.data import Subset
from sklearn.model_selection import train_test_split
from torchvision.transforms import Compose
from torchvision.transforms import ToTensor
from torchvision.transforms import Resize
import matplotlib.patches as patches
import matplotlib.pyplot as plt
import numpy as np
import random
import torch
import cv2
import os
# initialize test transform pipeline
testTransform = Compose([
	Resize((config.IMAGE_SIZE, config.IMAGE_SIZE)), ToTensor()])
# create the test dataset and initialize the test data loader
testDataset = ImageFolder(config.TEST_PATH, testTransform)
testLoader = get_dataloader(testDataset, config.PRED_BATCH_SIZE)
# initialize iterable variable
sweeper = iter(testLoader)
# list to store permuted images
imageInput = []

# grab a batch of test data
print("[INFO] getting the test data...")
batch = next(sweeper)
(images, _) = (batch[0], batch[1])
# switch off autograd
with torch.no_grad():
	# send the images to the device
	images = images.to(config.DEVICE)

	# loop over all the batch
	for index in range(0, config.PRED_BATCH_SIZE):
		# grab the image, de-normalize it, scale the raw pixel
		# intensities to the range [0, 255], and change the channel
		# ordering from channels first tp channels last
		image = images[index]
		image = image.permute((1, 2, 0))
		imageInput.append(image.cpu().detach().numpy())

# call the required entry points
ssdModel = torch.hub.load("NVIDIA/DeepLearningExamples:torchhub", "nvidia_ssd")
utils = torch.hub.load("NVIDIA/DeepLearningExamples:torchhub", "nvidia_ssd_processing_utils")
# flash model to the device and set it to eval mode
ssdModel.to(config.DEVICE)
ssdModel.eval()
# new list for processed input
processedInput = []
# loop over images and preprocess them
for image in imageInput:
	image = normalize (image)
	processedInput.append(image)
# convert the preprocessed images into tensors
inputTensor = utils.prepare_tensor(processedInput)

# turn off auto-grad
print("[INFO] getting detections from the test data...")
with torch.no_grad():
	# feed images to model
	detections = ssdModel(inputTensor)
# decode the results and filter them using the threshold
resultsPerInput = utils.decode_results(detections)
bestResults = [utils.pick_best(results,
	config.THRESHOLD) for results in resultsPerInput]

# get coco labels
classesToLabels = utils.get_coco_object_dictionary()
# loop over the image batch
for image_idx in range(len(bestResults)):
	(fig, ax) = plt.subplots(1)
	# denormalize the image and plot the image
	image = processedInput[image_idx] / 2 + 0.5
	ax.imshow(image)
	# grab bbox, class, and confidence values
	(bboxes, classes, confidences) = bestResults[image_idx]

	# loop over the detected bounding boxes
	for idx in range(len(bboxes)):
		# scale values up according to image size
		(left, bot, right, top) = bboxes[idx ] * 300
		# draw the bounding box on the image
		(x, y, w, h) = [val for val in [left, bot, right - left,
			top - bot]]
		rect = patches.Rectangle((x, y), w, h, linewidth=1,
			edgecolor="r", facecolor="none")
		ax.add_patch(rect)
		ax.text(x, y,
			"{} {:.0f}%".format(classesToLabels[classes[idx] - 1],
			confidences[idx] * 100),
			bbox=dict(facecolor="white", alpha=0.5))

# check to see if the output directory already exists, if not
# make the output directory
if not os.path.exists(config.SSD_OUTPUT):
    os.makedirs(config.SSD_OUTPUT)
# save plots to output directory
print("[INFO] saving the inference...")
outputFileName = os.path.join(config.SSD_OUTPUT, "output.png")
plt.savefig(outputFileName)
四、训练参考
机器学习笔记 - 使用pytorch + yolov5训练自定义数据集_bashendixie5的博客-CSDN博客_yolov5 自定义数据集学习使用pytorch版本的yolo5模型进行自定义数据的目标识别训练。https://skydance.blog.csdn.net/article/details/122563689Python视觉深度学习系列教程 第三卷 第16章 从头开始训练SSD_bashendixie5的博客-CSDN博客在上一章中,我们讨论了Single Shot Detector (SSD) 的内部工作原理。现在已经大致了解了 SSD 框架,我们可以使用TensorFlow ObjectDetection API (TFOD API) 在数据集上训练 SSD,类似于第15章我们使用 TFOD API 训练Faster R-CNN。我们将通过使用由dlib的Davis King策划和标记的车辆数据集训练SSD来识别车辆的前视图和后视图,从而继续探讨自动驾驶汽车的深度学习主题。这个过程不仅会让我们更多地......
https://skydance.blog.csdn.net/article/details/122319511