文章目录
一、混入 mixin
1. mixin 的功能
可以把多个组件公用的配置提取成一个混入对象。
2. 使用方式
第一步在 mixin.js 中定义混入:
	{


		data(){

    ...},
		methods:{

    ...},
		....
	}
第二步在子组件中混入(局部混入)
mixins:[xxx]
在 main.js 中全局混入
Vue.mixin(xxx)
3. 实例:局部混入
注意点:
- 在
mixin.js定义混入时也要对其进行暴露。- 在子组件中要引入混合
import { mixin } from "../mixin";- 在子组件中配置时,
mixins: [mixin],注意加s和 不加''- 局部混入不需要在父组件中配置。
School.vue
<template>
<div>
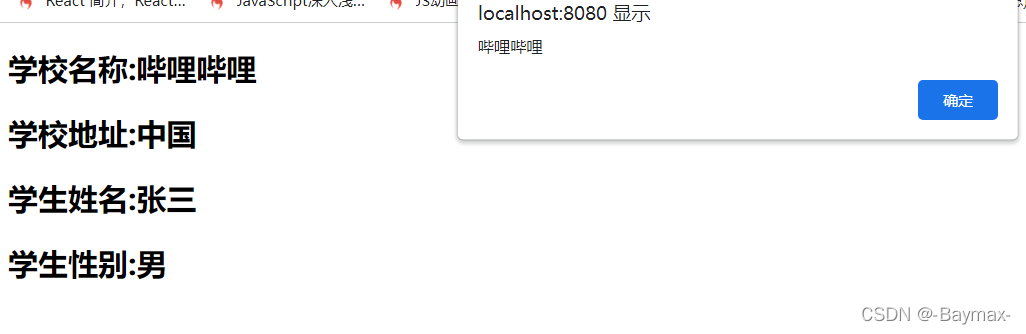
<h2 @click="showName">学校名称:{
{
name}}</h2>
<h2>学校地址:{
{
address}}</h2>
</div>
</template>
<script>
//引入一个混合
import {
mixin} from '../mixin'
export default {
name: 'SchoolName',
data(){
return{
name:'哔哩哔哩',
address:'中国'
}
},
mixins:[mixin]
}
</script>
Student.vue
<template>
<div>
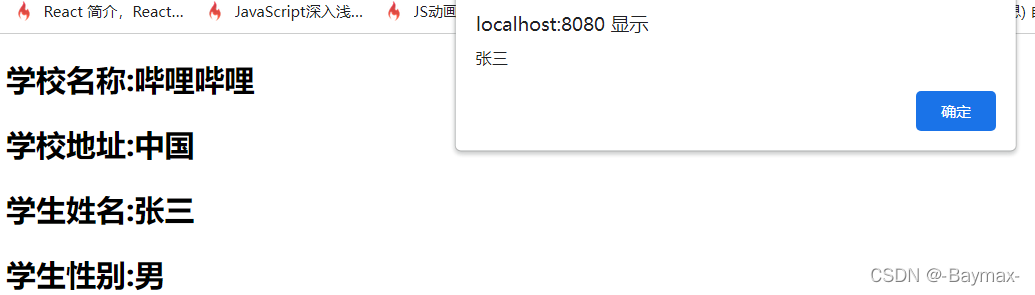
<h2 @click="showName">学生姓名:{
{
name}}</h2>
<h2>学生性别:{
{
sex}}</h2>
</div>
</template>
<script>
//引入一个混合
import {
mixin} from '../mixin'
export default {
name: 'StudentName',
data(){
return{
name:'张三',
sex:'男'
}
},
mixins:[mixin]
}
</script>
App.vue
	<template>
	  <div>
	      <School/>
	      <student/>
	  </div>
	</template>

	<script>
	    // 引入 School 组件
	    import School from './components/School.vue'
	    import Student from './components/Student.vue'
	    export default {


	        name: 'App',
	        components: {

    School,Student},
	    }
	</script>
mixin.js
	//分别暴露
	export const mixin = {


	    methods:{


	        showName(){


	            alert(this.name)
	        }
	    }
	}
4. 实例:全局混入
删除
School.vue和Student.vue的import {mixin} from '../mixin'以及mixins:[mixin],并修改 main.js
main.js
	// 引入 Vue
	import Vue from 'vue'
	// 引入 App
	import App from './App.vue'
	// 全局混入
	import {

    mixin} from './mixin'
	// 关闭 vue 的生产提示
	Vue.config.production = false
	// 全局混入
	Vue.mixin(mixin)
	// 创建 vm
	new Vue({


	    el:'#app',
	    render: h => h(App)
	})
四、插件 plugins
1. plugins 的功能
用于增强 Vue
2. plugins 的本质
包含
install方法的一个对象,install的第一个参数是Vue,第二个以后的参数是插件使用者传递的数据。
3. 定义插件的方式
	对象.install = function (Vue, options) {


        //1.添加全局过滤器
        Vue.filter(...)

        //2.添加全局指令
        Vue.directive(...)

        //3.配置全局混入
        Vue.mixin(...)

        //4.添加实例方法
        Vue.prototype.$myMethod = function () {

    ...}
        Vue.prototype.$myProperty = xxx
    }
4. 实例:plugins 定义插件
plugins.js
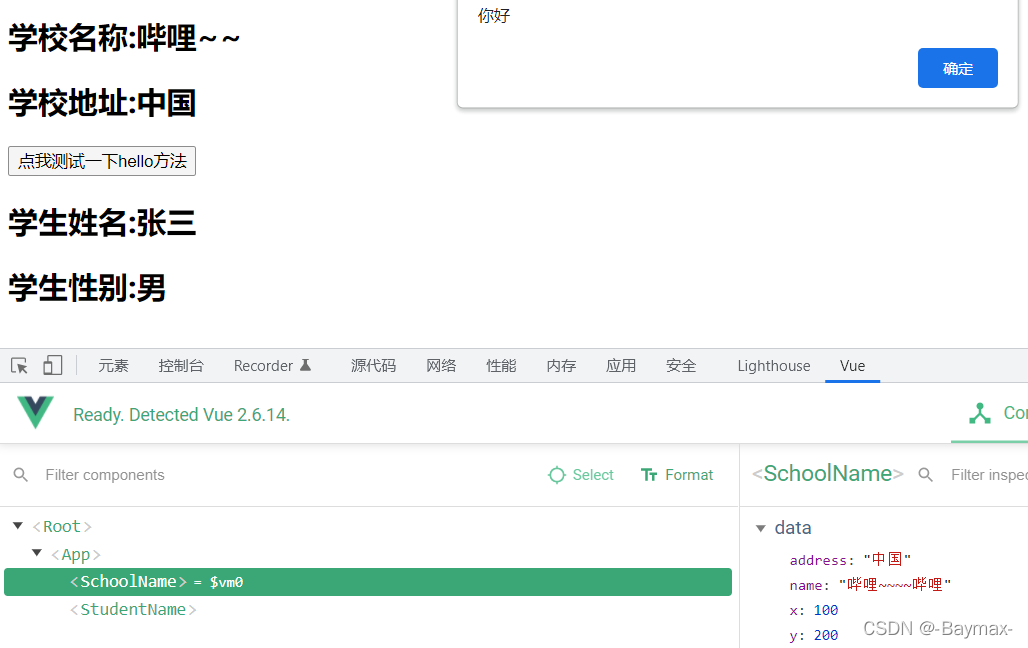
	export default {


	    install(Vue){


	        //全局过滤器
	        Vue.filter('mySlice', function(value) {


	            return value.slice(0,4)
	        })

	        //定义混入
	        Vue.mixin({


	            data(){


	                return {


	                    x:100,
	                    y:200
	                }
	            }
	        })

	        //给Vue原型上添加一个方法(vm 和 vc就都能用了)
	        Vue.prototype.hello = ()=>{

    alert('你好')}
	    }
	}
School.vue
	<template>
	    <div>
	        <h2>学校名称:{

    {

    name | mySlice}}</h2>
	        <h2>学校地址:{

    {

    address}}</h2>
	        <button @click="test">点我测试一下hello方法</button>
	    </div>
	</template>

	<script>
	    export default {


	        name: 'SchoolName',
	        data(){


	            return{


	                name:'哔哩~~~~哔哩',
	                address:'中国'
	            }
	        },
	        methods:{


	            test(){


	                this.hello()
	            }
	        }
	    }
	</script>
main.js
	// 引入 Vue
	import Vue from 'vue'
	// 引入 App
	import App from './App.vue'
	//引入插件
	import plugins from './plugins'
	// 关闭 vue 的生产提示
	Vue.config.production = false

	//应用插件
	Vue.use(plugins)
	//创建 vm
	new Vue({


	    el:'#app',
	    render: h => h(App)
	})
五、样式 scoped
1. scoped 的作用
让样式在局部生效,防止冲突。
2. scoped 的写法
<style scoped>
School.vue
<style scoped>
    .demo{


        background-color: orange;
    }
</style>
Student.vue
<style scoped>
    .demo{


        background-color: skyblue;
    }
</style>
加上 scoped 可以防止样式的命名冲突,如果不加,样式重名时只能使用后引入的样式。
不积跬步无以至千里 不积小流无以成江海