搭建Jetbrains授权idea服务器
一、下载服务器搭建软件
本软件作者Lanyu,在此表示由衷感谢!
当前版本(v1.5)下载:点我 提取密码: 7gje
官方各版本下载: http://blog.lanyus.com/archives/314.html
二、安装
下载完成后进行解压,里面几乎涵盖了所有操作系统的版本,所以不管你是Win、Mac或是Linux都可以放心使用,这里使用的是v1.5版本,其他类似。
1.windows版本安装
选择对应的32位/64位可直接运行
IntelliJIDEALicenseServer_windows_386.exe //32位
IntelliJIDEALicenseServer_windows_amd64.exe //64位
2.linux版本安装
2.1 根据自己服务器的操作系统选择对应的32位/64位拷贝到服务器上
IntelliJIDEALicenseServer_linux_386 //32位
IntelliJIDEALicenseServer_linux_amd64 //64位
2.2 进入到软件存放的位置,运行以下命令,授予可执行权限
cd /root //进入文件所在目录,这里放的是root目录
chmod a+x IntelliJIDEALicenseServer_linux_amd64 //这里用的64位
2.3 启动
/root/IntelliJIDEALicenseServer_linux_amd64 -p1029 -prolongationPeriod999999999999若失败可执行:
/root/IntelliJIDEALicenseServer_linux_amd642.4 通过supervisor实现进程守护
vi/etc/supervisord.conf

#添加以下内容

[program:idea-server]

command=/root/IdeaServer -p1029 -umoonce -prolongationPeriod999999999

autostart=true

autorestart=true

startsecs=3
2.5 配置nginx进行反向代理,实现域名远程连接
server

{

listen 80;

server_name idea.moonce.com;#自己准备好的域名

root /home/wwwroot/;

location / {

proxy_pass http://127.0.0.1:1029;#指定监听的端口

proxy_redirect off;

proxy_set_header Host $host;

proxy_set_header X-Real-IP $remote_addr;

proxy_set_header X-Forwarded-For $proxy_add_x_forwarded_for;

}
access_log off; #access_log end

error_log /dev/null; #error_log end

}
3.mac版本安装
3.1 根据自己服务器的操作系统选择对应的32位/64位拷贝到服务器上
IntelliJIDEALicenseServer_darwin_386 //32位
IntelliJIDEALicenseServer_darwin_amd64 //64位
3.2 添加文件执行权限
chmod +x IntelliJIDEALicenseServer_darwin_amd64 3.3 用screen在后台执行,避免关闭terminal激活失败
screen -dmS IntelliJIDEALicenseServer_darwin_amd64 -d -m3.4 启动
sudo ./IntelliJIDEALicenseServer_darwin_amd64 -p1029 -umoonce -prolongationPeriod999999999三、相关参数
-l #指定绑定监听到哪个IP(私人用)
-u #用户名参数,当未设置-u参数,且计算机用户名为^[a-zA-Z0-9]+$时,使用计算机用户名作为idea用户名
-p #参数,用于指定监听的端口
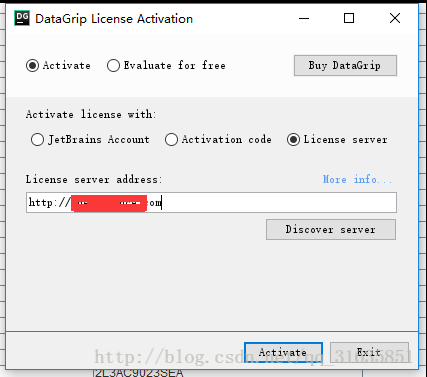
-prolongationPeriod #指定过期时间参数四、使用
本地可直接用 172.0.0.1:端口号 使用。远程服务器也可使用 ip:端口号 的形式,注意前面要加”http://”,我这里用得域名重定向解析,重新指向带端口号得ip,所以不用加端口号