文章目录
一,Nginx概述来历
Nginx (“engine x”) 是一个高性能的 HTTP 和反向代理服务器。Nginx 是由 Igor Sysoev 为俄罗斯访问点开量第二的 Rambler.ru 站发的,第一个公开版本 0.1.0 发布于 2004 年 10 月 4 日。其将源代码以类 BSD 许可证的形式发布,因它的稳定性、丰富的功能集、示例配置文件和低系统资源的消耗而闻名。2011 年 6 月 1 日,Nginx 1.0.4 发布
Nginx 是一款轻量级的 Web 服务器/反向代理服务器及电子邮件(IMAP/POP3)代理服务器,单台物理服务器可支持30 000~50 000个并发请求。并在一个 BSD-like 协议下发行。由俄罗斯的程序设计师 Igor Sysoev 所开发,供俄国大型的入口网站及搜索引擎Rambler(俄文:Рамблер)使用
其特点是占有内存少,并发能力强,事实上 Nginx 的并发能力确实在同类型的网页服务器中表现较好,中国大陆使用 Nginx 网站用户有:百度 BWS、新浪、网易、腾讯、等
二,Tengine概述(了解)
Tengine 是由淘宝网发起的 Web 服务器项目。它在 Nginx 的基础上,针对大访问量网站的需求,添加了很多高级功能和特性
Tengine 的性能和稳定性已经在大型的网站如淘宝网、天猫商城等得到了很好的检验。(可以这样理解:淘宝网拿到了 Nginx 源代码之后,进行了功能的填充、优化等等,然后提交给Nginx 官方,但是由于 Nginx 官方相应慢甚至不响应,加上语言沟通的不顺畅,于是淘宝公司就自己打包,在遵循 GPL 的原则上进行二次开发,于是就出了现在的 Tengine 这个版本)
三,Nginx和Apache的区别
Nginx是一个甚于事件的Web服务器,Apache是一个基于流程的服务器;
Nginx所有请求都由一个线程处理,Apache单个线程处理单个请求;
Nginx避免子进程的概念,Apache是基于子进程的;
Nginx在内存消耗和连接方面更好,Apache在内存消耗和连接方面一般;
Nginx的性能和可伸缩性不依赖于硬件,Apache依赖于CPU和内存等硬件;
Nginx支持热部署,Apache不支持热部署;
Nginx对于静态文件处理具有更高效率,Apache相对一般;
Nginx在反向代理场景具有明显优势,Apache相对一般。
- 优缺点对比:
1.Nginx 配置简洁, Apache 复杂 ;Nginx 静态处理性能比 Apache 高 2倍以上 ;
2.Apache 对 PHP 支持比较简单,Nginx 需要配合其他后端用;Apache 的组件比 Nginx 多 ;
3.apache是同步多进程模型,一个连接对应一个进程;Nginx是异步的,多个连接(万级别)可以对应一个进程;

4.Nginx处理静态文件好,耗费内存少;动态请求由apache去做,Nginx只适合静态和反向;
5.Nginx适合做前端服务器,负载性能很好;Nginx本身就是一个反向代理服务器 ,且支持负载均衡
1、nginx相对于apache的优点:
轻量级,同样web 服务,比apache 占用更少的内存及资源 ;
抗并发,nginx 处理请求是异步非阻塞的,而apache 则是阻塞型的,在高并发下nginx 能保持低资源低消耗高性能 ;
高度模块化的设计,编写模块相对简单 ;
社区活跃,各种高性能模块出品迅速;
Nginx本身就是一个反向代理服务器 ,Nginx支持7层负载均衡;Nginx可能会比apache支持更高的并发,
nginx配置文件写的很简洁,正则配置让很多事情变得简单运行效率高,占用资源少,代理功能强大,很适合做前端响应服务器 !
2、apache 相对于nginx 的优点:
apache的rewrite ,比nginx 的rewrite 强大 ;
模块超多,基本想到的都可以找到 ;
少bug ,nginx 的bug 相对较多 ;
超稳定 ,Aapche依然是大部分公司的首先,因为其成熟的技术和开发社区已经 也是非常不错的性能。
四,Nginx应用场景
1.静态服务器 (图片、视频服务、文本)
2.动态服务
3.反向代理, 负载均衡
4.缓存服务
五,关于Nginx
- 一款高性能、轻量级web服务软件
- 稳定性高
- 系统资源消耗低
- 对HTTP并发连接的处理能力高
- 单台物理服务器可支持30000~50000个并发请求
- NG并发连接能力受2个因素的影响
1.CPU个数
2.本地物理服务器系统的最大文件打开数
六,编译安装Nginx服务
1. 配置环境
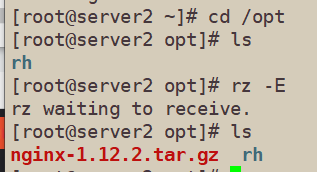
- 关闭防火墙,将安装nginx所需软件包传到/opt目录下
systemctl stop firewalld
systemctl disable firewalld
setenforce 0
2. 安装依赖包
- nginx的配置及运行需要pcre、zlib等软件包的支持,因此需要安装这些软件的开发包,以便提供相应的库和头文件
yum -y install pcre-devel zlib-devel gcc gcc-c++ make

3.创建运行用户、组
- (Nginx 服务程序默认以 nobody 身份运行,建议为其创建专门的用户账号,以便更准确地控制其访问权限)
useradd -M -s /sbin/nologin nginx

4.编译安装Nginx
tar zxvf nginx-1.12.2.tar.gz -C /opt

cd /opt/nginx-1.12.2/
./configure \
--prefix=/usr/local/nginx \
--user=nginx \
--group=nginx \
--with-http_stub_status_module
#指定nginx安装路径
#指定用户名
#指定组名
#启用 httpd_stub_status_module 模块以支持状态统计


make -j 4 && make install

ln -s /usr/local/nginx/sbin/nginx /usr/local/sbin/
#优化路径,让系统识别nginx的操作命令


5.检查、启动、重启、停止 nginx服务
nginx -t
#检查配置文件是否正确

nginx
##启动


##停止
cat /usr/local/nginx/logs/nginx.pid
#先查看nginx的PID号
kill -3 <PID号>
kill -s QUIT <PID号>
killall -3 nginx
killall -s QUIT nginx

##重载
kill -1 <PID号>
kill -s HUP <PID号>
killall -1 nginx
killall -s HUP nginx

##日志分隔,重新打开日志文件
kill -USR1 <PID号>

##平滑升级
kill -USR2 <PID号>
| 信号编号 | 信号名 | 含义 |
|---|---|---|
| 0 | EXIT | 程序退出时收到该信息 |
| 1 | HUP | 挂掉电话线或终端连接的挂起信号,这个信号也会造成某些进程在没有终止的情况下重新初始化 |
| 2 | INT | 表示结束进程,但并不是强制性的,常用的 “Ctrl+C” 组合键发出就是一个 kill -2 的信号 |
| 3 | QUIT | 退出 |
| 9 | KILL | 杀死进程,即强制结束进程 |
| 11 | SEGV | 段错误 |
| 15 | TERM | 正常结束进程,是 kill 命令的默认信号 |


6.添加 Nginx 系统服务
- 方法一:
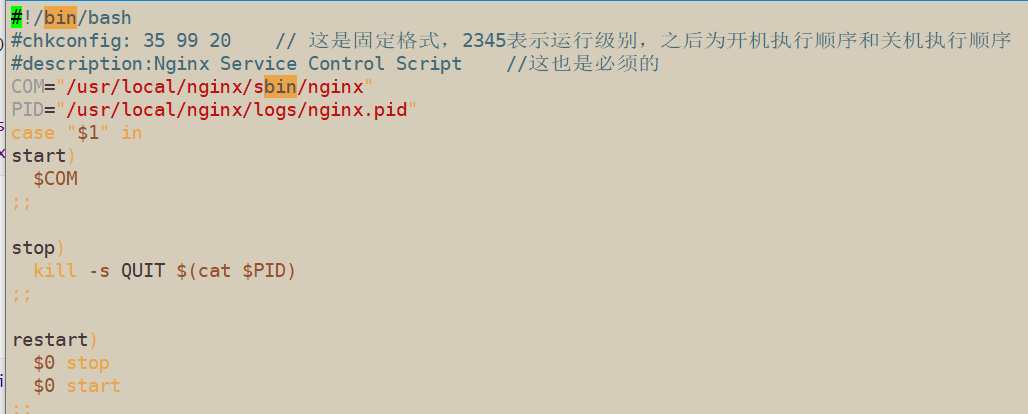
vim /etc/init.d/nginx
#!/bin/bash
# chkconfig: - 99 20    						#chkcofig - “-” 表示不启用开机启动管理 (同时 若不加“#”, chkconfig add nginx 会加载不到配置)
# description: Nginx Service Control Script     #启动信息
COM="/usr/local/nginx/sbin/nginx"				#命令程序文件位置(nginx)
PID="/usr/local/nginx/logs/nginx.pid"			#pid文件
case "$1" in   									#$1指的是nginx的stop和start
start)
   $COM
   ;;
stop)
   kill -s QUIT $(cat $PID)
   ;;
restart)
   $0 stop    				#用$0执行stop
   $0 start   				#用$0调用start
   ;;
reload)
   kill -s HUP $(cat $PID)
   ;;
*)
       echo "Usage: $0 {start|stop|restart|reload}"
       exit 1
esac
exit 0

chmod +x /etc/init.d/nginx
chkconfig --add nginx   		#添加为系统服务
service nginx start		 	 	#开启服务
#可在/etc/rc.d/init.d目录下查看到nginx服务


############################################################################################################
vim /etc/init.d/nginx

#!/bin/bash
# chkconfig: - 99 20
# description: Nginx Service Control Script

COM="/usr/local/nginx/sbin/nginx"
PID="/usr/local/nginx/logs/nginx.pid"

case "$1" in
start)
        $COM
        ;;
stop)
        kill -s QUIT $(cat $PID)
        ;;
restart)
        $0 stop
        $0 start
        ;;
reload)
        kill -s HUP $(cat $PID)
        ;;
*)
        echo "Usage: $0 {start|stop|restart|reload}"
        exit 1
esac
exit 0

- 方法2:使用systemctl管理
vim /usr/lib/systemd/system/nginx.service

[Unit]
Description=nginx		 	#描述
After=network.target		#描述服务类别
[Service]
Type=forking									#后台运行类型
PIDFile =/usr/local/nginx/logs/nginx.pid		#PID文件位置
ExecStart=/usr/local/nginx/sbin/nginx			#启动服务
ExecReload=/bin/kill -s HUP $MAINPID			#根据PID重载配置
ExecStop=/bin/kill -s QUIT $MAINPID				#根据PID终止进程
PrivateTmp=true						#开启
[Install]
WantedBy=multi-user.target			#启动级别

chmod 754 /lib/systemd/system/nginx.service		#设置754权限是一种安全优化
systemctl start nginx.service
systemctl enable nginx.service


############################################################################################################
vim /lib/systemd/system/nginx.service

[Unit]
Description=nginx
After=network.target
[Service]
Type=forking
PIDFile=/usr/local/nginx/logs/nginx.pid
ExecStart=/usr/local/nginx/sbin/nginx
ExecReload=/bin/kill -s HUP $MAINPID
ExecStop=/bin/kill -s QUIT $MAINPID
PrivateTmp=true
[Install]
WantedBy=multi-user.target

chmod 754 /lib/systemd/system/nginx.service

systemctl start nginx.service
systemctl enable nginx.service

新版本升级
1.准备新版本压缩包拖到/opt,并解压
tar -zxvf nginx-1.22.0.tar.gz /opt

2.编译安装新版本
cd nginx-1.22.0

yum -y install gcc openssl openssl-devel pcre-devel zlib zlib-devel

./configure \
--prefix=/usr/local/nginx \
--user=nginx \
--group=nginx \
--with-http_stub_status_module \
--with-http_ssl_module

make
mv /usr/local/nginx/sbin/nginx /usr/local/nginx/sbin/nginx_old   备份
cp objs/nginx /usr/local/nginx/sbin/nginx
重启服务

并且nginx -V   #查看版本

#或者先 killall nginx ,再/usr/local/nginx/sbin/nginx

七,认识Nginx服务的主配置文件 nginx.conf
在 Nginx 服务器的主配置文件 /usr/local/nginx/conf/nginx.conf 中,包括全局配置、I/O 事件配置和 HTTP 配置这三大块内容,配置语句的格式为 “关键字 值 ;”(末尾以分号表示结束),以“#”开始的部分表示注释
cp /usr/local/nginx/conf/nginx.conf /usr/local/nginx/conf/nginx.conf.bak20020720
#重中之重,先备份
1.全局配置
vim /usr/local/nginx/conf/nginx.conf

#user  nobody;                              #运行用户,若 编译时未指定则默认为 nobody
worker_processes  1;						#工作进程数量,可配置成服务器内核数 * 2,如果网站访问量不大,一般设为1就够用了
#error_log  logs/error.log;					#错误日志存放位置
#error_log  logs/error.log  notice;
#error_log  logs/error.log  info;
#pid        logs/nginx.pid;                 #PID文件的位置
2.I/O事件配置
- 使用 "events { } " 界定标记,用来指定 Nginx 进程的 I/O 相应模型,每个进程的连接数等设置(默认为1024)
events {


    worker_connections  1024;
}
-
linux 系统对文件打开的数量有最大的限制,通常设置为1024,这个数值很容易会达到,从而造成系统程序或者系统的瓶颈;所以需要修改文件打开最大数
-
如提高每个进程的连接数还需执行“ulimit -n 16384命令临时修改本地每个进程可以同时打开的最大文件数
-
在Linux平台上,在进行高并发TCP连接处理时,最高的并发数量都要受到系统对用户单一进程同时可打开文件数量的限制(这是因为系统为每个TCP连接都要创建一个socket句柄,每个socket句柄同时也是一个文件句柄)
-
epoll是Linux内核为处理大批句柄而作改进的poll,是Linux下多路复用IO接口select/poll的增强版本,它能显著的减少程序在大量并发连接中只有少量活跃的情况下的系统CPU利用率
[root@server2 ~]# cd /usr/local/nginx/conf
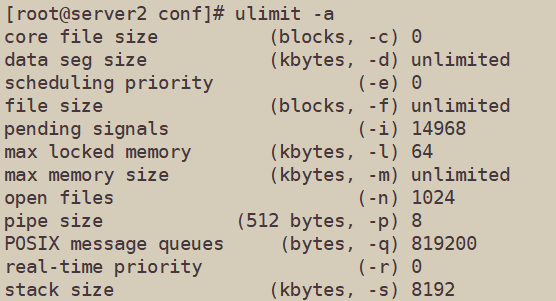
[root@server2 conf]# ulimit -a #查看当前进程可以打开的最大文件数
core file size (blocks, -c) 0
data seg size (kbytes, -d) unlimited
scheduling priority (-e) 0
file size (blocks, -f) unlimited
pending signals (-i) 14968
max locked memory (kbytes, -l) 64
max memory size (kbytes, -m) unlimited
open files (-n) 1024
pipe size (512 bytes, -p) 8
POSIX message queues (bytes, -q) 819200
real-time priority (-r) 0
stack size (kbytes, -s) 8192
......
[root@server2 conf]# ulimit -n #查看当前进程可以打开文件的最大数量
1024
[root@server2 conf]# cat /proc/sys/fs/file-max #查看当前系统的最大文件数
378382
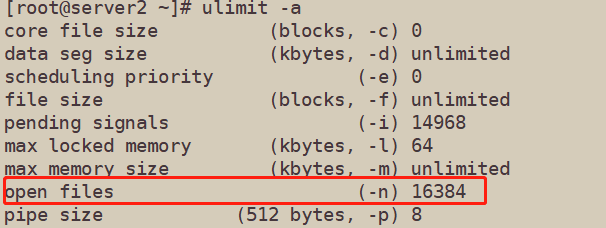
#通过命令ulimit -n 16384可以临时进行更改
[root@server2 conf]# ulimit -n 16384
[root@server2 conf]# ulimit -n
16384


##永久配置,更改
[root@server2 conf]# vim /etc/security/limits.conf
##50行以下是注释,格式怎么写
 50 #<domain>      <type>  <item>         <value>
 51 #
 52
 53 #*               soft    core            0
 54 #*               hard    rss             10000
 55 #@student        hard    nproc           20
 56 #@faculty        soft    nproc           20
 57 #@faculty        hard    nproc           50
 58 #ftp             hard    nproc           0
 59 #@student        -       maxlogins       4
 60
 61 # End of file
###在下面追加,若是用Xshell连接更改(添加)文件的话,ulimit -a查看当前进程可以打开的最大文件数没刷新,只需断开重连查看即可
 62 root  soft  nofile  16384
 63 root  hard  nofile  16384
3.HTTP 配置文件介绍
- 使用 "http { } "界定标记,包括访问日志、HTTP 端口、网页目录、默认字符集、连接保持,以及虚拟Web主机、PHP解析等一系列设置,其中大部分配置语句都包含在子界定标记 "server { } " 内
http {


    include       mime.types;          			 	    #文件扩展名与文件类型映射表
    default_type  application/octet-stream;				#默认文件类型

														#日志格式设置
    #log_format  main  '$remote_addr - $remote_user [$time_local] "$request" '
    #                  '$status $body_bytes_sent "$http_referer" '
    #                  '"$http_user_agent" "$http_x_forwarded_for"';

    #access_log  logs/access.log  main;					#访问日志位置

    sendfile        on;									#支持文件发送(下载)
    #tcp_nopush     on;    								#此选项允许或禁止使用socket的TCP_CORK的选项( 发送数据包前先缓存数据),此选项仅在使用sendfile的时候使用

    #keepalive_timeout  0;								#连接保持超时时间,单位为秒
    keepalive_timeout  65;

    #gzip  on;											#压缩模块输出,on 表示开启


    server {

    											#web服务监听相关配置
        listen       80;								#默认监听的端口
        server_name  localhost;							#站点域名,可以有多个,用空格隔开   需改为www.dsj.com


        #charset koi8-r;								#字符集支持(修改为中文UTF-8),网页的默认字符集

        #access_log  logs/host.access.log  main;		#此web服务的主访问日志

        location / {

    									#根目录配置
            root   html;								#网站根目录的位置(/usr/local/nginx/html)
            index  index.html index.htm;				#默认首页(索引页)
        }

        #error_page  404              /404.html;

        # redirect server error pages to the static page /50x.html
        #
        error_page   500 502 503 504  /50x.html;		#内部错误的反馈页面
        location = /50x.html {

    							#错误页面配置
            root   html;
        }
- 配置本地映射
[root@nginx /usr/local/nginx/conf]#vim /etc/hosts
127.0.0.1 localhost localhost.localdomain localhost4 localhost4.localdomain4
::1 localhost localhost.localdomain localhost6 localhost6.localdomain6
192.168.113.128 www.dxj.com #这里格式必不能错,不然无法访问
或
echo "192.168.113.128 www.dxj.com" >> /etc/hosts
[root@nginx /usr/local/nginx/conf]#curl www.dxj.com #curl可以测试一台服务器是否可以到达一个网站
<!DOCTYPE html>
<html>
<head>
<title>Welcome to nginx!</title>
<style>
body {
width: 35em;
margin: 0 auto;
font-family: Tahoma, Verdana, Arial, sans-serif;
}
</style>
</head>
<body>
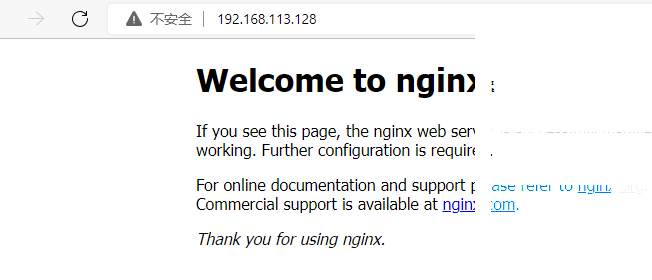
<h1>Welcome to nginx!</h1>
<p>If you see this page, the nginx web server is successfully installed and
working. Further configuration is required.</p>
<p>For online documentation and support please refer to
<a href="http://nginx.org/">nginx.org</a>.<br/>
Commercial support is available at
<a href="http://nginx.com/">nginx.com</a>.</p>
<p><em>Thank you for using nginx.</em></p>
</body>
</html>
[root@nginx /usr/local/nginx/conf]#cd /usr/local/nginx/html/
[root@nginx /usr/local/nginx/html]#ls
50x.html  index.html
[root@nginx /usr/local/nginx/html]#mkdir test
[root@nginx /usr/local/nginx/html]#cd test/
[root@nginx /usr/local/nginx/html/test]#vim index.html

hello world!
[root@nginx /usr/local/nginx/html]#systemctl stop nginx.service
[root@nginx /usr/local/nginx/html]#systemctl start nginx.service
- 日志格式设定:
r e m o t e a d d r 与 remote_addr与 remoteaddr与http_x_forwarded_for用以记录客户端的ip地址;
$remote_user:用来记录客户端用户名称;
$time_local: 用来记录访问时间与时区;
$request: 用来记录请求的url与http协议;
$status: 用来记录请求状态;成功是200,
$body_bytes_sent :记录发送给客户端文件主体内容大小;
$http_referer:用来记录从哪个页面链接访问过来的;
$http_user_agent:记录客户浏览器的相关信息;
通常web服务器放在反向代理的后面,这样就不能获取到客户的IP地址了,通过$remote_add拿到的IP地址是反向代理服务器的iP地址。反向代理服务器在转发请求的http头信息中,可以增加x_forwarded_for信息,用以记录原有客户端的IP地址和原来客户端的请求的服务器地址
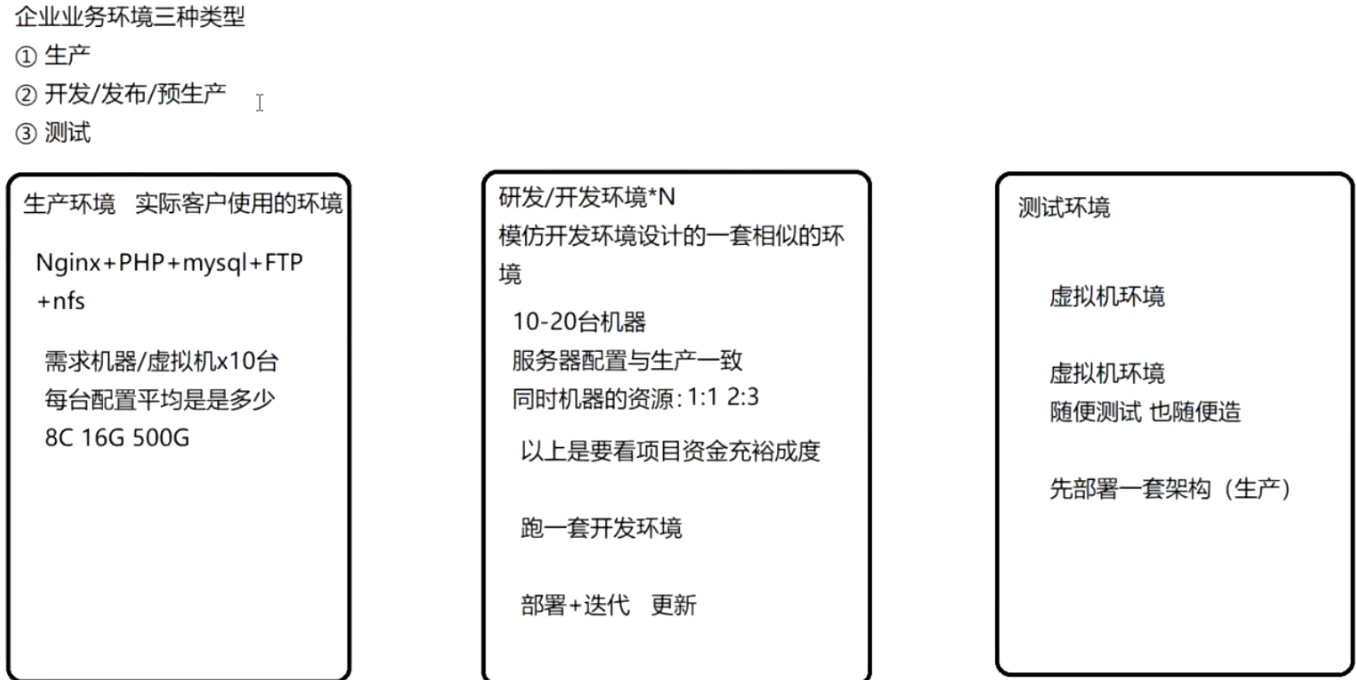
- 企业业务环境三中类型:
4.访问状态统计
- Nginx内置了 HTTP_STUB_STATUS 状态统计模块,用来反馈当前得 Web 访问情况,配置编译参数时可添加
–with-http_stup_status_dodule 来启用此模块支持 - 可使用命令 /usr/local/nginx/sbin/nginx -V 来查看已安装的 Nginx 是否包含 HTTP_STUB_STATUS 模块
- 要使用 Nginx 的状本统计功能,除了启用内建模块以外,还需要修改 nginx.conf 配置文件,指定访问位置并添加stub_status 配置代码
[root@server2 html]# cat /opt/nginx-1.22.0/auto/options | grep YES    #查看环境配置
[root@server2 html]# nginx -V
nginx version: nginx/1.22.0           #版本
built by gcc 4.8.5 20150623 (Red Hat 4.8.5-44) (GCC)
built with OpenSSL 1.0.2k-fips  26 Jan 2017
TLS SNI support enabled

#环境配置
configure arguments: --prefix=/usr/local/nginx --user=nginx --group=nginx --with-http_stub_status_module --with-http_ssl_module
- 修改 nginx.conf 配置文件,指定访问位置并添加 stub_status 配置代码
[root@server2 html]# cd /usr/local/nginx/conf/

[root@server2 html]# vim /usr/local/nginx/conf/nginx.conf
......
 35     server {


 36         listen       80;
 37         server_name  www.dxj.com;
 38
 39         charset UTF-8;
 40
 41         #access_log  logs/host.access.log  main;
 42
 43         location / {


 44             root   html;
 45             index  index.html index.htm;
 46         }

#在46行下添加如下代码

    location /status {

          #访问位置为/status
      stub_status on;       #打开状态统计功能
      access_log off;       #关闭此位置的日志记录
    }

#改完以后检查语句是否正确
nginx -t
- 若访问不到地址没有解析的话按照以下操作给与权限更改hosts文件即可:
1.按下win+r快捷键打开运行菜单,输入框中输入“gpedit.msc”确定。
2.依次点击打开“计算机配置”选项,然后再找到“Windows设置”这个选项,再从“Windows设置”找到并打开“安全设置”选项,接着打开“本地策略”最后找到打开“安全选项”即可。
3.找到“账户:管理员状态”,可以看见状态为“已禁用”,我们需要的是将它开启。
4.鼠标右键单击“账户:管理员状态”,在弹出的快捷菜单中选择“属性”。
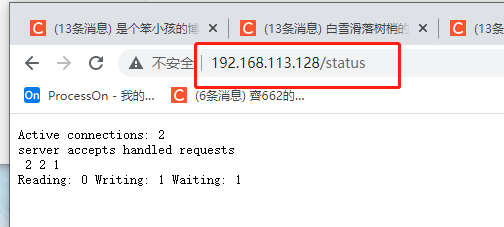
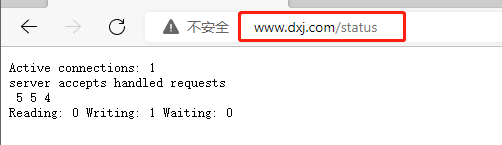
- 改完以后重启 nginx 服务,在浏览器中访问服务器 /status 网站位置,可以看到当前得状态统计信息
”Active connections“表示当前的活动连接数
”server accepts handled requests“表示已经处理的连接信息,三个数字依次表示:
已处理的连接数、成功的TCP握手次数、己处理的请求数
八、Nginx 访问控制
1.基于授权的访问控制步骤
1.1概述
-
Nginx 与 Apache 一样,可以实现基于用户授权的访问控制,当客户端想要访问相应的网站或目录时,要求用户输入用户名和密码才能正常访问。
-
Apache 网页认证实现可总结为以下几个步骤:
① 生成用户密码认证文件
② 修改主配置文件相对应目录,添加认证配置项
③ 重启服务,访问测试
1.2 步骤
- 使用 htpasswd 生成用户认证文件,如果没有该命令,可使用 yum 安装 http-tools 软件包
[root@server2 html]# yum install -y httpd-tools.x86_64

#在/usr/local/nginx/目录下生成passwd.db文件,用户名为 test
[root@server2 html]# htpasswd -c /usr/local/nginx/passwd.db xht
New password:                                 #输入二次密码
Re-type new password:
Adding password for user xht				  #生成用户和密码的密文
[root@server2 html]# cat /usr/local/nginx/passwd.db
xht:$apr1$sR3CEQF2$xv4yaAuGkOqm5D.BMJmYR
2.修改密码文件的权限为400,将所有者改为 nignx ,设置 nginx 的运行用户有读取的权限
[root@server2 html]# chown nginx /usr/local/nginx/passwd.db
[root@server2 html]# chmod 400 /usr/local/nginx/passwd.db
[root@server2 html]# cd /usr/local/nginx/
[root@server2 /usr/local/nginx]# ll
总用量 8
......
-r-------- 1 nginx root   43 10月  08 0.28 passwd.db
3.修改主配置文件 nginx.conf ,添加相应认证配置项
[root@server2 /usr/local/nginx]# vim /usr/local/nginx/conf/nginx.conf
......
 #在43行下面添加配置选项
 43         location / {


 44         auth_basic "secret";             #在主页配置项中添加认证
 45         auth_basic_user_file /usr/local/nginx/passwd.db;
 46             root   html;
 47             index  index.html index.htm;
 48         }


[root@server2 /usr/local/nginx]# nginx -t     #检查语法有没有错误
nginx: the configuration file /usr/local/nginx/conf/nginx.conf syntax is ok
nginx: configuration file /usr/local/nginx/conf/nginx.conf test is successful

[root@server2 /usr/local/nginx]# systemctl stop nginx.service
[root@server2 /usr/local/nginx]# systemctl start nginx.service
- 重启服务以后,用浏览器访问网址,检验控制效果
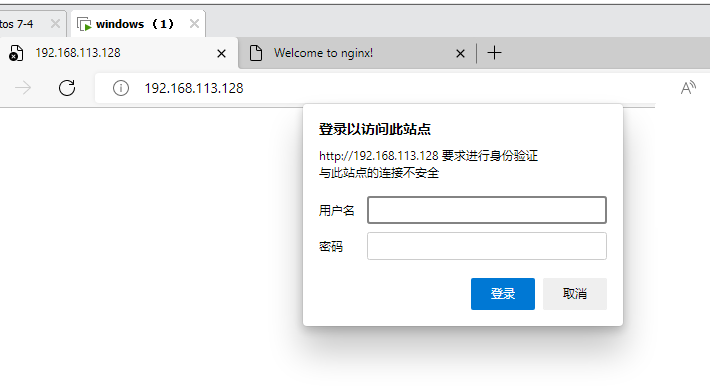
- 输入创建的账号密码即可显示内容
2. 基于客户端的访问控制
2.1概述
- 基于客户端的访问控制是通过客户端 IP 地址,决定是否允许对页面访问。
- 规则如下:
① deny IP/IP段:拒绝某个 IP 或 IP 段的客户端访问
② allow IP/IP段:允许某个 IP 或 IP 段的客户端访问
③ 规则从上往下执行,如匹配则停止,不再往下匹配
2.2 步骤
[root@server2 /usr/local/nginx]# vim /usr/local/nginx/conf/nginx.conf

server {


......
        location / {


            deny 192.168.113.128;            #这里添加规则,不允许128的IP访问
            allow all;					   #允许其它IP客户端访问,类似于黑白名单
            root   html;
            index  index.html index.htm;
        }

[root@server2 /usr/local/nginx]# nginx -t  #检查语法
nginx: the configuration file /usr/local/nginx/conf/nginx.conf syntax is ok
nginx: configuration file /usr/local/nginx/conf/nginx.conf test is successful

[root@server2 /usr/local/nginx]# systemctl stop nginx.service
[root@server2 /usr/local/nginx]# systemctl start nginx.service
九、虚拟主机
1. 基于域名的 Nginx 虚拟主机
- 为虚拟主机提供域名解析
echo "192.168.113.128 www.accp.com www.xtz.com" >> /etc/hosts
- 为虚拟主机准备网页文档
[root@localhost ~]#mkdir -p /var/www/html/accp
[root@localhost ~]#mkdir -p /var/www/html/xtz
[root@localhost ~]#echo "<h1> www.accp.com</h1>" >/var/www/html/accp/index.html
[root@localhost ~]#echo "<h1> www.xtz.com</h1>" >/var/www/html/xtz/index.html
[root@localhost ~]#cat /var/www/html/accp/index.html
<h1> www.accp.com</h1>
[root@localhost ~]#cat /var/www/html/xtz/index.html
<h1> www.xtz.com</h1>
- 修改 Nginx 的配置文件
    server {


        listen       80;
        server_name  www.accp.com;   ##设置域名
        charset utf-8;
        access_log  logs/accp.access.log;   ##设置日志名
        location / {


            root   /var/www/html/accp;    ##设置/var/www/html/accp工作目录
            index  index.html index.htm;
        }
        error_page   500 502 503 504  /50x.html;
        location = /50x.html {


            root   html;
        }
}

    server {


        listen       80;
        server_name  www.xtz.com;
        charset utf-8;
        access_log  logs/xtz.access.log;
        location / {


            root   /var/www/html/xtz;
            index  index.html index.htm;
        }
        error_page   500 502 503 504  /50x.html;
        location = /50x.html {


            root   html;
        }
}
2. 基于端口的 Nginx 虚拟主机
- 修改 Nginx 的配置文件
 server {


        listen       192.168.113.128:80;
        server_name  www.accp.com;   ##设置域名
        charset utf-8;
        access_log  logs/accp.access.log;   ##设置日志名
        location / {


            root   /var/www/html/accp;    ##设置/var/www/html/accp工作目录
            index  index.html index.htm;
        }
        error_page   500 502 503 504  /50x.html;
        location = /50x.html {


            root   html;
        }
}
 server {


        listen       192.168.113.128:8080;
        server_name  www.accp.com;
        charset utf-8;
        access_log  logs/accp8080.access.log;
        location / {


            root   /var/www/html/accp8080;
            index  index.html index.htm;
        }
        error_page   500 502 503 504  /50x.html;
        location = /50x.html {


            root   html;
        }
}
- 检测、重启服务
[root@localhost ~]#cd /var/www/html/
[root@localhost /var/www/html]#ls
accp  benet
[root@localhost /var/www/html]#mkdir accp8080
[root@localhost /var/www/html]#cd accp8080/
[root@localhost /var/www/html/accp8080]#vim index.html
[root@localhost /var/www/html/accp8080]#cat index.html
<h1> htis is accp8080 </h1>
[root@localhost /var/www/html/accp8080]#nginx -t
nginx: the configuration file /usr/local/nginx/conf/nginx.conf syntax is ok
nginx: configuration file /usr/local/nginx/conf/nginx.conf test is successful
[root@localhost /var/www/html/accp8080]#systemctl restart nginx.service
3.基于IP的 Nginx 虚拟主机
- 添加192.168.8.188 的映射
[root@localhost /usr/local/nginx/conf]#vim /etc/hosts

127.0.0.1   localhost localhost.localdomain localhost4 localhost4.localdomain4
::1         localhost localhost.localdomain localhost6 localhost6.localdomain6
192.168.8.135 www.accp.com
192.168.8.188 www.benet.com
- 创建网站根目录,创建192.168.8.188的网站首页文件
[root@localhost /usr/local/nginx/logs]#cd /var/www/html/
[root@localhost /var/www/html]#mkdir benet188
[root@localhost /var/www/html]#ls
accp  accp8080  benet  benet188
[root@localhost /var/www/html]#cd benet188/
[root@localhost /var/www/html/benet188]#vim index.html
<h1> this is benet188 web </h1>
- 创建临时虚拟网卡
[root@localhost /usr/local/nginx/conf]#ifconfig ens33:0 192.168.8.188 netmask 255.255.255.0
[root@localhost /usr/local/nginx/conf]#ifconfig
......
ens33:0: flags=4163<UP,BROADCAST,RUNNING,MULTICAST>  mtu 1500
        inet 192.168.8.188  netmask 255.255.255.0  broadcast 192.168.8.255
        ether 00:0c:29:57:05:a8  txqueuelen 1000  (Ethernet)
- 修改 Nginx 的配置文件
[root@localhost /var/www/html/benet188]#cd /usr/local/nginx/conf/
[root@localhost /usr/local/nginx/conf]#vim nginx.conf
    server {


        listen       192.168.8.135:80;
        server_name  www.accp.com;
        charset utf-8;
        access_log  logs/accp.access.log;
        location / {


            root   /var/www/html/accp;
            index  index.html index.htm;
        }
        error_page   500 502 503 504  /50x.html;
        location = /50x.html {


            root   html;
        }
}

    server {


        listen       192.168.8.188:80;
        server_name  www.benet.com;
        charset utf-8;
        access_log  logs/benet188.access.log;
        location / {


            root   /var/www/html/benet188;
            index  index.html index.htm;
        }
        error_page   500 502 503 504  /50x.html;
        location = /50x.html {


            root   html;
        }
}
- 检测、重启服务
[root@localhost /usr/local/nginx/conf]#nginx -t
nginx: the configuration file /usr/local/nginx/conf/nginx.conf syntax is ok
nginx: configuration file /usr/local/nginx/conf/nginx.conf test is successful
[root@localhost /usr/local/nginx/conf]#systemctl restart nginx.service
ion / {
root /var/www/html/accp;
index index.html index.htm;
}
error_page 500 502 503 504 /50x.html;
location = /50x.html {
root html;
}
}
server {
    listen       192.168.8.188:80;
    server_name  www.benet.com;
    charset utf-8;
    access_log  logs/benet188.access.log;
    location / {
        root   /var/www/html/benet188;
        index  index.html index.htm;
    }
    error_page   500 502 503 504  /50x.html;
    location = /50x.html {
        root   html;
    }
}
- 检测、重启服务

```bash
[root@localhost /usr/local/nginx/conf]#nginx -t
nginx: the configuration file /usr/local/nginx/conf/nginx.conf syntax is ok
nginx: configuration file /usr/local/nginx/conf/nginx.conf test is successful
[root@localhost /usr/local/nginx/conf]#systemctl restart nginx.service