托管C++– OpenCV 图像处理工程项目:
C++ 托管和非托管项目的区别:
C++ 托管项目,采用C++语言编写COM组件,导出函数或类,供CLR(公共语言运行时)C++托管类封装接口。编写的C++ COM组件不需要,公共语言运行时(/clr)支持。编写C++托管类COM组件,需要,公共语言运行时支持。
创建VC++项目,可以在属性配置中->常规:

修改(配置类型)可以选择.exe进行调试。可以选择.dll 生成组件
修改(公共语言运行时支持(/clr)),编写供WPF工程引用的COM组件
注意:带有/clr头的组件可以用ildasm.exe 进行反编译,可以在VS 2013 x86 命令提示符,控制台中,输入ildasm x.dll 反编译组件头的部分,需要双击MANIFEST字段,查看组件依赖的.net版本信息,包含Version, publickeytoken。有可能会在注册全局程序集命令:gacutil 中用到。以上提到的命令可以使用 /? 选项查看详细说明。本文档过程中未用到,但相关错误,查看众多博客有用这两个命令解决。
C++项目导出类声明:class __declspec(dllexport) [class_name]{};
托管C++项目引用类声明:public ref class [class]{};
托管C++项目值类声明:public value class [class]{};
托管C++项目需要申明命名空间名。所有类和函数需要包含到命名空间中。供引用时调用。
关于托管C++:https://msdn.microsoft.com/zh-CN/library/68td296t.aspx
非托管C++项目,采用非托管的C++组件,在WPF项目中引用,方法类似于Android中使用到JNI:Java、C++混合编程。使用C++编写COM组件,导出函数。尝试过导出类,但在引用处无法调用。查看过众多博客,没见使用非托管的方式导出类,有博客提到非托管方式导出类,方式较为繁琐。本处留作以后尝试。
同样创建普通C++ 控制台工程即可。(配置类型)设置为.dll。同样可以设置为.exe进行调试。
在导出函数前添加导出声明:__declspec(dllexport)
非托管C++项目:
WPF项目中的调用:
using System.Runtime.InteropServices; //使用DllImport需要用到的命名空间

public class cppdll

{

        [DllImport(@"Base.dll", CharSet =CharSet.Ansi)]

        publicstaticexternIntPtr print();

}
可以编写类来封装导出函数。其中IntPtr对应于C++中的char*。
在调试模式下需要将编译好的COM组件放置到bin->Debug目录下。发布程序需要放到Release目录下。
组件申明表达式:
[DllImport(@”dll文件路径”,[EntryPoint = [函数名]], [CharSet = [对应字符集]])]
函数需申明为外部链接静态函数。
托管C++项目:
创建控制台工程(空项目)VideoStreamReader:
VideoReader.h:#ifndef VIDEO_READER_H
#define VIDEO_READER_H
#include <string>
#include <opencv2/opencv.hpp>
typedef unsigned char uchar;
class _declspec(dllexport) VideoReader{
public:
VideoReader();
~VideoReader();
public:
bool openVideo(std::string);
uchar* getFrame();
void seekFrame(int pos);
int getCurrentPos();
int getFPS();
int getTotalFrameNum();
int getFrameHeight();
int getFrameWidth();
int getFrameChinnal();
int getDepth();
int getType();
int getStep();
private:
bool read();
private:
cv::VideoCapture* _ptr_video_cap;
cv::Mat _current_frame;
int _current_pos;
int _total_frame_num;
int _frame_cols;
int _frame_rows;
int _frame_depth;
int _frame_chinnal;
int _frame_type;
int _frame_step;
};
#endif //VIDEO_READER_H
VideoReader.cpp:
#include "VideoReader.h"

VideoReader::VideoReader() :_current_pos(0), _total_frame_num(0),
_frame_cols(0),
_frame_rows(0),
_frame_depth(0),
_frame_chinnal(0),
_frame_step(0)
{
	_ptr_video_cap = new cv::VideoCapture();
}

VideoReader::~VideoReader()
{
	_ptr_video_cap->release();
}

bool VideoReader::openVideo(std::string path)
{
	assert(path.compare("") != 0);
	_ptr_video_cap->open(path);
	bool result = false;
	assert((result = _ptr_video_cap->isOpened()));
	_total_frame_num = _ptr_video_cap->get(CV_CAP_PROP_FRAME_COUNT);//获取视频总帧数
	//读取第一帧:
	assert(read());

	_frame_cols = _current_frame.cols;
	_frame_rows = _current_frame.rows;
	_frame_depth = _current_frame.depth();
	_frame_chinnal = _current_frame.channels();
	_frame_type = _current_frame.type();

	return result;
}

uchar* VideoReader::getFrame()
{
	assert(read()); //读取一帧
	assert(_current_frame.rows != 0 && _current_frame.cols != 0);
	return _current_frame.data;
}

bool VideoReader::read()
{
	bool result = _ptr_video_cap->read(_current_frame);
	return result;
}

int VideoReader::getFrameHeight()
{
	return _ptr_video_cap->get(CV_CAP_PROP_FRAME_HEIGHT);
}

int VideoReader::getFrameWidth()
{
	return _ptr_video_cap->get(CV_CAP_PROP_FRAME_WIDTH);
}

int VideoReader::getFrameChinnal()
{
	return _frame_chinnal;
}

int VideoReader::getDepth()
{
	return _frame_depth;
}

int VideoReader::getType()
{
	return _frame_type;
}

int VideoReader::getCurrentPos()
{
	return _current_pos;
}

int VideoReader::getFPS()
{
	return _ptr_video_cap->get(CV_CAP_PROP_FPS);
}

int VideoReader::getTotalFrameNum()
{
	//return _video_cap->get(CV_CAP_PROP_FRAME_COUNT);
	return _total_frame_num;
}

void VideoReader::seekFrame(int pos)
{
	assert(pos >= 0 && pos <= _total_frame_num);
	_ptr_video_cap->set(CV_CAP_PROP_POS_FRAMES, pos);
}

int VideoReader::getStep()
{
	assert(!_current_frame.empty());
	return _current_frame.step;
}
配置选项添加常规的OpenCV配置。生成VideoStreamReader.dll,VideoStreamReader.lib供托管工程调用。
创建托管C++工程,这里可以直接选择,模板->Visual C++->CLR->CLR空项目
也可以先选择,模板->Visual C++->Win32 控制台应用程序,再修改工程配置中的(配置类型)和(公共语言运行时支持)。
工程名:VideoReaderHost
VideoReaderHost.h:
#ifndef VIDEO_STREAM_READER_H
#define VIDEO_STREAM_READER_H
#include <msclr/marshal_cppstd.h>
#include <string>

#include "VideoReader.h"

using namespace msclr::interop;
using namespace System;

namespace VideoStreamReader{

	public ref class VideoReaderHost{
	public:
		VideoReaderHost();
		~VideoReaderHost();

	public:
		property String^ _video_path  //^代表托管引用类型 类似于指针操作
		{
			void set(String^);
			String^ get();
		}

		IntPtr getFrame();
		bool openVideo();
		int getTotalFramNum();
		int getCurrentPos();
		int getFps();
		void seekFrame(int pos);
		int getFrameWidth();
		int getFrameHeight();
		int getFrameChinnal();
		int getFrameStep();

	private:
		VideoReader* _ptr_video_reader;
		String^ _path;
	};

};

#endif //VIDEO_STREAM_READER_H
VideoReaderHost.cpp:
#include "VideoReaderHost.h"

namespace VideoStreamReader{

	VideoReaderHost::VideoReaderHost()
	{
		_ptr_video_reader = new VideoReader();
	}

	VideoReaderHost::~VideoReaderHost()
	{
		delete _ptr_video_reader;
	}

	IntPtr VideoReaderHost::getFrame()
	{
		return (IntPtr)_ptr_video_reader->getFrame();
	}

	bool VideoReaderHost::openVideo()
	{
		Diagnostics::Debug::Assert(_path != "");
		std::string path = marshal_as<std::string>(_path->ToString());
		return _ptr_video_reader->openVideo(path);
	}

	int VideoReaderHost::getTotalFramNum()
	{
		return _ptr_video_reader->getTotalFrameNum();
	}

	int VideoReaderHost::getCurrentPos()
	{
		return _ptr_video_reader->getCurrentPos();
	}

	int VideoReaderHost::getFps()
	{
		return _ptr_video_reader->getFPS();
	}

	void VideoReaderHost::seekFrame(int pos)
	{
		_ptr_video_reader->seekFrame(pos);
	}

	int VideoReaderHost::getFrameWidth()
	{
		return _ptr_video_reader->getFrameWidth();
	}

	int VideoReaderHost::getFrameHeight()
	{
		return _ptr_video_reader->getFrameHeight();
	}

	int VideoReaderHost::getFrameChinnal()
	{
		return _ptr_video_reader->getFrameChinnal();
	}

	void VideoReaderHost::_video_path::set(String^ path)
	{
		_path = path;
	}

	String^ VideoReaderHost::_video_path::get()
	{
		return _path;
	}

	int VideoReaderHost::getFrameStep()
	{
		return _ptr_video_reader->getStep();
	}
};
工程最后生成供WPF调用的COM组件。
注意:项目属性配置中添加对OpenCV的支持(和C++逻辑组件工程配置一样),此外需要添加用到的头文件的路径或头文件,添加依赖项VideoStreamReader.lib。
此处需要注意的事项:
1. 在使用类型转换时需要用到msclr::interop::marshal_as<>()方法,此时包含头文件<msclr/marshal_cppstd.h>,此头文件中包含的<marshal.h>头文件中包含了<windows.h>。
<windows.h>中实现了IServiceProvider接口和CLR中的接口重复。因此当头文件<msclr/marshal_cppstd.h>放置在usingnamespace System;之后时会引发以下错误:

所以此处需要将头文件放置到using namespace System;之前。
2. 可能会产生错误:尝试读取或写入受保护的内存。这通常指示其他内存已损坏。
产生此错误原因可能时托管组件中没有对包含类类型指针开辟堆内存空间。可以在托管C++类的构造函数中new,在托管C++类的析构函数中调用delete。
3. 此处可以使用VS 命令提示符工具,使用dumpbin命令查看COM组件的依赖项和导出函数接口。Dependents 选项查看依赖,Exports 查看导出。
4. 托管类中需要用到Bitmap类时,可能会遇到没有定义的问题,可以在工程解决方案上点击右键。
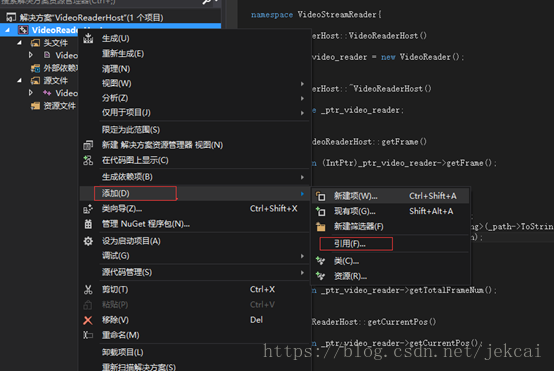

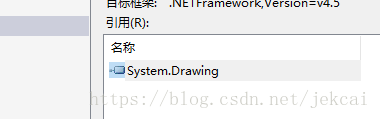
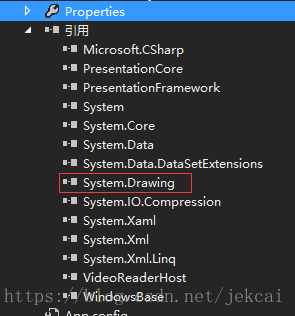
完成引用,就可以在托管C++中以域操作符调用Bitmap类。同样在WPF工程中也需要自己手动添加对System.Drawing的引用。
建立一个引用此COM组件的WPF工程:
工程的布局文件中添加:Image控件和一个Button
<Window x:Class="DFA_DAA_display.MainWindow"

        xmlns="http://schemas.microsoft.com/winfx/2006/xaml/presentation"

        xmlns:x="http://schemas.microsoft.com/winfx/2006/xaml"

        Title="MainWindow" Height="350" Width="525">

    <Grid>

        <Image x:Name="picture" Width="500" Margin="7,10,10,73"/>

        <Button x:Name="show_img" Width="100" Height="50" Click="show_img_Click" Margin="368,259,49,10"></Button>

    </Grid>

</Window>
后台逻辑程序:
using System;
using System.Collections.Generic;
using System.Linq;
using System.Text;
using System.Threading.Tasks;
using System.Windows;
using System.Windows.Controls;
using System.Windows.Data;
using System.Windows.Documents;
using System.Windows.Input;
using System.Windows.Media;
using System.Windows.Media.Imaging;
using System.Windows.Navigation;
using System.Windows.Shapes;
using System.Drawing;
using System.IO.MemoryMappedFiles;

using VideoStreamReader;

namespace DFA_DAA_display
{
    /// <summary>
    /// MainWindow.xaml 的交互逻辑
    /// </summary>
    public partial class MainWindow : Window
    {
        public VideoReaderHost vrh = new VideoReaderHost();
        public MainWindow()
        {
            InitializeComponent();

            vrh._video_path = "C:\\Users\\JekCai\\Desktop\\2017.11.08-16.57.36.mp4";
            vrh.openVideo();
        }

        private void show_img_Click(object sender, RoutedEventArgs e)
        {
            IntPtr dst = vrh.getFrame();
            int width = vrh.getFrameWidth();
            int height = vrh.getFrameHeight();
            int step = vrh.getFrameStep();

            Bitmap bmp = new Bitmap(width, height, step, System.Drawing.Imaging.PixelFormat.Format24bppRgb, dst);

            BitmapSource bs = System.Windows.Interop.Imaging.CreateBitmapSourceFromHBitmap(bmp.GetHbitmap(), IntPtr.Zero, Int32Rect.Empty, BitmapSizeOptions.FromEmptyOptions());
            picture.Source = bs;
        }
    }
}
需要添加依赖的dll :(可以使用dumpbin 命令查看依赖)
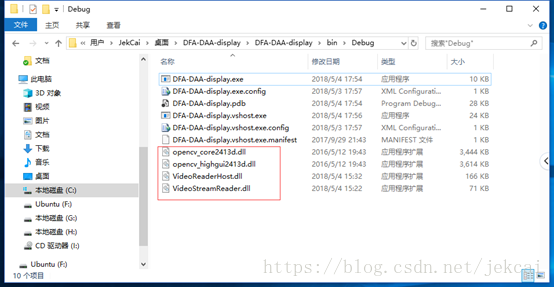
工程中添加对VideoReaderHost.dll和System.Drawing 的引用,并且需要将托管C++组件以及其所依赖的组件(包括依赖的OpenCV动态库)拷贝到WPF的运行环境中(此处为Debug文件夹下)。
使用到Image空间需要将Bitmap转成BitmapSource,其中BitmapSource是ImageSource的子类。可以直接使用Image.Source = BitmapSource;显示图片。
注意:视频文件路径,路径不对会导致程序异常。
程序运行结果:

总结:托管C++代码编写需要,公共语言运行时(/clr),的支持,其语言编写特性需遵从一定规范,C++和C#的特性兼而有之。可以理解成两种语言的混合编程。托管C++的优点是在原C++工程上的一层封装,保留了原项目完整的面向对象结构,将原C++项目以组件的形式嵌入到WPF工程中,而界面编程是WPF所擅长的,WPF又是以数据驱动的Windows程序设计框架,这种逻辑和界面分开的编程方式是一种趋势。