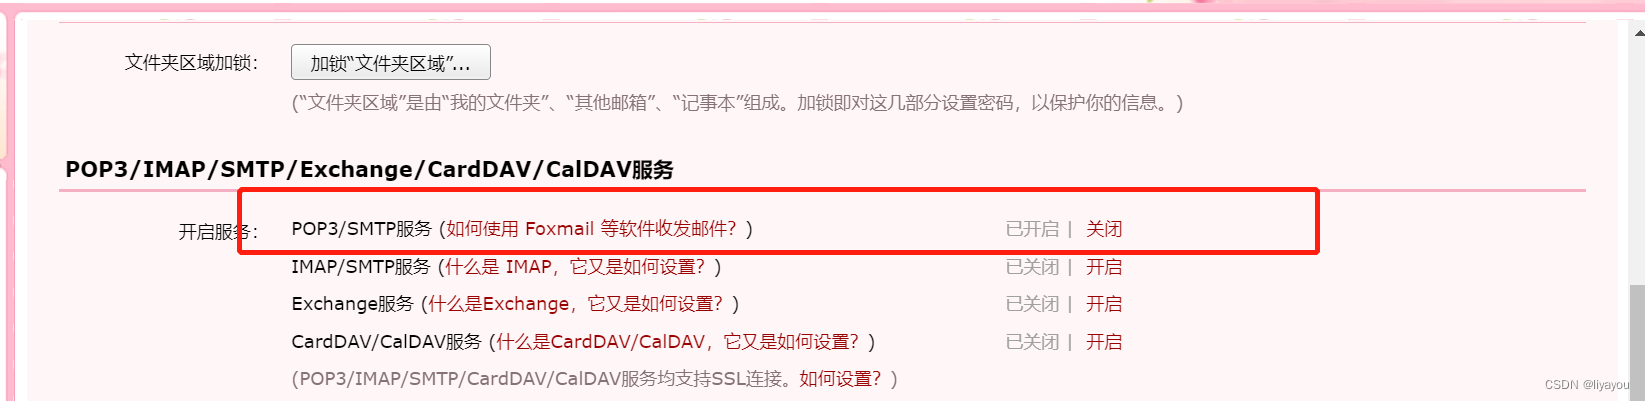
1.先到qq邮箱中开启POP3(设置-账户),并获取授权码,后面有用
2.在spring boot项目中添加依赖
<dependency>
    <groupId>org.springframework.boot</groupId>
    <artifactId>spring-boot-starter-mail</artifactId>
    <version>2.7.5</version>
</dependency>
3.application.yml文件,默认用的是25端口,但是我们平时部署的正式环境上25端口一般是被封的,所以用了587端口。
spring:
  mail:
    host: smtp.qq.com
    port: 587
    username: [email protected]
    password: fhishfdslkfhdskjfg  #第一步中获取的授权码
    properties:
      from: [email protected]
4.编写EmailConfig类(开始的时候没写,但是会报错,找不到JavaEmailSenderImpl这个bean)
package test.config;

import org.springframework.beans.factory.annotation.Autowired;
import org.springframework.boot.autoconfigure.mail.MailProperties;
import org.springframework.boot.context.properties.EnableConfigurationProperties;
import org.springframework.context.annotation.Bean;
import org.springframework.context.annotation.Configuration;
import org.springframework.mail.javamail.JavaMailSenderImpl;

/*邮箱配置类*/
@Configuration
@EnableConfigurationProperties(MailProperties.class)  //使MailProperties类生效
public class EmailConfig {

    @Autowired
    MailProperties mailProperties;

    @Bean
    JavaMailSenderImpl javaMailSenderImpl(){
        JavaMailSenderImpl sender=new JavaMailSenderImpl();
        sender.setHost(mailProperties.getHost());
        sender.setPort(mailProperties.getPort());
        sender.setUsername(mailProperties.getUsername());
        sender.setPassword(mailProperties.getPassword());
        return sender;
    }
}
5.编写EmailUtils工具类
package test.common;

import test.model.EmailModel;
import org.springframework.beans.factory.annotation.Autowired;
import org.springframework.boot.autoconfigure.mail.MailProperties;
import org.springframework.mail.SimpleMailMessage;
import org.springframework.mail.javamail.JavaMailSenderImpl;
import org.springframework.stereotype.Component;

@Component
/*邮箱工具类*/
public class EmailUtils {

    @Autowired
    private JavaMailSenderImpl sender;
    @Autowired
    MailProperties mailProperties;

    public  void  sendEmail(EmailModel emailModel){
        SimpleMailMessage message=new SimpleMailMessage();
        message.setFrom(mailProperties.getProperties().get("from"));
        message.setTo(emailModel.getTo());
        message.setSubject(emailModel.getSubject());
        message.setText(emailModel.getContent());
        sender.send(message);
    }
}
6.EmailModel实体类
/*邮箱实体类*/
@Data
public class EmailModel {
    private String to;
    private String subject;
    private String content;
}
7.使用
package test.controller;

import test.common.*;
import test.model.EmailModel;
import org.springframework.beans.factory.annotation.Autowired;
import org.springframework.beans.factory.annotation.Value;
import org.springframework.web.bind.annotation.PostMapping;
import org.springframework.web.bind.annotation.RequestMapping;
import org.springframework.web.bind.annotation.RestController;


@RestController
@RequestMapping("/AAA")
public class AAAController {
    @Autowired
    private EmailUtils emailUtils;

    @PostMapping("/sendEmail")
    public String sendEmail() {
        String code="456431";
        EmailModel emailModel = new EmailModel();
        emailModel.setTo("[email protected]");
        emailModel.setSubject("Test");
        emailModel.setContent("【Test】验证码" + code );
        emailUtils.sendEmail(emailModel);
        return "ok";
    }

}