硬件搭建
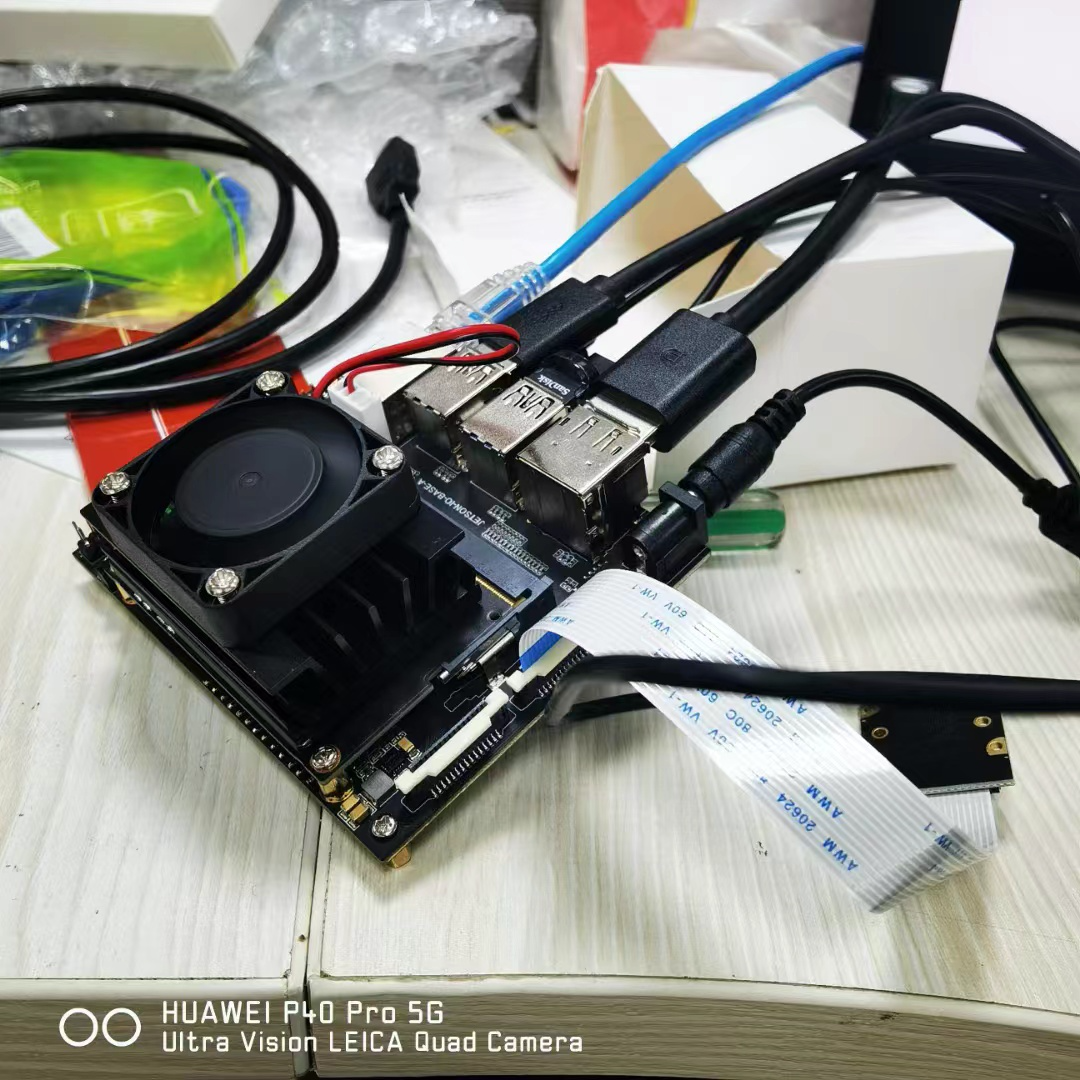
硬件搭建其实挺简单的,把风扇固定好,把键盘、鼠标、USB卡都插在USB接口上,把显示器的HDMI线接在HDMI接口上,把摄像头的线接在摄像头插口上,接好网线就可以了,最后接上电源开机启动,画面如下,这是英伟达Jetson Nano芯片默认的乌班图操作系统。
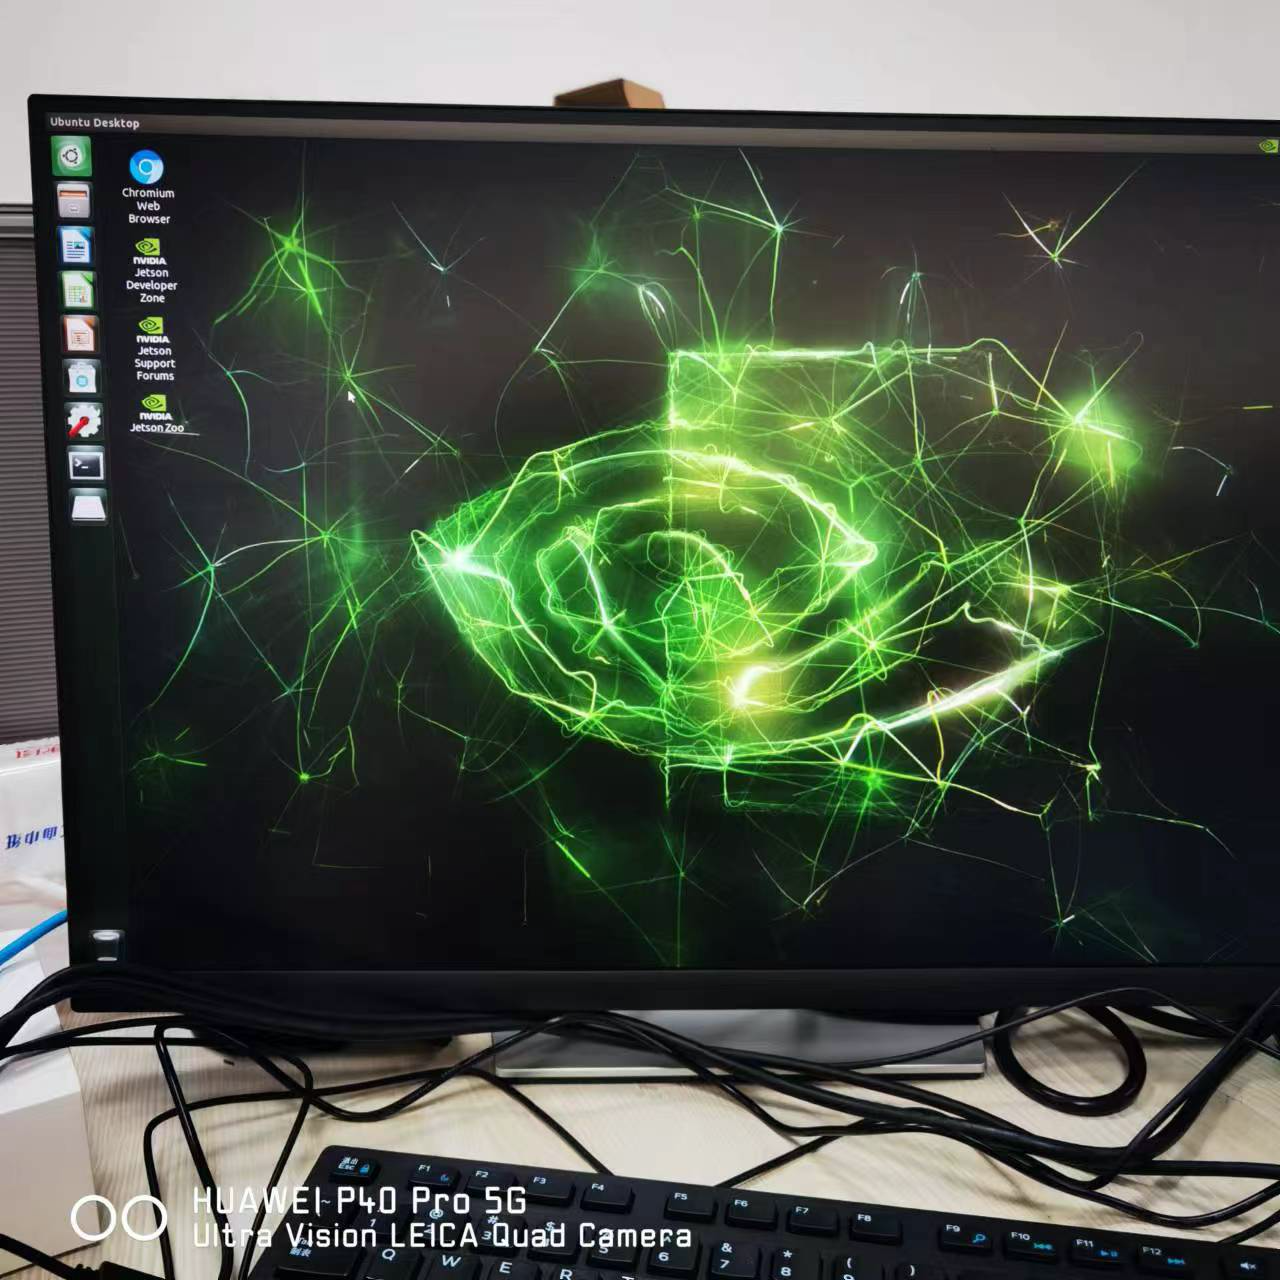
如果需要登录密码的话,密码为:yahboom
烧写系统
当然如果我们的U盘是空白的,就没有办法进入上面的操作系统,现在我们需要对该启动U盘来进行系统烧写。
这里我们需要准备一条老式的安卓充电线,不是TypeC的,另外一头是USB插口。我们使用的是乌班图18.04操作系统(注意不能是其他版本的乌班图)来进行烧写。
下载NVIDIA SDK Manager
使用乌班图操作系统的浏览器打开网址:https://developer.nvidia.com/nvidia-sdk-manager
下载最新的.deb文件,进行安装(这里的下载路径为Downloads)
sudo apt install ./sdkmanager_1.9.2-10884_amd64.deb
安装完后,输入命令
sdkmanager

点击LOGIN,使用英伟达的账号,密码登录。登录完成后,如果我们的Jetson Nano没有连接到乌班图主机的话,会出现这个画面

红色框代表没有设备连接。
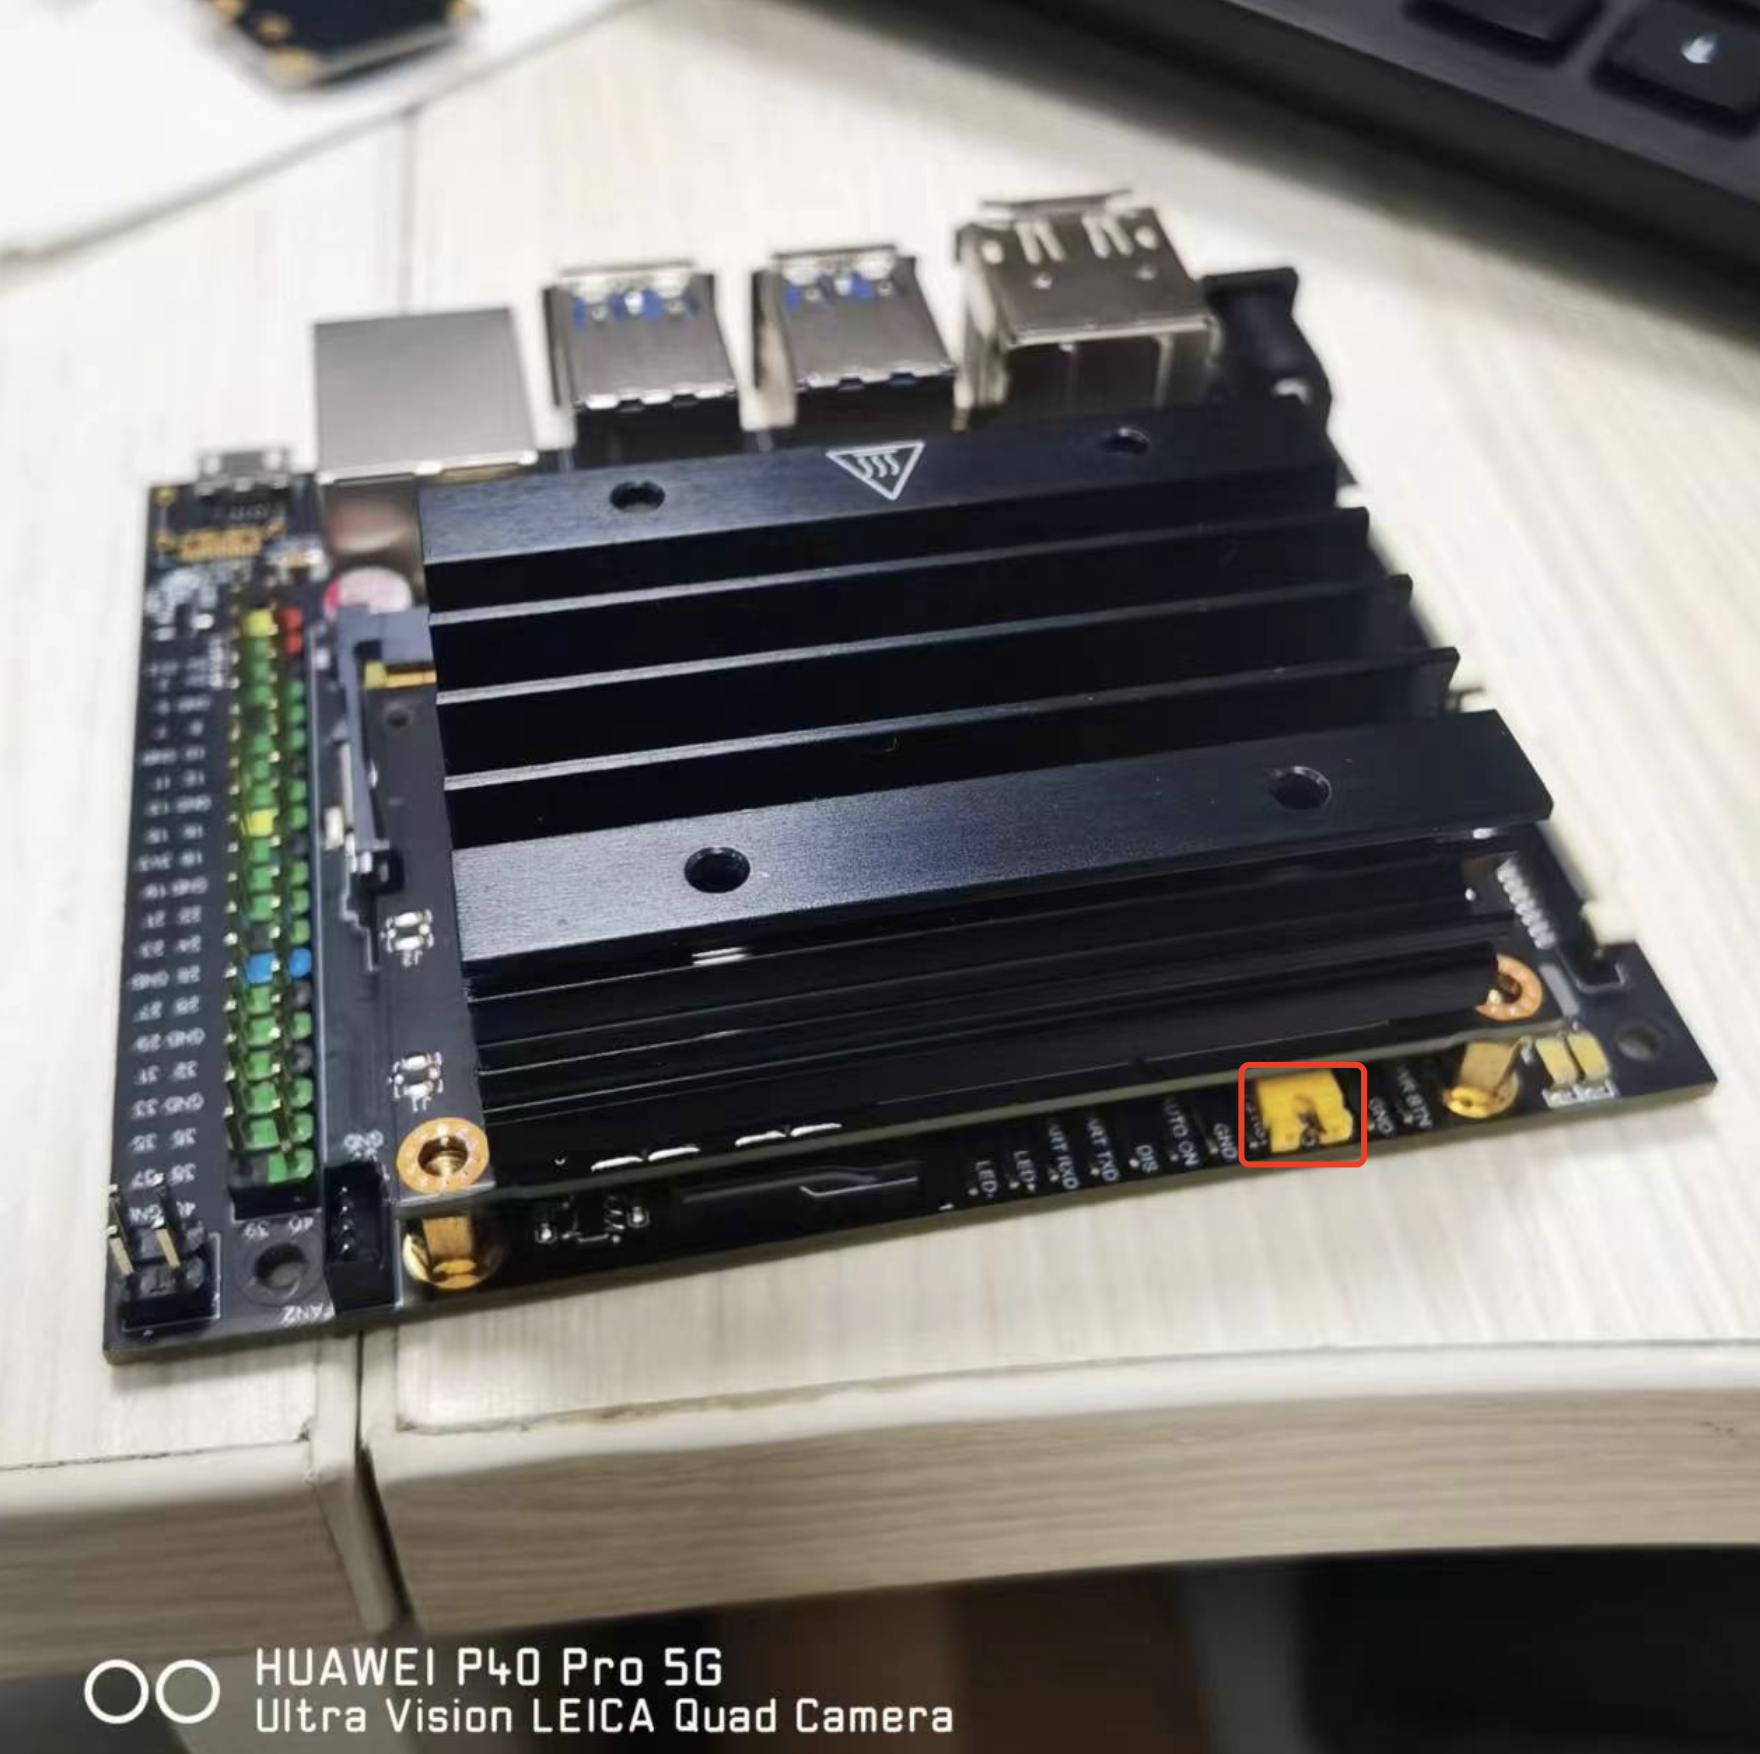
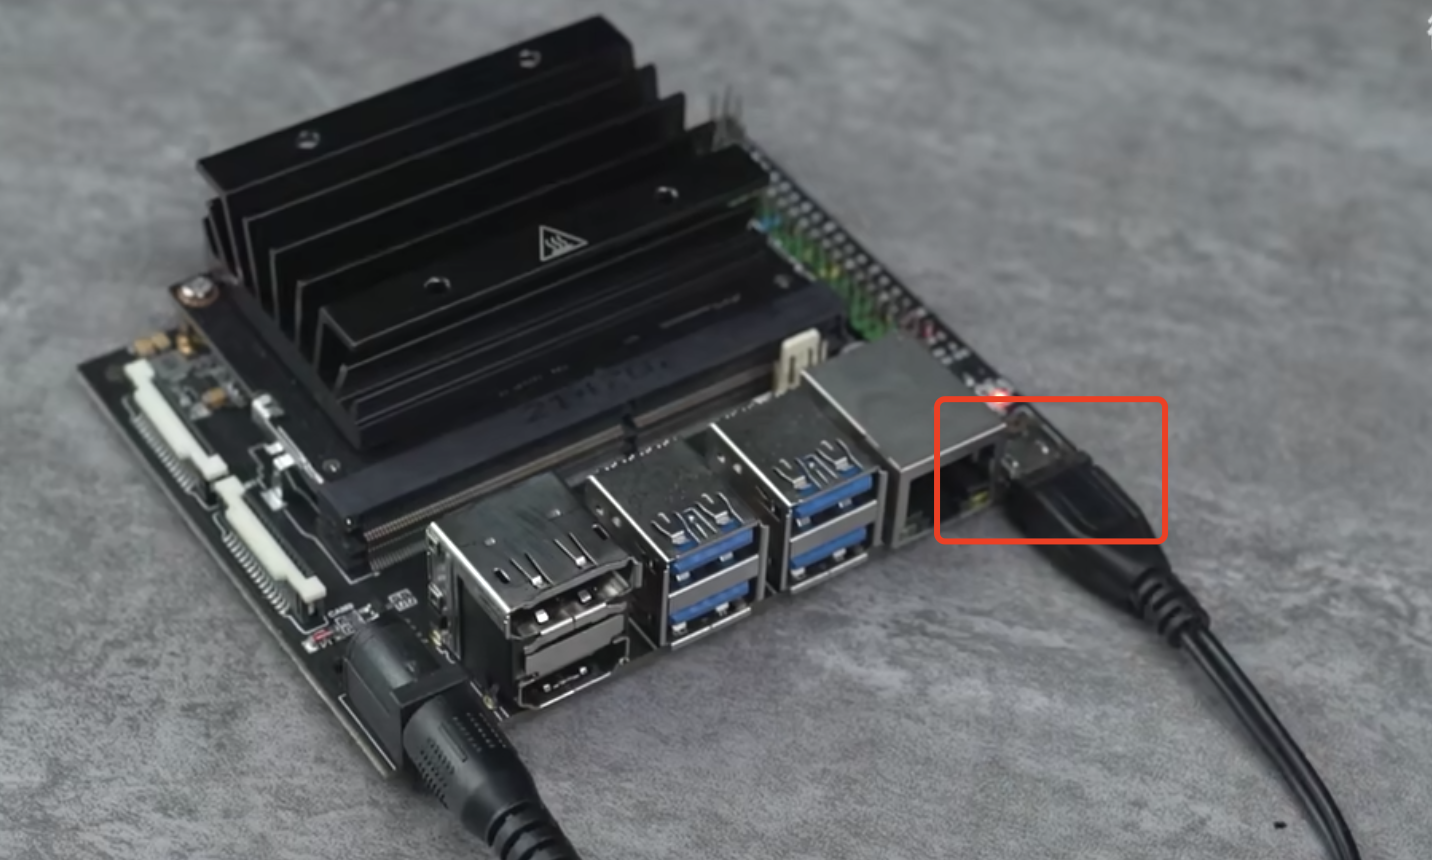
将Jetson nano的FC REC和GND引脚用跳线帽连接,如上图所示。接上电源线,将Micro USB线(老式安卓线)接到开发版的Micro USB接口,并连接到Ubuntu 18.04电脑。
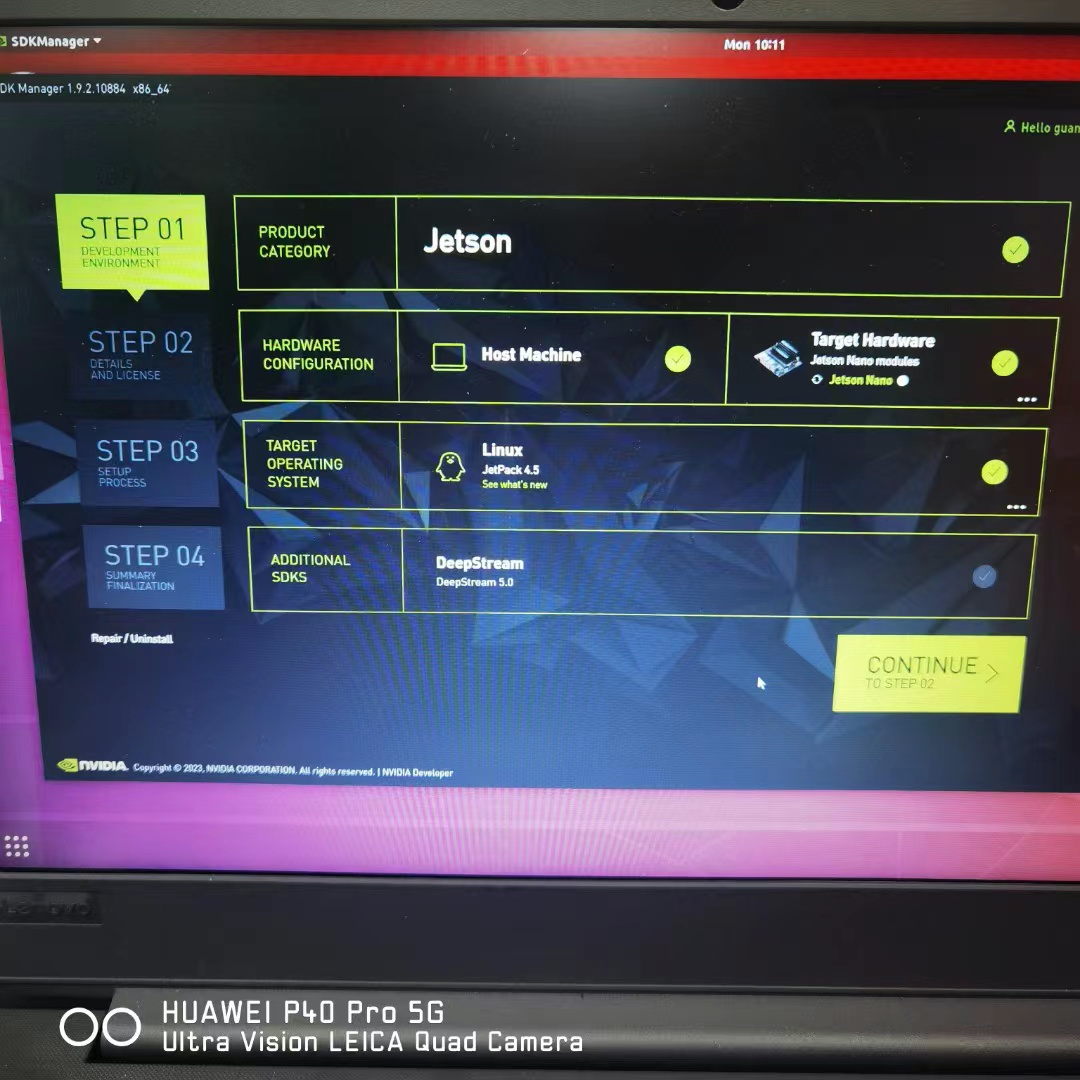
JetPack我这里选的是4.5,当然你可以根据你的实际情况进行挑选。
进入到下一步,勾选掉Jetson SDK Components,因为需要先安装操作系统OS。
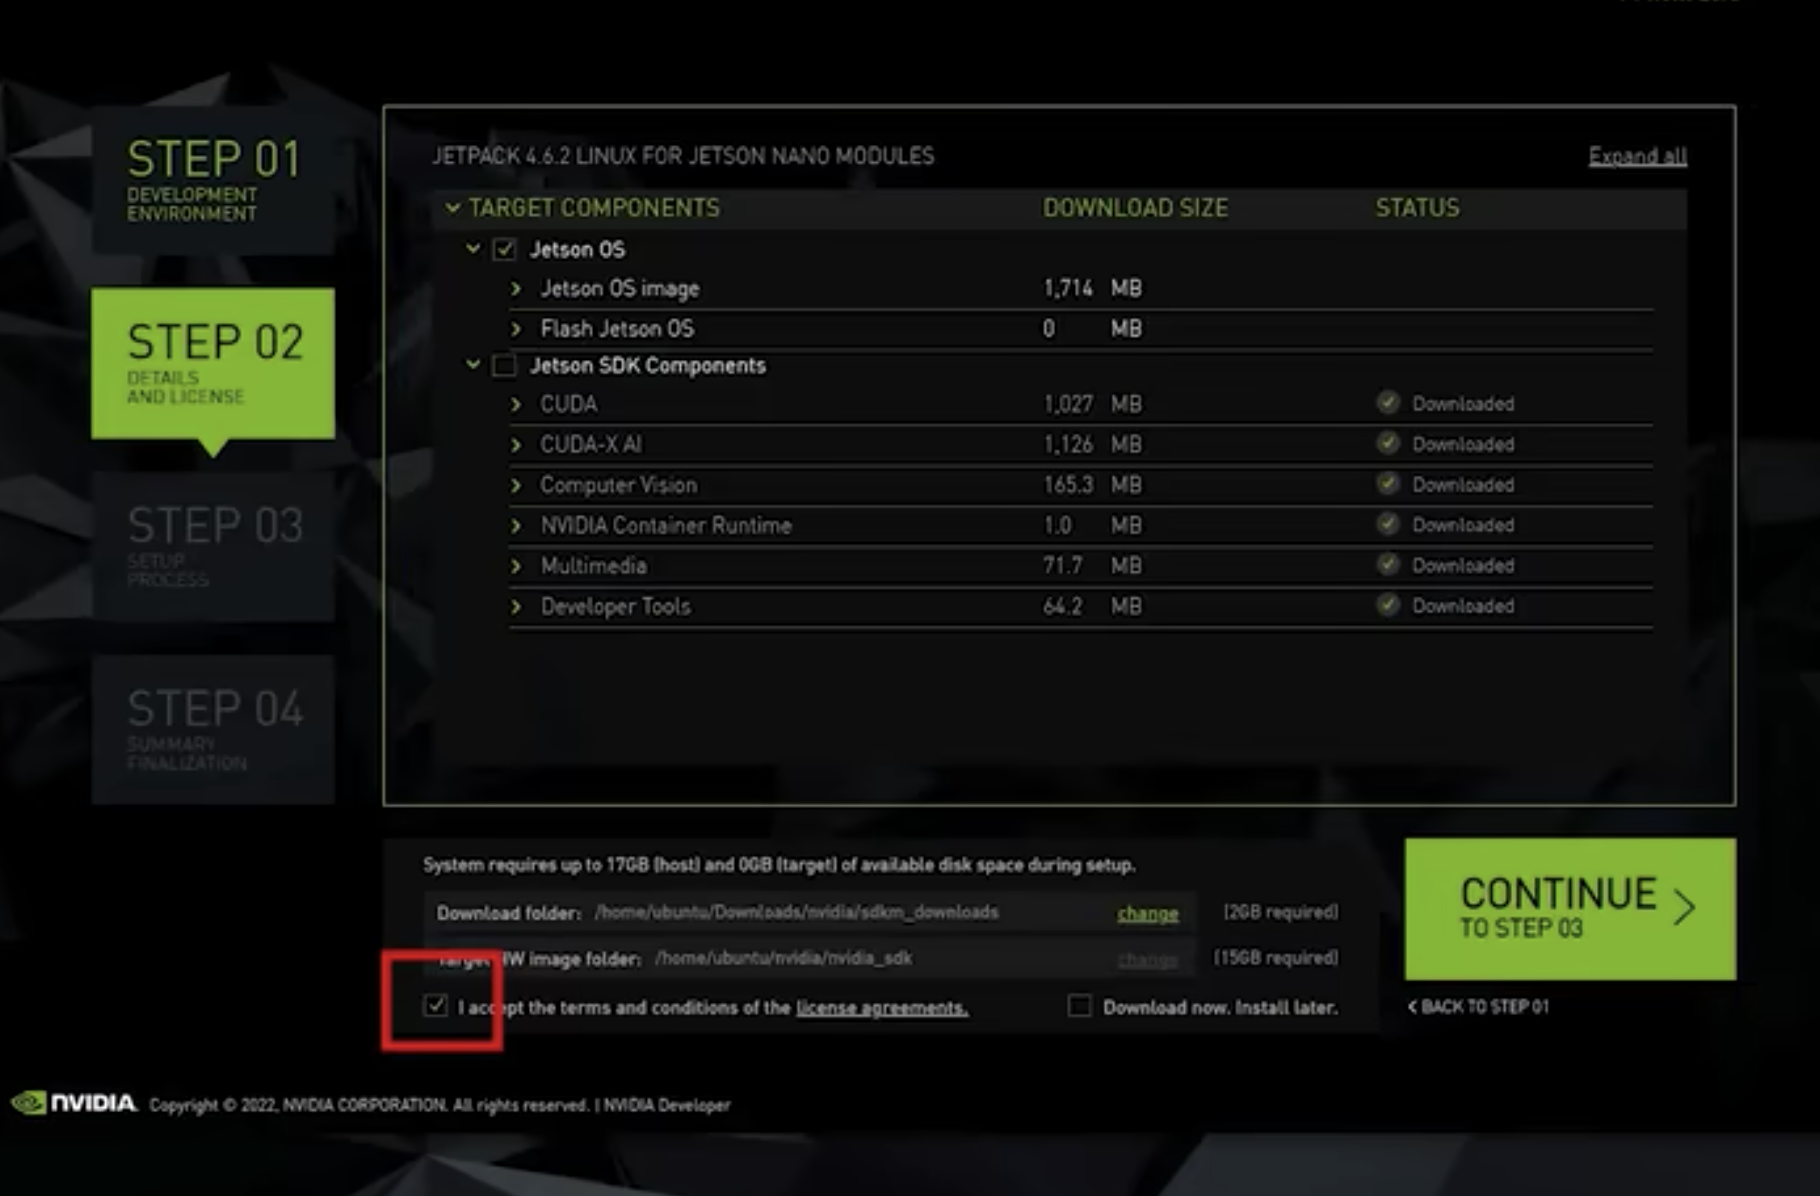
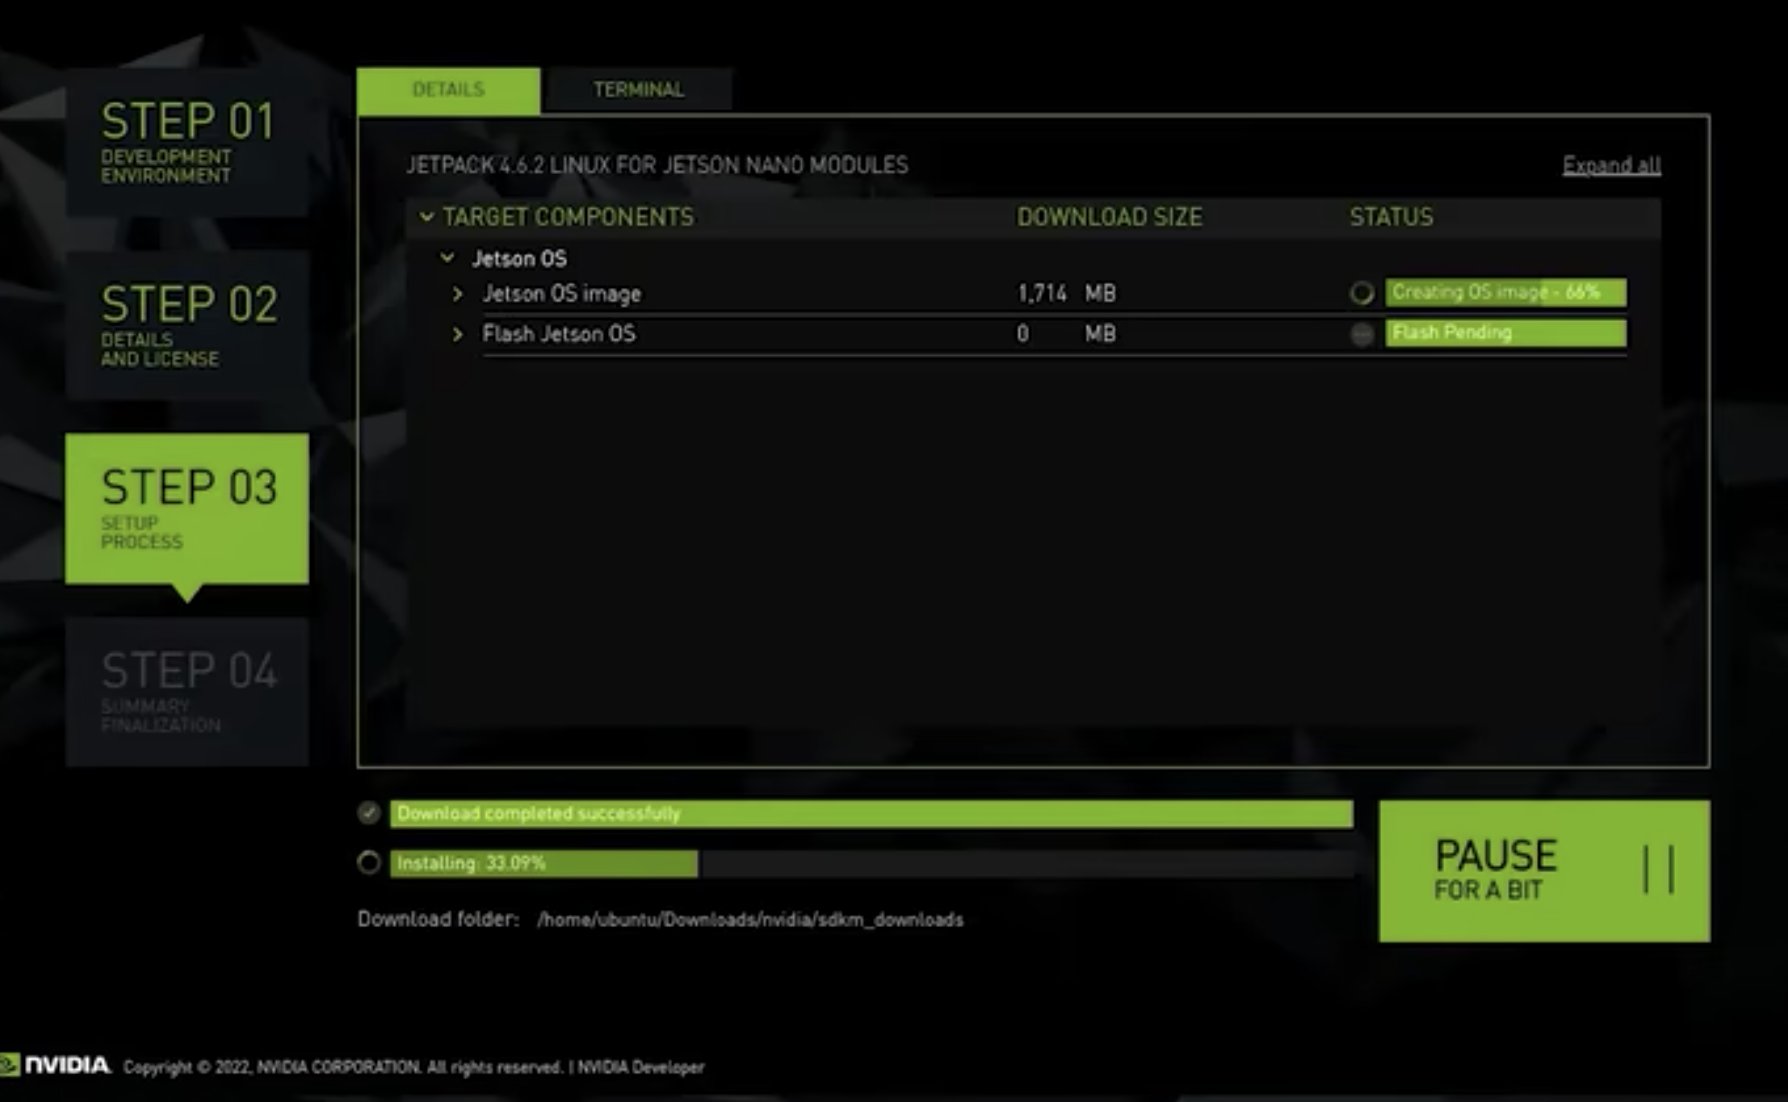
勾选协议,并进入下一步。然后进入烧录阶段,时间会久一点。
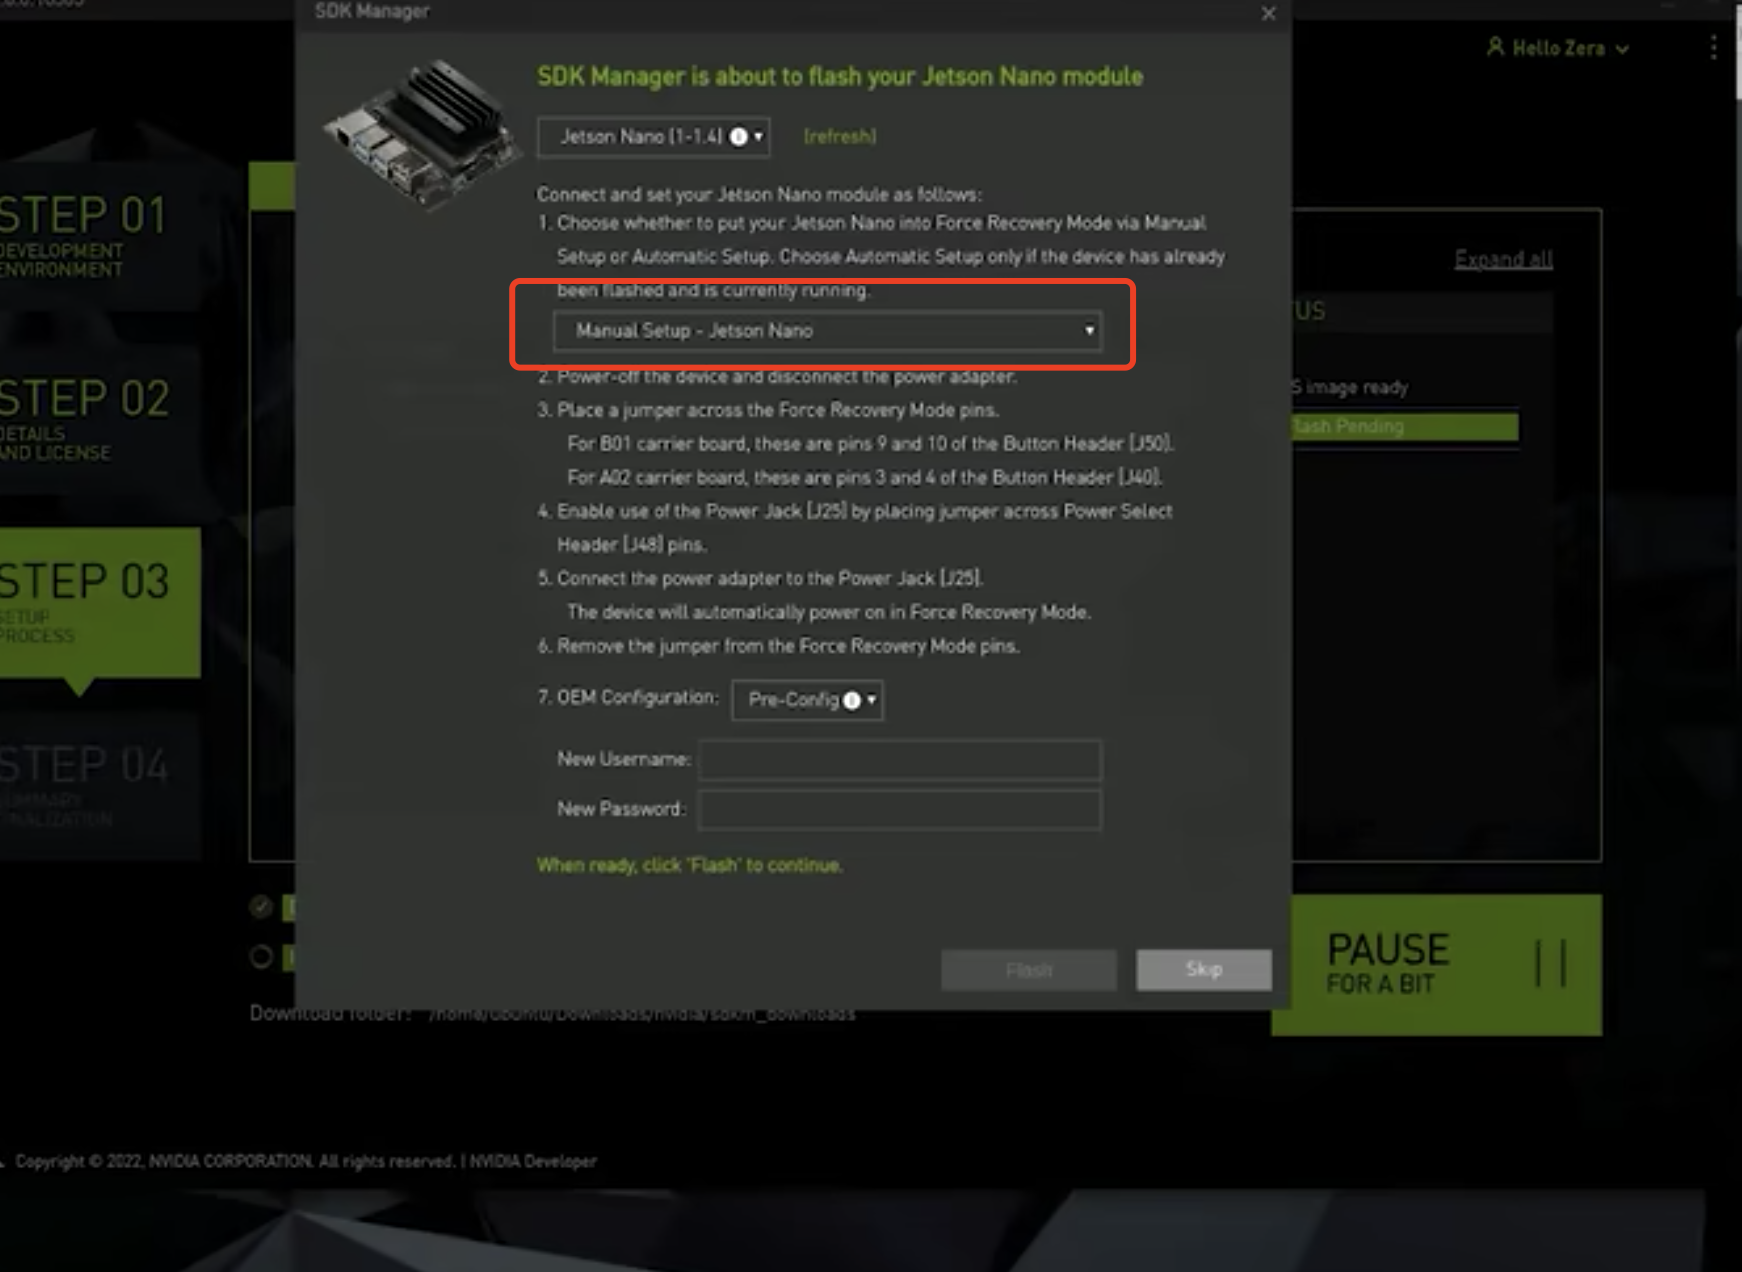
SDK Manager烧系统的时候会弹窗进行预设置,这里的红色框选择Manual setup。点击flash进行系统烧录。
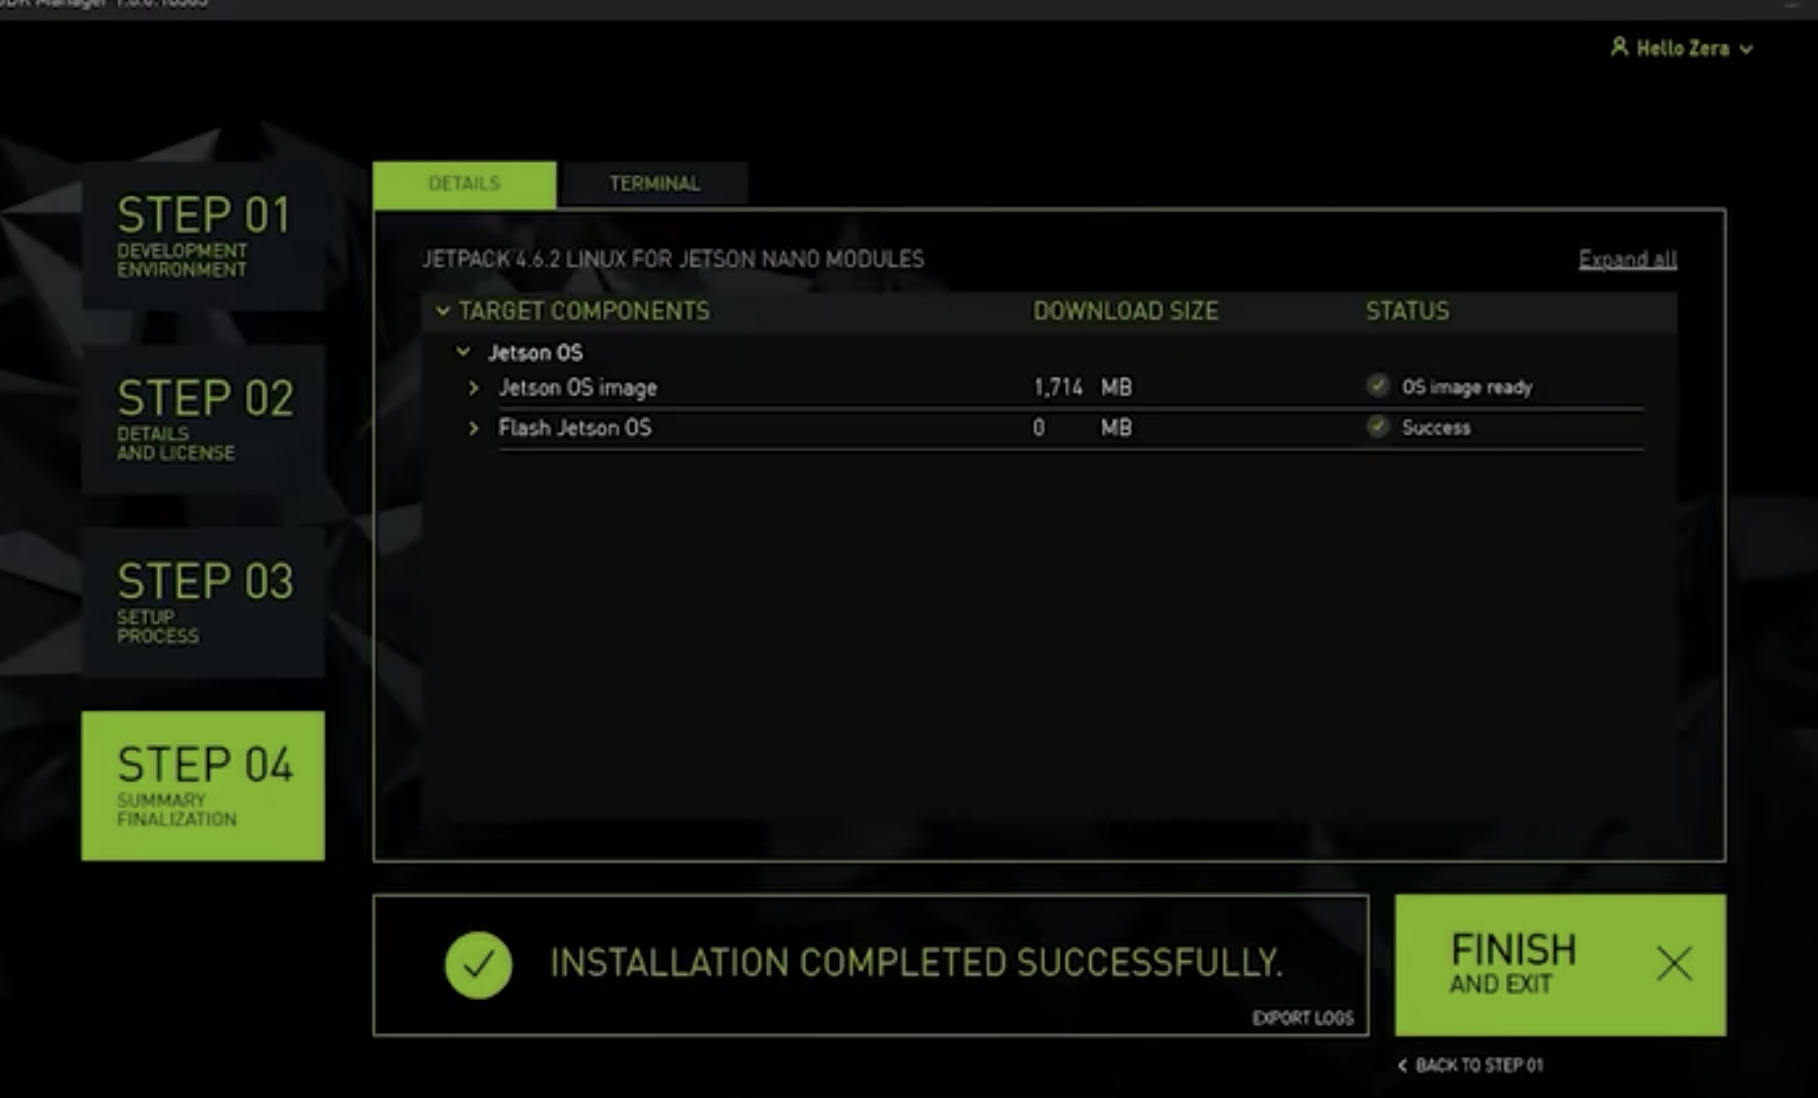
烧录成功会出现如下画面,点击FINISH结束烧录。
此时会退出sdk manager,将jetson nano的跳线帽取下,插上键盘、鼠标、网线、显示器HDMI线,通电即可像之前一样进入系统jetson nano的系统界面。
此时我们将U盘插入到jetson nano的USB插槽中,查看该U盘的盘符,以便为设置U盘启动使用,我这里是
df -h
/dev/sda4
命令方式烧录
进入目录
cd /home/username/nvidia/nvidia_sdk/JetPack_4.5_Linux_JETSON_NANO/Linux_for_Tegra
使用命令进行烧录(一般重新烧录都使用该方法)
sudo ./flash.sh jetson-nano-emmc mmcblk0p1
烧录完成后,去掉跳帽,连接插上键盘、鼠标、网线、显示器HDMI线,通电完成从eMMc启动。
设置U盘启动
之前的系统烧录是烧录在Jetson nano的16G emmc的系统盘里,在安装了系统后,剩余空间较小,不方便后续的SDK和其他资源。对于所有的jetson系列产品来说,系统的启动不能完全依赖U盘,U盘只能作为根文件系统的路径,启动分区依然在内部的eMMc或者存储芯片上。因此在将文件系统复制到U盘之前,需要先正常烧录eMMc并检查jetson nano是否可以做正常的启动。
将U盘插入到之前安装了sdk manager的Ubuntu 18.04电脑,执行指令
df -h
我这里得到的是(不同的电脑获取的可能不同)
/dev/sdb4
为U盘资源(此处非路径)
取消挂载
umount /dev/sdb4
使用ext4格式进行格式化
sudo mkfs.ext4 /dev/sdb4
格式化完成后进行重新挂载
sudo mount /dev/sdb4 /mnt
这里的/mnt为系统中的路径。
进入对U盘进行系统复制的文件夹
cd /home/username/nvidia/nvidia_sdk/JetPack_4.5_Linux_JETSON_NANO/Linux_for_Tegra/rootfs
将文件系统复制到U盘中
sudo tar -cpf - * | (cd /mnt/ ; sudo tar -xpf - )
此过程需要等待一段时间,并且此过程没有任何打印提示。
复制完成后,卸载/mnt,然后拔出U盘
sudo umount /mnt
如果你进入过/mnt目录,会报target is busy,只需要进入任意非/mnt下的目录即可。
重新用跳帽短接FC引脚,上电后用Micro USB线接到Ubuntu 18.04电脑,使用
lsusb
检查jetson nano是否正常接入Ubuntu 18.04电脑。出现Nvidia Corp.表示接入成功。
进入烧录文件夹
cd /home/username/nvidia/nvidia_sdk/JetPack_4.5_Linux_JETSON_NANO/Linux_for_Tegra
执行烧录指令
sudo ./flash.sh jetson-nano-emmc sda4
这里的sda4就是之前在jetson nano中看到的盘符。
烧录完成后,去掉跳帽,连接插上键盘、鼠标、网线、显示器HDMI线以及刚刚烧录的U盘。通电完成从U盘启动。
安装和测试DeepStream
- 安装依赖,命令如下
sudo apt install \
libssl1.0.0 \
libgstreamer1.0-0 \
gstreamer1.0-tools \
gstreamer1.0-plugins-good \
gstreamer1.0-plugins-bad \
gstreamer1.0-plugins-ugly \
gstreamer1.0-libav \
libgstrtspserver-1.0-0 \
libjansson4=2.11-1
- 安装DeepStream SDK
5.0的SDK下载地址:https://pan.baidu.com/s/1YrjiBN_Ak9XlOdCs0GPbFQ 提取码: 5ehw
5.1的SDK下载地址:https://pan.baidu.com/s/1rBjNiuvsg_-W_zjk_d9-8A 提取码: bcep
使用哪个版本的SDK要看你的开发板的JetPack的版本号,5.0对应的是4.4;5.1对应的是4.5。查看JetPack的命令如下
cat /etc/nv_tegra_release
当然还可以执行一些其他的命令来查看一些其他的信息
jtop
可以查看一些实时运行时的信息,按6可以查看一些库版本信息。
执行命令
sudo tar -xvf deepstream_sdk_v5.0.0_jetson.tbz2 -C /
cd /opt/nvidia/deepstream/deepstream-5.0
sudo ./install.sh
sudo ldconfig
- DeepStream测试
执行命令
cd /opt/nvidia/deepstream/deepstream-5.0/sources/objectDetector_Yolo
设置root用户密码
sudo passwd root
设置完成后切换到root用户
su root
执行编译命令
CUDA_VER=10.2 make -C nvdsinfer_custom_impl_Yolo
编辑文件prebuild.sh
vim prebuild.sh
注释掉除yolov3-tiny的语句
执行
./prebuild.sh
此时会下载yolov3-tiny的配置和权重文件。
执行
deepstream-app -c deepstream_app_config_yoloV3_tiny.txt
查看deepstream的版本信息
deepstream-app --version-all
如果遇到有这样的报错——Could not open X Display,可以使用以下方式来解决
export DISPLAY=:0.0
使用
xclock
来检测是否有效。
PC端YOLOV5的处理
下载YOLOV5,这里使用的是6.0的,现在最新版本为7.0:https://github.com/ultralytics/yolov5/tree/v6.0
安装库,在YOLOV5的主目录下执行
pip install -i https://pypi.tuna.tsinghua.edu.cn/simple -r requirements.txt
下载权重文件:https://pan.baidu.com/s/1Bs_DIDe9XubjDyBwmuAAzQ 提取码: gt5m
下载tensorrtx:https://pan.baidu.com/s/1meO4jNCfw-2IuQTFZMiU_g 提取码: 1dih
下载好 tensorrtx 后,进入 yolov5的文件夹,复制 gen_wts.py 到 YOLOV5框架主目录下,确定你的 YOLOV5框架主目录下存在 yolov5s.pt 文件,执行
python gen_wts.py -w ./yolov5s.pt
执行后会发现多了一个 yolov5s.wts 文件
在Nano上生成yolov5s.engine文件
在Nano的操作系统中下载tensorrtx
下载完成后,修改 yolov5 目录下的 CMakeLists.txt
# tensorrt
include_directories(/usr/include/aarch64-linux-gnu/)
link_directories(/usr/lib/aarch64-linux-gnu/)
mkdir build
cd build
cmake ..
make
此时将yolov5s.wts拷贝到build目录中,执行
./yolov5 -s ./yolov5s.wts yolov5s.engine s
此时会生成一个yolov5s.engine的文件。
测试
./yolov5 -d yolov5s.engine ../samples
使用DeepStream部署YOLOV5
执行
sudo chmod -R 777 /opt/nvidia/deepstream/deepstream-5.0/sources/
下载YOLOV5 DeepStream
https://pan.baidu.com/s/1aIVOxZUqXP6dRMrF1pApig 提取码: qgrm
下载完成之后解压,将整个文件夹拷贝到DeepStream的系统目录下
cd /opt/nvidia/deepstream/deepstream-5.0/sources
cp -R /home/nano/Downloads/yolov5 ./
cd yolov5
拷贝yolov5s.engine到yolov5目录下
cp /home/nano/Downloads/tensorrtx-master/yolov5/build/yolov5s.engine ./
如果我们只检测其中的一种类别,比如说人,可以修改nvdsinfer_custom_impl_Yolo/nvdsparsebbox_Yolo.cpp文件,修改内容如下
for(auto& r : res) {
	    NvDsInferParseObjectInfo oinfo;

	    oinfo.classId = r.class_id;
	    if ((int)oinfo.classId == 0) {
	    	oinfo.left    = static_cast<unsigned int>(r.bbox[0]-r.bbox[2]*0.5f);
	    	oinfo.top     = static_cast<unsigned int>(r.bbox[1]-r.bbox[3]*0.5f);
	    	oinfo.width   = static_cast<unsigned int>(r.bbox[2]);
	    	oinfo.height  = static_cast<unsigned int>(r.bbox[3]);
	    	oinfo.detectionConfidence = r.conf;
	    	objectList.push_back(oinfo);
      	    }
    }
切换到root用户,编译yolov5的DeepStream
CUDA_VER=10.2 make -C nvdsinfer_custom_impl_Yolo
视频测试
deepstream-app -c deepstream_app_config.txt
CSI摄像头视频测试
deepstream-app -c source1_csi_dec_infer_yolov5.txt
不过这种方式并不能看到视频画面,下面给一段使用python版的opencv调用CSI摄像头的代码,当然这里并不能实现物体检测,只是能看到画面。
import cv2

# 设置gstreamer管道参数
def gstreamer_pipeline(
    capture_width=1280,  #摄像头预捕获的图像宽度
    capture_height=720,  #摄像头预捕获的图像高度
    display_width=1280,  #窗口显示的图像宽度
    display_height=720,  #窗口显示的图像高度
    framerate=60,        #捕获帧率
    flip_method=0,       #是否旋转图像
):
    return (
        "nvarguscamerasrc ! "
        "video/x-raw(memory:NVMM), "
        "width=(int)%d, height=(int)%d, "
        "format=(string)NV12, framerate=(fraction)%d/1 ! "
        "nvvidconv flip-method=%d ! "
        "video/x-raw, width=(int)%d, height=(int)%d, format=(string)BGRx ! "
        "videoconvert ! "
        "video/x-raw, format=(string)BGR ! appsink"
        % (
            capture_width,
            capture_height,
            framerate,
            flip_method,
            display_width,
            display_height,
        )
    )

if __name__ == "__main__":

    capture_width = 1280
    capture_height = 720

    display_width = 1280
    display_height = 720

    framerate = 60			# 帧数
    flip_method = 0			# 方向

    # 创建管道
    print(gstreamer_pipeline(capture_width,capture_height,display_width,display_height,framerate,flip_method))
    #管道与视频流绑定
    cap = cv2.VideoCapture(gstreamer_pipeline(flip_method=0), cv2.CAP_GSTREAMER)

    if cap.isOpened():
        window_handle = cv2.namedWindow("CSI Camera", cv2.WINDOW_AUTOSIZE)

        while cv2.getWindowProperty("CSI Camera", 0) >= 0:
            ret_val, img = cap.read()
            cv2.imshow("CSI Camera", img)

            keyCode = cv2.waitKey(30) & 0xFF
            if keyCode == 27: # ESC键退出
                break

        cap.release()
        cv2.destroyAllWindows()
    else:
        print("open failed")
调用HTTP接口,与服务器通信
与服务器进行HTTP通信,需要用到C++的两个组件——curl以及json。
- 安装curl库
下载地址:http://curl.haxx.se/download/curl-7.38.0.tar.gz
解压
tar -xzvf curl-7.38.0.tar.gz
安装
cd curl-7.38.0
./configure
sudo make
sudo make install
查看/usr/include目录下有没有curl文件夹,没有的话需要将解压包/curl-7.38.0/include中的curl拷贝过去;查看/usr/local/lib/目录下有没有libcurl.so.4.3.0和libcurl.so,没有的话将/curl-7.38.0/lib/.libs/libcurl.so.4.3.0拷贝到/usr/local/lib/下,并建立软链接:ln -s libcurl.so.4.3.0 libcurl.so。
- 安装json库
下载地址:https://github.com/Tencent/rapidjson
将include/rapidjson目录复制至/opt/nvidia/deepstream/deepstream-5.0/sources/includes目录下。
- 对YOLOV5 deepstream源文件的修改
nvdsinfer_custom_impl_Yolo/nvdsparsebbox_Yolo.cpp
/*
* Copyright (c) 2020, NVIDIA CORPORATION. All rights reserved.
*
* Licensed under the Apache License, Version 2.0 (the "License");
* you may not use this file except in compliance with the License.
* You may obtain a copy of the License at
*
* http://www.apache.org/licenses/LICENSE-2.0
*
* Unless required by applicable law or agreed to in writing, software
* distributed under the License is distributed on an "AS IS" BASIS,
* WITHOUT WARRANTIES OR CONDITIONS OF ANY KIND, either express or implied.
* See the License for the specific language governing permissions and
* limitations under the License.
*/
#include <algorithm>
#include <cassert>
#include <cmath>
#include <cstring>
#include <chrono>
#include <memory>
#include <ctime>
#include <iomanip>
#include <fstream>
#include <iostream>
#include <sys/types.h>
#include <ifaddrs.h>
#include <netinet/in.h>
#include <arpa/inet.h>
#include <unordered_map>
#include "nvdsinfer_custom_impl.h"
#include <sys/time.h>
#include <stdio.h>
#include <stdlib.h>
#include <unistd.h>
#include <curl/curl.h>
#include <curl/easy.h>
#include <string.h>
#include <list>
#include <vector>
#include <set>
#include <string>
#include <cstdio>
#include <cstdlib>
#include <cstring>
#include <sys/socket.h>
#include <sys/ioctl.h>
#include <netinet/in.h>
#include <net/if.h>
#include <sys/utsname.h>
#include "rapidjson/document.h"
#include "rapidjson/writer.h"
#include "rapidjson/stringbuffer.h"
#include <iconv.h>
#include <sstream>
using namespace std;
using namespace rapidjson;
using std::chrono::system_clock;
#include <map>
#define kNMS_THRESH 0.45
string current_time1() {
system_clock::time_point tp = system_clock::now();
time_t raw_time = system_clock::to_time_t(tp);
struct tm *timeinfo = std::localtime(&raw_time);
stringstream ss;
ss << std::put_time(timeinfo, "%Y-%m-%d %H:%M:%S");
return ss.str();
}
int getEthNames(set<string> ðName)
{
FILE *fp = NULL;
char *p = NULL;
char linebuf[512];
char devname[128];
string tmp;
fp = fopen("/proc/net/dev", "r");
if(fp == NULL)
{
return -1;
}
memset(linebuf, 0x00, sizeof(linebuf));
memset(devname, 0x00, sizeof(devname));
while(fgets(linebuf, 511, fp) != NULL)
{
p = strstr(linebuf, ":");
if(p == NULL)
{
memset(linebuf, 0x00, sizeof(linebuf));
continue;
}
p[0] = 0x00;
memset(devname, 0x00, sizeof(devname));
strncpy(devname, linebuf, 127);
tmp = string(devname);
tmp.erase(0, tmp.find_first_not_of(" "));
tmp.erase(tmp.find_last_not_of(" ")+1);
if(strncmp(tmp.c_str(), "lo", 2) != 0 )
{
if(strncmp(tmp.c_str(), "eth", 3) == 0 || strncmp(tmp.c_str(), "ens", 3) == 0 || \
strncmp(tmp.c_str(), "enp", 3) == 0 || strncmp(tmp.c_str(), "en", 2) == 0)
{
ethName.insert(tmp);
}
}
memset(linebuf, 0x00, sizeof(linebuf));
}
fclose(fp);
return 0;
}
int getIPMACs(set<string> ðName, map<string, pair<string, string>> &macs)
{
set<string>::iterator it;
struct ifreq ifr;
struct sockaddr_in *sin;
char ip_addr[30];
char mac_addr[30];
int sockfd = -1;
int nRes = -1;
sockfd = socket(AF_INET, SOCK_STREAM, 0);
if(sockfd < 0)
{
return -1;
}
for(it=ethName.begin(); it!=ethName.end(); it++)
{
nRes = -1;
memset(ip_addr, 0x00, sizeof(ip_addr));
memset(mac_addr, 0x00, sizeof(mac_addr));
memset(&ifr, 0x00, sizeof(ifr));
strcpy(ifr.ifr_name, (*it).c_str());
nRes = ioctl(sockfd, SIOCGIFADDR, &ifr);
if(nRes < 0)
{
strcpy(ip_addr, "");
}
else
{
sin = (struct sockaddr_in *)&ifr.ifr_addr;
strcpy(ip_addr, inet_ntoa(sin->sin_addr));
}
nRes = ioctl(sockfd, SIOCGIFHWADDR, &ifr);
if(nRes < 0)
{
strcpy(mac_addr, "00:00:00:00:00:00");
}
else
{
sprintf(mac_addr, "%02x:%02x:%02x:%02x:%02x:%02x",
(unsigned char)ifr.ifr_hwaddr.sa_data[0],
(unsigned char)ifr.ifr_hwaddr.sa_data[1],
(unsigned char)ifr.ifr_hwaddr.sa_data[2],
(unsigned char)ifr.ifr_hwaddr.sa_data[3],
(unsigned char)ifr.ifr_hwaddr.sa_data[4],
(unsigned char)ifr.ifr_hwaddr.sa_data[5]);
}
macs.insert(make_pair(string(mac_addr), make_pair(string(ifr.ifr_name), string(ip_addr))));
}
close(sockfd);
return 0;
}
size_t push_string(void* buffer, size_t size, size_t nmemb, void* stream)
{
string data((const char*)buffer, (size_t) size * nmemb);
*((stringstream*) stream) << data << endl;
return size*nmemb;
}
char *send_post(char *url, char *param)
{
std::stringstream res_str;
CURL *curl_handle = NULL;
CURLcode curl_res;
curl_res = curl_global_init(CURL_GLOBAL_ALL);
// printf("param is: %s\n", param);
if(curl_res == CURLE_OK)
{
curl_handle = curl_easy_init();
if(curl_handle != NULL)
{
curl_easy_setopt(curl_handle, CURLOPT_URL, url);
curl_easy_setopt(curl_handle, CURLOPT_POST, 1);
curl_easy_setopt(curl_handle, CURLOPT_POSTFIELDSIZE, strlen(param));
curl_easy_setopt(curl_handle, CURLOPT_POSTFIELDS, param);
curl_easy_setopt(curl_handle, CURLOPT_SSL_VERIFYPEER, 0);
curl_easy_setopt(curl_handle, CURLOPT_SSL_VERIFYHOST, 0);
curl_easy_setopt(curl_handle, CURLOPT_TIMEOUT, 30);
curl_easy_setopt(curl_handle, CURLOPT_CONNECTTIMEOUT, 10L);
curl_easy_setopt(curl_handle, CURLOPT_WRITEFUNCTION, push_string);
curl_easy_setopt(curl_handle, CURLOPT_WRITEDATA, &res_str);
curl_easy_setopt(curl_handle, CURLOPT_HEADER, 0L);
struct curl_slist *pList = NULL;
pList = curl_slist_append(pList,"Content-Type: application/json;charset=utf-8");
curl_easy_setopt(curl_handle, CURLOPT_HTTPHEADER, pList);
curl_res = curl_easy_perform(curl_handle);
if(curl_res != CURLE_OK)
{
printf("curl_easy_perform error, err_msg:[%ld]\n", curl_res);
}
curl_easy_cleanup(curl_handle);
}
}
else
{
printf("CURL ERROR : %s", curl_easy_strerror(curl_res));
}
std::string str_json = res_str.str();
char *str;
str = (char *)malloc(200);
strcpy(str, str_json.c_str());
return str;
}
static constexpr int LOCATIONS = 4;
struct alignas(float) Detection{
//center_x center_y w h
float bbox[LOCATIONS];
float conf; // bbox_conf * cls_conf
float class_id;
};
float iou(float lbox[4], float rbox[4]) {
float interBox[] = {
std::max(lbox[0] - lbox[2]/2.f , rbox[0] - rbox[2]/2.f), //left
std::min(lbox[0] + lbox[2]/2.f , rbox[0] + rbox[2]/2.f), //right
std::max(lbox[1] - lbox[3]/2.f , rbox[1] - rbox[3]/2.f), //top
std::min(lbox[1] + lbox[3]/2.f , rbox[1] + rbox[3]/2.f), //bottom
};
if(interBox[2] > interBox[3] || interBox[0] > interBox[1])
return 0.0f;
float interBoxS =(interBox[1]-interBox[0])*(interBox[3]-interBox[2]);
return interBoxS/(lbox[2]*lbox[3] + rbox[2]*rbox[3] -interBoxS);
}
bool cmp(Detection& a, Detection& b) {
return a.conf > b.conf;
}
void nms(std::vector<Detection>& res, float *output, float conf_thresh, float nms_thresh) {
int det_size = sizeof(Detection) / sizeof(float);
std::map<float, std::vector<Detection>> m;
for (int i = 0; i < output[0] && i < 1000; i++) {
if (output[1 + det_size * i + 4] <= conf_thresh) continue;
Detection det;
memcpy(&det, &output[1 + det_size * i], det_size * sizeof(float));
if (m.count(det.class_id) == 0) m.emplace(det.class_id, std::vector<Detection>());
m[det.class_id].push_back(det);
}
for (auto it = m.begin(); it != m.end(); it++) {
auto& dets = it->second;
std::sort(dets.begin(), dets.end(), cmp);
for (size_t m = 0; m < dets.size(); ++m) {
auto& item = dets[m];
res.push_back(item);
for (size_t n = m + 1; n < dets.size(); ++n) {
if (iou(item.bbox, dets[n].bbox) > nms_thresh) {
dets.erase(dets.begin()+n);
--n;
}
}
}
}
}
/* This is a sample bounding box parsing function for the sample YoloV5 detector model */
static bool NvDsInferParseYoloV5(
std::vector<NvDsInferLayerInfo> const& outputLayersInfo,
NvDsInferNetworkInfo const& networkInfo,
NvDsInferParseDetectionParams const& detectionParams,
std::vector<NvDsInferParseObjectInfo>& objectList)
{
const float kCONF_THRESH = detectionParams.perClassThreshold[0];
std::vector<Detection> res;
nms(res, (float*)(outputLayersInfo[0].buffer), kCONF_THRESH, kNMS_THRESH);
char url[100] = "http://192.168.3.184:8090/biz/device/report/send";
char *res_str;
set<string> eth;
map<string, pair<string, string>> macs;
map<string, pair<string, string>>::iterator it;
getEthNames(eth);
getIPMACs(eth, macs);
char* mac;
it = macs.begin();
mac = (char*)(*it).first.c_str();
int i = 0;
for(auto& r : res) {
NvDsInferParseObjectInfo oinfo;
oinfo.classId = r.class_id;
oinfo.detectionConfidence = r.conf;
if ((int)oinfo.classId == 0 && oinfo.detectionConfidence >= 0.4) {
i++;
oinfo.left = static_cast<unsigned int>(r.bbox[0]-r.bbox[2]*0.5f);
oinfo.top = static_cast<unsigned int>(r.bbox[1]-r.bbox[3]*0.5f);
oinfo.width = static_cast<unsigned int>(r.bbox[2]);
oinfo.height = static_cast<unsigned int>(r.bbox[3]);
objectList.push_back(oinfo);
cout << "find a person" << endl;
}
}
if(i > 0) {
string time = current_time1();
StringBuffer s;
Writer<StringBuffer> writer(s);
writer.StartObject();
writer.Key("reportTime");
writer.String((char*)time.c_str());
writer.Key("reportType");
writer.Uint(0);
writer.Key("deviceCode");
writer.String(mac);
writer.Key("content");
writer.Uint(i);
writer.Key("imageBase64");
writer.String("");
writer.EndObject();
string str = s.GetString();
cout << str << endl;
res_str = send_post(url, (char*)str.c_str());
printf("return string is: %s", res_str);
}
return true;
}
extern "C" bool NvDsInferParseCustomYoloV5(
std::vector<NvDsInferLayerInfo> const &outputLayersInfo,
NvDsInferNetworkInfo const &networkInfo,
NvDsInferParseDetectionParams const &detectionParams,
std::vector<NvDsInferParseObjectInfo> &objectList)
{
return NvDsInferParseYoloV5(
outputLayersInfo, networkInfo, detectionParams, objectList);
}
/* Check that the custom function has been defined correctly */
CHECK_CUSTOM_PARSE_FUNC_PROTOTYPE(NvDsInferParseCustomYoloV5);
修改nvdsinfer_custom_impl_Yolo下的Makefile中的一行
LFLAGS:= -shared -Wl,--start-group $(LIBS) -Wl,--end-group -lcurl
其他步骤与前面相同。
DeepStream配置文件说明
为了将检测到的图像显示到显示器中,我们需要修改yolov5中的配置文件source1_csi_dec_infer_yolov5.txt。
[sink0]
enable=1
#Type - 1=FakeSink 2=EglSink 3=File 4=RTSPStreaming 5=Overlay
type=2
sync=1
再次运行
deepstream-app -c source1_csi_dec_infer_yolov5.txt
就可以看见检测后的画面显示到显示器屏幕中了。现将该文件中的内容大致说明如下
[application]
# 是否开启应用程序的性能测试
enable-perf-measurement=1
# 性能指标测试时间间隔(秒)
perf-measurement-interval-sec=5
# 存储了主检测器输出结果(KITTI数据格式)的路径名(已经存在)---mei
#gie-kitti-output-dir=streamscl

[tiled-display]
# 是否平铺展示
enable=1
# 平铺2D数组行数
rows=1
# 平铺2D列数
columns=1
# 平铺宽,单位像素
width=1280
# 高,单位像素
height=720

[source0]
# 输入资源是否有效
enable=1
#Type - 1=CameraV4L2 2=URI 3=MultiURI 4=RTSP 5=CSI
# 1:USB相机(摄像头)(V4L2)2:URI 3:MultiURI(复用URI)4:网络摄像头RTSP 5:相机(摄像头)(CSI)(只针对Jetson)
# 如果type=2或者3的话,需要写一个资源的uri,2的时候为单源,3为多源,如
# uri=file://../../streams/shanghai.mp4
# 如果type=4的话也需要写一个资源的uri,如
# uri=rtsp://用户名:密码@IP:端口号/video
type=5
# 摄像头画面宽
camera-width=640
# 摄像头画面高
camera-height=480
# 摄像头画面帧率
camera-fps-n=30
camera-fps-d=1
#延迟毫秒数
latency=200
#每隔多少帧丢帧
drop-frame-interval=5

[sink0]
# 输出设备是否开启
enable=1
#Type - 1=FakeSink 2=EglSink 3=File 4=RTSPStreaming 5=Overlay
# 1:Fakesink,伪插件,黑洞插件,吞噬一切数据 2:基于EGL的窗口接收器(nveglglessink) 3:编码+文件保存(编码器+混合器+ filesink)4:编码+ RTSP流 5:叠加层(仅适用于Jetson)
# 一般如果不做任何处理会选择5
type=2
# 指示要渲染流的速度。0:尽可能快 1:同步
sync=1
# 显示HEAD的ID。 对叠加水槽有效(类型= 5)
display-id=0
# 渲染器窗口的水平偏移量(以像素为单位)
offset-x=0
# 渲染器窗口的垂直偏移量,以像素为单位。
offset-y=0
width=0
height=0
overlay-id=1
# 选择源
source-id=0

[sink1]
enable=0
type=3
#1=mp4 2=mkv
# 用于文件保存的容器。 仅对type = 3有效。
container=1
#1=h264 2=h265 3=mpeg4
# 用于保存文件的编码器。
codec=1
#encoder type 0=Hardware 1=Software
enc-type=0
sync=0
# 用于编码的比特率,以每秒位数为单位。 适用于type = 3和4。
bitrate=2000000
#H264 Profile - 0=Baseline 2=Main 4=High
#H265 Profile - 0=Main 1=Main10
profile=0
# 输出编码文件的路径名。 仅对type = 3有效。
output-file=out.mp4
source-id=0

[sink2]
enable=0
#Type - 1=FakeSink 2=EglSink 3=File 4=RTSPStreaming 5=Overlay
type=4
#1=h264 2=h265
codec=1
#encoder type 0=Hardware 1=Software
enc-type=0
sync=0
bitrate=4000000
#H264 Profile - 0=Baseline 2=Main 4=High
#H265 Profile - 0=Main 1=Main10
profile=0
# set below properties in case of RTSPStreaming
# RTSP流服务器的端口; 有效的未使用端口号。 对type = 4有效。
rtsp-port=8554
# 流实现内部使用的端口; 有效的未使用端口号。 对type = 4有效。
udp-port=5400

[osd]
# 每一帧上显示的文本和矩形框
enable=1
border-width=2
text-size=15
text-color=1;1;1;1;
text-bg-color=0.3;0.3;0.3;1
font=Serif
show-clock=0
clock-x-offset=800
clock-y-offset=820
clock-text-size=12
clock-color=1;0;0;0

[streammux]
# 混流
##Boolean property to inform muxer that sources are live
# 可混流的源的数量
live-source=1
# 批次
batch-size=1
##time out in usec, to wait after the first buffer is available
##to push the batch even if the complete batch is not formed
# 超时时间
batched-push-timeout=40000
## Set muxer output width and height
width=1280
height=720
## If set to TRUE, system timestamp will be attached as ntp timestamp
## If set to FALSE, ntp timestamp from rtspsrc, if available, will be attached
# attach-sys-ts-as-ntp=1

# config-file property is mandatory for any gie section.
# Other properties are optional and if set will override the properties set in
# the infer config file.
[primary-gie]
# 插件设置
enable=1
batch-size=1
gpu-id=0
gie-unique-id=1
nvbuf-memory-type=0
config-file=config_infer_primary.txt
Jetson Nano串口通信
#include <stdio.h>
#include <stdlib.h>
#include <string.h>
#include <sys/types.h>
#include <sys/stat.h>
#include <errno.h>
#include <unistd.h>
#include <termios.h>
#include <fcntl.h>
#include <iconv.h>
#include <string>
#include <iostream>
using namespace std;

// 函数声明部分
int open_port(int com_port);
int set_uart_config(int fd, int baud_rate, int data_bits, char parity, int stop_bits);

// 使用实例
int main()
{
    // begin::第一步,串口初始化
    int UART_fd = open_port(0);
    if (set_uart_config(UART_fd, 115200, 8, 'N', 1) < 0)
    {
	perror("set_com_config");
	exit(1);
    }
    // end::串口初始化

    // begin::第二步,读下位机上发的一行数据
    char str[128] = "aaddccee";
    char buff[1];
    int len = sizeof(str);
    //这一段读取数据的代码需要斟酌,考虑字符串结束符的问题,对方发过来的数据到底有没有这个符号,否则会卡死这里
    /*while (1)
    {
	if (read(UART_fd, buff, 1)) {
	    if (buff[0] == '\n') {
		break;
	    }else {
		str[len++] = buff[0];
	    }
        }
    }
    printf("content:%s\n",str);*/
    // end::读下位机上发的一行数据

    // begin::第三步,向下位机发送数据
    write(UART_fd, str, len);
    // end::向下位机发送数据

    return 0;
}

/*
* 打开串口
*/
int open_port(int com_port)
{
    int fd;
    /* 使用普通串口 */
    // TODO::在此处添加串口列表
    //char* dev[] = { "/dev/ttyTHS1", "/dev/ttyUSB0" };
    char* dev[] = { "/dev/ttyTHS1" };
    //O_NDELAY 同 O_NONBLOCK。
    fd = open(dev[com_port], O_RDWR | O_NOCTTY);
    cout << fd << endl;
    if (fd < 0)
    {
        perror("open serial port");
        return(-1);
    }

    //恢复串口为阻塞状态
    //非阻塞:fcntl(fd,F_SETFL,FNDELAY)
    //阻塞:fcntl(fd,F_SETFL,0)
    if (fcntl(fd, F_SETFL, 0) < 0)
    {
        perror("fcntl F_SETFL\n");
    }
    /*测试是否为终端设备*/
    if (isatty(STDIN_FILENO) == 0)
    {
        perror("standard input is not a terminal device");
    }

    return fd;
}

/*
* 串口设置
*/
int set_uart_config(int fd, int baud_rate, int data_bits, char parity, int stop_bits)
{
    struct termios opt;
    int speed;
    if (tcgetattr(fd, &opt) != 0)
    {
        perror("tcgetattr");
        return -1;
    }

    /*设置波特率*/
    switch (baud_rate)
    {
        case 2400:
	    speed = B2400;
	    break;
        case 4800:
	    speed = B4800;
	    break;
        case 9600:
	    speed = B9600;
	    break;
        case 19200:
	    speed = B19200;
	    break;
        case 38400:
	    speed = B38400;
	    break;
        default:
	    speed = B115200;
	    break;
    }
    cfsetispeed(&opt, speed);
    cfsetospeed(&opt, speed);
    tcsetattr(fd, TCSANOW, &opt);

    opt.c_cflag &= ~CSIZE;

    /*设置数据位*/
    switch (data_bits)
    {
        case 7:
	{
            opt.c_cflag |= CS7;
	}
	break;//7个数据位
        default:
	{
	    opt.c_cflag |= CS8;
	}
	break;//8个数据位
    }

    /*设置奇偶校验位*/
    switch (parity) //N
    {
        case 'n':case 'N':
        {
            opt.c_cflag &= ~PARENB;//校验位使能
            opt.c_iflag &= ~INPCK; //奇偶校验使能
        }
	break;
        case 'o':case 'O':
        {
            opt.c_cflag |= (PARODD | PARENB);//PARODD使用奇校验而不使用偶校验
            opt.c_iflag |= INPCK;
        }
	break;
        case 'e':
	case 'E':
        {
            opt.c_cflag |= PARENB;
            opt.c_cflag &= ~PARODD;
            opt.c_iflag |= INPCK;
        }
	break;
        case 's':
	case 'S': /*as no parity*/
        {
            opt.c_cflag &= ~PARENB;
            opt.c_cflag &= ~CSTOPB;
        }
	break;
        default:
        {
            opt.c_cflag &= ~PARENB;//校验位使能
            opt.c_iflag &= ~INPCK; //奇偶校验使能
        }
	break;
    }

    /*设置停止位*/
    switch (stop_bits)
    {
        case 1:
	{
	    opt.c_cflag &= ~CSTOPB;
	}
	break;
        case 2:
	{
	    opt.c_cflag |= CSTOPB;
	}
	break;
        default:
	{
	    opt.c_cflag &= ~CSTOPB;
	}
	break;
    }

    /*处理未接收字符*/
    tcflush(fd, TCIFLUSH);

    /*设置等待时间和最小接收字符*/
    opt.c_cc[VTIME] = 1000;
    opt.c_cc[VMIN] = 0;

    /*关闭串口回显*/
    opt.c_lflag &= ~(ICANON | ECHO | ECHOE | ECHOK | ECHONL | NOFLSH);

    /*禁止将输入中的回车翻译为新行 (除非设置了 IGNCR)*/
    opt.c_iflag &= ~ICRNL;
    /*禁止将所有接收的字符裁减为7比特*/
    opt.c_iflag &= ~ISTRIP;

    /*激活新配置*/
    if ((tcsetattr(fd, TCSANOW, &opt)) != 0)
    {
        perror("tcsetattr");
        return -1;
    }

    return 0;
}
运行这一段代码前,需要将/dev/ttyTHS1设置为可执行状态,并且每次开机前都要设置一次
sudo chmod 777 /dev/ttyTHS1
开机自启动程序
首先要创建一个start.sh的脚本,位置随意,我这里的是/home/nano/Documents/workspace/start.sh
#! /bin/bash

cd /opt/nvidia/deepstream/deepstream-5.0/sources/apps/sample_apps/deepstream-app
chmod 777 /dev/ttyTHS1
./deepstream-app -c ../../../yolov5/source1_rtsp_dec_infer_yolov5.txt
设置可执行权限
sudo chmod 777 start.sh
创建一个start.service文件,位置为/etc/systemd/system下
[Unit]
Description=Run a Custom Script at Startup
After=default.target

[Service]
ExecStart=/home/nano/Documents/workspace/start.sh

[Install]
WantedBy=default.target
设置可执行权限
sudo chmod 777 start.service
启动服务
systemctl daemon-reload
systemctl enable start.service
设置默认root用户登录
由于chmod 777 /dev/ttyTHS1需要root用户权限,如果我们只是普通用户登录是无法执行的
vim /usr/share/lightdm/lightdm.conf.d/50-ubuntu.conf
修改内容如下
[Seat:*]
autologin-user=root
user-session=ubuntu
greeter-show-manual-login=true
allow-guest=false
切换root用户,执行
vim /root/.profile
将最后一行修改为
tty -s && mesg n || true
这样在整个完成后,重启jetson nano就可以自动执行我们需要的程序了。
在局域网中查找jetson nano的IP
使用一台乌班图linux系统电脑与jetson nano在同一个局域网中,安装nmap
sudo apt install nmap
安装完成后进行局域网扫描所有可用的电脑,假设网段为192.168.3.0开始
nmap -sP 192.168.3.0/24
再使用
arp -a
就可以列出扫描出的所有IP的mac地址,根据事先知道的mac地址就可以知道jetson nano的IP
监控deepstream程序
由于deepstream程序有可能会因为未知原因崩溃,我们需要对deepstream程序进行监控,在任意位置下编写一个restart.sh,我这里是/home/nano/Documents/workspace,内容如下
#! /bin/bash
proc_name="deepstream-app"
num=`ps -ef | grep $proc_name | grep -v grep | wc -l`

if [ $num -eq 0 ]
        then /opt/nvidia/deepstream/deepstream-5.0/sources/apps/sample_apps/deepstream-app/deepstream-app -c /opt/nvidia/deepstream/deepstream-5.0/sources/yolov5/source1_rtsp_dec_infer_yolov5.txt
fi
给该文件添加可执行权限
chmod 777 restart.sh
将该文件添加到cron下进行调度执行,更换常用编辑器
select-editor
出现
Select an editor.  To change later, run 'select-editor'.
  1. /bin/nano        <---- easiest
  2. /usr/bin/vim.basic

Choose 1-2 [1]:
这里我们使用2,vim作为编辑器。
执行
crontab -e
在编辑文件中输入
*/5 * * * * /home/nano/Documents/workspace/restart.sh
保存退出,这样就会每隔5分钟检查一次deepstream是否挂掉,如果挂掉就重启该程序。期间我们可以使用状态来查看cron的执行情况
service cron status
内容大致如下
cron.service - Regular background program processing daemon
   Loaded: loaded (/lib/systemd/system/cron.service; enabled; vendor preset: enabled)
   Active: active (running) since Thu 2023-03-30 14:19:39 CST; 26min ago
     Docs: man:cron(8)
 Main PID: 4301 (cron)
    Tasks: 44 (limit: 4183)
   CGroup: /system.slice/cron.service
           ├─4301 /usr/sbin/cron -f
           ├─9234 /usr/sbin/CRON -f
           ├─9235 /bin/sh -c /home/nano/Documents/workspace/restart.sh
           ├─9236 /bin/bash /home/nano/Documents/workspace/restart.sh
           └─9242 /opt/nvidia/deepstream/deepstream-5.0/sources/apps/sample_apps/deepstream-app/deepstream-app -c /opt/nvidia/deepstream/deepstream-5.

3月 30 14:20:02 nano-desktop CRON[7562]: (nano) CMD (/home/nano/Documents/workspace/restart.sh)
3月 30 14:20:02 nano-desktop CRON[7537]: pam_unix(cron:session): session closed for user nano
3月 30 14:35:01 nano-desktop CRON[8825]: pam_unix(cron:session): session opened for user nano by (uid=0)
3月 30 14:35:01 nano-desktop CRON[8826]: (nano) CMD (/home/nano/Documents/workspace/restart.sh)
3月 30 14:35:01 nano-desktop CRON[8825]: pam_unix(cron:session): session closed for user nano
3月 30 14:40:01 nano-desktop CRON[9234]: pam_unix(cron:session): session opened for user nano by (uid=0)
3月 30 14:40:01 nano-desktop CRON[9235]: (nano) CMD (/home/nano/Documents/workspace/restart.sh)
3月 30 14:45:01 nano-desktop CRON[9309]: pam_unix(cron:session): session opened for user nano by (uid=0)
3月 30 14:45:01 nano-desktop CRON[9310]: (nano) CMD (/home/nano/Documents/workspace/restart.sh)
3月 30 14:45:01 nano-desktop CRON[9309]: pam_unix(cron:session): session closed for user nano
也可以通过如下命令来查看cron中的任务
crontab -l